
Some days I want chocolate, but I don’t want to turn the oven on or commit to a whole cake. That’s exactly when I make this chocolate mochi: a glossy, cocoa-scented dough that cooks on the stovetop and turns into little pillows with that signature bouncy “pull” when you bite in. If you’ve ever made mochi and ended up with something stiff or gummy in a bad way, this version is designed to stay tender thanks to a small amount of cornstarch and a finish of softened butter.
It’s also the kind of dessert that looks more impressive than it is. Once the dough is cooked, it goes from sticky and unruly to smooth and stretchy with a quick knead—then you portion, roll in cocoa powder, and you’re done. If you’re in a no-bake mood, you might also like my chocolate brownie cookies for another chocolate hit (different texture, same satisfaction).
Why You’ll Love This Recipe
- No oven needed: everything happens in one cooking step, and your kitchen won’t heat up like it does with brownies or cake.
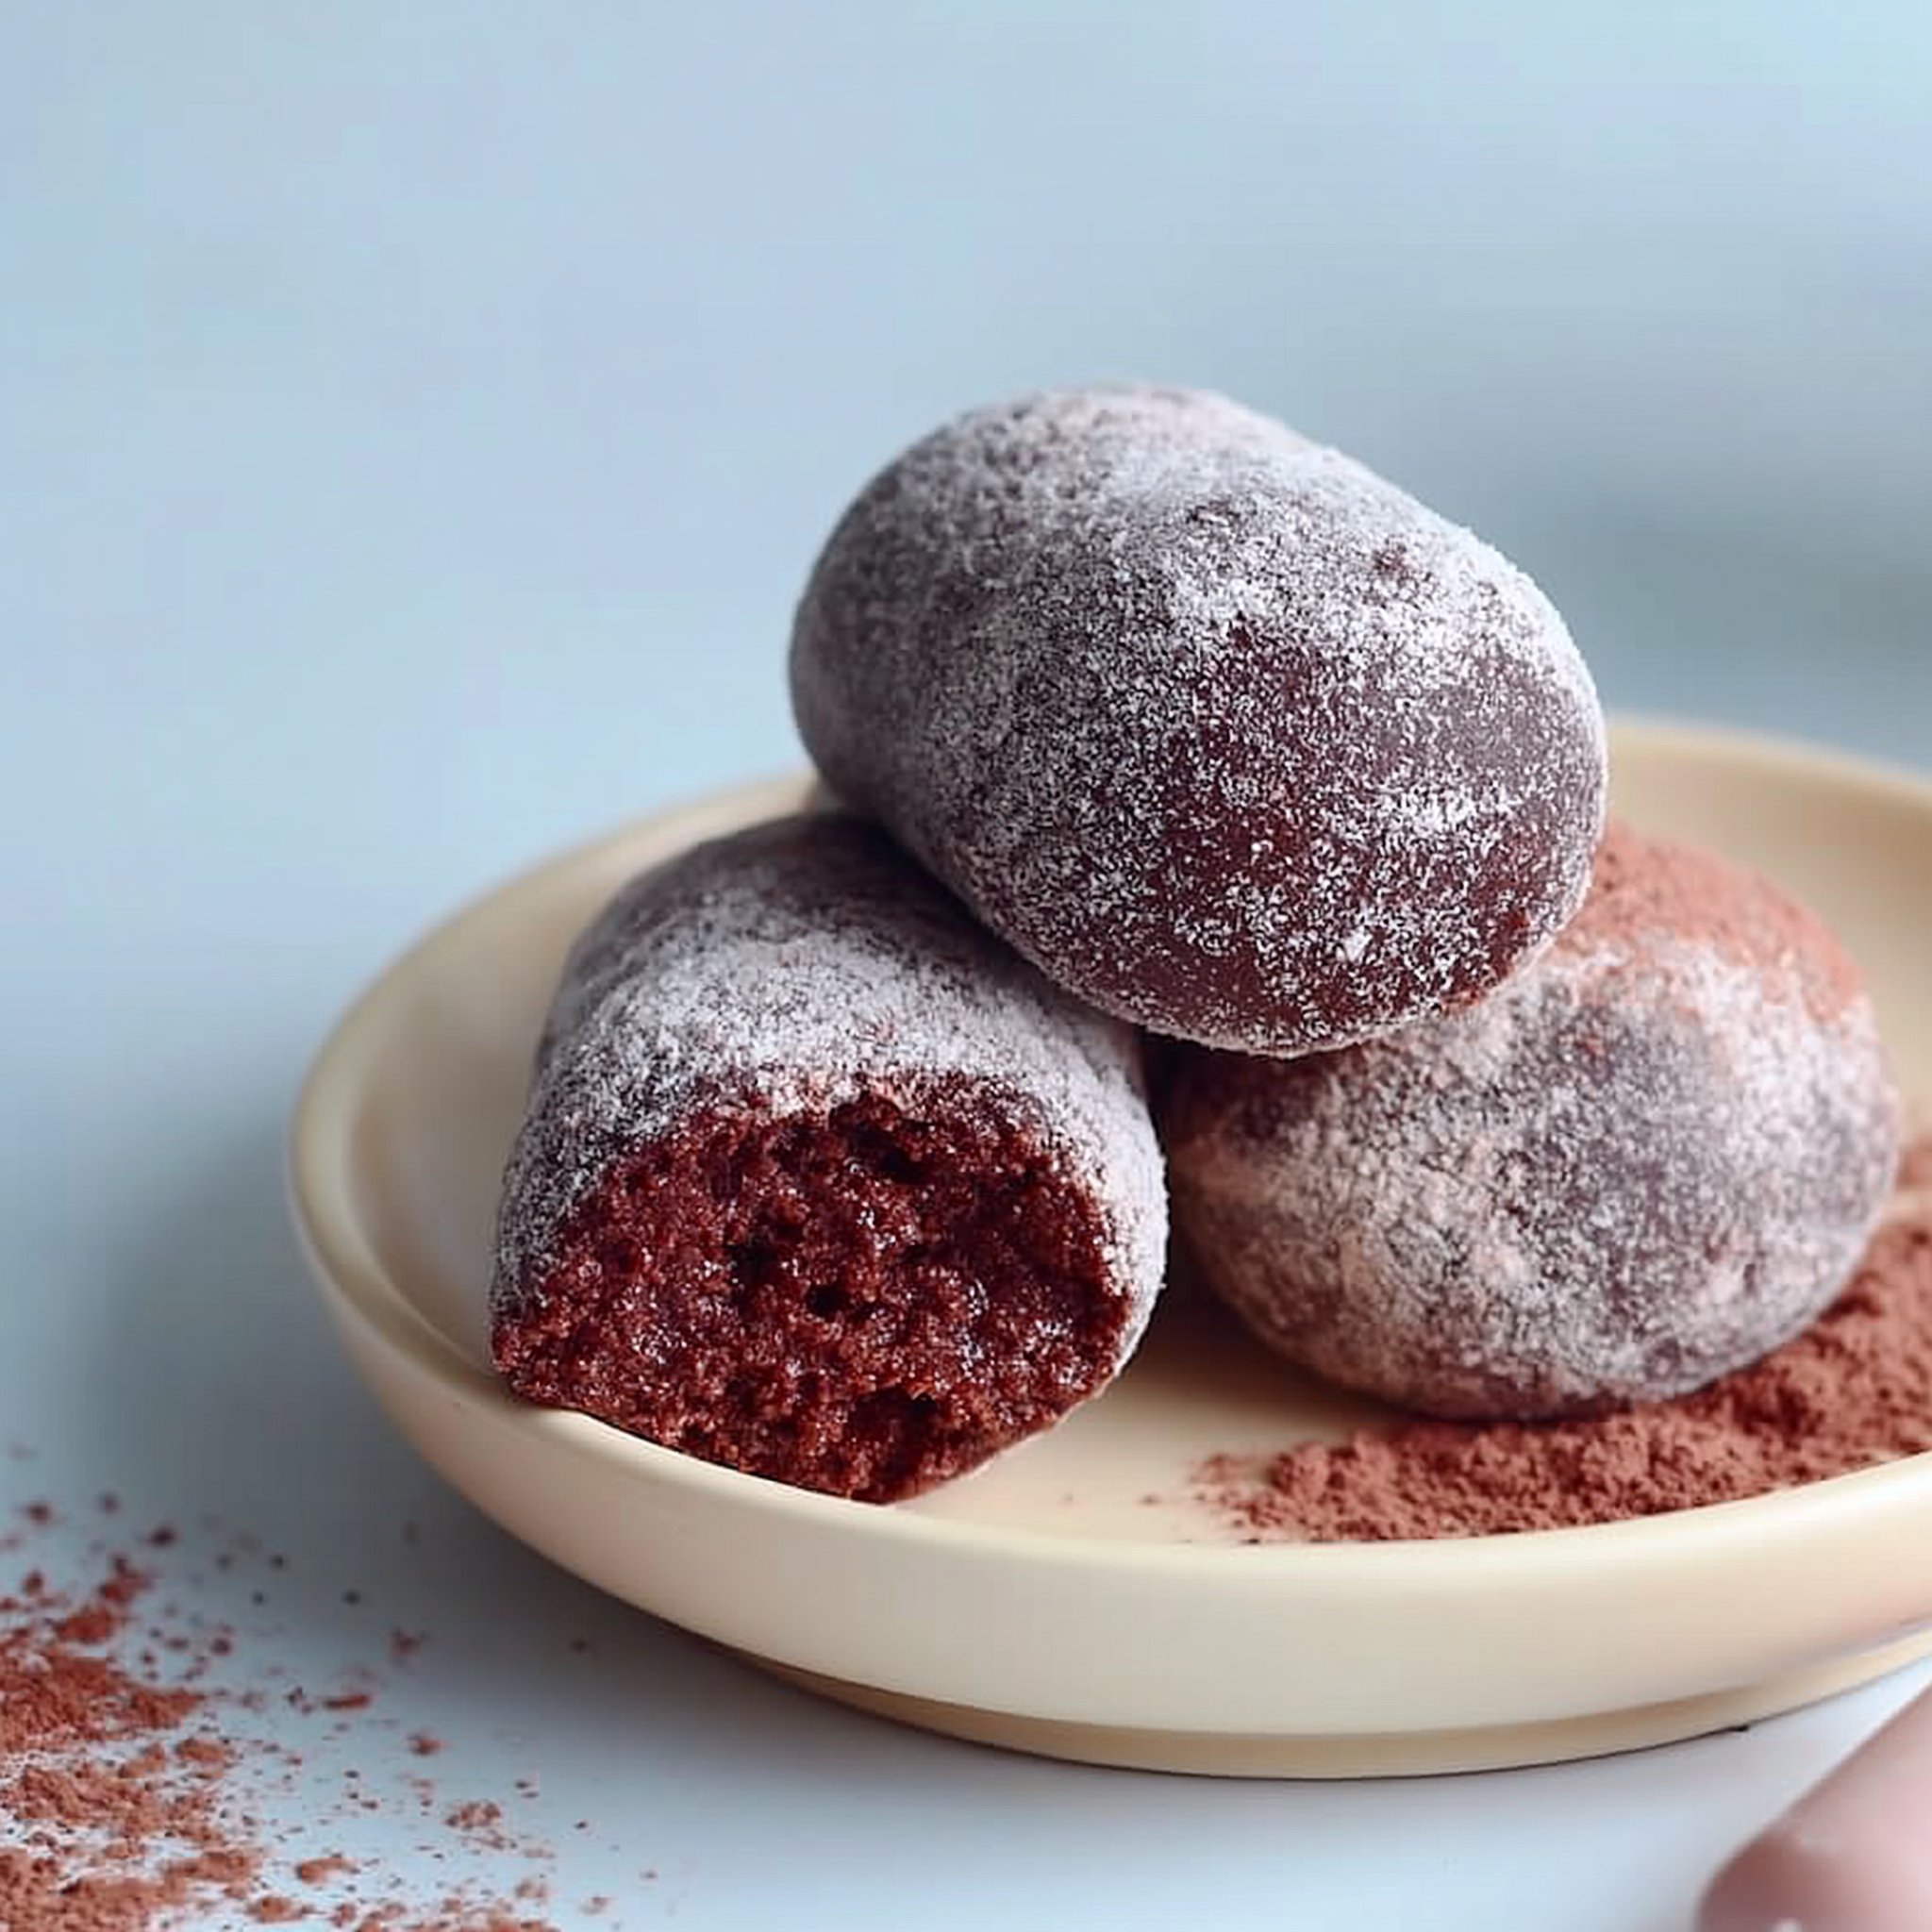
- That true mochi chew: glutinous rice flour gives you a springy, stretchy bite that’s elastic—not bread-like or cakey.
- Balanced chocolate flavor: cocoa powder brings a deep aroma without making it overly sweet (40 g sugar keeps it nicely mellow).
- Soft, not rubbery: cornstarch helps keep the chew tender, and butter makes the finished dough feel supple instead of stiff.
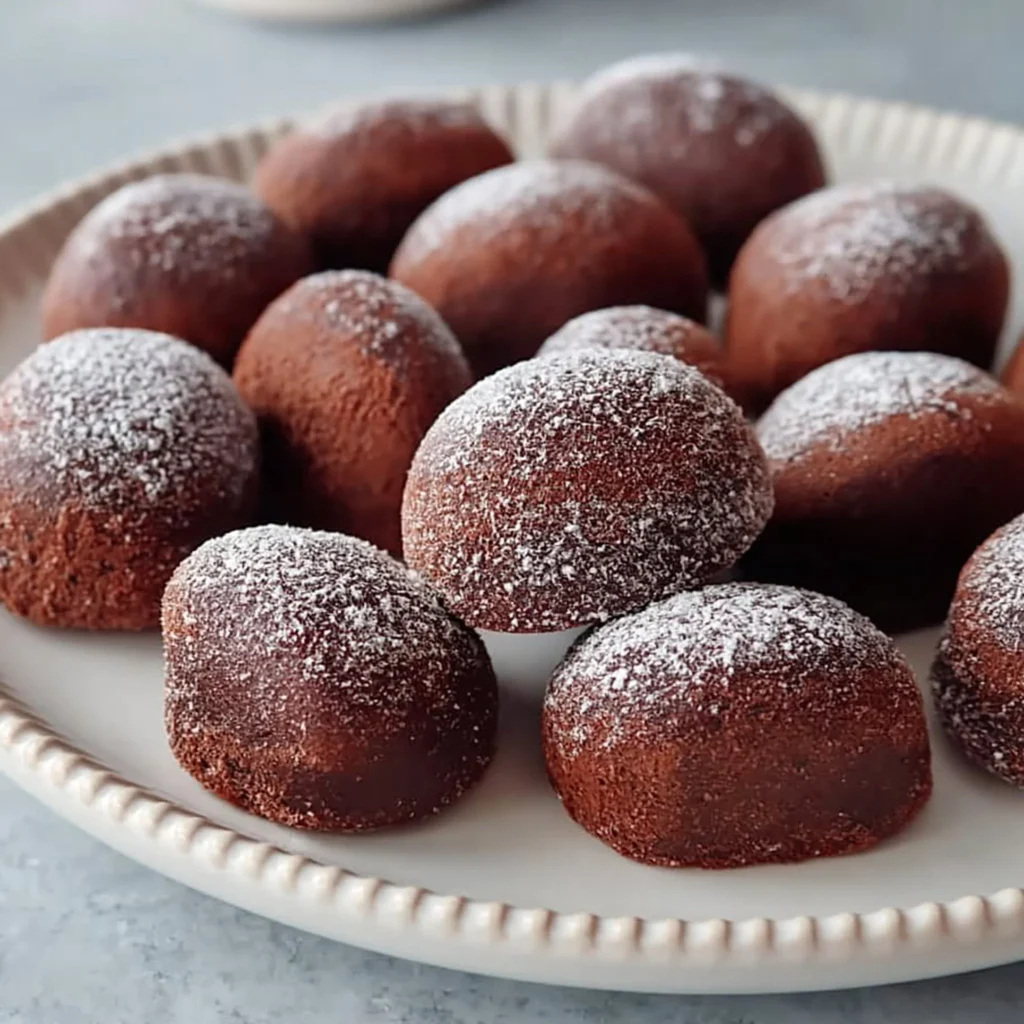
- Pretty, low-effort finish: a cocoa powder coating keeps the surface from sticking and gives each piece a truffle-like look.
The Story Behind This Recipe
I tested this as a quick “stir-and-cook” treat for when I want something chocolatey but don’t want to bake—similar to the easy comfort of my brownie-bottom cheesecake, just in a completely different (chewier, bouncier) direction.
What It Tastes Like
Think lightly sweet cocoa with a clean dairy note from the milk, wrapped in a stretchy mochi chew that pulls slightly as you bite. The butter rounds the edges so it tastes more like chocolate milk and cocoa than straight dark chocolate, and the cocoa powder coating gives a faint bitter finish that keeps each piece from feeling cloying.
Ingredients You’ll Need
Glutinous rice flour is non-negotiable here—it’s what creates mochi’s elastic chew (regular rice flour won’t behave the same). Cornstarch softens the texture and makes the dough easier to handle once cooked. Cocoa powder provides the chocolate flavor, and the milk (full-fat or skim both work) controls how tender the dough sets. The softened butter gets kneaded in at the end for a smoother, more stretchy finish.
- 160 g glutinous rice flour
- 30 g cornstarch
- 10 g cocoa powder
- 40 g granulated sugar
- 230 g milk (full-fat or skim)
- 20 g butter (softened)
- Cocoa powder (as needed for coating)
How to Make How to Make Chocolate Mochi (No Oven Needed!)
Mix the batter until completely smooth.
In a mixing bowl, whisk together the glutinous rice flour, cornstarch, cocoa powder, and granulated sugar. Pour in the milk and whisk until you have a smooth, pourable batter with no dry pockets (scrape the bowl—glutinous rice flour loves to cling at the bottom). It should look like a thin chocolate pudding base, not a thick dough yet.Cook the mixture until it turns into a sticky dough.
Transfer the batter to a pan and cook over medium to medium-low heat, stirring constantly. At first it will look like chocolate sauce; then it will thicken quickly into glossy lumps. Keep stirring and pressing those lumps together. You’ll know it’s ready for the next step when it forms one cohesive, sticky mass and no longer looks fluid in the pan—think “elastic paste,” not batter. (This usually takes several minutes; don’t rush the heat or you’ll get uneven thickening.)Knead in the softened butter for stretch.
While the dough is still warm (but safe to touch), add the softened butter and knead it in. At first it will look slippery and like it won’t incorporate—keep going. After a minute or two of kneading, the dough should become smoother, shinier, and noticeably more stretchy when you pull it.Shape the mochi while it’s pliable.
Divide the dough into small portions. If it sticks to your hands, dust lightly with cocoa powder (a little goes a long way). Roll each portion into a ball or a neat rounded shape. The surface should feel soft and tacky, but not wet.Coat generously in cocoa powder.
Roll each piece in cocoa powder to prevent sticking and to give that finished, truffle-like look. Tap off excess so you don’t get a dry, dusty layer—just a thin, even coat.
Tips for Best Results
- Whisk the dry ingredients first. Cocoa powder and cornstarch can clump when they hit liquid; mixing them into the flour and sugar first helps the batter turn smooth fast.
- Stir continuously while cooking. Mochi thickens suddenly—constant stirring keeps it from setting into firm patches before the rest catches up.
- Stop cooking once it becomes one mass. If you keep cooking long after it’s fully set, the dough can tighten and lose that tender bounce you want.
- Knead while warm for the best texture. Butter blends in more easily when the dough is warm, which is what gives you that smooth, stretchy finish.
- Use cocoa powder as your “anti-stick flour.” It keeps the chocolate theme and prevents a chalky surface that can happen if you over-dust with starch.
Variations and Substitutions
- Milk choice: full-fat milk gives a slightly richer mouthfeel; skim milk still sets well and tastes clean and light.
- Cocoa coating level: a light coat keeps it gently bitter; a heavier coat leans more “dark chocolate truffle.” Either works—just dust to your taste.
If you’re in a cheesecake mood instead of chewy mochi, my caramel macchiato cheesecake is the total opposite texture, but the same kind of cozy dessert moment.
How to Serve It
Serve these at room temperature when the mochi is at its stretchiest and softest. I like them piled on a small plate so the cocoa coating looks extra dramatic against the dark chocolate color. For a dessert spread, they’re a fun chewy contrast next to something sliceable like my chocolate caramel toffee crunch cake.
How to Store It
Store chocolate mochi in an airtight container in the fridge to keep the pieces from sticking to each other. Before serving, let them sit out briefly so the texture relaxes and the chew turns soft and bouncy again. If the cocoa coating looks damp after chilling, roll lightly in a fresh dusting of cocoa right before serving.

Final Thoughts
Chocolate mochi is one of those “small effort, big payoff” treats: you get a deep cocoa aroma, a soft elastic chew, and a tidy cocoa-dusted finish without turning on the oven. Once you make it once, you’ll start craving that stretchy bite on purpose.
Conclusion
If you’re on a no-oven streak, Gemma’s roundup of no oven needed recipes is a great browse for more warm-weather dessert ideas. For a totally different (but very satisfying) chocolate-and-mochi direction, I’m also obsessed with this flakey pastry stuffed with mochi and chocolate. And if you like nerdy, practical baking reads, Kat Lieu’s piece on making cookies with water is surprisingly useful for understanding how small liquid tweaks change texture.


