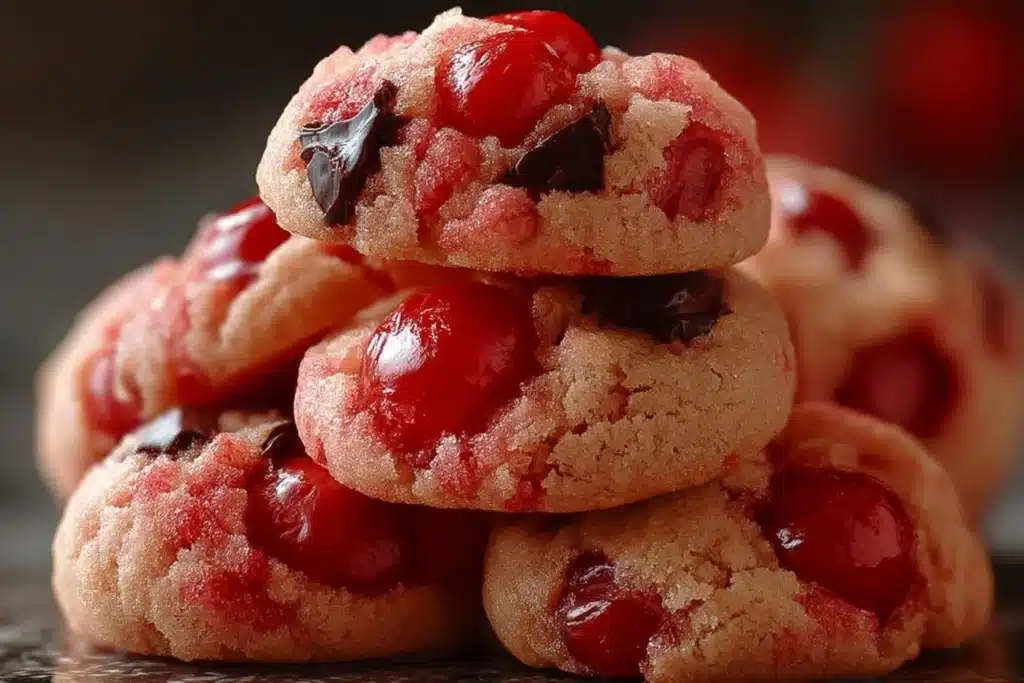
I bake a lot, and these cherry cookies are the kind I come back to when I want quick butter cookie comfort with a bright, juicy pop in every bite. They’re simple enough to make on a weeknight but pretty enough to share—golden-edged, tender in the center, and studded with fresh cherry pieces that soften and perfume the dough as they bake. If you like the floral lift in my cherry blossom cookies, this is a more rustic, everyday cousin that’s faster to pull together.
The recipe uses basic pantry staples and one cup of freshly pitted, chopped cherries, so you get real fruit flavor—not just a hint. If you prefer chocolate with cherries, consider the texture contrast in my cherry-chocolate chip version; for this one I keep it pure and buttery so the cherries shine through.
Why You’ll Love This Recipe
- Bright fruit in a buttery cookie: chopped cherries lend a juicy burst against a rich, tender dough.
- Crisp edge, soft center: bake time is calibrated so the rim browns while the middle stays slightly yielding.
- Minimal ingredients, big payoff: no fancy mix-ins—just butter, sugar, flour, and cherries.
- Fast to assemble: the dough comes together in one bowl with no chill required.
- Easy to share: they look homemade but present well, with cherry flecks visible across each top.
The Story Behind This Recipe
I developed these when I wanted something simpler than a tart but more satisfying than a plain sugar cookie—just enough butter and fresh fruit to make each bite feel special without fuss.
What It Tastes Like
These are moderately sweet, leaning on buttered richness rather than sugar rush. The oven releases a warm cherry-and-vanilla aroma while the edges toast faintly; texture is tender and fine-grained with little pockets of softened cherry that give a fresh, slightly acidic lift on the finish.
Ingredients You’ll Need
Start with good-quality unsalted butter and ripe cherries—the butter gives a silky mouthfeel while the fresh cherries add moisture and bright flavor. If your cherries are very juicy, pat them dry after pitting to avoid a soggy dough; otherwise they’ll blend right in. For a simpler drop-cookie technique, you can compare proportions with classic short cookie recipes like this 3-ingredient sugar cookie for a sense of texture.
- 1 cup unsalted butter, softened
- 1 cup granulated sugar
- 2 cups all-purpose flour
- 1/2 teaspoon salt
- 1 teaspoon vanilla extract
- 1 cup cherries, pitted and chopped
- 1 egg
How to Make Cherry Cookies
- Preheat the oven to 350°F (175°C). Line a baking sheet with parchment paper or a silicone mat. Preheating ensures the edges begin to set right away and you get that slight crispness.
- In a large bowl, cream the softened butter and granulated sugar together until light and fluffy—about 2 to 3 minutes with a hand mixer, or 3 to 4 minutes in a stand mixer. Look for the mixture to turn paler in color and to hold a ribbon when the beaters are lifted.
- Beat in the egg and vanilla extract until the mixture is glossy and smooth, scraping down the bowl so everything is evenly incorporated. The batter should feel silky, not curdled.
- Gradually add the all-purpose flour and 1/2 teaspoon salt, mixing just until a soft dough forms. Stop as soon as there are no streaks of flour; the dough should be soft and slightly tacky, not dry or crumbly. Overmixing here will make the cookies tough.
- Gently fold in the chopped cherries so they’re evenly distributed. If the pieces are large, they’ll leave visible red pockets on top; smaller pieces will blend through the dough. A light hand preserves the dough’s tenderness.
- Drop rounded spoonfuls of dough (about 1 to 1 1/2 tablespoons each) onto the prepared sheet, spacing them 2 inches apart. The dough won’t spread aggressively—expect modest spreading—so spacing helps keep their shape.
- Bake for 12–15 minutes, rotating the pan halfway through if your oven runs hot. The cookies are done when the edges are lightly golden and the centers look set but still slightly soft to the touch; they will continue to firm as they cool. Avoid waiting until the tops are deeply brown.
- Let the cookies cool on the baking sheet for 3–5 minutes so the centers finish setting, then transfer to a wire rack to cool completely. This short resting time helps prevent breakage and keeps the centers tender.
Tips for Best Results
- Use butter that’s softened but not greasy—press it with a finger and it should give without melting. This makes creaming quicker and gives a fine crumb.
- Pat chopped cherries dry on a paper towel before folding them in if they seem wet; excess juice thins the dough and can make cookies spread excessively.
- Chop cherries fairly small (roughly pea to blueberry size) so they distribute evenly and you don’t get giant wet spots.
- Watch the first pan closely around 12 minutes—ovens vary. Pull them when edges color and centers are no longer glossy. For a different fun shape or drop-size inspiration, see these soft, chewy drop cookies.
- Cool on the pan briefly before moving to a rack—this keeps the bottoms from tearing and lets the centers finish setting.
Variations and Substitutions
- Frozen cherries work fine: thaw and drain well, then pat dry before chopping.
- For a nuttier note, swap 1/4 teaspoon of the vanilla for almond extract (use sparingly—almond is strong).
- If you want a drier, sturdier fruit, use chopped dried cherries rehydrated briefly; these will change texture but hold up well in the dough, similar to small homemade treats like simple dog-cookie recipes in method if you’re shaping by hand.
How to Serve It
Serve warm or at room temperature—these cookies are lovely with a cup of tea or a small scoop of plain vanilla ice cream to contrast the buttery cookie and juicy cherry. They’re also attractive on a platter for guests: the chopped cherry bits make each cookie distinctly flecked and colorful.

How to Store It
Store cooled cookies in an airtight container at room temperature for up to 3 days; place a sheet of parchment between layers to prevent sticking. For longer storage, freeze baked cookies in a single layer on a tray, then transfer to a freezer bag for up to 3 months — thaw at room temperature before serving. Refrigeration will firm them and can dry edges, so only chill if you prefer a denser bite.

Final Thoughts
These cherry cookies are exactly what I reach for when I want an unfussy, fruit-studded cookie with buttery depth and a bright finish. They’re straightforward to make and forgiving enough for weekday baking—give them a try the next time cherries are in season.
Conclusion
If you’re curious to compare different takes on cherry cookies from around the web, this Cherry Cookies recipe on Food.com is a classic to browse for technique notes. For a shortbread-style cherry cookie with almond flavor, check out the Cherry Almond Shortbread Cookies at Sally’s Baking Addiction. And if you love the idea of chocolate with cherries, this Chocolate Covered Cherry Cookies post from The Floating Kitchen is a tempting variation.