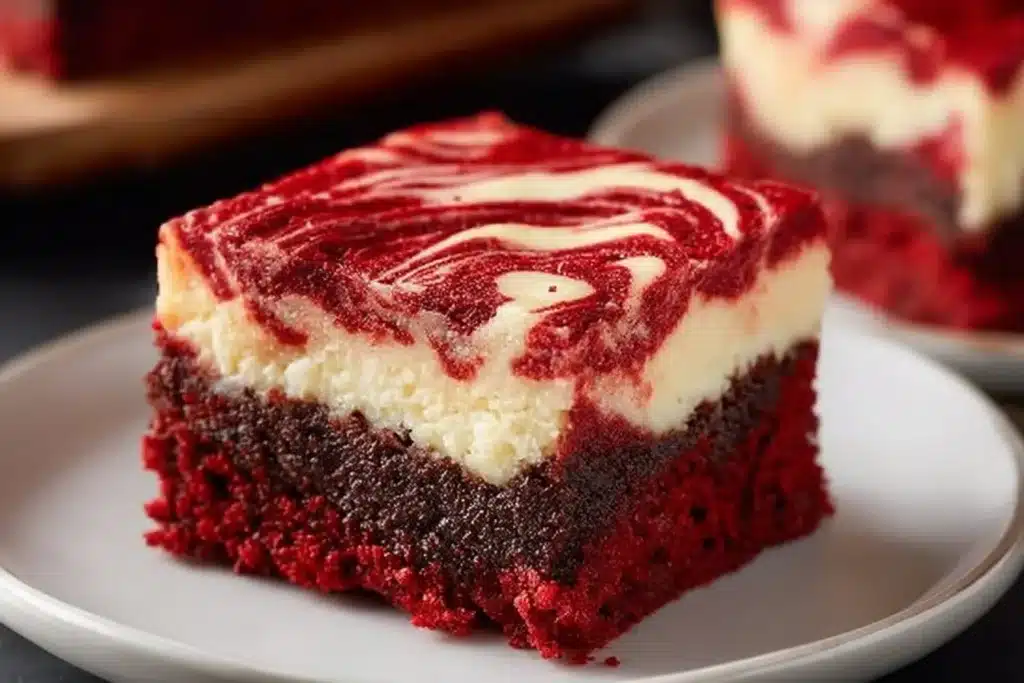
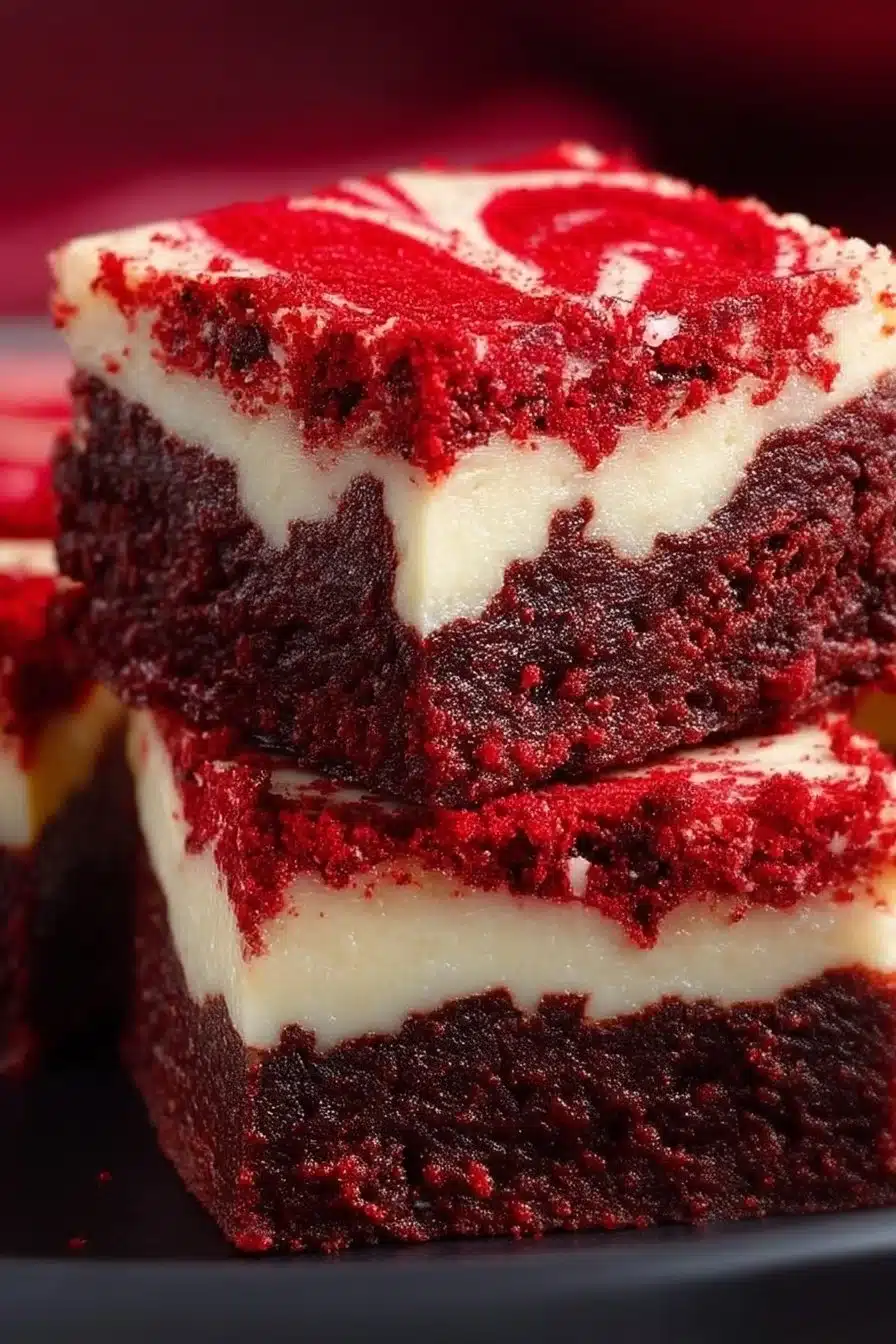
I made these Red Velvet Cheesecake Brownies on a slow Sunday afternoon when I wanted something that felt both special and ridiculously easy. The payoff is exactly what it sounds like: dense, fudgy red velvet bars with a silky, tangy cream cheese ribbon that cuts cleanly and tastes like the best part of a cheesecake without any fuss.
What stands out here is the contrast — the cake-mix red velvet base gives deep cocoa notes and that signature red color, while the cream cheese layer brightens the whole thing with a smooth, lightly tangy bite. It’s an easy, one-bowl red velvet batter plus a whipped cream cheese filling, swirled together for a marbled top that looks impressive but takes only a minute.
Why You’ll Love This Recipe
- Fast and reliable: one box of red velvet mix turns into a dense, brownie-like base without complicated measurements.
- Velvety contrast: the cream cheese layer is soft and tangy, cutting through the sweet red velvet for a balanced bite.
- Pretty presentation: a simple knife swirl creates a marbled top that looks bakery-made.
- Minimal equipment: no springform pans or water baths — just a 9×13 pan and a spoon.
- Make-ahead friendly: these firm up in the fridge and slice cleanly the next day, which is great for sharing.
The Story Behind This Recipe
This is a tidy shortcut dessert — the cake mix keeps the structure and cocoa flavor consistent, while the cream cheese filling elevates it into something more decadent than a simple boxed-cake bar.
What It Tastes Like
Sweet but not cloying: the red velvet base has mild cocoa and a smooth, slightly dense crumb; the cream cheese adds a bright, tangy richness and silky mouthfeel. Warm from the oven you’ll notice cocoa aroma and a hint of vanilla; chilled, the bars slice neat and the flavors feel more concentrated.
Ingredients You’ll Need
The most important parts here are the boxed red velvet mix — it gives the batter its color, cocoa backbone, and reliable texture — and the cream cheese, which should be fully softened so itWhips smooth for a clean ribbon. If you want bite-sized alternatives, see my notes on mini red velvet cheesecakes for inspiration.
- 1 box red velvet cake mix
- 1/3 cup vegetable oil
- 2 large eggs
- 1/2 cup cream cheese, softened
- 1/4 cup granulated sugar
- 1 teaspoon vanilla extract
- 1/2 cup semi-sweet chocolate chips (optional)
How to Make Red Velvet Cheesecake Brownies
- Preheat and prepare: Preheat your oven to 350°F (175°C). Grease a 9×13 inch baking pan so the bars release easily and the edges brown evenly.
- Make the red velvet batter: In a mixing bowl, combine the red velvet cake mix, 1/3 cup vegetable oil, and 2 large eggs. Stir until the batter is smooth and thick — it should be glossy and hold its shape a little on the spoon, not runny. Stop mixing as soon as there are no visible streaks of dry mix.
- Make the cream cheese filling: In another bowl, beat together 1/2 cup softened cream cheese, 1/4 cup granulated sugar, and 1 teaspoon vanilla extract until completely smooth and lump-free. The mixture should be creamy and easy to spoon — if it’s still lumpy, beat a little longer.
- Layer the pan: Spread half of the red velvet batter into the prepared pan in an even layer; use a spatula to get the corners. The layer will be fairly dense and a little tacky — that’s normal.
- Add the cream cheese dollops: Spoon the cream cheese mixture in even dollops over the red velvet layer. Try to space them so you get a consistent ribbon when you swirl.
- Top with remaining batter and swirl: Drop the remaining red velvet batter over the cream cheese in a few scoops and gently spread to cover. Use a knife to swirl the two batters together in a few figure-eight motions — you want distinct red and white ribbons, not fully blended.
- Optional chips and bake: If desired, sprinkle 1/2 cup semi-sweet chocolate chips over the top. Bake for 25–30 minutes. The top should look set and slightly springy; a toothpick inserted into the center should come out clean. Avoid overbaking — once the toothpick is clean, pull them out.
- Cool and slice: Allow the bars to cool fully in the pan so the cream cheese layer firms up; this makes clean slices. For the neatest cuts, chill in the fridge for 30–60 minutes before slicing.
Note: The technique here is close to my approach for other pan-baked red velvet treats — if you’ve made oven-baked red velvet brownies, you’ll recognize the feel of the batter and the “done” cues.
Tips for Best Results
- Soften the cream cheese to room temperature so it whips smooth; cold cream cheese makes a lumpy ribbon.
- Don’t overmix the red velvet batter — stop when no dry streaks remain to keep the texture dense, not cakey.
- Swirl sparingly: a couple of broad figure-eight motions creates a clear marbled pattern; too much stirring blends the layers.
- Let the bars cool completely (or chill briefly) before cutting — warm bars crumble and smear the cream cheese. For cleaner slices, run a sharp knife under hot water, dry it, and wipe between cuts.
- If you like a deeper chocolate contrast, fold the optional chips into the top rather than sprinkling so they melt into pockets.
Mentioning a different finish? See my idea for cookie-sized twists at red velvet cheesecake cookies.
Variations and Substitutions
- Chocolate chips are optional — swap semi-sweet for white chocolate chips for a sweeter bite.
- For a denser ribbon, double the cream cheese filling (note: texture will be richer and slightly softer).
- If you want a more dramatic cheesecake ribbon, compare technique notes with this larger-layer treatment in my knock you naked red velvet cheesecake post.
How to Serve It
Serve these bars chilled or at room temperature. They’re terrific on their own, or topped with a small scoop of vanilla ice cream for contrast. A dusting of cocoa or a few extra chocolate chips on top adds a polished look and a little crunch.
How to Store It
Store leftovers in an airtight container in the refrigerator for up to 4 days — the cream cheese keeps them best chilled. You can freeze cut bars in a single layer on a tray, then transfer to a freezer bag for up to 2 months; thaw in the fridge before serving. If you want the cleanest slices, chill the pan for 30–60 minutes before cutting.

Final Thoughts
These Red Velvet Cheesecake Brownies are a quick way to make something that looks fussier than it is: rich red velvet, a silky cream cheese ribbon, and an easy marbled top. They’re fast to pull together and reward you with clean slices and true cheesecake flavor without the fuss.
Conclusion
For another take on this flavor combination, check out Just a Taste’s Red Velvet Cheesecake Brownies for a slightly different spin. If you want a step-by-step photo guide, see Live Well Bake Often’s Red Velvet Cheesecake Brownies. For more texture and topping ideas, I also like Mel’s Kitchen Cafe’s Red Velvet Cheesecake Brownies.