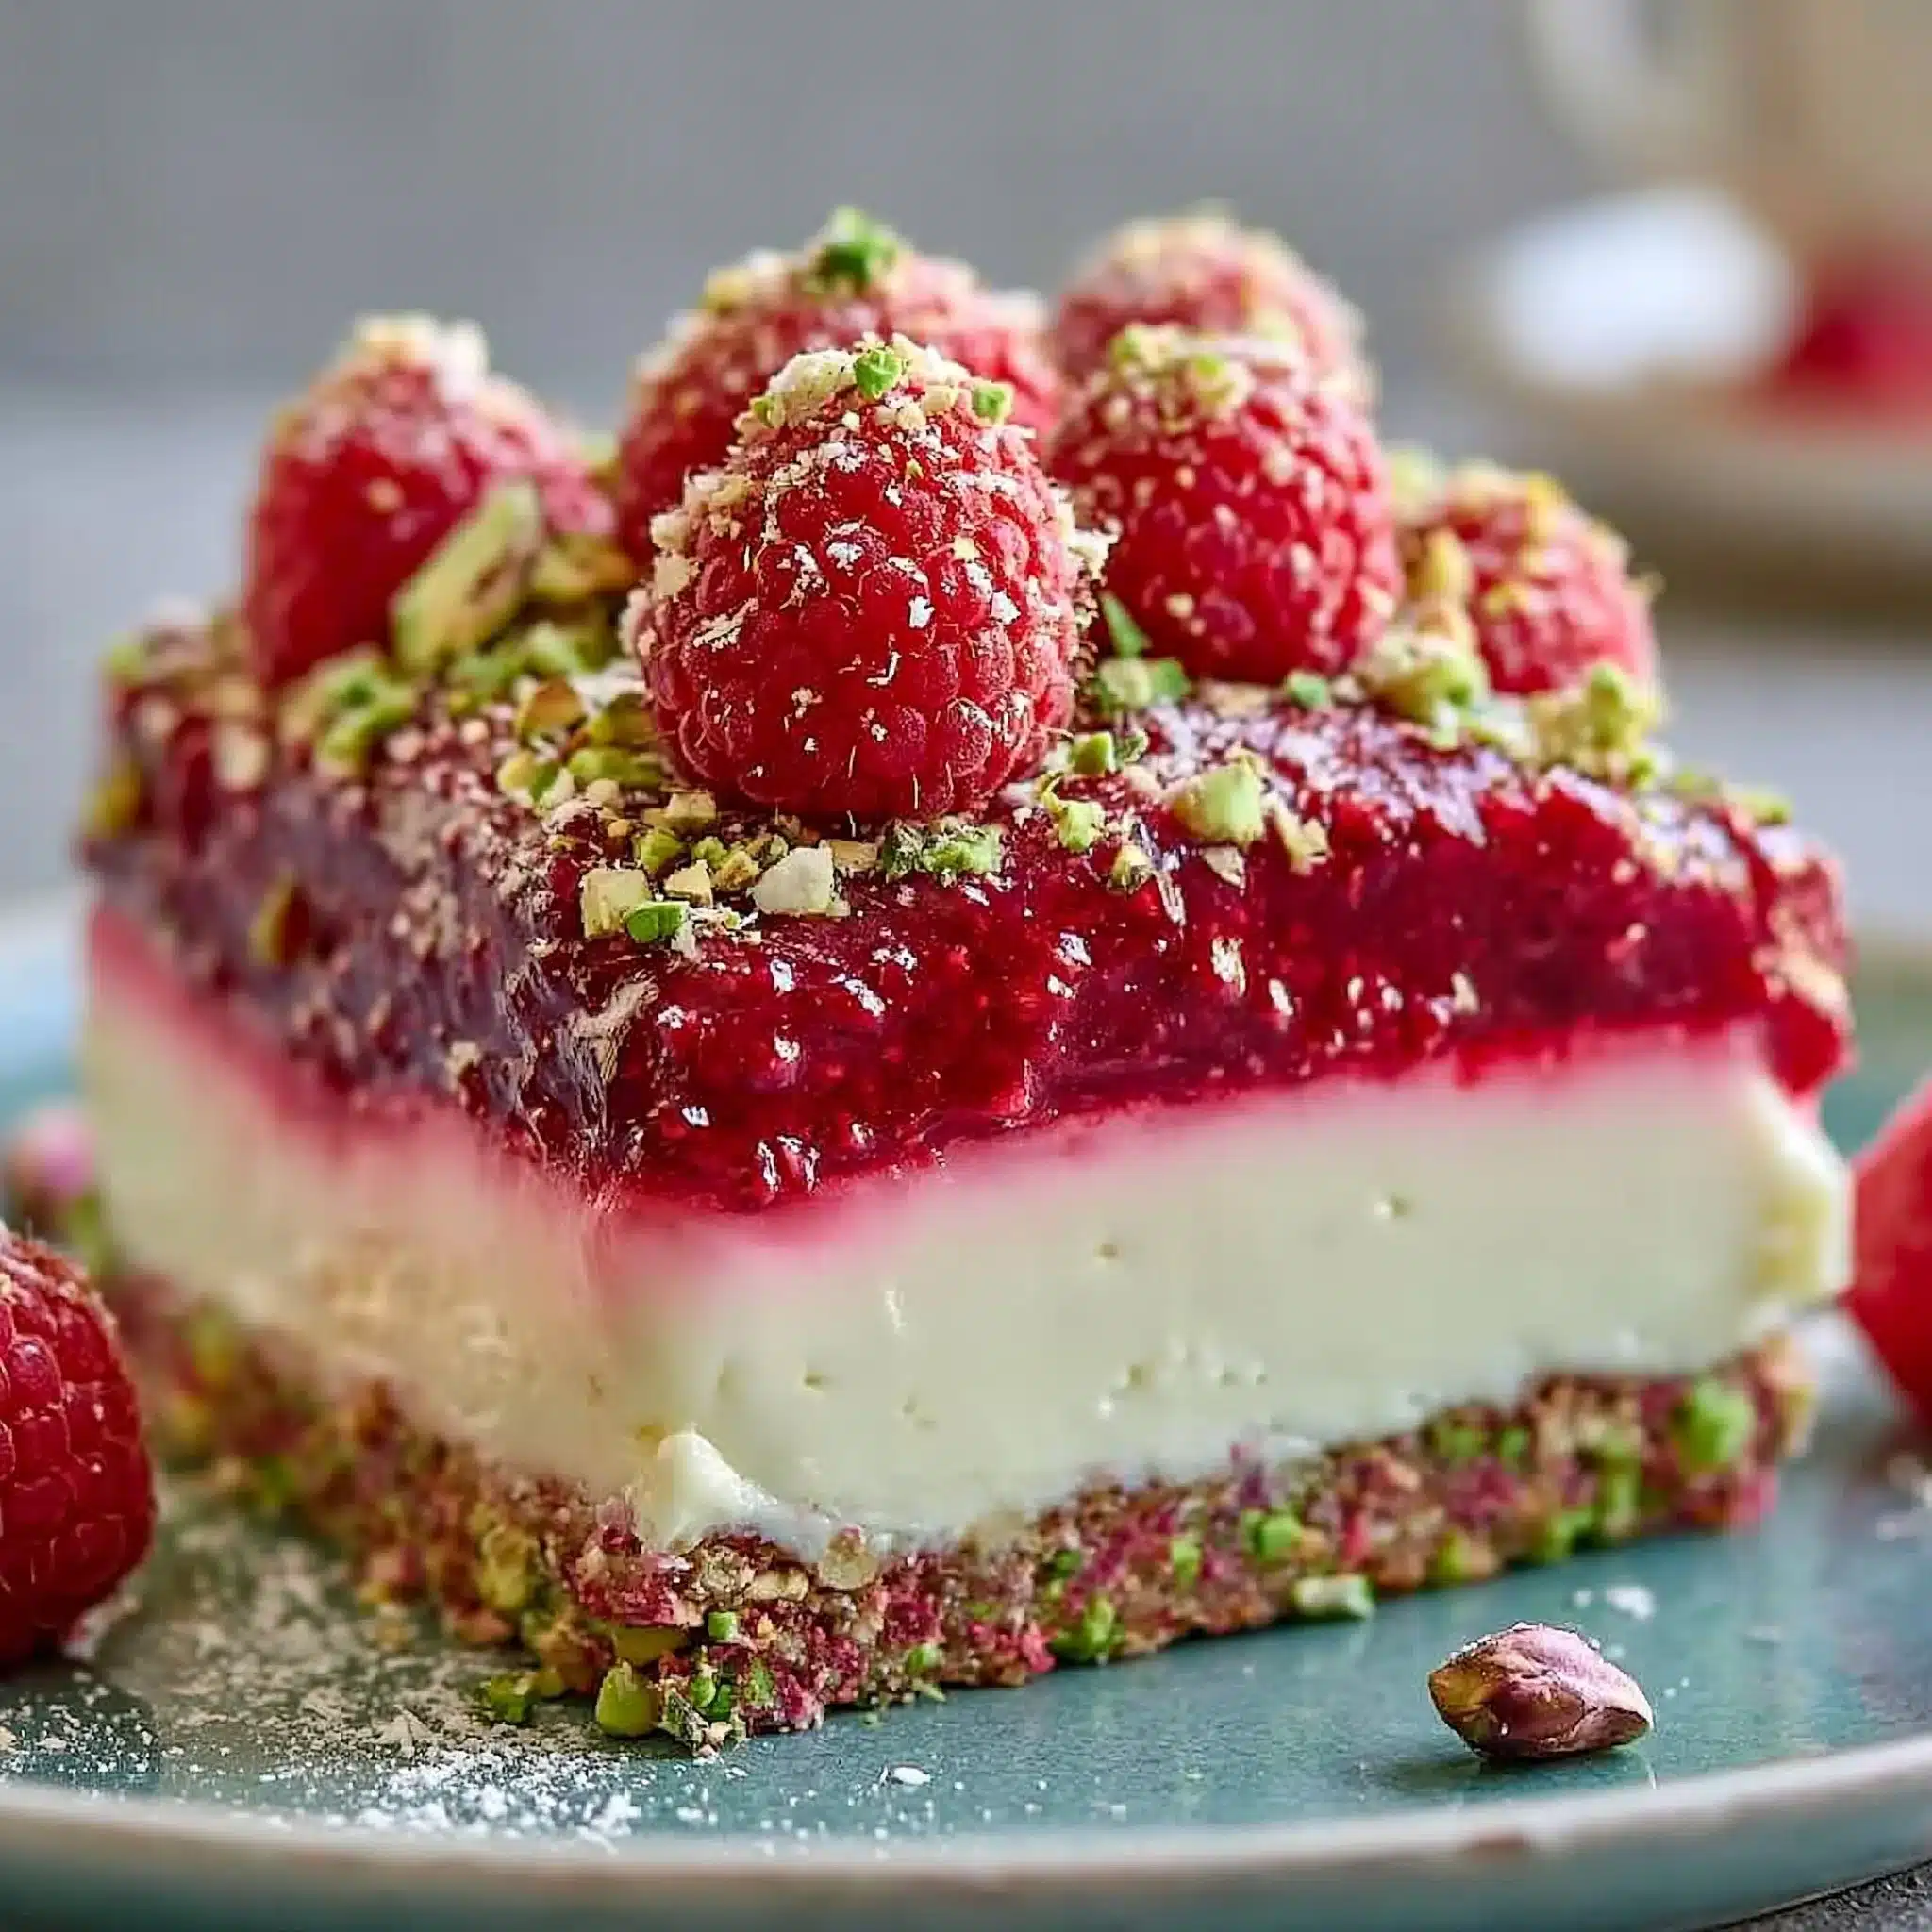
The quickest way to make this cheesecake feel “special occasion” is the contrast: a buttery pistachio crunch under a creamy filling, plus bright raspberry that cuts through the richness. It slices clean, looks polished on a platter, and the flavors land exactly where you want them—nutty, tangy, and just sweet enough.
If you’ve made my baked raspberry cheesecake before, you’ll recognize that same berry-forward balance here—but the pistachio base adds a toasty, almost bakery-style aroma the minute it hits the oven.
Why You’ll Love This Recipe
- The pistachio “crunch” base stays pleasantly crisp under the filling, so every bite has a little snap against the creamy cheesecake.
- Raspberry brings a clean, tangy pop that keeps the dessert from feeling heavy or one-note.
- The filling bakes up smooth and rich without needing anything fussy—just good mixing habits and patience while it chills.
- It’s a make-ahead win: the flavor improves after a full chill, and it slices more neatly the next day.
- The green pistachio + ruby raspberry combo looks elegant even with simple finishing—no complicated decorating required.
The Story Behind This Recipe
I wanted a pistachio cheesecake that didn’t lean “too sweet” or get lost under a thick topping, so I built it around a crisp pistachio crust and a clear hit of raspberry—kind of the same crowd-pleasing contrast you get in my baklava pistachio cheesecake, but with a cleaner, modern finish and a crunch that actually stays crunchy.
What It Tastes Like
This one tastes rich but not cloying: creamy cheesecake with a gentle tang, toasted pistachio depth, and bright raspberry that perfumes the whole slice. The sweetness reads medium (not candy-sweet), and the texture is the star—silky filling against that buttery pistachio crunch, with little berry bursts that keep each forkful lively.
Ingredients You’ll Need
Pistachios are doing real work here—they bring flavor, color, and that toasted nuttiness in the crust. Raspberries (or raspberry component from the recipe) are what keep the cheesecake feeling fresh instead of heavy. And as always with cheesecake, cream cheese and eggs are the structure: you want them well-mixed but not overbeaten so the bake stays smooth.
Ingredient list (as provided):
How to Make Elegant Pistachio Raspberry Crunch Cheesecake
- Prep your pan and oven. Get your springform pan ready (a parchment round on the bottom helps with clean removal). Preheat the oven as directed in your recipe so it’s fully hot when the cheesecake goes in.
- Make the pistachio crunch crust. Combine the crust ingredients until the mixture looks like damp sand and holds together when you press it in your fist. Press firmly into the bottom of the pan (use a flat-bottomed glass to compact it so it bakes up crisp, not crumbly).
- Bake (or set) the crust as directed. You’re looking for a lightly toasted, fragrant pistachio smell and a surface that looks set—no loose, dry patches. Let it cool while you make the filling.
- Mix the cheesecake filling until smooth. Beat the cream cheese mixture just until it’s creamy and lump-free. Scrape the bowl often—pistachio cheesecake mixtures love to hide little cream cheese pockets along the bottom and sides.
- Add eggs carefully. Mix in the eggs as directed, stopping as soon as they’re incorporated. Overmixing at this stage adds extra air, which can lead to a puffed top and cracks.
- Add the raspberry element. Fold or swirl in the raspberry component according to your recipe. The goal is distinct raspberry pockets or ribbons—not fully pink batter unless that’s what your instructions specify.
- Fill and bake. Pour the batter over the cooled crust and level the top. Bake for the time/temperature given. Don’t chase browning—cheesecake “doneness” is about the jiggle: the edges should look set, and the center should wobble like soft gelatin when you gently nudge the pan.
- Cool gradually. Let the cheesecake cool as instructed (a gradual cool helps prevent sudden sinking and surface cracks). It should feel barely warm before it goes into the fridge.
- Chill until fully firm. Refrigerate for the full chill time in the recipe. A properly chilled cheesecake will slice with clean edges and hold its layers without slumping.
- Finish and slice. Add any crunchy pistachio/raspberry finishing elements from your recipe. Use a hot, dry knife for neat slices—wipe between cuts for the cleanest presentation.
Tips for Best Results
- Compact the crust firmly. A tightly packed pistachio crunch layer won’t crumble when you slice, and it stays crisp longer under the filling.
- Scrape the bowl more than you think. Cream cheese loves to cling—scraping prevents little lumps that show up as pale specks in a green-tinged pistachio batter.
- Stop mixing as soon as the eggs disappear. That’s the difference between a dense-but-creamy cheesecake and one that bakes up airy and prone to cracking.
- Bake to a jiggle, not a color. The top may look pale and still be done; watch for set edges with a gently wobbly center.
- Chill overnight for the cleanest slices. It’s tempting to cut early, but the pistachio crust and the raspberry layer settle beautifully with time—similar to what you’ll notice in my caramel toffee crunch cheesecake when it fully firms up.
Variations and Substitutions
- If your recipe uses raspberries in a swirl, you can keep the same method but make the swirl more dramatic (few bigger ribbons) or more even (many thin ribbons) depending on the look you want.
- For extra crunch on top only if your recipe includes a topping step, reserve a small handful of pistachio crunch to sprinkle right before serving so it stays crisp.
How to Serve It
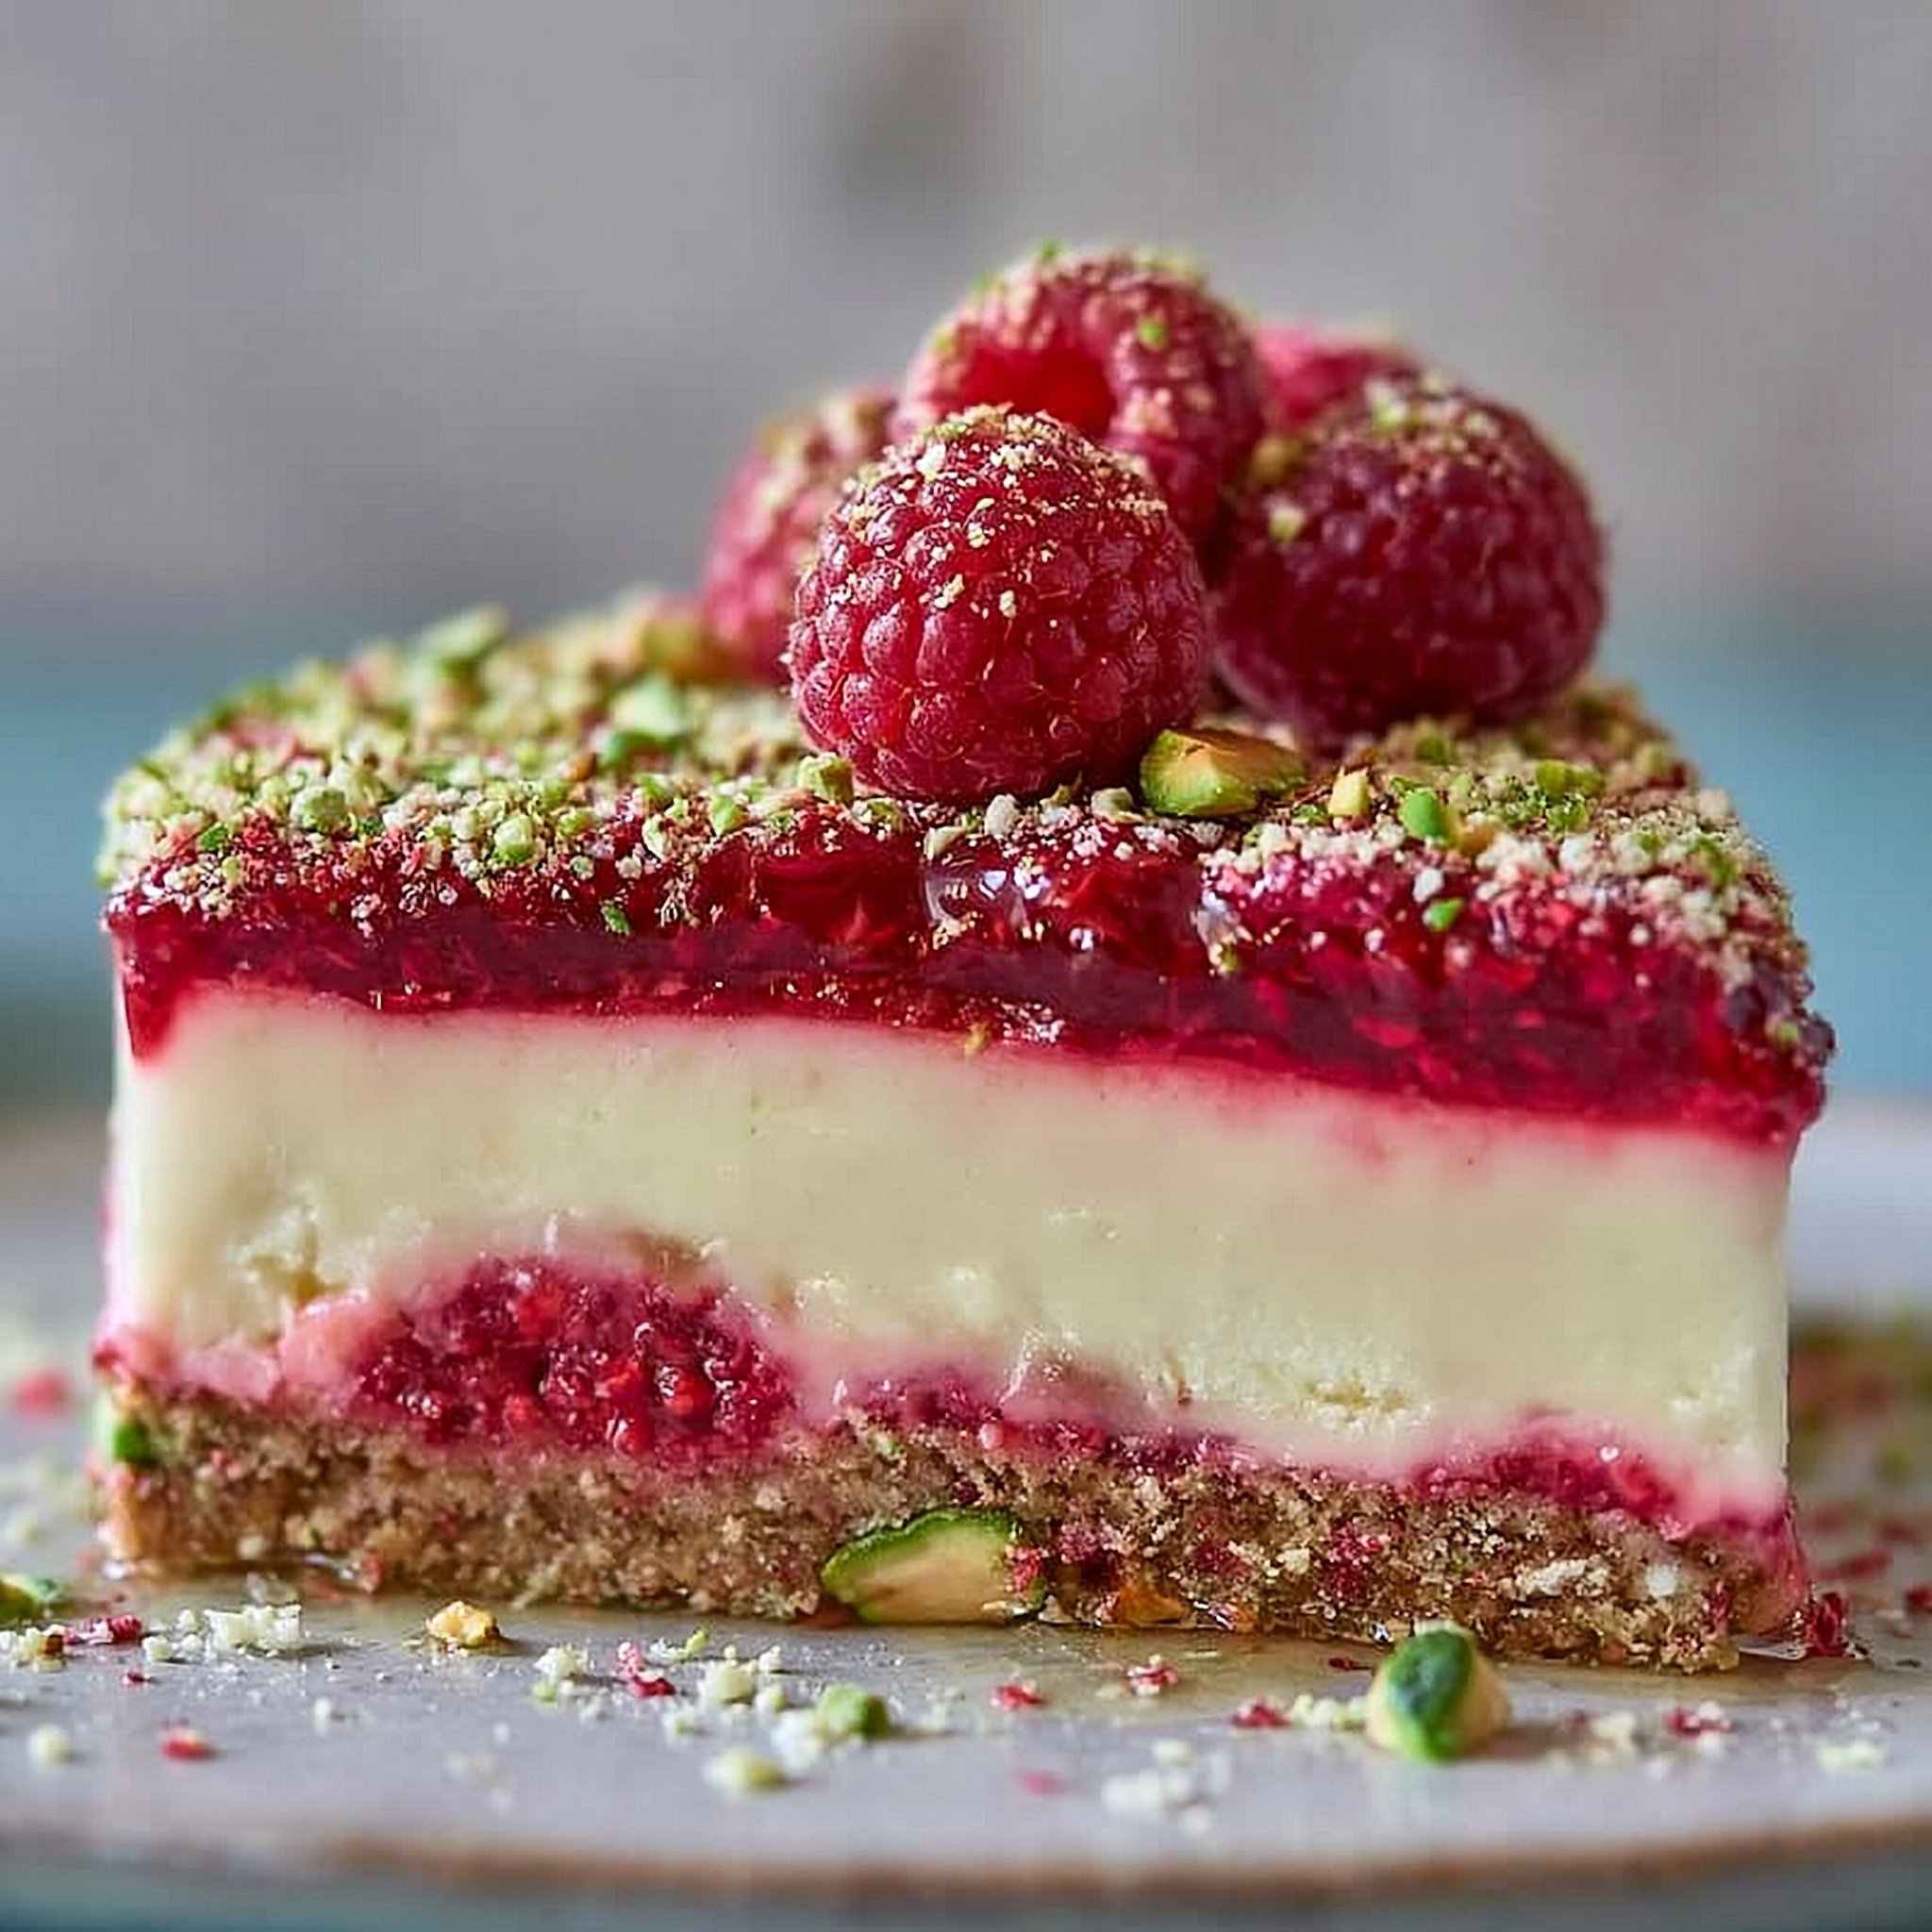
Serve cold for the cleanest texture: the filling should feel dense and silky, and the pistachio base will give you that satisfying snap. I like to plate slices with a few fresh raspberries on the side to echo the berry notes, and if you’re serving it after dinner, a small espresso works beautifully with the toasted pistachio flavor (this is the same kind of pairing that shines with my caramel crunch cheesecake too).
How to Store It
Keep the cheesecake covered in the refrigerator to protect it from fridge odors and to prevent the surface from drying out. For best texture, add any crunchy finishing elements right before serving (or as late as your recipe allows) so the pistachio crunch stays crisp. You can also make it a day ahead—this cheesecake is at its best once it’s fully chilled and sliceable.
Final Thoughts
If you love that pistachio-and-berry contrast, this cheesecake delivers it in a very “grown-up dessert table” way: crisp, creamy, and bright, with slices that look as good as they taste—very much in the same family as my oven-baked baklava pistachio cheesecake, but with a cleaner crunch and a fresher finish.
Conclusion
If you’re in a pistachio mood, I also appreciate how this pistachio cheesecake guide breaks down the flavor-building side of pistachio desserts. For a different take on the pistachio-raspberry pairing, this pistachio raspberry crunch mousse cake idea is a fun inspiration. And if you’re after an elegant plated look, these pistachio & raspberry cheesecake domes show how beautifully the colors translate into a more modern presentation.

Pistachio Raspberry Crunch Cheesecake
Ingredients
For the crust
- 1 cup crushed pistachios Use unsalted for a balanced flavor.
- 1/2 cup butter, melted This will help bind the crust.
- 1/4 cup sugar Adjust according to sweetness preference.
- 1 cup graham cracker crumbs For texture and flavor.
For the filling
- 16 oz cream cheese, softened Ensure it’s at room temperature for easier mixing.
- 3 large eggs Add eggs one at a time for better texture.
- 1/2 cup sugar To sweeten the filling.
- 1 cup raspberry puree Fresh or frozen raspberries can be used.
Instructions
Preparation
- Preheat the oven and prepare the springform pan with a parchment round on the bottom.
- In a mixing bowl, combine crust ingredients until it resembles damp sand. Press firmly into the bottom of the pan.
Baking the crust
- Bake the crust until lightly toasted and fragrant, then allow to cool.
Making the filling
- Beat the cream cheese until smooth and free of lumps.
- Add in eggs one at a time, mixing until just incorporated.
- Gently fold in the raspberry puree, creating distinct pockets or ribbons.
Final Baking
- Pour the filling over the cooled crust and level the top. Bake until the edges set and the center jiggles slightly.
- Allow to cool gradually before refrigerating for proper chilling.
- Chill in the fridge until firm, typically for a few hours or overnight.
Serving
- Slice using a hot, dry knife for clean edges and serve with fresh raspberries.