Why This One Delivers
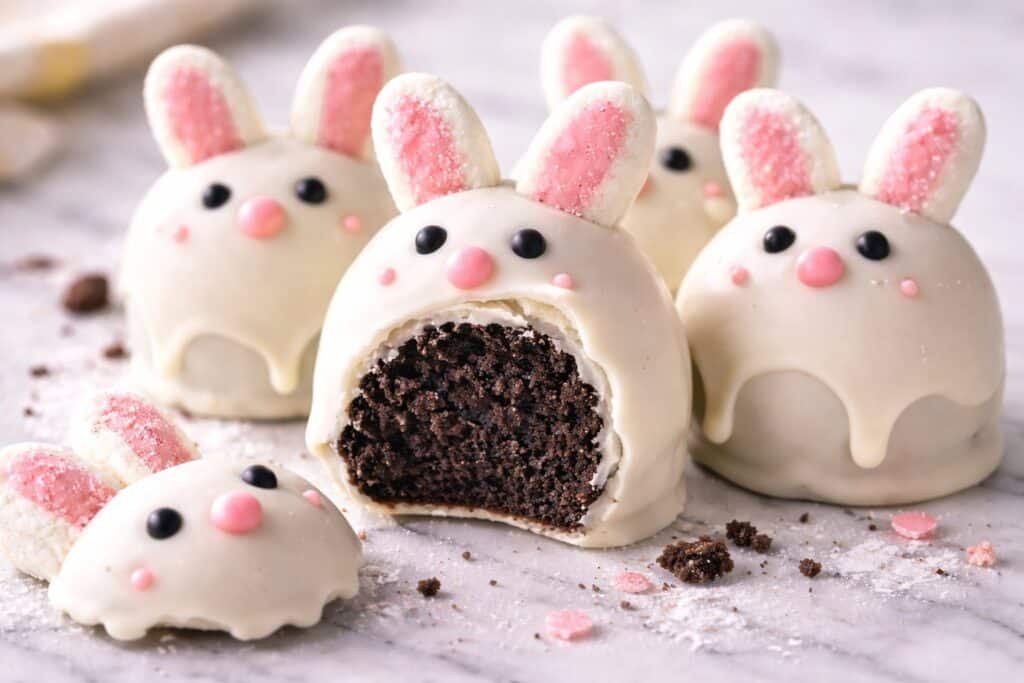
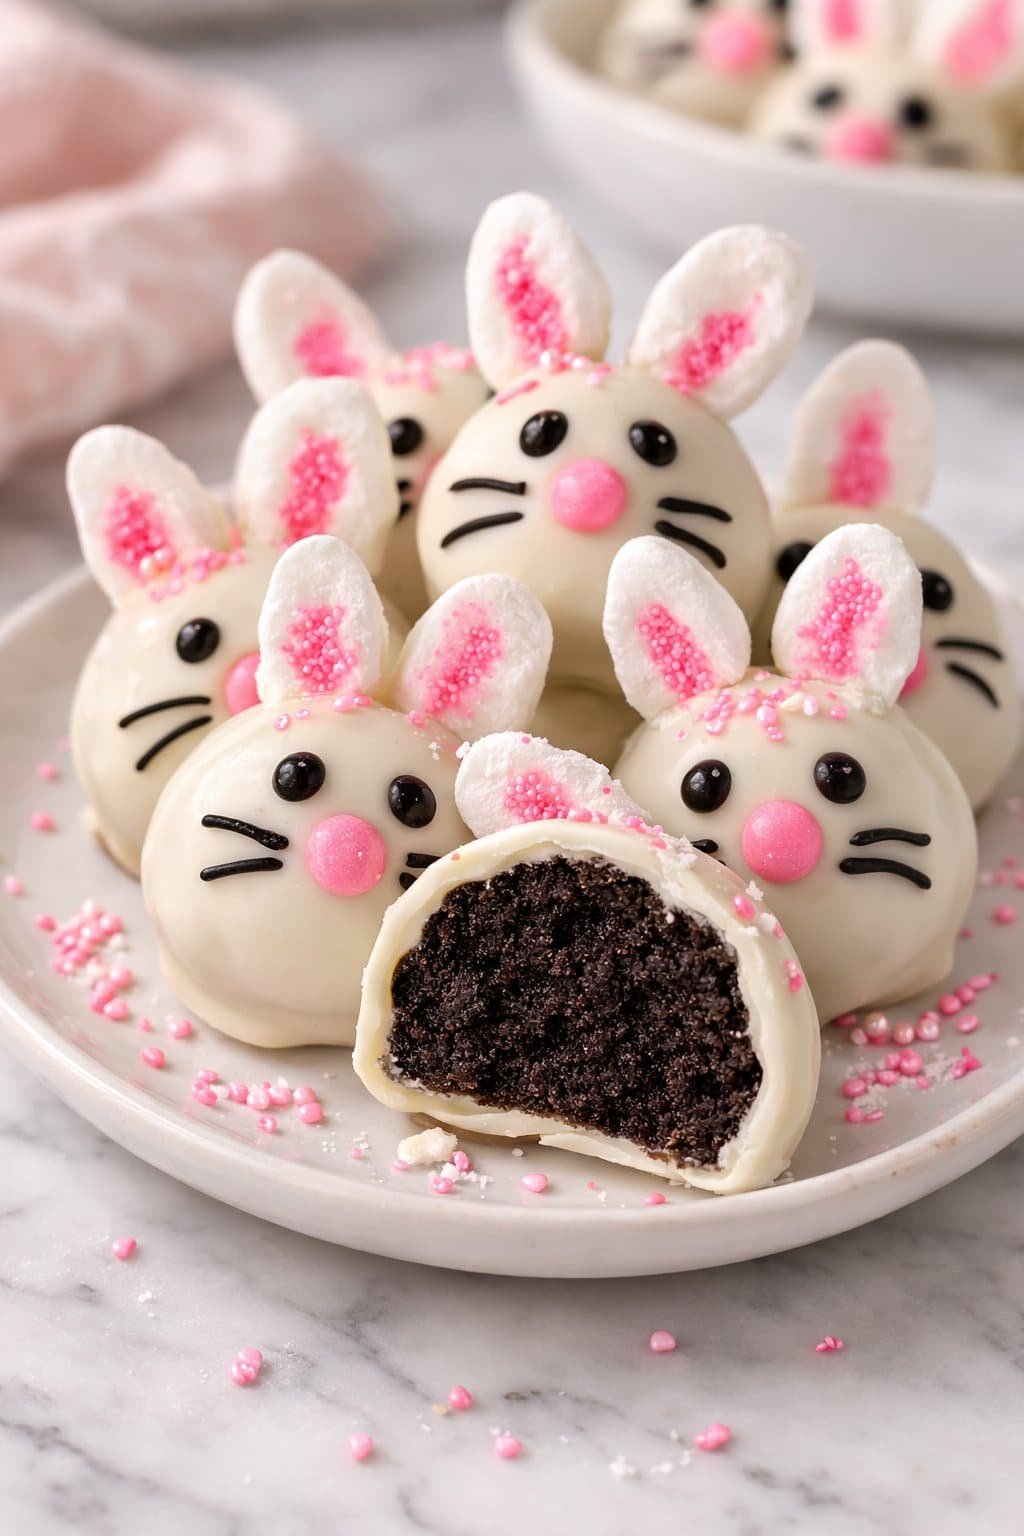
Bunny Oreo Balls give you bakery case cuteness with almost no effort and absolutely no oven. You get glossy, white chocolate coated truffles that look like they came from a fancy shop, but you build them with supermarket ingredients and a mixing bowl. Crush a full package of Oreos, blend them with softened cream cheese, and suddenly you have a rich, truffle like center that tastes like the inside of a chocolate shop treat. The smooth white chocolate or candy melt coating sets up beautifully in the fridge, so your bunnies look neat and polished instead of “I tried this at midnight” homemade.
Even if you rarely bake, the steps stay straightforward. You scoop, roll, chill, dip, and decorate, and that is it. The mini marshmallow ears, pink sugar sprinkles, and simple edible marker faces turn basic Oreo truffles into personality filled little bunnies that kids and adults cannot resist. You can color code faces and ears for different flavors or family members, or keep everything classic and let the decorations do the talking. Since the recipe yields about 24 pieces, it works beautifully for classroom parties, Easter dessert boards, or gifting on cookie trays. They keep well in the fridge for up to 5 days, so you can prep them ahead and pull out a chilled plate of perfect little bunnies the moment the doorbell rings.
From Prep to Finish
Once your cookies are finely crushed and mixed with softened cream cheese, the fun really starts. Use a small cookie scoop or a level tablespoon to portion the mixture so your Bunny Oreo Balls stay close in size, about 2.5 centimeters or 1 inch each. Roll them quickly between your palms until they look smooth and round. If the mixture feels sticky or too soft, pop the bowl in the fridge for about 10 minutes, then roll again. Arrange the balls on a parchment lined baking sheet with a little space between each one so cold air can move around them. Slide the tray into the refrigerator for at least 30 minutes so they firm up and do not slump or crack when you dip them.
For dipping, melt your white chocolate or candy melts in a microwave safe bowl. Heat in short bursts of 20 to 30 seconds, stirring well between each burst, until the mixture looks smooth and glossy with no lumps. If it seems too thick, you can stir in a tiny bit of neutral oil to loosen it. Drop one chilled Oreo ball into the melted coating at a time, then use a fork to lift it out. Tap the fork gently on the side of the bowl so extra coating drips off instead of pooling into a big skirt underneath. Set each coated ball back on a clean piece of parchment and work at a steady pace so the chocolate stays fluid and does not seize.
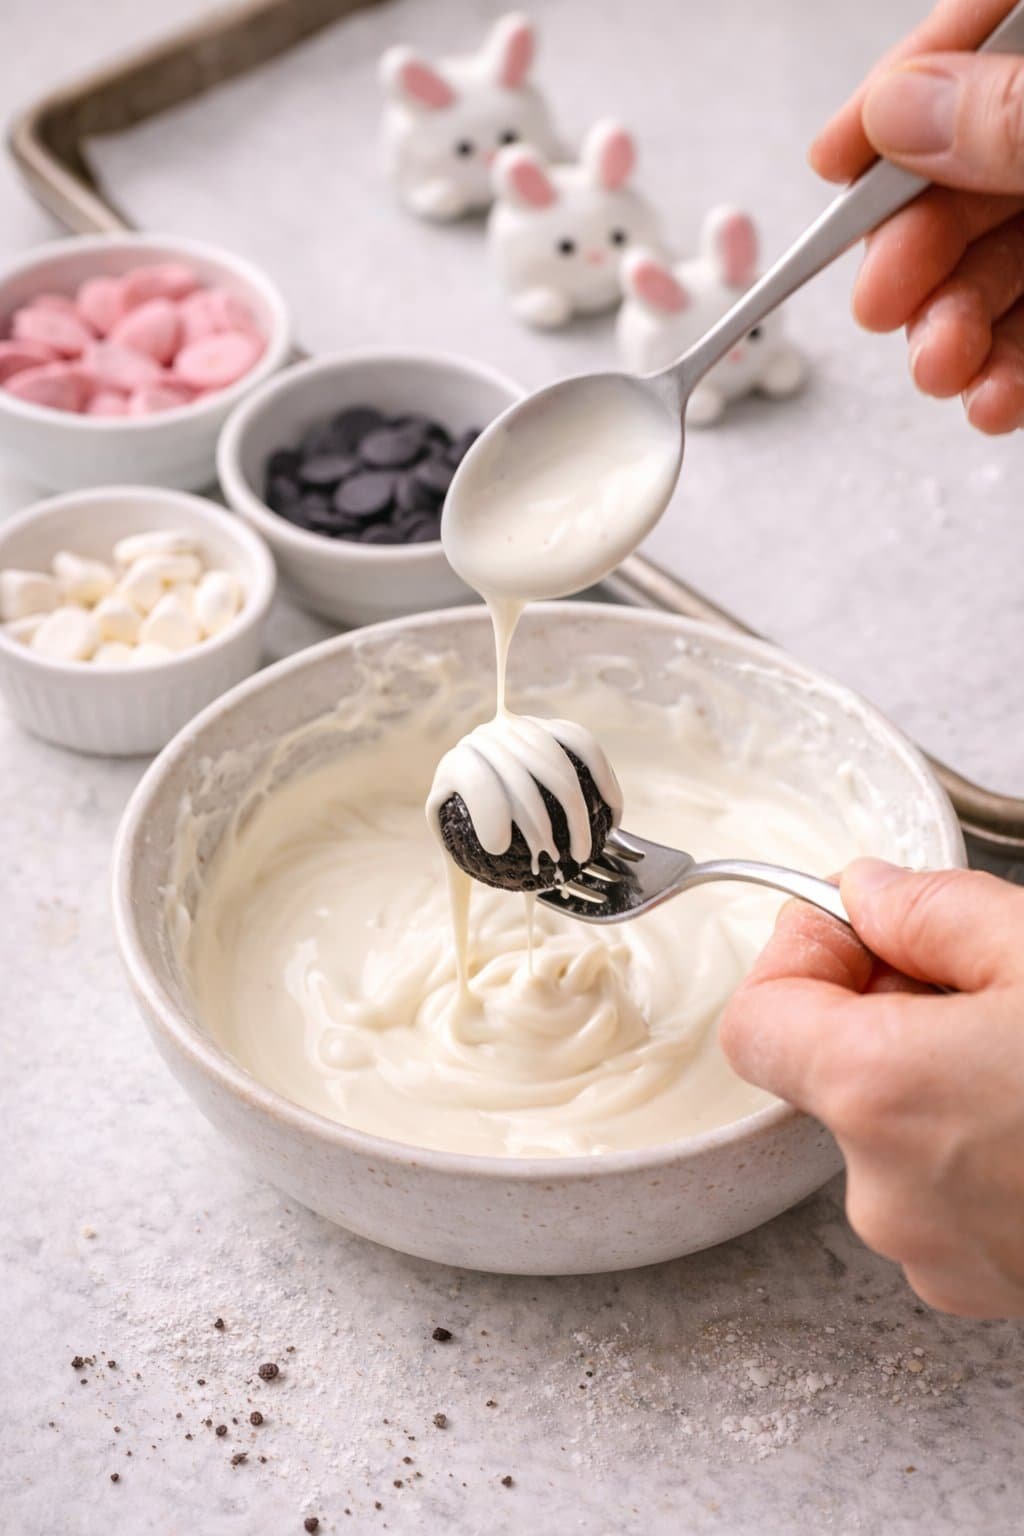
Process Image of Bunny Oreo Balls
While the coating is still soft, press two mini vanilla marshmallows on top as bunny ears. Add a pinch of pink sugar sprinkles if you like a little sparkle inside the ears or across the top. Let that base shell set. Once the coating feels firm and dry to the touch, use pink and black candy melts or an edible marker to dot on tiny noses, eyes, and whiskers. You can give each bunny a slightly different expression so they look like a little candy family. If the candy melts thicken while you work, warm them gently again and stir until smooth before continuing.
When your Bunny Oreo Balls look the way you like, let them sit at room temperature until the coating is completely firm, about 20 minutes, or pop the tray into the refrigerator to speed things up. Once the shells are set, gently peel each one off the parchment. Transfer them to an airtight container and, if you need to layer them, tuck a sheet of parchment between layers so the faces and ears stay neat. Store them in the refrigerator for up to 5 days, and serve them chilled for the best texture, with that creamy, fudgy center tucked inside a crisp, sweet shell. If you are building a whole dessert tray, they pair beautifully with simple treats like chewy brownie bites, soft sugar cookies, or a slice of chilled white chocolate raspberry tiramisu, and they almost always disappear first.
Timing, Storage, and Make Ahead
You can have these Bunny Oreo Balls on a plate surprisingly fast, which makes them a dream for last minute gatherings. Active prep time runs about 25 minutes for crushing, mixing, and rolling, plus around 10 minutes for melting and dipping, then another 10 to 15 minutes for decorating. I still recommend at least 30 minutes of chilling after you first roll the balls so they hold their shape when they meet warm candy coating. If you plan to serve them for a party, finish all decorating at least 1 hour before guests arrive so the coating and bunny faces have time to fully set and dry. They are rich and sweet, so one batch of 24 servings usually covers a small gathering nicely, especially if you pair them with something simple like chocolate dipped strawberries or slices of an easy cherry cheese danish.
Store your Bunny Oreo Balls in a single layer in an airtight container in the refrigerator, where they keep well for up to 5 days. If you need to stack them, separate layers with parchment so the bunny ears and faces do not smudge or stick together. For a make ahead option, you can roll the uncoated Oreo balls and refrigerate them for up to 2 days, or freeze them solid on a baking sheet, then transfer to a freezer bag for up to 2 months. Dip the chilled or frozen centers right before decorating, and add the marshmallow ears while the coating is still slightly wet so they adhere properly. Once fully decorated, avoid freezing, since condensation can blur the faces and make the pink details weep or bleed. If you are building a larger dessert table with treats like no bake cheesecake bars, Easter poke cake, or slices of indulgent strawberry chocolate shell cake, you can safely make these a day or two ahead and keep them chilled until you are ready to arrange your sweet little bunny parade.
Ingredient Swaps and Serving Options
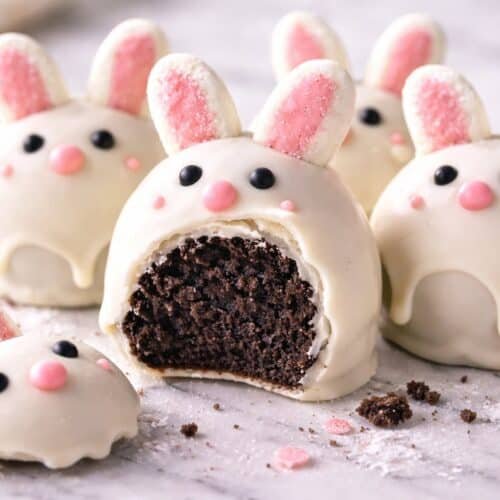
Serving Image of Bunny Oreo Balls
One of my favorite things about Bunny Oreo Balls is how easy they are to personalize with what you already have on your baking shelf. If you do not have classic chocolate Oreos, you can use golden sandwich cookies for a vanilla version, or try mint or birthday cake flavors for a fun twist. Any full fat cream cheese will work here, and you can even swap in a flavored cream cheese, like strawberry, for a soft pastel color without extra food coloring. White chocolate chips, almond bark, or vanilla flavored candy melts can all stand in for the coating. Just remember to melt low and slow and stir well so everything stays smooth and glossy, not grainy. If you are out of pink candy melts, stir a tiny drop or two of pink gel food coloring into white melts, or roll the still soft ears in crushed freeze dried strawberries for a natural blush color.
For the bunny details, you can use regular mini marshmallows or even sliced large marshmallows for bigger, floppy ears. Tint the cut side with a bit of pink icing, sanding sugar, or colored sugar sprinkles. If you do not have an edible marker, pipe on faces with melted dark chocolate, a chocolate ganache, or a simple cocoa powdered royal icing, then add pink sugar for cheeks if you like an extra cute look. To serve Bunny Oreo Balls for Easter dessert, tuck them into paper mini cupcake liners, arrange them in a nest of shredded paper grass, or place one on each plate as a sweet place setting beside a slice of pineapple upside down sugar cookie bar or a square of homemade Snickers cheesecake bars. You can also skip the faces and ears and turn this base recipe into simple Oreo truffles for parties, cookie boxes, or a Christmas treat tray alongside peppermint bark, mocha caramel macarons, or hot chocolate cookies. Keep a small plate of these chilled in the fridge for easy snacking, then bring them out about 10 minutes before serving so the centers soften to that perfect creamy bite.
Conclusion
Every time I roll and dip a tray of these little cuties, I am reminded that the best desserts are rarely the fanciest. They are the ones that make kids drag stools over to the counter to “help,” that spark giggles when a bunny ear leans a little to one side, and that vanish from the plate before you can even set it down. These Bunny Oreo Balls are exactly that kind of recipe. They feel special enough for a holiday table, but simple and forgiving enough for a random Tuesday afternoon sweet craving.
I hope this becomes one of those traditions you come back to year after year, whether you are making them with little helpers, for a school party, or just for your own cozy sweet tooth. Pull out the sprinkles, embrace the chocolate smudges on your counter, and have fun with it. When you do make a batch, take a picture, share it with the people you love, and most of all, enjoy every bite.
Recipe
Bunny Oreo Balls
Ingredients
Ingredients
- 1 package 14.3 oz Oreo cookies
- 8 oz cream cheese softened
- 12 oz white chocolate or vanilla candy melts
- 1/2 cup pink candy melts
- 1/2 cup black candy melts
- 48 mini vanilla marshmallows
- 2 tbsp pink sugar sprinkles
- 1 black edible food marker
Instructions
- Place the Oreo cookies in a food processor and pulse until they form fine crumbs, or crush them in a zip top bag with a rolling pin until very finely ground.
- Add the softened cream cheese to the Oreo crumbs in a mixing bowl and stir or mix until the mixture is smooth and evenly combined with no visible streaks of cream cheese.
- Use a small cookie scoop or a level tablespoon to portion the mixture into 24 mounds, then roll each portion between your palms to form smooth 1 inch balls.
- Arrange the balls on a parchment lined baking sheet and refrigerate for 30 minutes, or until firm to the touch.
- Near the end of the chilling time, place the white chocolate or vanilla candy melts in a microwave safe bowl and heat in 20 to 30 second bursts, stirring after each burst, until completely melted and smooth.
- Working with one chilled Oreo ball at a time, drop it into the melted white chocolate, turn it gently to coat, then lift it out with a fork and tap the fork on the side of the bowl to let excess coating drip off.
- Set each coated ball back onto a clean parchment lined baking sheet, leaving space between them so the coating can set without sticking together.
- While the white coating is still soft, press two mini vanilla marshmallows into the top of each ball to form bunny ears.
- While the coated balls with ears set, place the pink candy melts in a small microwave safe bowl and melt in short bursts, stirring until smooth, then repeat with the black candy melts in a separate bowl.
- Use a toothpick or small piping bag to add small pink candy melt dots for noses and inner ears, and black candy melts for eyes and whiskers, or use the black edible marker to draw the facial details once the coating is fully firm.
- Sprinkle pink sugar sprinkles over the tops or around the ears while any remaining coating is still slightly tacky so they adhere.
- Let the Bunny Oreo Balls sit until the chocolate coating and decorations are completely set, then transfer them to an airtight container and refrigerate until ready to serve.
Notes
- If the candy coating thickens as you work, rewarm it briefly in the microwave and stir until smooth before continuing.