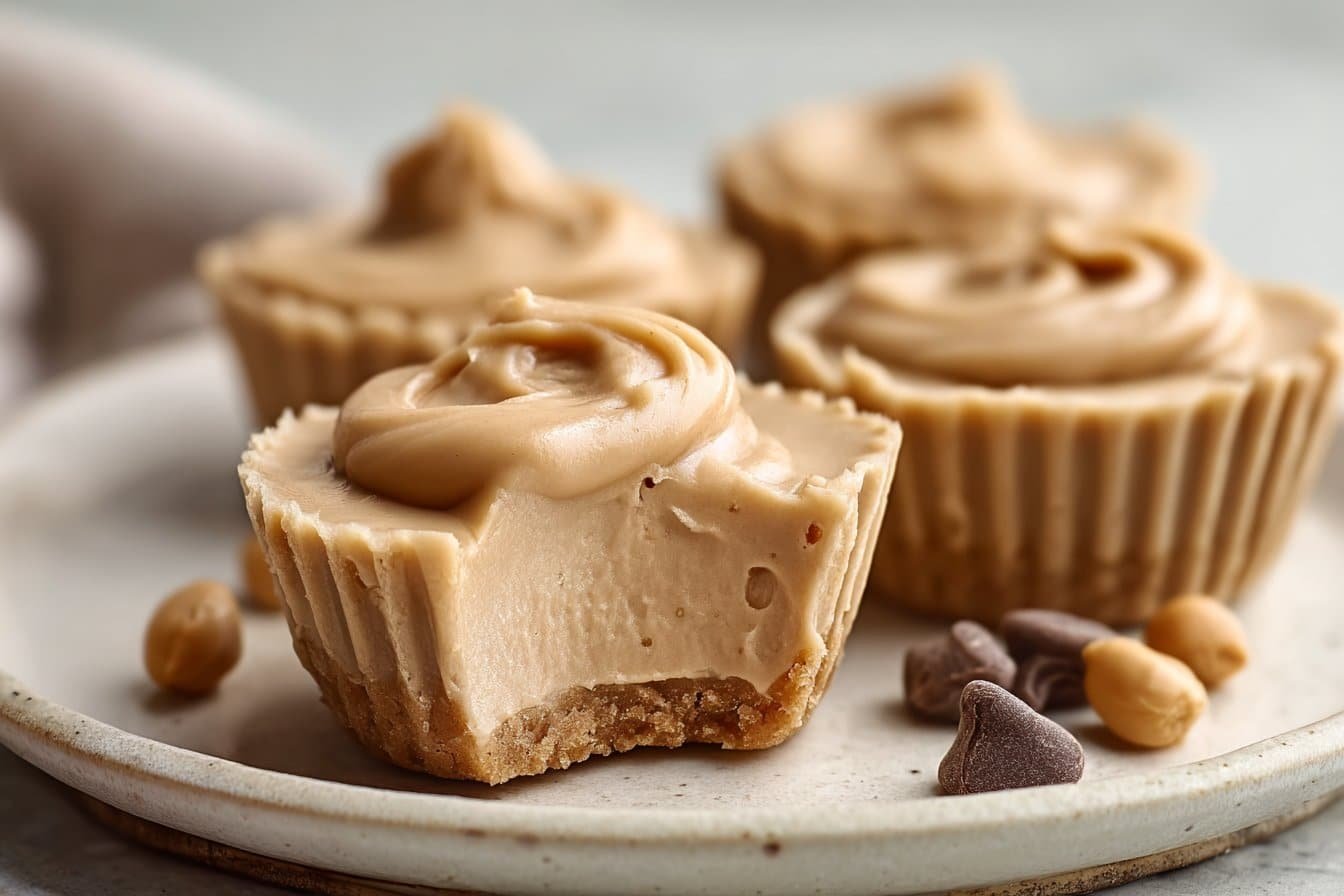
The Memory Behind This Treat
The first time I made these Creamy Peanut Butter Greek Yogurt Frozen Cups, it was one of those sweltering July afternoons when turning on the oven felt like a personal attack. My kids kept circling the kitchen asking for “something cold… but not ice cream again.” I grabbed a tub of Greek yogurt, the jar of natural peanut butter that always separates a little, and a nearly empty bottle of honey. Fifteen minutes later, I had a tray of hopeful little cups headed for the freezer and a very sticky whisk in the sink. By the time after-dinner cravings hit, we had a tray of frosty, nutty, creamy “mini cheesecakes” waiting — and no one believed they were mostly yogurt.
These frozen yogurt cups quickly became our in-between snack: lighter than a slice of cake, more satisfying than a handful of chocolate chips. I loved that I could stir them together during a work call, using things I almost always have: Greek yogurt, natural peanut butter, and a drizzle of honey or maple syrup. When I started testing this recipe for Taste to Rate, I played with tiny details you’d appreciate in your own kitchen — like adding just a pinch of salt to wake up the peanut flavor, and folding in mini chocolate chips so they don’t all sink to the bottom. The texture reminded me of the inside of a peanut butter pie, only colder and lighter, with that tangy Greek yogurt finish that keeps you coming back for one more bite.
Over time, these Creamy Peanut Butter Greek Yogurt Frozen Cups became my “bring something quick” answer for casual get-togethers and kid playdates. I’d line up silicone muffin cups on a baking sheet, whisk the mixture in one big bowl, and freeze them while we cleaned up dinner. They pop out looking like tidy little frozen cheesecake bites without any crust to fuss over. On busy weeks, I stash a batch in the freezer next to my chocolate banana bread and strawberry yogurt bark so there’s always a not-too-sweet treat waiting — especially for those nights when you want dessert, but also want tomorrow’s jeans to still fit.
How To Make It (Mix & Ingredients)
To make these Creamy Peanut Butter Greek Yogurt Frozen Cups, start by getting your ingredients to room temperature for 5–10 minutes. Cold peanut butter can be stubborn and clumpy, so let it soften slightly while you measure the Greek yogurt, honey or maple syrup, vanilla, and salt. Give your natural peanut butter a really good stir from the bottom of the jar so the oil is fully blended back in; this is the secret to a silky, not separated, frozen texture. I love using 2% or full‑fat Greek yogurt here because it keeps the cups extra creamy instead of icy. If you’ve ever made frozen yogurt that turned rock hard, you’ll notice the difference this little bit of fat and the peanut butter make.
Instructions Process of Creamy Peanut Butter Greek Yogurt Frozen Cups
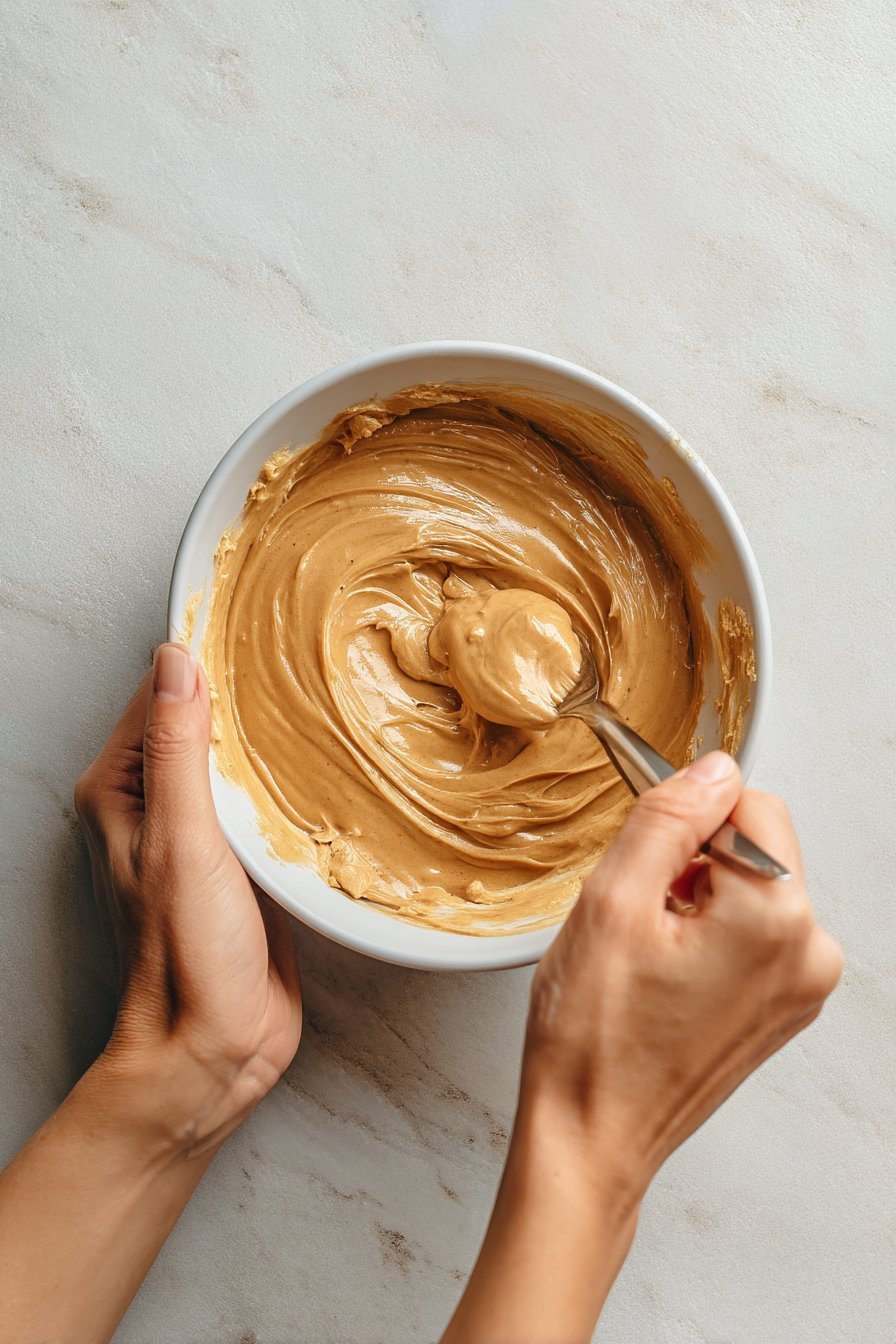
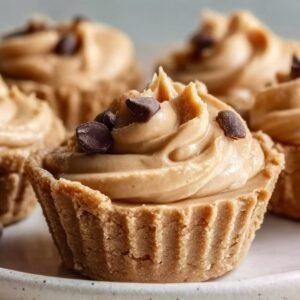
Grab a medium mixing bowl and add the Greek yogurt and peanut butter first. Whisk or stir with a sturdy spatula until the mixture is completely smooth, with no streaks of white or tan; it should look like fluffy peanut butter mousse. Taste as you go while you stir in the honey or maple syrup, vanilla bean paste, and a tiny pinch of salt—sweeten it to your own “snack vs. dessert” level. If you’re using chopped peanuts or mini chocolate chips, fold them in gently at the very end so you don’t crush them into dust. Then spoon the mixture into silicone muffin cups or small ramekins, give each one a little wiggle or tap on the counter to level, and slide them onto a flat tray in the freezer. Four hours will set them enough to enjoy, but overnight gives you that firm, ice-cream-cup vibe that makes these feel like a proper treat.
Make-Ahead & Storage
These Creamy Peanut Butter Greek Yogurt Frozen Cups are made for meal prep and grab-and-go snacks. I like to mix the peanut butter and yogurt base the night before, portion it into silicone muffin cups, and freeze the whole tray. Since they need at least 4 hours to set (overnight is best), you can make them on Sunday and enjoy them all week. Once they’re completely frozen, pop the cups out of their molds and transfer them to a zip-top freezer bag or airtight container so they don’t absorb any freezer smells. If you stack them, add a small piece of parchment between layers to prevent sticking and smudged chocolate chips.
For the best texture and flavor, enjoy your Creamy Peanut Butter Greek Yogurt Frozen Cups within 2 weeks. They will technically last longer, but the edges can start to get a little icy and lose that smooth, creamy bite. When you’re ready to eat, let a cup sit at room temperature for 5–10 minutes so it softens slightly; it should feel like firm ice cream, not a rock. If you forget and they’re too hard, you can microwave a single cup for 10–15 seconds on low power—just enough to take off the chill, not melt it into a puddle. And if you love having a freezer full of treats, these cups share space happily with fruit popsicles, banana ice cream bites, or even leftover brownie chunks for crumbling on top.
Best Ingredients & Party Variations
For the creamiest Creamy Peanut Butter Greek Yogurt Frozen Cups, start with full-fat or 2% Greek yogurt for that velvety, cheesecake-like texture. I love a natural smooth peanut butter with just peanuts (and maybe salt) on the label—no added sugar means you control the sweetness. Taste your peanut butter before mixing; extra-roasty brands make the flavor deeper, while milder ones keep it kid-friendly. If you prefer things less sweet, start with 2 tablespoons of honey or maple syrup, freeze a spoonful to test, then adjust before filling all your cups. A pinch of salt might seem tiny, but it’s what makes the peanut butter flavor pop, especially if you swirl in mini dark chocolate chips or chopped peanuts for crunch.
For parties, think of these frozen cups as a dessert bar waiting to happen. Make a big batch of plain Creamy Peanut Butter Greek Yogurt Frozen Cups, then set out bowls of toppings: chopped peanuts, crushed pretzels, mini chocolate chips, shredded coconut, or a drizzle of warmed peanut butter or chocolate just before serving. For a “PB&J” spin, press a thin layer of crushed graham crackers mixed with a teaspoon of melted coconut oil into the bottom of each muffin cup, then dollop a bit of strawberry jelly under the yogurt mixture. Want something more elegant for a dessert platter next to your favorite mini cheesecakes or brownie bites? Swirl 1–2 tablespoons of melted dark chocolate into the top of each cup before freezing for a marbled look. You can even do a kid tray and a grown-up tray—one with colorful sprinkles, one with salted peanuts and chocolate—for a crowd-pleasing freezer-friendly spread.
Serving of Creamy Peanut Butter Greek Yogurt Frozen Cups
Conclusion
I love how a simple tray of these Creamy Peanut Butter Greek Yogurt Frozen Cups can turn an ordinary afternoon into a little celebration. They’re the kind of treat you can pull from the freezer and instantly create a pause in the day—kids wandering in from outside, partners taking a break from work, friends lingering just a little longer around your kitchen counter. That first cool, velvety bite with the salty-sweet peanut butter swirl feels like a tiny reward you made just for them.
If you’ve been wanting a dessert that’s as easy as it is impressive, this is your sign to try these. Clear a little space in your freezer, gather your ingredients, and give yourself permission to play in the kitchen. You might discover a new family favorite, a go-to after-school snack, or your own late-night “just one more” treat.
For more delicious recipes like this, follow us on social media!
What type of Greek yogurt is best for Creamy Peanut Butter Greek Yogurt Frozen Cups?
For the creamiest texture, use full-fat Greek yogurt in your Creamy Peanut Butter Greek Yogurt Frozen Cups. It gives you that rich, ice cream–like feel without turning icy. If you prefer something a bit lighter, 2% Greek yogurt still works beautifully and won’t compromise the structure. I don’t recommend nonfat yogurt here, as it tends to freeze harder and more icy. Whatever you choose, make sure it’s plain, unsweetened Greek yogurt so you can control the sweetness.
Can I adjust the sweetness or make these cups less sugary?
You absolutely can dial the sweetness up or down to your taste. Start with the lower end of the honey or maple syrup amount, taste the mixture before freezing, and then add more if needed. Remember that flavors mute a bit once frozen, so it should taste slightly sweeter than you think at room temperature. For a lower-sugar option, you can use less sweetener or swap in your favorite sugar-free liquid sweetener, adding a little at a time. Just keep the texture thick and creamy so the cups set nicely.
How do I keep Creamy Peanut Butter Greek Yogurt Frozen Cups from getting too hard?
These cups will freeze firm, but a few tricks help keep them pleasantly creamy. Use full-fat or 2% Greek yogurt and natural peanut butter for the best texture. Avoid thinning the mixture with milk or extra liquid sweeteners, which can make them more icy. When you’re ready to enjoy, let the cups sit at room temperature for 3–5 minutes so they soften slightly. You can also make them in smaller portions so they’re easier to bite into straight from the freezer.
Recipe
Creamy Peanut Butter Greek Yogurt Frozen Cups
Ingredients
Ingredients
- 2 cups full-fat or 2% Greek yogurt
- 3/4 cup natural smooth peanut butter no added sugar or salt
- 3 tablespoons honey or maple syrup
- 1 teaspoon vanilla bean paste
- 1 pinch salt
- 1/4 cup chopped peanuts optional
- 2 tablespoons mini dark chocolate chips optional
Instructions
- Stir the natural peanut butter well in the jar to recombine the oils and solids until smooth.
- Add the Greek yogurt and peanut butter to a medium mixing bowl.
- Whisk or stir the yogurt and peanut butter together until the mixture is completely smooth and no streaks remain.
- Add the honey or maple syrup, vanilla bean paste, and a pinch of salt, then stir until fully combined.
- Taste the mixture and, if desired, add a small extra drizzle of honey or maple syrup and stir again.
- Gently fold in the chopped peanuts and mini dark chocolate chips, if using, until evenly distributed.
- Arrange silicone muffin cups or small ramekins on a flat tray or baking sheet.
- Spoon the mixture evenly into the cups or ramekins, filling each about three-quarters full.
- Tap the tray lightly on the counter to level the tops and remove any air pockets.
- Place the tray in the freezer and freeze for at least 4 hours, or until the cups are firm.
- Once frozen solid, pop the cups out of the silicone molds or loosen them from ramekins with a thin knife.
- Serve immediately, or transfer the frozen cups to an airtight container and store in the freezer for up to 2 weeks.
Notes
- Silicone muffin cups work best for easy release, but paper liners in a muffin pan also work.
- For a sweeter dessert-style treat, use the full amount of honey or maple syrup; for a snack, you can slightly reduce it.
- Allow frozen cups to sit at room temperature for 3–5 minutes before eating for a creamier texture.