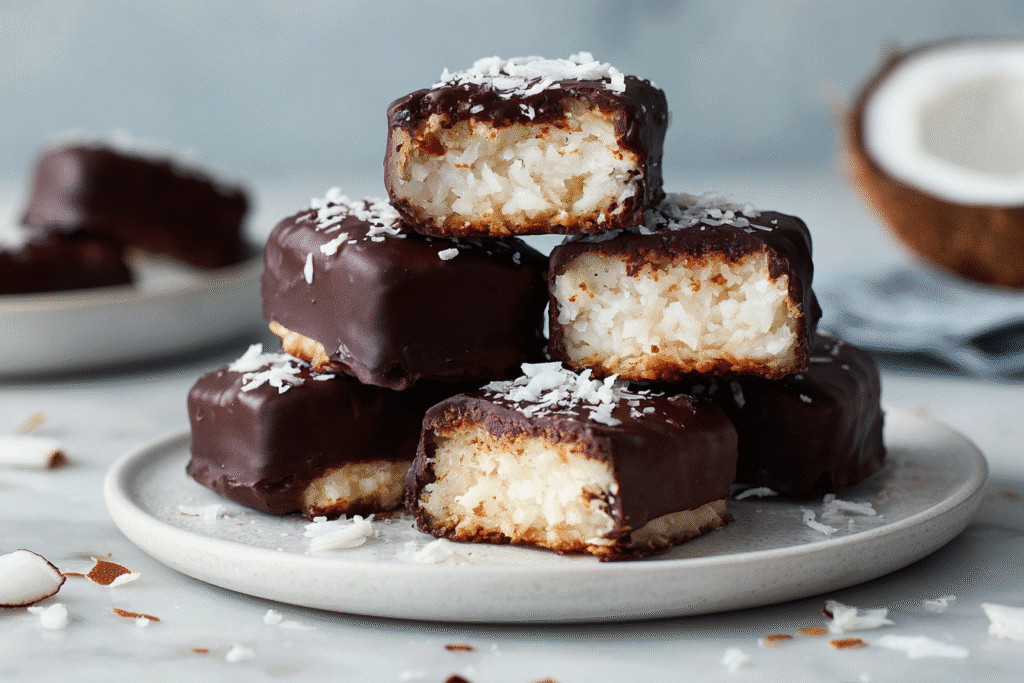

Featured of Homemade Coconut Mounds Bars
The Memory Behind This Treat
The first time I attempted making Homemade Coconut Mounds Bars, I was transported back to my grandmother’s cozy kitchen, where the air was always filled with the comforting aroma of cocoa and coconut. Grandma had a knack for turning simple ingredients into pure magic, and her affinity for coconut was legendary. On rainy afternoons, she’d let me help her create her own version of these bars using whatever we had on hand. I still remember the mess we made trying to dip the coconut filling into the melted chocolate with forks that seemed to have a mind of their own. Despite the chaos, the results were always deliciously rewarding.
Over the years, I’ve refined the recipe, making it incredibly easy and no-bake, perfect for those days when you need a quick sweet fix without the fuss. The magic of these Chocolate Coconut Bars lies in their simplicity—just a handful of pantry staples, yet they deliver a rich, creamy bite with a satisfying nutty crunch. I love that these bars bring a taste of nostalgia, reminding me of my grandmother’s kitchen adventures, while also offering a delightful treat that’s perfect for modern-day snacking or gifting.
Whenever I make these bars, I’m reminded of the joy in sharing food and stories with loved ones. Whether you’re bonding over the slight mess of dipping or indulging in a perfectly set bar, these homemade treats promise a little slice of happiness with every bite. If you enjoy these, be sure to check out my other nostalgic recipes like the Classic Chocolate Chip Cookies and Fudgy Brownies.
How To Make It (Mix & Ingredients)
Making Homemade Coconut Mounds Bars is delightfully simple, and you’ll only need a few ingredients to create these creamy, nutty treats. Begin by gathering your ingredients for the coconut filling: 3 cups of sweetened shredded coconut, a 14-ounce can of sweetened condensed milk, 1/2 teaspoon of pure vanilla extract, and a pinch of salt. These pantry staples come together to form a deliciously sticky mixture that’s the heart of your bars.

Instructions Process of Homemade Coconut Mounds Bars
In a large mixing bowl, thoroughly combine the shredded coconut, condensed milk, vanilla, and salt. You’ll know it’s ready when the mixture feels thick and almost like a dough. It should hold together easily when pressed. Line an 8×8-inch baking pan with parchment paper for easy removal later. Gently press the coconut mix into the pan, smoothing the top with a spatula or your hands. Freeze this for about 30 minutes until it’s firm enough to slice.
Once your coconut filling is set, it’s time to prepare the chocolate coating. Use 2 1/2 cups of semi-sweet or dark chocolate chips and a tablespoon of coconut oil (this helps achieve a silky finish). Melt them together in a microwave-safe bowl, zapping in 30-second bursts and stirring in between until smooth. Now comes the fun part: dipping the bars! Slice your chilled coconut filling into bars, then coat them in the melted chocolate using a fork. Place the bars on a parchment-lined baking sheet and let them harden. Voilà! You’ve made your very own homemade Mounds bars. For more sweet inspiration, check out my other chocolate dessert recipes.
Make-Ahead & Storage
When crafting your Homemade Coconut Mounds Bars, planning ahead can make all the difference. These delightful treats can easily be made ahead of time, making them perfect for impromptu gatherings or a sweet craving later on. Once you’ve dipped the bars in chocolate, allow them to set completely. Then, transfer them to an airtight container, placing parchment paper between layers to prevent sticking. Stored this way, they’ll last up to 2 weeks in the refrigerator, maintaining their creamy coconut goodness and rich chocolate coating.
If you’re thinking of making these bars well in advance, consider freezing them. Simply wrap each bar individually in plastic wrap and place them all in a freezer-safe bag. This technique ensures they keep their delicious flavor and texture for up to 3 months. When you’re ready to indulge, let them thaw in the refrigerator overnight. You’ll find they’re just as delicious as the day you made them.
For those of you who love to have treats on hand, this recipe is your new best friend. Whether you’re packing snacks for work or prepping for a party, knowing your Homemade Coconut Mounds Bars are ready to go can ease the stress of last-minute dessert planning. Remember to keep an eye on temperature changes, as chocolate can sometimes bloom if it gets too warm, leaving a white streak. But don’t worry—this doesn’t affect the taste or your enjoyment!
Best Ingredients & Party Variations
When crafting these Homemade Coconut Mounds Bars, the choice of ingredients is key to achieving that irresistible creamy and nutty flavor. Start with sweetened shredded coconut—it’s the heart of the filling, bringing sweetness and texture. Opt for a high-quality sweetened condensed milk to bind everything together with rich, caramel notes. A dash of pure vanilla extract rounds out the flavor profile, adding warmth and depth.
The chocolate coating is just as important. Choose between semi-sweet or dark chocolate chips based on your preference. For a smoother finish, consider adding a touch of coconut oil. This not only enhances the shine but also complements the coconut filling beautifully.
Now, let’s talk about making these bars party-perfect! For a festive twist, sprinkle some toasted coconut flakes on top while the chocolate is still soft. This adds a delightful crunch and an extra layer of flavor. If you’re feeling adventurous, incorporate chopped almonds into the filling to mimic the beloved Almond Joy. For a vegan-friendly version, swap out the regular condensed milk for a non-dairy alternative, and make sure your chocolate chips are vegan as well.
These variations ensure your Homemade Coconut Mounds Bars are not only a hit at parties but also versatile enough to suit any crowd. Whether you’re hosting a holiday gathering or simply enjoying a quiet night in, these indulgent treats are sure to please. If you’re looking for more chocolatey inspiration, check out our Chocolate Truffles and No-Bake Chocolate Cheesecake recipes.

Serving of Homemade Coconut Mounds Bars
Conclusion
Making these Homemade Coconut Mounds Bars is like crafting little bites of happiness that bring people together. I remember the first time my family gathered around the kitchen island, sneaking bites of the creamy coconut filling before it even met the chocolate. The laughter, the sticky fingers, the sweet indulgence—all of it made for a special, unforgettable afternoon.
I hope this recipe not only fills your home with the comforting aroma of chocolate and coconut but also creates new memories for you and your loved ones. Whether it’s a quiet evening treat or a joyful potluck surprise, these bars are sure to delight everyone who tries them.
I encourage you to give this recipe a whirl and let its magic unfold in your kitchen. Don’t forget to share your creations and tag us—we’d love to see your versions! For more delicious recipes and sweet inspirations, follow us on social media. Happy baking!
What are Homemade Coconut Mounds Bars?
Homemade Coconut Mounds Bars are delightful chocolate treats featuring a creamy coconut filling enveloped in rich chocolate. Inspired by the classic candy bar, they’re simple to make at home using just a few pantry staples. The result is a nostalgic, indulgent dessert that brings back fond memories with every bite.
Can I use unsweetened coconut instead of sweetened shredded coconut?
While you can use unsweetened coconut, it will alter the sweetness and texture of your bars. The original recipe is crafted for sweetened shredded coconut to ensure the filling is moist and flavorful. If you prefer a less sweet option, consider adding a bit more sweetened condensed milk to balance it out.
How should I store Homemade Coconut Mounds Bars?
Store these bars in an airtight container in the refrigerator for freshness up to 1 week. If you’re planning to keep them longer, freezing is an excellent option. They can be enjoyed straight from the freezer or allowed to thaw slightly, offering a perfect texture for any sweet craving.

Homemade Coconut Mounds Bars
Ingredients
Ingredients
- 3 cups sweetened shredded coconut
- 1 can 14 oz sweetened condensed milk
- 1/2 teaspoon pure vanilla bean paste
- Pinch of salt
- 2 1/2 cups semi-sweet or dark chocolate chips
- 1 tablespoon coconut oil optional
Instructions
- In a large mixing bowl, combine the shredded coconut, sweetened condensed milk, vanilla bean paste, and salt. Stir until thick and sticky.
- Line an 8x8-inch baking pan with parchment paper. Press the coconut mixture evenly into the pan. Freeze for 30 minutes until firm.
- Once firm, lift the filling from the pan and cut into 12 to 16 bars. Return to the freezer.
- In a microwave-safe bowl, combine chocolate chips and coconut oil. Microwave in 30-second intervals, stirring until smooth.
- Line a baking sheet with parchment paper. Dip each bar into the melted chocolate, coating all sides. Place on the baking sheet.
- Refrigerate bars for 20 to 30 minutes until the chocolate is set.
Notes
- Bars can be stored in the refrigerator for up to 1 week.