The Memory Behind This Treat
The idea for these Tiramisu Brownies was born on a night when I was trying to impress my very opinionated Italian cousin. I had promised tiramisu, but as I opened the fridge, I realized I had no ladyfingers, very little time, and a serious chocolate craving humming in the background. What I did have was a bar of good dark chocolate, a tub of mascarpone, and leftover strong coffee from that afternoon. So I did what any dessert-obsessed person would do: I baked a pan of brownies, cooled them on the windowsill, and layered them with a quick, coffee-kissed mascarpone topping. That first bite tasted like a cozy shortcut version of the tiramisu we grew up with, wrapped in a fudgy hug.
Over the years, these Tiramisu Brownies have become my “peace offering” dessert for family gatherings and slightly chaotic dinner parties. When a cake falls in the middle or a custard refuses to set, I know I can melt chocolate and butter, whisk in sugar and eggs, and have a brownie base in the oven in minutes. Once it cools, that creamy mascarpone and espresso mixture spreads over the top like icing made for grown‑ups—silky, a little boozy if you’d like, and dusted with cocoa just like the classic. I love that they feel special enough for holidays, yet simple enough that you can whip them up on a Tuesday night when you just need something sweet, strong, and unapologetically comforting. Every pan reminds me that some of the best desserts come from those “uh-oh” moments when you have to get a little creative in the kitchen.
How To Make It (Mix & Ingredients)
To build these dreamy Tiramisu Brownies, you’ll first make a rich, classic-style brownie base, then finish with a silky mascarpone-coffee layer. Start by gently melting dark chocolate and unsalted butter together until smooth and glossy; I like using a heatproof bowl set over a pot of simmering water so nothing scorches. Once melted, whisk in the granulated sugar while the mixture is still warm—this helps dissolve the sugar and gives you that shiny, crackly top. Let it cool just a bit so you don’t scramble the eggs, then beat in the eggs one at a time until the batter looks thick and luscious. Sift in the all-purpose flour and fold it in just until no dry streaks remain; over-mixing here can turn your fudgy brownies into tough little bricks.
Instructions Process of Tiramisu Brownies
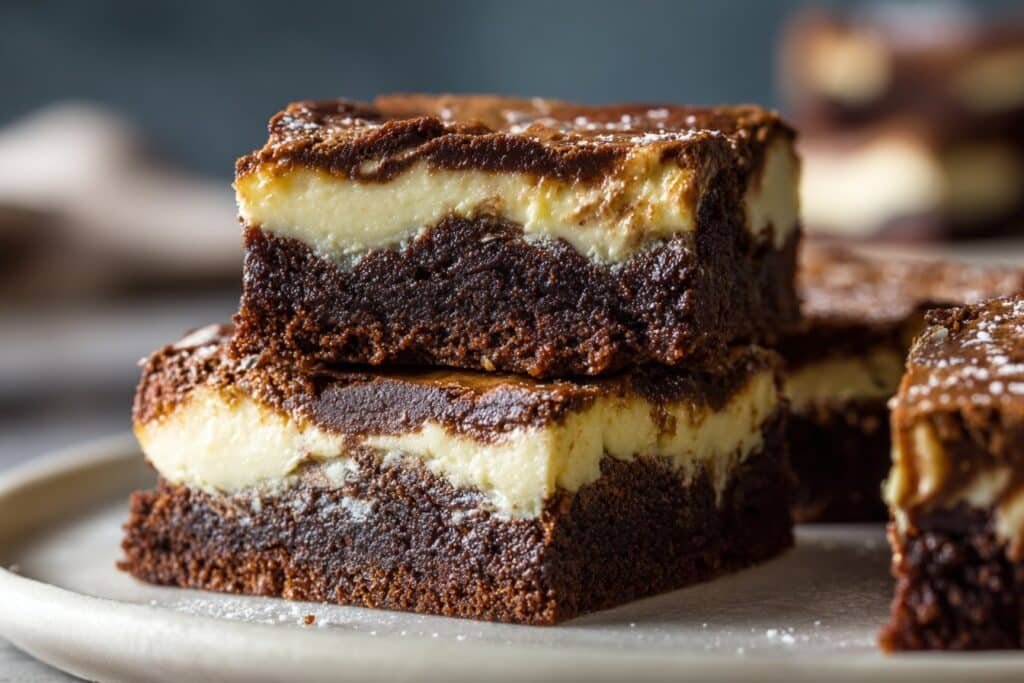
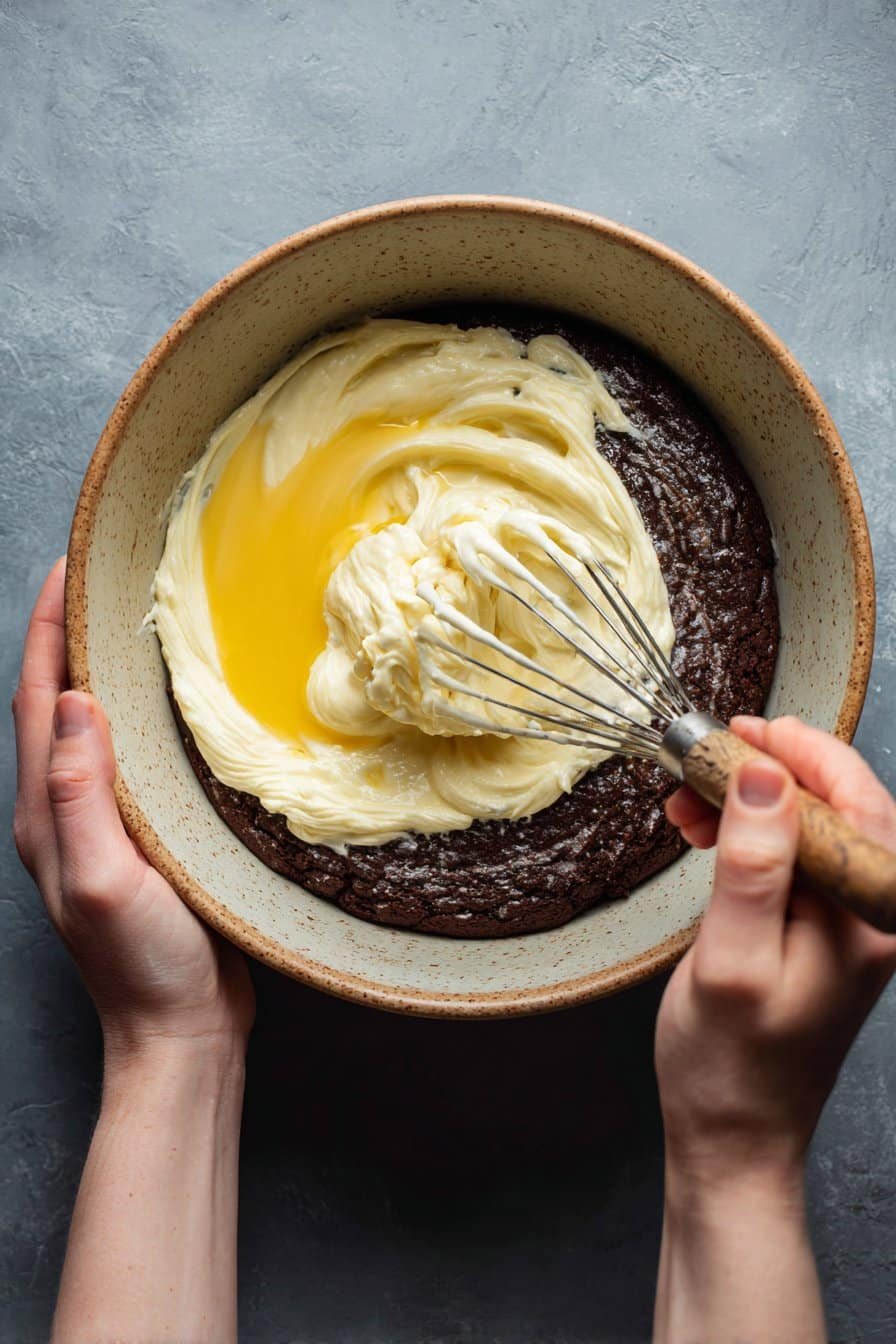
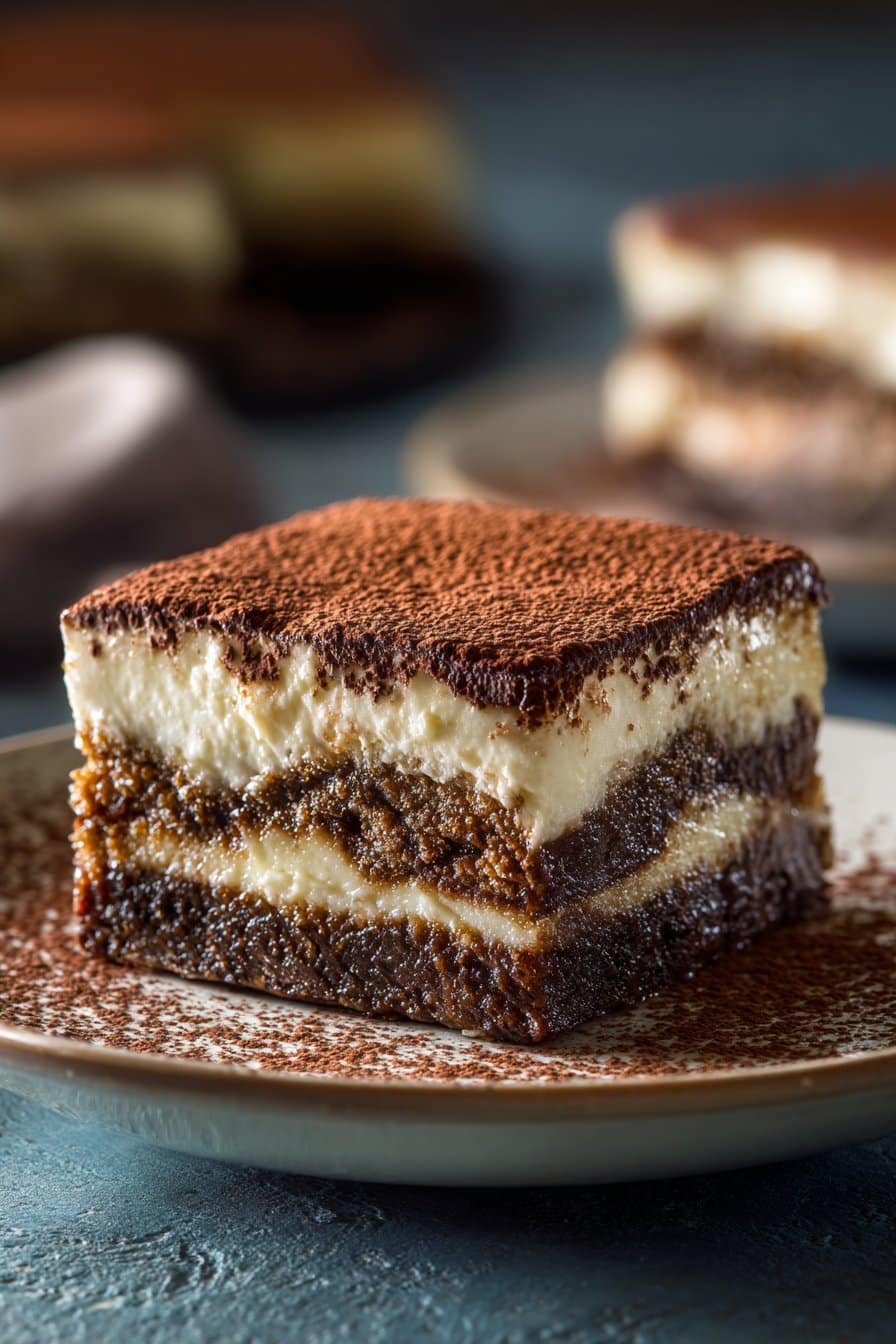
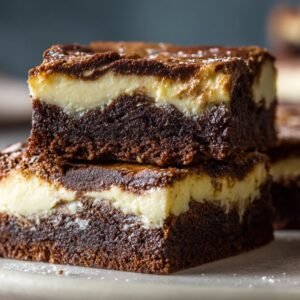
For the “tiramisu” part of your Tiramisu Brownies, you’ll whisk together mascarpone cheese, strong brewed coffee or espresso, and a splash of coffee liqueur if you like a grown-up kick. The mixture should be creamy and spreadable—like a thick yogurt. If you can’t find mascarpone, cream cheese at room temperature works in a pinch, just beat it very smooth so you don’t end up with tiny lumps in your topping. Once your brownie base is baked and completely cooled, spread that coffee-kissed mascarpone layer right to the edges, cover the pan, and chill it so everything can firm up and the flavors settle in. Before serving, slice with a hot knife (wipe between cuts) and finish with a dusting of unsweetened cocoa powder for that classic tiramisu look and flavor.
Make-Ahead & Storage
Tiramisu Brownies are actually better when made ahead, because the coffee and mascarpone have time to soak into the chocolate base. For a dinner party, I like to bake the brownies in the morning, cool them completely, add the mascarpone-coffee layer, then chill for at least 4 hours or overnight. If you’re planning ahead by a full day, keep the pan covered tightly with plastic wrap or a lid so the mascarpone doesn’t absorb fridge odors. For clean slices, chill the brownies fully, then cut with a hot, dry knife right before serving. You can always dust with fresh cocoa after slicing so the tops stay pretty and don’t smudge.
In the refrigerator, these Tiramisu Brownies keep well for 3–4 days. Store them in an airtight container, either in the original pan tightly wrapped or layered in a container with parchment between layers to protect the mascarpone topping. Because of the mascarpone and coffee, I don’t recommend storing them at room temperature for more than 1–2 hours—treat them like you would cheesecake. If you need to freeze them, slice and freeze on a baking sheet until firm, then wrap each brownie in plastic and place them in a freezer bag for up to 2 months. Thaw in the fridge overnight, then freshen them up with a light cocoa dusting before serving so they look as luxurious as they taste.
Best Ingredients & Party Variations
For the most irresistible Tiramisu Brownies, start with good building blocks. Use high-quality dark chocolate (at least 60% cocoa) so the brownie base tastes deep and fudgy, not flat or overly sweet. Real mascarpone gives you that classic tiramisu tang and silkiness, but cream cheese works if you soften it well and whisk until completely smooth. Choose strong brewed coffee or espresso, cooled to room temperature, so it doesn’t loosen the mascarpone layer too much. And don’t skip the unsweetened cocoa powder dusting on top—that’s where a lot of that “real tiramisu” flavor shows up, both in taste and looks.
Once you’ve nailed the basics, you can play with party-ready twists. For adults, add the full coffee liqueur and cut the pan into tiny squares for rich bite-size dessert “truffles.” For a family-friendly version, skip the alcohol and swirl in a little vanilla or almond extract instead. You can also bake the brownie layer in a lined muffin tin for mini Tiramisu Brownie cups, then pipe the mascarpone mixture on top like frosting for a more formal dessert tray. If you love a layered dessert moment, serve small squares over a spoonful of lightly sweetened whipped cream, or alongside a scoop of vanilla gelato so the warm-cold contrast really makes the chocolate and coffee pop.
Serving of Tiramisu Brownies
Conclusion
If you’re anything like me, dessert isn’t just something sweet after dinner—it’s a tiny celebration at the end of the day. These Tiramisu Brownies feel like that kind of treat. You get the comfort of a fudgy brownie, the elegance of tiramisu, and the cozy ritual of whisking, layering, and sharing. I love how a simple pan of brownies can turn an ordinary evening into a little occasion, whether you’re serving them after a Sunday meal, bringing them to a potluck, or sneaking one with your afternoon coffee.
I hope you’ll give these a spot in your regular baking rotation and make your own memories with them. Let them be the dessert you bake for birthdays when you’re short on time, for date nights at home, or for that friend who always orders tiramisu at every restaurant. When you pull the pan from the oven and spread on that dreamy mascarpone layer, you’re not just making dessert—you’re creating a moment worth lingering over.
For more delicious recipes like this, follow us on social media!
What makes these Tiramisu Brownies different from regular brownies?
Tiramisu Brownies layer a classic fudgy brownie base with a creamy, coffee-kissed mascarpone topping, so you get both chocolate bliss and tiramisu elegance in one bite. The bottom is rich and dense from dark chocolate and butter, while the top stays light, silky, and just sweet enough. Strong brewed coffee or espresso flavors the mascarpone so it really tastes like tiramisu, not just “coffee brownies.” A final dusting of cocoa powder adds that traditional tiramisu look and a touch of bitterness to balance the sweetness.
Can I customize the coffee and alcohol levels in Tiramisu Brownies?
Absolutely—you’re in charge of how bold the coffee flavor is. For a stronger coffee kick, use espresso and reduce any added sugar slightly in the mascarpone layer so it doesn’t get too sweet. For a milder version, use strong coffee instead of espresso and add a splash of cream to soften the flavor. The coffee liqueur is completely optional: use the full amount for a grown-up dessert, reduce it by half for a hint of warmth, or skip it entirely and replace it with more coffee for a family-friendly pan.
How do I get the perfect texture in the brownie layer and mascarpone topping?
For the brownie base, melt the chocolate and butter just until smooth, then mix in the sugar and eggs gently so you don’t whip in too much air. Bake only until a toothpick comes out with a few moist crumbs; if it’s completely clean, the brownies will be drier and less fudgy. Let the brownies cool completely before adding the mascarpone topping, or the dairy will loosen and slide. Whisk the mascarpone mixture until creamy but not runny; if it feels thin, chill it for 10–15 minutes before spreading.
Recipe
Tiramisu Brownies
Ingredients
Ingredients
- 8 oz dark chocolate chopped
- 1/2 cup unsalted butter cut into pieces
- 1 cup granulated sugar
- 3 large eggs at room temperature
- 1 cup all-purpose flour
- 1/4 tsp fine sea salt
- 8 oz mascarpone cheese at room temperature
- 1/2 cup strong brewed coffee or espresso cooled
- 2 tbsp coffee liqueur
- 2 tbsp unsweetened cocoa powder for dusting
Instructions
- Preheat the oven to 350°F. Lightly grease a 9x13-inch baking pan and line the bottom with parchment paper.
- Place the chopped dark chocolate and butter in a heatproof bowl set over a pot of gently simmering water, making sure the bowl does not touch the water. Stir until completely melted and smooth, then remove from heat.
- While the chocolate mixture is still warm, whisk in the granulated sugar until well combined and glossy. Let the mixture cool for 2 to 3 minutes.
- Add the eggs one at a time, whisking well after each addition until the batter is thick and smooth.
- Sift the flour and salt over the chocolate mixture and fold gently with a spatula just until no dry streaks of flour remain.
- Pour the brownie batter into the prepared pan and spread it into an even layer.
- Bake for 30 minutes, or until a toothpick inserted near the center comes out with a few moist crumbs but no wet batter.
- Transfer the pan to a wire rack and let the brownies cool completely in the pan.
- In a mixing bowl, whisk together the mascarpone, cooled brewed coffee or espresso, and coffee liqueur until smooth, creamy, and slightly thickened.
- Spread the mascarpone mixture evenly over the cooled brownie layer, smoothing the top with an offset spatula.
- Cover the pan tightly with plastic wrap and refrigerate for at least 2 hours, or until the topping is set and chilled.
- When ready to serve, use a sharp knife run under hot water and wiped dry to cut the brownies into 12 squares.
- Just before serving, dust the tops evenly with unsweetened cocoa powder and transfer the brownies to a serving plate.
Notes
- For the cleanest slices, chill the brownies well and wipe the knife clean between each cut.
- Store leftover brownies covered in the refrigerator for up to 4 days.
- For a stronger coffee flavor, replace some of the brewed coffee with additional espresso.
- If you prefer to omit alcohol, replace the coffee liqueur with an equal amount of brewed coffee.