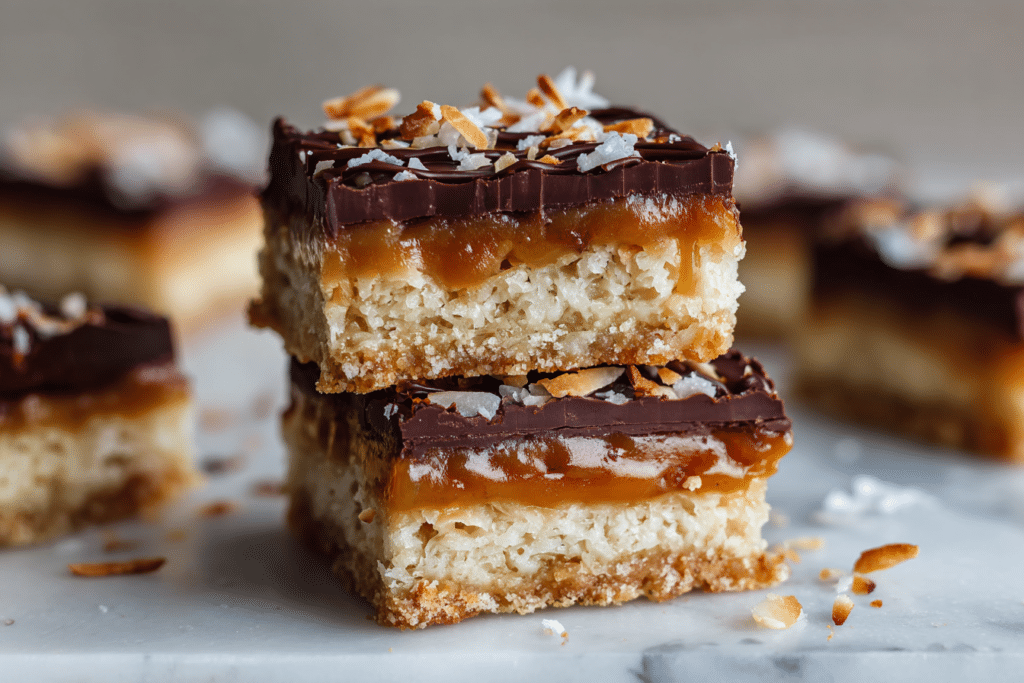
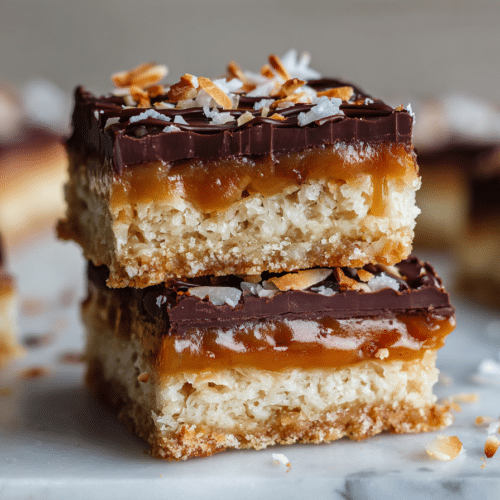
Samoa Cookie Bars bring all the best parts of the classic cookie into one pan, without the fussy shaping or dipping. You get a buttery shortbread base, chewy caramel soaked coconut on top, and a firm layer of chocolate that snaps when you bite into it. The flavor leans rich and toasty, with deep caramel notes and just enough salt to keep each square from feeling cloying. This recipe works especially well for bake sales, potlucks, or any time you want something that looks impressive but relies on straightforward steps and supermarket ingredients.
In the sections ahead, you will see exactly why these bars earn a spot in regular rotation, along with what to expect from each layer in terms of texture and taste. We will walk through the key ingredients, like which caramel holds up best, how to toast coconut so it tastes nutty instead of burnt, and what chocolate gives you a clean slice. Then we will move into a clear, step by step method so you know when the crust is done, how to handle the warm caramel, and how long to chill before cutting. Finally, you will get practical guidance on make ahead timing, how to store the bars without soggy bottoms or weeping caramel, and a few serving ideas, from tidy squares to crumbled over ice cream.
Why You Will Love Samoa Cookie Bars
Samoa Cookie Bars give you all the flavor of the classic cookie without the fuss of individual scooping and shaping. You get a buttery shortbread base that bakes up crisp at the edges and just tender in the center, sturdy enough to hold a generous layer of chewy caramel coconut. A final drizzle of melted chocolate, plus a thin chocolate layer on the bottom if you like, brings in that familiar candy bar snap. The bars slice cleanly once chilled, so they work just as well on a bake sale tray as they do on a holiday dessert plate.
The flavor profile of these Samoa Cookie Bars leans rich and toasty, not cloying. Lightly browned coconut and caramel give you deep, nutty notes, while the shortbread keeps things balanced with a simple buttery backbone. A mix of semisweet and milk chocolate creates a rounded chocolate flavor, though you can use all dark chocolate if you prefer less sweetness. A small pinch of salt in both the crust and caramel keeps the sweetness in check and makes the coconut taste more pronounced.
From a practical standpoint, Samoa Cookie Bars save time and headache compared to traditional cookies. You press one pan of dough, bake once, then layer the caramel coconut mixture right on top, so there is no chilling, no scooping, and no rotating multiple trays. The bars hold up well at room temperature, so you can bake them the day before and slice just before serving. They travel neatly in the pan or in a lidded container, which makes them a smart choice for potlucks and school events.
These Samoa Cookie Bars also give you room to adjust for your kitchen and your crowd. You can toast the coconut more deeply for a stronger flavor, or keep it pale for a softer chew. If you need to avoid nuts, you can skip any nut garnish entirely and still get plenty of texture from the coconut. Cut them small for a rich bite size treat, or into larger rectangles and stack them like bakery bars on a platter.
Ingredients and Flavor Notes
Samoa Cookie Bars lean on simple pantry ingredients, but each one has a clear job. The base usually starts with all purpose flour, softened butter, sugar, and a pinch of salt, which bakes into a shortbread style crust that stays tender yet sturdy enough to hold the caramel coconut layer. Use unsalted butter so you can control the salt, and choose granulated sugar for a crisp, clean crumb. If you need a gluten free option, a good quality 1 to 1 baking flour works, but chill the unbaked crust 15 to 20 minutes so it does not spread too much in the oven. A splash of vanilla in the crust adds a gentle warmth that keeps the bars from tasting flat.

The caramel coconut layer is where Samoa Cookie Bars earn their name. You can use soft store bought caramels melted with a bit of heavy cream, or make a simple stovetop caramel with sugar, butter, and cream if you are comfortable watching the color closely. Stir in toasted shredded coconut, not raw, so you get that nutty, roasty edge instead of a flat sweetness. Sweetened shredded coconut gives the classic flavor, but if you only have unsweetened, add an extra tablespoon or two of brown sugar to the caramel. The mixture should be thick but spreadable, like warm peanut butter, so it sets in a chewy, sliceable layer.
Chocolate finishes the bars and balances all the sugar. Semi sweet chocolate chips or chopped chocolate work best, since milk chocolate can tip the bars into cloying territory. Melt the chocolate gently, either in short microwave bursts or over a double boiler, and spread a thin, even layer over the cooled caramel coconut before it fully sets so the layers bond. For the classic Samoa Cookie Bars look, reserve a bit of chocolate to drizzle over the top in thin lines. A light sprinkle of flaky sea salt on the chocolate is optional but smart, since it sharpens the caramel notes and keeps each square from tasting heavy after the second bite.
How to Make Samoa Cookie Bars with Caramel Coconut and Chocolate
Start with the shortbread base, since it anchors the Samoa Cookie Bars. Line a metal 23 by 33 centimeter pan with parchment, letting it overhang for easy lifting. Cream softened butter with sugar and a pinch of salt until it looks pale and fluffy, then beat in vanilla. Gently mix in the flour on low speed or by hand so the dough stays tender, and press it evenly into the pan with lightly floured fingers or the bottom of a measuring cup. Dock the surface with a fork a few times, then bake at 175°C until the edges turn light golden and the center looks set, usually 18 to 22 minutes. Let the crust cool until just warm, not hot, so the topping grips without turning soggy.

While the crust bakes, toast the coconut on a parchment lined tray in the same oven, stirring every few minutes until it turns mostly golden with a few deeper brown edges. Keep a close eye on it, since coconut goes from perfect to burnt very quickly. For the caramel layer, gently melt soft caramels with a splash of cream over low heat, stirring until smooth and thick but still pourable. Fold most of the toasted coconut into the warm caramel, reserving a small handful for sprinkling, then spread this mixture over the warm shortbread in an even layer, pressing it down with a greased spatula so it adheres. Chill the pan for 20 to 30 minutes, just until the caramel firms enough to cut cleanly.
For the chocolate finish, melt chocolate chips or chopped chocolate with a teaspoon or two of neutral oil until glossy and smooth. Lift the slab of Samoa Cookie Bars from the pan, then cut into neat squares or bars before glazing, wiping the knife between cuts for tidy edges. Dip the bottoms of the bars into a thin layer of melted chocolate on a parchment lined tray if you want the classic cookie effect, or simply spread a chocolate layer over the top. Drizzle extra chocolate in thin lines across the surface for a bakery style look, then sprinkle on the reserved toasted coconut. Let the chocolate set at room temperature until firm to the touch before stacking or storing.
Make-Ahead, Storage, and Serving Tips
You can make Samoa Cookie Bars in stages, which helps if you are juggling work, kids, or other baking projects. Bake the shortbread base up to 2 days ahead, cool it completely, then wrap it tightly in plastic and keep it at room temperature. You can also toast the coconut in advance and store it in an airtight container so it stays crisp and ready for the caramel. If you want to go fully make ahead, assemble the bars, chill until firm, then slice and freeze them on a tray before packing them into containers with parchment between layers.

For storage, keep Samoa Cookie Bars in an airtight tin or container at cool room temperature for 3 to 4 days, or refrigerate for up to a week. The caramel firms up in the fridge, so let the bars sit out for about 15 minutes before serving for the best chewy texture. If your kitchen runs hot and the chocolate drizzle wants to smear, store the bars in the refrigerator and cut them straight from cold with a sharp knife. To freeze, wrap the slab or individual bars in plastic, then in foil, and freeze for up to 2 months, thawing in the fridge overnight.
Troubleshooting is simple with Samoa Cookie Bars. If the shortbread layer seems too crumbly when you slice, it probably needed a slightly firmer press into the pan or a few extra minutes in the oven, so next time really pack it down and bake until the edges are lightly golden. If the caramel coconut layer slides off, the base may have cooled too much, so try spreading the topping while the shortbread is just barely warm. For overly firm caramel, warm the whole slab briefly at room temperature, then use a hot, dry knife to cut clean bars.
You can customize Samoa Cookie Bars without losing their character. Swap part of the shredded coconut for chopped toasted pecans or almonds for a nuttier bite, or use dark chocolate instead of milk chocolate for a less sweet finish. A pinch of flaky sea salt on top of the chocolate drizzle adds a nice contrast and keeps the bars from tasting flat. Serve Samoa Cookie Bars in small squares on a platter, or cut them into slim fingers and tuck them into lunch boxes or cookie boxes where they travel well and hold their shape.
FAQ
-
Can I use store bought caramel for Samoa Cookie Bars?
Yes, good quality store bought caramel works very well for Samoa Cookie Bars. Choose a thicker sauce or soft caramel candies that you melt with a splash of cream so the layer sets instead of running. Warm the caramel gently, then spread it over the cooled shortbread in an even layer, right to the edges. If the caramel seems thin, chill it for 10 to 15 minutes before adding the toasted coconut. This helps the bars slice cleanly and keeps the layers distinct. -
How do I keep the shortbread base from getting tough?
Use softened butter, not melted, and mix just until the dough comes together and no dry flour remains. Overmixing develops gluten, which makes the shortbread chewy instead of tender. Press the dough into the pan with light, even pressure, and avoid packing it down too hard. Bake only until the edges turn light golden and the center looks set but pale. Slight underbaking is better than overbaking, since the bars firm up as they cool. -
Can I make Samoa Cookie Bars ahead of time?
Yes, Samoa Cookie Bars actually taste better after they rest for several hours. You can bake and assemble the bars, then chill them, tightly covered, for up to 3 days. For longer storage, freeze the uncut slab, well wrapped, for up to 2 months, then thaw in the fridge overnight. Add the final chocolate drizzle after thawing so it looks fresh and glossy. Let the bars sit at room temperature for about 20 minutes before slicing so the caramel softens slightly. -
How should I cut and serve Samoa Cookie Bars neatly?
Chill the finished bars until the caramel and chocolate layers are firm to the touch. Use a long, sharp knife and run it under hot water, then dry it before each cut for clean edges. Press straight down rather than sawing so you do not drag the coconut and caramel. Cut smaller squares than you think you need, since Samoa Cookie Bars are quite rich. Serve on a cool plate, and keep extras in the fridge if your kitchen is warm so the caramel does not slump.
Conclusion
Samoa Cookie Bars bring together a buttery shortbread base, chewy caramel coconut topping, and crisp chocolate in a way that feels both nostalgic and practical for busy bakers. The strongest trick is to work in stages: bake and cool the crust fully, toast the coconut until it smells nutty and looks golden at the edges, then spread the caramel coconut while it is still warm and pliable. A clean, firm chocolate layer or drizzle finishes everything, and a short chill in the fridge makes slicing into neat squares much easier. Lining the pan with parchment and leaving an overhang turns removal from a wrestling match into a simple lift and cut.
For storage, keep Samoa Cookie Bars in an airtight container at cool room temperature if your kitchen is not too warm, or refrigerate them for longer keeping and sharper edges. Let chilled bars sit out for a few minutes so the caramel softens slightly before serving. Share them on a cookie tray, pack them for a bake sale, or wrap a few for a friend, and they will disappear faster than you expect. In the end, a pan of Samoa Cookie Bars proves that a little planning, some patient cooling time, and good chocolate go a very long way.
Recipe
Samoa Cookie Bars with Caramel Coconut and Chocolate
Ingredients
- 2 cups all-purpose flour spooned and leveled
- 1/2 cup granulated sugar
- 1 cup 2 sticks unsalted butter, softened
- 1/2 tsp fine salt
- 1 tsp vanilla extract
- 11 oz soft caramel candies unwrapped
- 1/3 cup heavy cream
- 3 cups sweetened shredded coconut
- 1/4 tsp fine salt for caramel layer
- 1 tsp vanilla extract for caramel layer
- 2 cups semisweet chocolate chips or chopped semisweet chocolate
- 1/2 cup milk chocolate chips optional, for mixed chocolate flavor
Instructions
- Preheat the oven to 350°F. Line a 9x13-inch baking pan with parchment paper, leaving overhang on the long sides for easy lifting. Lightly grease the parchment.
- Make the shortbread base: In a mixing bowl, combine the flour, granulated sugar, 1/2 tsp salt, and 1 cup softened butter. Beat or stir until the mixture forms a soft, even dough. Mix in 1 tsp vanilla extract.
- Press the dough evenly into the prepared pan, smoothing the top and pushing it slightly up to the edges and corners so the layer is level.
- Bake the crust for 18–20 minutes, until the edges are lightly golden and the top looks set and dry. Place the pan on a wire rack to cool slightly while you prepare the topping.
- Toast the coconut: Spread the shredded coconut on a large baking sheet in an even layer. Bake at 350°F for 6–8 minutes, stirring once or twice, until lightly golden and fragrant. Watch closely so it does not burn. Let cool slightly.
- Make the caramel coconut layer: In a medium saucepan over low to medium-low heat, combine the unwrapped caramels and heavy cream. Stir constantly until the caramels are fully melted and the mixture is smooth.
- Remove the caramel from the heat and stir in the toasted coconut, 1/4 tsp salt, and 1 tsp vanilla extract. The mixture should be thick but spreadable, similar to warm peanut butter.
- Assemble the bars: While the crust is still just warm (not hot), dollop the caramel coconut mixture over the shortbread. Use a greased spatula or the back of a spoon to gently spread it into an even layer, pressing lightly so it adheres to the crust. Let cool to room temperature, about 20–30 minutes.
- Melt the chocolate: Place the semisweet chocolate chips and milk chocolate chips (if using) in a heatproof bowl. Microwave in 20–30 second bursts, stirring after each, until just melted and smooth. Alternatively, melt over a double boiler on the stove.
- Spread the chocolate over the cooled caramel coconut layer, reserving 2–3 tablespoons if you want a decorative drizzle. Smooth into a thin, even layer that fully covers the surface.
- If drizzling, rewarm the reserved chocolate briefly if needed, transfer it to a small piping bag or a zip-top bag with a tiny corner snipped off, and drizzle over the top in thin lines.
- Chill the pan in the refrigerator for 45–60 minutes, or until the chocolate is firm and the bars are well set.
- Use the parchment overhang to lift the slab from the pan onto a cutting board. Let sit at room temperature for 5–10 minutes to soften slightly, then use a sharp knife to cut into 24 bars or smaller bite-size squares. Wipe the knife between cuts for clean edges.
Notes
If using unsweetened shredded coconut, add 1–2 tablespoons packed brown sugar to the melted caramel before stirring in the coconut.
For a firmer chocolate snap, use all semisweet or dark chocolate instead of including milk chocolate.
To make ahead, prepare the bars up to 2 days in advance. Store tightly covered at room temperature in a cool spot, or refrigerate for longer storage and let soften slightly before serving.
For very neat squares, score the chocolate lightly with a warm knife before it fully hardens, then finish cutting once completely set.