The Memory Behind This Treat
The first time I made Red Velvet Cinnamon Rolls, it wasn’t for Valentine’s Day or a special brunch—it was for a slightly chaotic Tuesday night. I’d promised my niece “something red and fancy” after her school play, and the only thing in my pantry that fit the bill was a half-empty bottle of red food coloring and a block of cream cheese. I already had my go-to cinnamon roll dough memorized, so I thought, Why not borrow the cocoa and tang from my favorite red velvet cake and swirl it into something cozy? As the dough rose on the counter, streaked with that dramatic red hue, the whole kitchen smelled like a bakery tucked inside a chocolate shop. By the time she walked in, stage makeup still smudged on her cheeks, those rolls were puffed, glossy, and begging for that thick cream cheese icing.
What I love most about these Red Velvet Cinnamon Rolls is that they feel special without being fussy. Underneath the color, it’s the same comforting process: warm milk to wake up the yeast, a soft, slightly sticky dough that clings to your fingers, and that familiar moment where you press brown sugar and cinnamon into a buttery sheet of dough and hope it doesn’t all spill out as you roll. The cocoa and vinegar give it that classic red velvet tang, but it’s the swirl of cinnamon that keeps it grounded and homey. I think of these rolls as what happens when a bakery-style cinnamon roll and a birthday cake decide to meet in the middle of your kitchen and make your morning better. Every time I make them now—usually alongside a pan of classic cinnamon rolls or a batch of chocolate chip banana bread—they still feel a little like a celebration, even if it’s just breakfast on an ordinary Sunday.
How To Make It (Mix & Ingredients)
To make these Red Velvet Cinnamon Rolls, you’ll start by waking up your yeast in warm milk (think baby-bottle warm, about 105–110°F). Sprinkle in the yeast and a pinch of sugar, then let it sit until foamy; if it doesn’t puff up after 10 minutes, your yeast may be dead and it’s worth starting over. Whisk in the remaining sugar, eggs at room temperature, melted butter, vanilla bean paste, and that little splash of vinegar that gives classic red velvet its gentle tang. When you add the cocoa powder, flour, salt, and red food coloring, start with the lower amount of flour and mix until a soft, slightly sticky dough forms. You want it tacky but not gluey—if it’s clinging to your hands in big wet patches, add flour 1 tablespoon at a time until it just pulls away from the bowl. A 5–7 minute knead (by hand or mixer) builds enough gluten to give you those pillowy, bakery-style spirals.
Instructions Process of Red Velvet Cinnamon Rolls
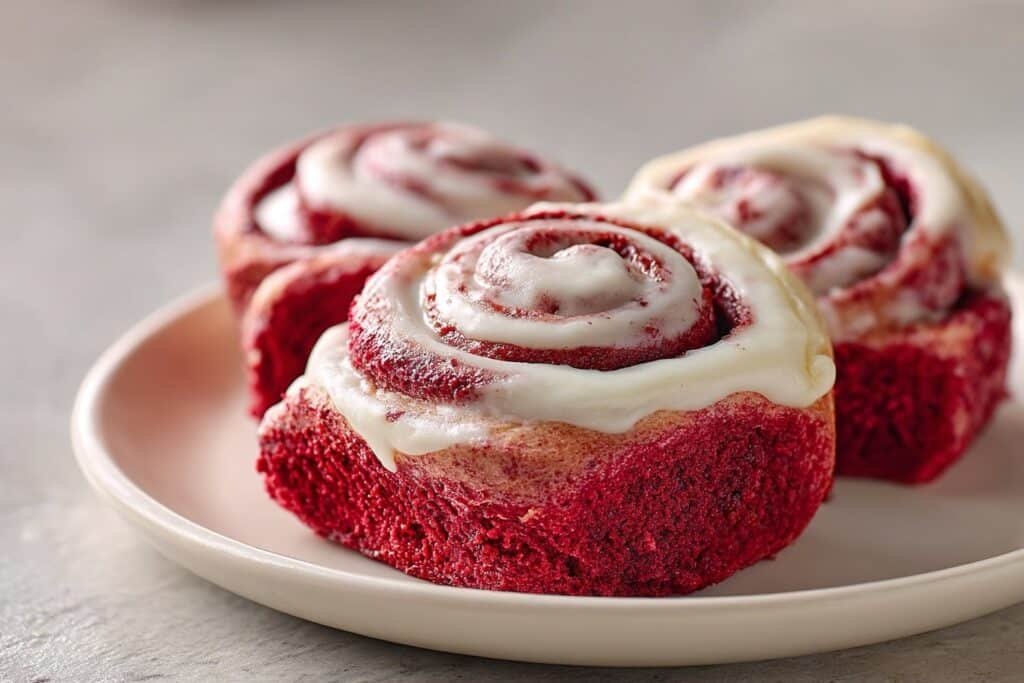
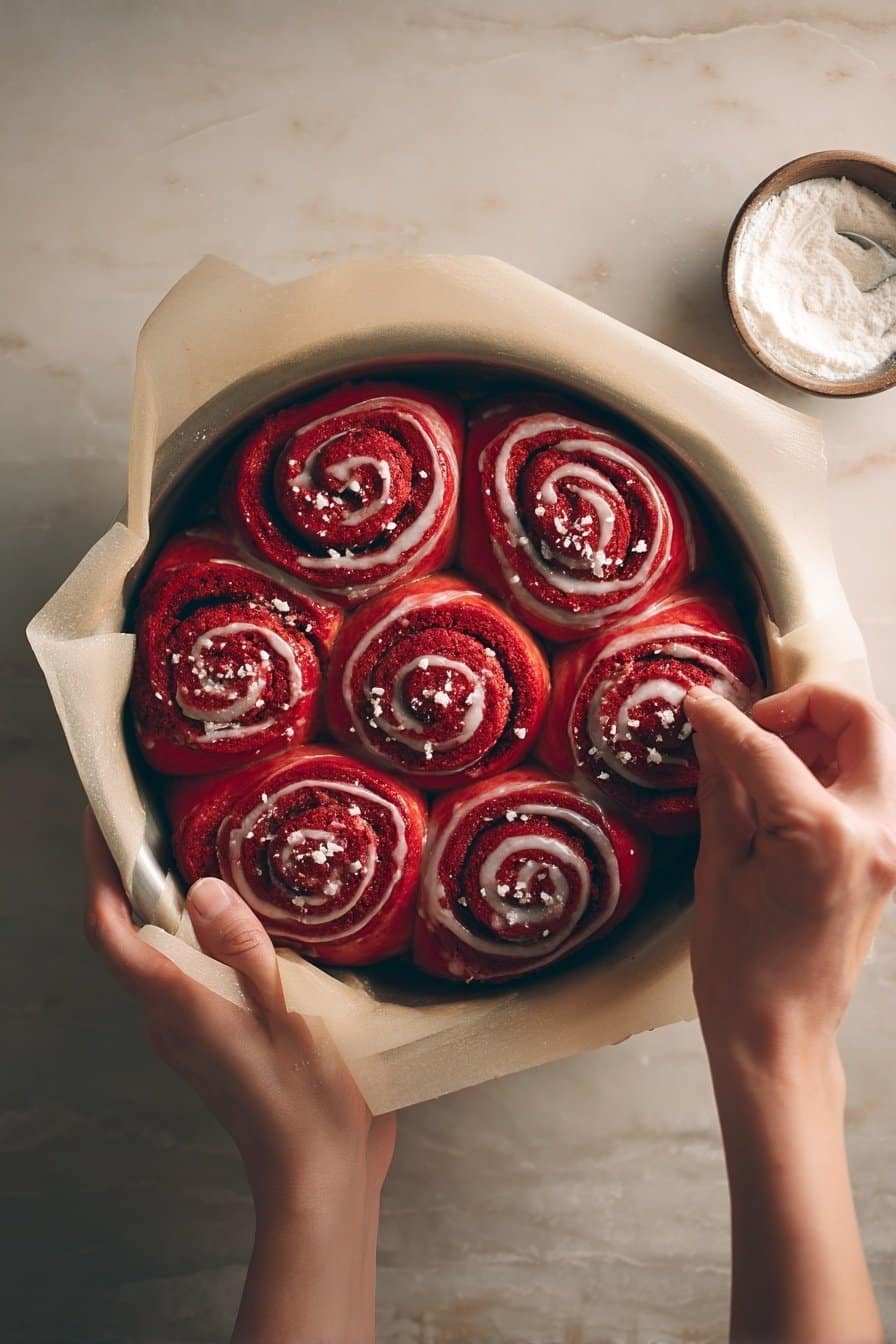
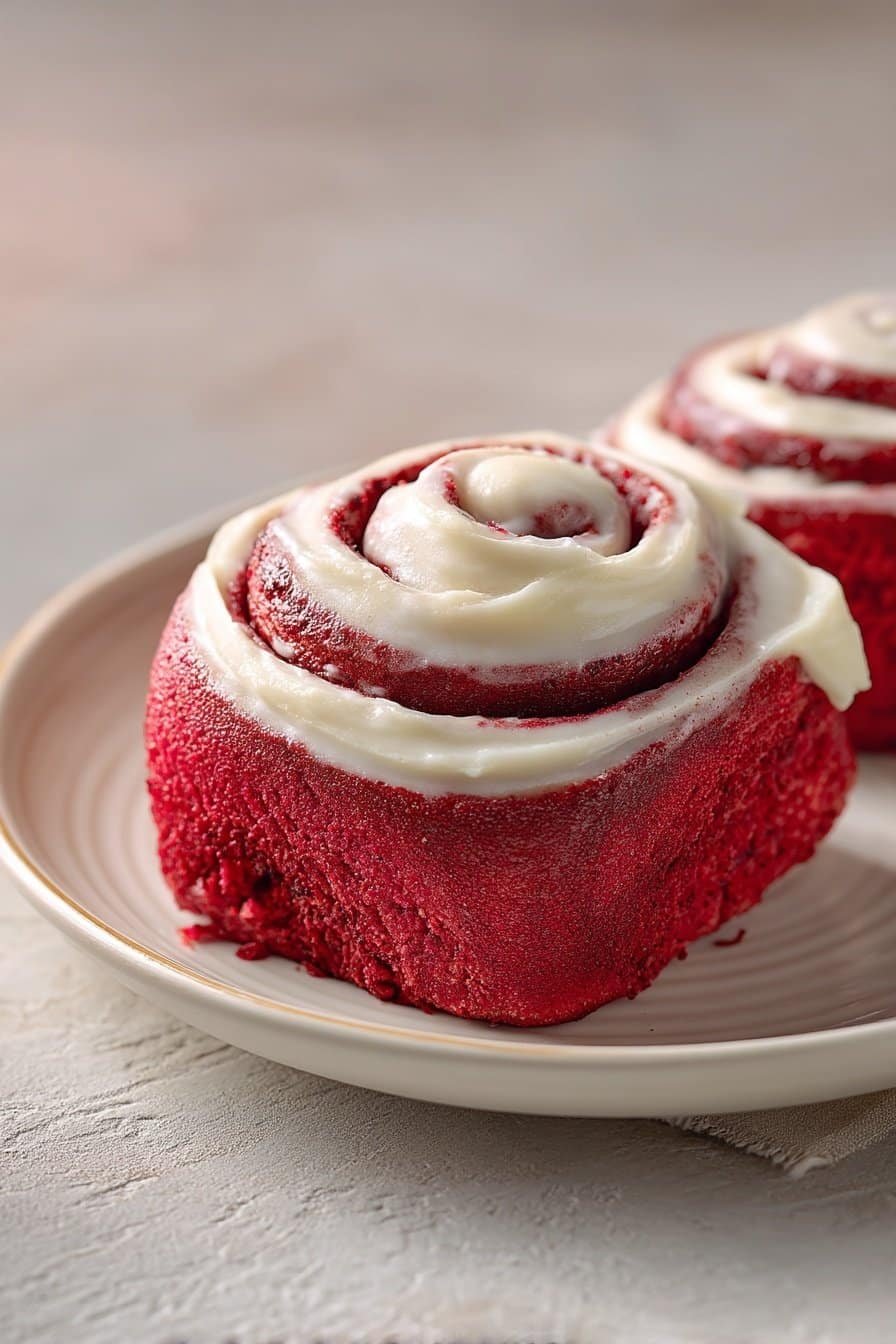
Once your Red Velvet Cinnamon Rolls dough is smooth and elastic, tuck it into a lightly greased bowl, cover it, and let it rise until doubled—usually about 1 hour in a warm kitchen. While it puffs, stir together the brown sugar and cinnamon, and set out your softened butter so it spreads like cold cream cheese, not rock-hard or melted. Roll your dough into a big rectangle (aim for about 16×21 inches), spread on the butter edge to edge, then shower it with the cinnamon-sugar mixture so every bite has filling. Roll it up snugly from the long side, slice into 12 even pieces (a piece of dental floss works better than a knife), and nestle them in your baking dish for a second rise. Bake until the tops are puffed and just turning golden around the edges, then whisk together the cream cheese icing with enough milk to make it spreadable. Swirl that icing over the warm rolls so it sinks into every red and cinnamon-swirled layer, the way it does on the best bakery rolls—or on my favorite [cinnamon roll cake] or [red velvet cupcakes] when I want that same cozy flavor.
Make-Ahead & Storage
These Red Velvet Cinnamon Rolls are wonderfully make-ahead friendly, which is great if you’re baking for a holiday brunch or sleepy weekend breakfast. For an overnight option, prepare the dough, fill, roll, and slice the rolls, then nestle them into your baking dish just like you would before the second rise. Instead of letting them rise, cover the pan tightly with plastic wrap and chill for up to 18–24 hours. In the morning, pull the pan from the fridge, remove the plastic, and let the rolls sit at room temperature for 45–60 minutes, until visibly puffy, before baking. You can also bake the rolls completely, cool them, and then frost the next morning for a fresh-looking finish.
For storage, let the Red Velvet Cinnamon Rolls cool until just slightly warm, then cover the pan tightly or transfer leftovers to an airtight container. Because of the cream cheese frosting, I recommend refrigerating after 2 hours at room temperature; they’ll keep well in the fridge for 3–4 days. Warm individual rolls in the microwave for 15–20 seconds, or in a 300°F oven, covered with foil, for about 10 minutes until soft and pillowy again. If you’d like to freeze them, you can freeze baked, unfrosted rolls for up to 2 months: cool completely, wrap the pan in plastic and foil (or use a freezer bag for individual rolls), then thaw overnight in the fridge and warm before frosting. If you ever make a double batch for a special brunch spread, pair these with something simple like banana bread or a classic coffee cake so you can prep as much as possible the day before.
Best Ingredients & Party Variations
Red Velvet Cinnamon Rolls really shine when you start with high-quality basics. Use full-fat dairy where you can: whole milk for the dough and brick-style cream cheese for the frosting give you that plush, bakery-style texture. I like a good-quality unsweetened cocoa powder (not Dutch-processed here) to keep the color vibrant and the flavor gently chocolatey, not bitter. For the food coloring, a gel or liquid gel works best—you’ll need less, and it won’t water down your dough. If you have it, vanilla bean paste adds those tiny specks and a deeper vanilla flavor that stands up beautifully to the cream cheese frosting. And when it comes to yeast, make sure it’s fresh; if it doesn’t get foamy in the warm milk within 5–10 minutes, start over before you waste your butter and flour.
Once you’ve nailed the base, you can dress these Red Velvet Cinnamon Rolls up for any party. For a birthday brunch, scatter mini chocolate chips over the cinnamon-sugar filling and top the warm frosted rolls with colorful sprinkles. For Valentine’s Day, bake them slightly closer together so they kiss and pull apart, then drizzle extra cream cheese icing in a crosshatch and finish with crushed freeze-dried raspberries. Hosting a holiday crowd? Swirl in a spoonful of orange zest into the filling and shower the tops with toasted pecans right after frosting. For a more elegant dessert moment, serve them slightly cooled with a scoop of vanilla ice cream and an extra drizzle of warm cream cheese glaze—very “dessert café,” just at home. And if your crew loves variety, make a half pan of classic cinnamon rolls and a half pan of red velvet; side-by-side, they look like the sweetest little bakery lineup.
Serving of Red Velvet Cinnamon Rolls
Conclusion
Whenever I pull a pan of these Red Velvet Cinnamon Rolls from the oven, my kitchen instantly feels a little more like home. There’s something about that swirl of cocoa-kissed dough, warm cinnamon filling, and creamy frosting that makes people wander in, grab a plate, and stay a little longer than they planned. These aren’t just breakfast rolls; they’re the kind of treat that turns an ordinary morning into a memory.
I hope you feel empowered and excited to jump in, even if you’re new to working with yeasted doughs. Take your time, enjoy the process, and don’t stress about perfection—the slightly wonky rolls are always the ones people reach for first. Share them on a lazy Sunday, for a birthday brunch, or “just because,” and watch how fast your table fills with smiles, second helpings, and “Can I get this recipe?” requests.
For more delicious recipes like this, follow us on social media!
What makes these Red Velvet Cinnamon Rolls unique?
Red Velvet Cinnamon Rolls start with a tender, slightly cocoa-kissed dough that includes red food coloring and a touch of white vinegar for that classic red velvet tang. Unlike classic cinnamon rolls, the chocolate notes are delicate, not rich or muddy, so the cinnamon filling still shines. The vinegar and cocoa also help keep the rolls soft and fluffy after baking. Cream cheese icing ties everything together with that signature red velvet flavor profile. You get the cozy cinnamon-roll comfort with a bakery-style, red velvet twist that feels just a little extra special.
Can I make these Red Velvet Cinnamon Rolls ahead of time?
Yes, these rolls are very make-ahead friendly. Prepare the recipe through shaping the rolls, place them in the baking dish, then cover tightly and refrigerate overnight. In the morning, let the rolls sit at room temperature for about 45–60 minutes, until they’re puffy and a bit jiggly, before baking. You can also bake the rolls completely, cool them, and store them covered at room temperature for 1 day. Just warm gently and glaze with fresh or leftover cream cheese icing before serving.
Do I have to use red food coloring in the dough?
You do not have to use red food coloring, but the rolls will look more like chocolate cinnamon rolls than classic Red Velvet Cinnamon Rolls. If you prefer to skip artificial coloring, you can simply omit it and keep the recipe the same. Natural food colorings or beet powder can work, but they often give a softer hue and can slightly affect flavor. The taste will still have that mild cocoa and vanilla profile even without the red color. Think of the food coloring as a visual treat, not a flavor must.
Recipe

Red Velvet Cinnamon Rolls
Ingredients
Ingredients
- 1 cup warm milk 105–110°F
- 2 1/4 teaspoons active dry yeast
- 1/2 cup granulated sugar
- 2 large eggs room temperature
- 1/4 cup unsalted butter melted and slightly cooled
- 1 teaspoon vanilla bean paste
- 1 teaspoon white vinegar
- 2 tablespoons unsweetened cocoa powder
- 2 3/4 cups all-purpose flour
- 1/2 teaspoon salt
- 2 teaspoons red food coloring
- 1/4 cup unsalted butter softened (for filling)
- 1 cup packed brown sugar
- 3 tablespoons ground cinnamon
- 4 ounces cream cheese softened
- 1/4 cup unsalted butter softened
- 1 cup powdered sugar
- 1/2 teaspoon vanilla bean paste
- 1 1/2 tablespoons milk
Instructions
- In a large bowl, combine the warm milk and yeast and let sit for 5–10 minutes until foamy.
- Whisk in the granulated sugar, eggs, melted butter, vanilla bean paste, and white vinegar until smooth.
- Add the cocoa powder, 2 1/2 cups of the flour, salt, and red food coloring, and mix until a soft dough forms.
- Add the remaining flour a little at a time and knead for 5–7 minutes, until the dough is smooth, elastic, and only slightly sticky.
- Place the dough in a lightly greased bowl, cover, and let rise in a warm place for about 1 hour, or until doubled in size.
- In a small bowl, stir together the brown sugar and cinnamon for the filling and set aside; ensure the softened butter for the filling is spreadable.
- Gently punch down the risen dough and turn it out onto a lightly floured surface.
- Roll the dough into a 16×21-inch rectangle with the long side facing you.
- Spread the softened butter for the filling evenly over the dough, leaving a small border on the edges.
- Sprinkle the brown sugar and cinnamon mixture evenly over the buttered dough, pressing it lightly into the surface.
- Starting from the long edge, roll the dough up tightly into a log, pinching the seam to seal.
- Cut the log into 12 equal pieces and place them, cut side up, in a greased 9×13-inch baking dish.
- Cover the dish and let the rolls rise for 30 minutes, or until puffy and touching.
- Preheat the oven to 350°F while the rolls finish rising.
- Bake the rolls for 20–25 minutes, or until the centers are cooked through and the edges are lightly golden.
- While the rolls bake, beat together the cream cheese and softened butter for the icing until smooth and creamy.
- Add the powdered sugar and vanilla bean paste to the cream cheese mixture and beat until fully combined.
- Add the milk gradually and mix until the icing is smooth and spreadable.
- Remove the baked rolls from the oven and let cool for 10 minutes.
- Spread the cream cheese icing over the warm rolls and serve.
Notes
- If slicing with dental floss, slide it under the log, cross the ends over the top, and pull to cut clean rolls.