Why This Recipe Works
This Raspberry Zinger Poke Cake borrows all the best tricks from old school bakery cakes and wraps them in a very low stress method. You start with a reliable box mix, which gives you a soft, even crumb that can stand up to soaking without falling apart. Poking the warm cake with the end of a wooden spoon creates little flavor channels, so the raspberry agar agar powder mixture seeps deep into the cake instead of just sitting on top. Every bite tastes moist and fully saturated with fruity flavor, not like dry cake hiding under a wet topping.
The layered raspberry effect is what makes this taste truly bakery style. The liquid agar agar powder brings that bright, clear raspberry note and beautiful color inside the cake, while the warmed seedless jam adds a richer, almost jammy stripe on top that nestles under the whipped topping. Using a tub of whipped topping instead of freshly whipped cream keeps the texture stable and fluffy for hours in the fridge. That steady, cloudlike top makes this perfect for potlucks, parties, and make ahead desserts like my strawberry sheet cake and easy Easter poke cake. The sweetened shredded coconut on top gives you that classic Zinger look and adds chewy texture that balances the very soft cake and pillowy topping.
From a baker’s perspective, this recipe behaves like a dream. The chilling time does the hard work for you and lets the flavors settle in, so the Raspberry Zinger Poke Cake actually tastes better after it rests. The ingredients are pantry friendly, and you assemble everything right in a 23 by 33 centimeter pan. That means no stacking, no crumb coat, and no fragile layers to babysit. You get a nostalgic, bakery worthy pan of cake that feels special, but the method stays simple enough for a busy weeknight or a baking session with kids helping in the kitchen.
How to Make It
You will start this Raspberry Zinger Poke Cake just like a classic sheet cake, which keeps things simple and familiar. Mix the boxed white cake according to the package directions, then spread the batter into a greased 23 by 33 centimeter pan. Smooth the top so it bakes evenly. Bake until the top looks lightly golden and a toothpick comes out clean. Let it cool on a rack for about 10 to 15 minutes. The cake should feel warm, not hot. While it is still warm, take the handle of a wooden spoon and poke holes all over the surface. Aim for holes about 2 centimeters apart so the raspberry mixture can sink in and give you that true bakery style look when you slice it.
Next, whisk the raspberry agar agar powder with boiling water in a heat safe bowl until it fully dissolves. Scrape the sides and bottom so no dry bits hide. Stir in the cold water so the mixture cools slightly. Slowly pour this liquid evenly over the warm cake, moving in passes across the surface and trying to hit as many holes as you can. You will see some puddling on top. That is exactly what you want. The cake will gradually drink it up as it sits.

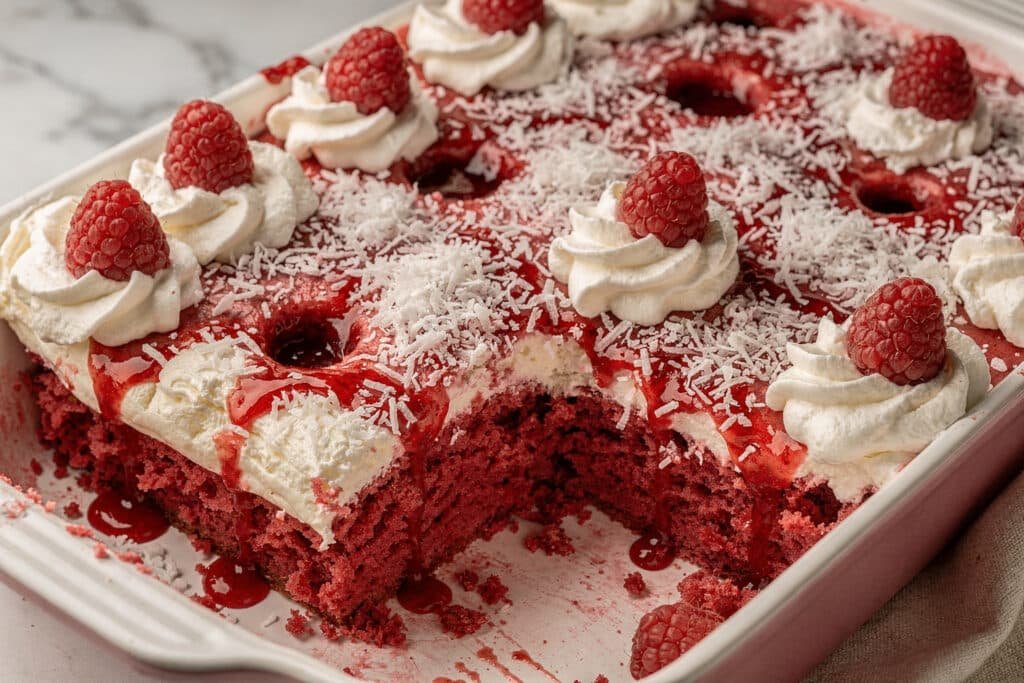
Process Image of Raspberry Zinger Poke Cake
Warm the raspberry jam in the microwave in a small bowl just until it loosens and becomes pourable. It should flow off a spoon, not splatter. Gently spread the warm jam over the surface of the cake with an offset spatula or the back of a spoon, keeping the layer thin and even so it does not pull up crumbs. Chill the cake, uncovered at first, for at least 2 hours so the raspberry layers set firmly and the whole cake takes on that tender, sliceable texture bakers love. After the first 30 minutes, you can cover the pan lightly if your fridge tends to dry things out.
Once the Raspberry Zinger Poke Cake is completely cold, you are ready for the creamy layer. Spread a thick, fluffy layer of thawed whipped topping over the top, reaching all the way to the corners. Use gentle strokes so you do not disturb the jam underneath. Shower it with sweetened shredded coconut, then press very lightly with your hand so it sticks to the cream without compacting it. If you like a little drama, finish with fresh raspberries scattered over the top for color and a tart pop. At this point you can serve it right away, or tuck it back into the fridge to chill longer. The flavor actually improves after a night of chilling, just like many old fashioned poke cakes and creamy tray desserts, such as my coconut sheet cake and berry filled summer cakes.
Time, Prep, and Storage Plan
From start to finish, you can have this Raspberry Zinger Poke Cake ready in about 2 hours, but only about 15 minutes of that is true hands on work. Plan about 30 minutes to bake the cake, 10 to 15 minutes to cool slightly before poking, and at least 2 hours in the fridge so the raspberry layer can set fully and the cake can chill. If you want it for an evening party, bake the cake in the morning, let it cool and soak with the raspberry mixture, then chill it all afternoon.
You can add the whipped topping and coconut just before serving, or up to 4 hours ahead. If you top it closer to serving time, the coconut stays a bit lighter and fluffier. If you top it earlier, the coconut softens slightly and clings to the whipped topping in a very snack cake way. Both versions taste wonderful, so choose the texture you like best.
For storage, cover the baking dish tightly with plastic wrap or a fitted lid and keep your Raspberry Zinger Poke Cake in the refrigerator. It keeps well for 3 to 4 days, and the texture actually improves during the first 24 hours as the raspberry agar agar mixture and jam sink in and mingle with the crumb, much like a good overnight tres leches cake or a chilled lemon icebox cake. If you like to prep ahead, you can bake the base cake and soak it with raspberry the day before, then top with whipped topping and coconut the day you plan to serve.
Leftover slices hold up beautifully for lunchbox treats, after school snacks, or an easy after dinner sweet, just like the way I treat leftovers of my coconut sheet cake or my pineapple upside down sugar cookie bars. This cake does not freeze well because of the whipped topping and the high moisture from the raspberry layer, so enjoy it fresh from the fridge for the best bakery style bite.
Flexible Options and Serving Notes

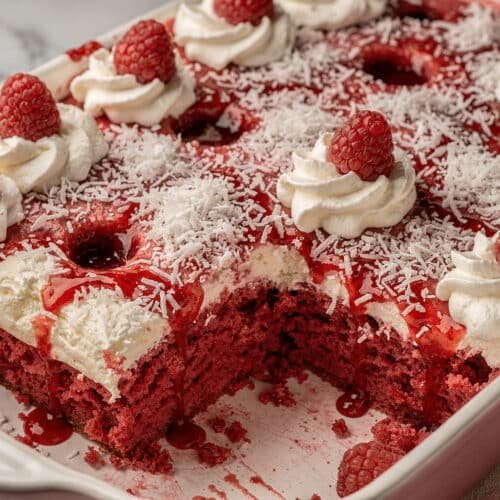
Serving Image of Raspberry Zinger Poke Cake
One of my favorite things about this Raspberry Zinger Poke Cake is how forgiving it is. You can start with a white, yellow, or even a light vanilla cake and it will still taste like the snack cake you grew up with. A yellow cake will taste a bit richer and more buttery, while a white cake keeps the color contrast extra bright. If you do not have raspberry agar powder, strawberry or cherry will give you the same nostalgic feel with a slightly different twist, very much like switching flavors in a classic poke cake bar.
You can also play with the creamy layer. Swap the whipped topping for lightly sweetened whipped cream if you prefer a more from scratch feel. Just whip it to medium peaks so it spreads easily over the chilled cake without turning grainy. Plan to serve within a day if you use real cream, since it does not hold as long as whipped topping.
For the coconut, you can leave it soft and snowy straight from the bag, or toast it in the oven at 175 °C for 5 to 7 minutes for deeper color and a nutty flavor. Spread it in a thin layer on a baking sheet and watch closely, because coconut goes from pale to deeply golden very fast. Let toasted coconut cool completely before you sprinkle it over the whipped topping, or it will melt the creamy layer.
This Raspberry Zinger Poke Cake also loves a little styling for parties and potlucks. For cleaner slices, chill the finished cake for at least 2 hours after you add the whipped topping, then use a sharp knife and wipe the blade between cuts so each piece shows those pretty red ribbons. Top each piece with a few fresh raspberries, a mint leaf, or a drizzle of warm raspberry jam right before serving.
If you want a more over the top dessert bar, pair this with other retro treats like a chocolate pudding poke cake, a lemon icebox style cake, or no bake cookie dough bites so guests can sample a few different textures. Leftovers keep well in the fridge for about 3 days. Just cover the pan tightly to keep the whipped topping and coconut soft, cloudlike, and ready for fork first “taste tests” every time you open the fridge.
Conclusion
Every time I pull this Raspberry Zinger Poke Cake from the fridge, it has the same effect. People wander into the kitchen, forks mysteriously appear in hands, and suddenly no one is in a rush to leave. It is the kind of dessert that invites lingering at the table, going back for “just a sliver,” and sharing one more story while you scrape the last pink crumbs from your plate. It tastes like childhood bake sales, family birthdays, and lazy Sunday afternoons all at once.
I hope you feel excited, not intimidated, to make this. You do not need fancy skills, just a pan, a whisk, and the willingness to have a little fun in your kitchen. If you are baking for a potluck, a birthday, or simply to brighten an ordinary weeknight, this Raspberry Zinger Poke Cake will show up for you and your people in the sweetest way.
When you try it, come back and tell me how it went, who you shared it with, and what memories you made around that pan. For more delicious recipes like this, follow Taste to Rate on Facebook and Pinterest so we can keep baking cozy desserts together.
Recipe
Raspberry Zinger Poke Cake
Ingredients
Ingredients
- 1 box white cake mix about 15.25 oz
- Ingredients listed on cake mix box typically eggs, oil, and water, as directed
- 1 box raspberry agar-agar powder dessert powder 3 oz or raspberry agar-agar dessert mix
- 1 cup boiling water
- 1/2 cup cold water
- 1 jar seedless raspberry jam 10 oz
- 1 tub whipped topping 8 oz, thawed
- 2 cups sweetened shredded coconut
- Fresh raspberries for garnish (optional)
Instructions
- Preheat the oven according to the cake mix package directions. Grease a 9x13 inch baking dish.
- Prepare the white cake batter by following the directions on the cake mix box, using the listed eggs, oil, and water.
- Pour the batter into the prepared baking dish and spread it into an even layer.
- Bake the cake according to the package directions, or until a toothpick inserted in the center comes out clean.
- Transfer the pan to a cooling rack and let the cake cool for 10 to 15 minutes, until warm but not hot.
- Using the handle of a wooden spoon, poke holes evenly over the entire surface of the warm cake, spacing the holes about 3/4 inch apart.
- In a medium heat-safe bowl, add the raspberry agar-agar powder powder. Pour in the boiling water and whisk until completely dissolved.
- Stir in the cold water until combined.
- Slowly pour the raspberry mixture evenly over the warm cake, making sure to cover the entire surface and fill the holes. Let the cake sit for 10 minutes at room temperature so it absorbs the liquid.
- Place the raspberry jam in a microwave-safe bowl and microwave for 20 to 30 seconds, just until it is smooth and pourable. Stir well.
- Gently spread the warm jam in an even layer over the surface of the cake, taking care not to tear the cake.
- Refrigerate the cake, uncovered, for at least 2 hours, or until completely chilled and the raspberry layer is set.
- Once chilled, spread the thawed whipped topping evenly over the top of the cake, all the way to the edges.
- Sprinkle the sweetened shredded coconut evenly over the whipped topping, then gently press so it adheres.
- Garnish with fresh raspberries, if desired.
- Slice into 12 squares and serve chilled.
Notes
- For cleaner slices, refrigerate the assembled cake for several hours or overnight before cutting.
- Store leftovers covered in the refrigerator for up to 3 days.
- If using agar-agar dessert mix, follow the same amounts and method as with agar-agar powder dessert powder.
- For extra raspberry flavor, drizzle a little additional warmed jam over each slice before serving.