The Memory Behind This Treat
The very first batch of these Pink Velvet Whoopie Pies happened on a snowy February afternoon when my kids were still little enough to drag chairs over to the counter and “help.” We had big plans for an elaborate Valentine’s cake, but halfway through measuring, one of them knocked over the buttermilk and we suddenly had less than the recipe needed. Instead of panicking (ok, maybe I panicked a tiny bit), I pivoted to something smaller, softer, and faster: pink whoopie pies that felt part cookie, part mini cake. I remember standing there with streaks of pink batter on my sweater, realizing these heart-shaped treats were far more fun—and far more forgiving—than the fussy cake we’d started. By the time we sandwiched them with frosting, everyone had pink fingers, sugar on their noses, and zero regrets.
What hooked me was how approachable they were, even in a chaotic kitchen moment. I didn’t need perfectly level cake layers or fancy tools—just a piping bag, a steady-ish hand, and a willingness to let the hearts be a little quirky. When those puffy pink tops came out of the oven, they had that soft, velvety crumb I love from classic velvet cakes, but in tidy, hand-held form you can pack into lunchboxes or cookie boxes. That same night, we boxed up a few to deliver to neighbors, right next to some leftover chocolate chip cookies from another Cookie of the Month experiment, and everyone asked for “the pink ones” first. Now, I pull out this recipe every February, not because it’s perfectly polished, but because it reminds me that the sweetest desserts are often the ones that start with a small kitchen disaster—and end with you licking frosting from the mixing bowl.
How To Make It (Mix & Ingredients)
To get these Pink Velvet Whoopie Pies started, you’ll mix up a simple, velvety batter that behaves a lot like a thick cake batter. In a stand mixer (or with a hand mixer), beat together your partially melted salted butter, sugar, eggs, and cake batter flavoring until the mixture looks pale, a little fluffy, and smells like someone just opened a birthday cake mix. Add your pink food coloring a little at a time; stop when it’s a shade or two deeper than you want, because the flour and buttermilk will soften the color. In a separate bowl, whisk together the flour, cornstarch, baking soda, and salt so there are no clumps waiting to surprise you. With the mixer on low, add the dry ingredients, then slowly stream in the buttermilk until you have a thick, pipeable batter—thicker than cupcake batter, but looser than cookie dough.
 1")
Instructions Process of Pink Velvet Whoopie Pies
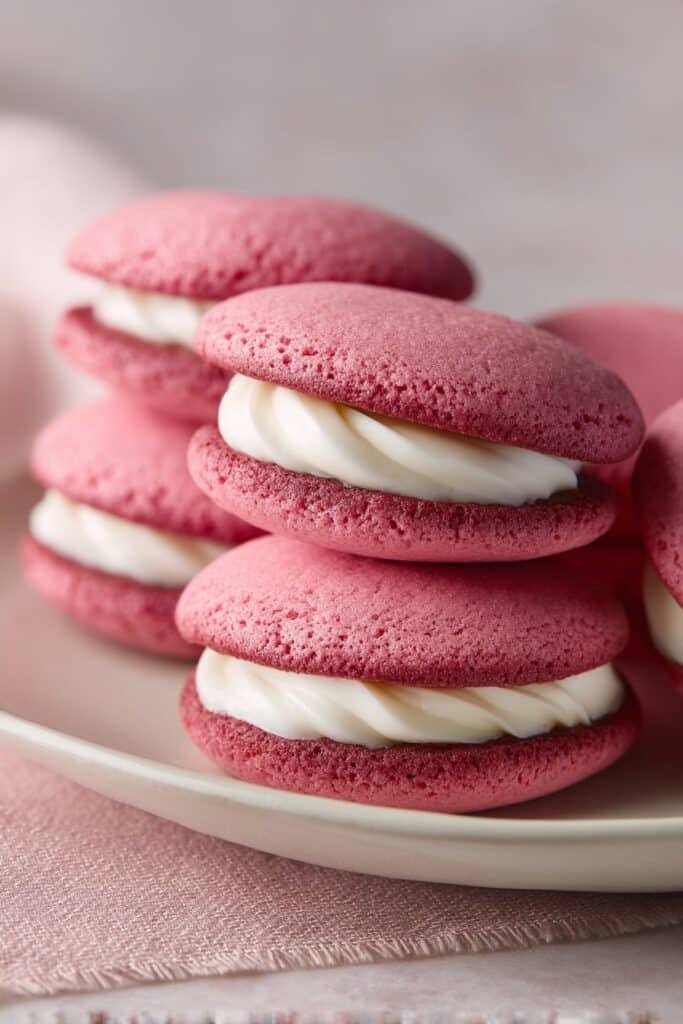
From here, the fun begins: transfer that pretty pink batter to a piping bag fitted with a round tip (or just snip the corner off a heavy-duty zip-top bag). To pipe the heart shapes, think “m-shaped”: start at the bottom point of the heart, pipe up and around the left side, then up and around the right, letting the two humps meet at the top. Leave room between hearts because they will puff and spread a bit in the oven, similar to soft chocolate whoopie pie shells or even my red velvet sandwich cookies. Bake until the hearts are slightly domed, set in the center when you tap them lightly, and the tops no longer look wet. Once they’re completely cool, sandwich them with your creamy frosting and admire your tray of pink velvet pillows—perfect for tucking into a Cookie of the Month box or sharing with your favorite valentine.
Make-Ahead & Storage
The good news: Pink Velvet Whoopie Pies are very make-ahead friendly, which is ideal if you’re prepping for a Valentine’s party or cookie box. For the unfilled cookies, let them cool completely, then layer them between parchment in an airtight container. They keep at room temperature for about 2 days, or in the fridge for up to 4–5 days. You can also freeze the baked cookies (unfilled) for up to 2 months; just freeze in a single layer first, then transfer to a freezer bag so they don’t stick together. Thaw them at room temperature, still in the container, so they don’t get rubbery or dry.
For the filling, make it up to 3 days ahead, cover it well, and store it in the fridge. It will firm up, so let it sit at room temperature for 20–30 minutes and re-whip with a hand mixer if needed to get it fluffy again before piping onto your Pink Velvet Whoopie Pies. Once you’ve sandwiched them, store the whoopie pies in a single layer (or with parchment between layers) in an airtight container in the fridge for 3–4 days. The longer they sit, the softer and more cake-like they become, so if you like a slightly firmer texture, fill them the day you plan to serve. For longer storage, you can freeze assembled whoopie pies for up to 1 month; just know the texture will be a little softer after thawing, but still perfectly dreamy with a cup of coffee or a plate of Valentine’s leftovers.
Best Ingredients & Party Variations
For the softest, most tender Pink Velvet Whoopie Pies, lean into quality and consistency. Use cake flour for an even lighter crumb, or keep your all-purpose and add an extra teaspoon of corn starch to mimic that softness. Make sure your butter is truly partially melted for the cakes (it should look like a puddle with a few soft chunks) and fully soft for the filling so it whips fluffy instead of grainy. A thicker, gel-based pink food coloring gives you that saturated Valentine’s hue without watering down the batter. And if you can, use real buttermilk instead of DIY milk + vinegar—the tang and fat content really help these hold their shape and stay moist.
Part of the magic of Pink Velvet Whoopie Pies is how easily they dress up for a party. For a kids’ Valentine’s Day spread, roll the frosting edges in sprinkles, nonpareils, or mini chocolate chips right after you sandwich them. For a more grown-up dessert board, tuck in a few filled with raspberry jam swirled into the frosting or a spoonful of cherry preserves in the center for a surprise. You can even pipe smaller hearts for mini whoopie pies—perfect for buffets or a cookie-of-the-month gift box alongside your chocolate crinkle cookies or red velvet thumbprints. However you play with the variations, keep an eye on size and bake time; smaller hearts bake faster, and overbaking is the only real way to lose that pink velvet softness.
 2")
Serving of Pink Velvet Whoopie Pies
Conclusion
If you made it this far, I hope you’re already picturing a plate of these little beauties on your table. There’s something so simple and sweet about baking a batch of Pink Velvet Whoopie Pies, then watching people’s faces light up as they take that first bite. It’s the kind of recipe that turns an ordinary afternoon into a tiny celebration, whether you’re baking with your kids, surprising a friend, or just treating yourself after a long day.
I always think of these as “sharing cookies” because they seem to wander off the plate and into lunchboxes, office kitchens, and neighbor drop-offs. That’s the quiet magic of baking: warm ovens, a little food coloring, a swirl of frosting, and suddenly you’ve made a memory. I hope you tie this recipe to a special moment of your own—maybe a birthday, a rainy Sunday, or just a cozy night in.
When you try this recipe, let me know how it goes and who you shared them with.
For more delicious recipes like this, follow us on social media!
What makes Pink Velvet Whoopie Pies different from regular whoopie pies?
Pink Velvet Whoopie Pies are soft, cake-like sandwich cookies with a gentle pink hue and a cozy “cake batter” flavor. Instead of cocoa-heavy red velvet, these lean into vanilla and buttery notes with just enough color to feel festive. The texture is somewhere between a cupcake top and a soft cookie, so they stay tender but still hold the filling. Their heart shape and color make them especially perfect for Valentine’s Day, baby showers, or any pink-themed celebration. Think classic whoopie pie, but dressed up for a party.
How can I get a vibrant, even pink color in the batter?
Add the pink food coloring right after you mix the butter, sugar, eggs, and cake batter flavoring, before the dry ingredients go in. Start with a small amount, mix well, then add more drop by drop until you reach a shade a bit deeper than you want in the final cookies. The color always lightens once you add the flour and buttermilk, so plan for that fade. Gel coloring works best because it gives strong color without thinning the batter. If your first tray bakes up lighter than you’d like, you can deepen the remaining batter with a touch more gel and mix gently.
How should I store Pink Velvet Whoopie Pies and how long do they last?
Once filled, place the whoopie pies in a single layer (or between sheets of parchment) in an airtight container. They keep well at room temperature for about 2 days, as long as your kitchen isn’t very warm. For longer storage, refrigerate them for up to 4–5 days; the texture will firm slightly but soften again as they sit out. Let refrigerated whoopie pies come to room temperature for 15–20 minutes before serving so the filling turns creamy again. If you’re making them ahead for an event, you can bake the hearts one day, fill them the next, and still serve them at their best.
Recipe
 3")
Pink Velvet Whoopie Pies
Ingredients
Ingredients
- 1/2 cup salted butter partially melted
- 1 cup granulated sugar
- 2 large eggs
- 3 tsp cake batter flavoring
- 1/2 tsp pink gel food coloring
- 2 1/2 cups all-purpose flour
- 1 tbsp cornstarch
- 1 tsp baking soda
- 1/2 tsp salt
- 1 cup buttermilk at room temperature
- 1/2 cup salted butter softened
- 3 cups powdered sugar
- 1/4 cup heavy whipping cream plus more as needed up to 1/3 cup total
- 1 1/2 tsp clear vanilla bean paste
Instructions
- Preheat the oven to 350°F. Line 2 large cookie sheets with parchment paper and set aside.
- In the bowl of a stand mixer or in a large mixing bowl with a hand mixer, beat the partially melted butter and granulated sugar until well combined and slightly fluffy, about 2 minutes.
- Add the eggs and cake batter flavoring and beat until the mixture is thick, pale, and smooth.
- Mix in the pink food coloring until the batter is a deep pink shade, slightly darker than you want the final cookies to be.
- In a separate bowl, whisk together the flour, cornstarch, baking soda, and salt until evenly combined.
- With the mixer on low speed, add the dry ingredients to the wet ingredients in 2 additions, alternating with the buttermilk, beginning and ending with the dry ingredients, and mix just until a thick, smooth batter forms.
- Transfer the batter to a large piping bag fitted with a round tip, or use a large heavy-duty zip-top bag with the corner snipped off.
- Pipe heart shapes onto the prepared baking sheets by starting at the bottom point of the heart, piping up and around the left side, then up and around the right side, letting the two curves meet at the top. Leave about 2 inches of space between each heart.
- Bake the hearts, one sheet at a time, for 10 to 12 minutes, until they puff slightly, the tops look set, and the centers feel firm when lightly tapped.
- Remove the pans from the oven and let the cookies cool completely on the baking sheets before filling.
- While the cookies cool, make the filling. In a clean mixing bowl, beat the softened butter until smooth and creamy.
- Add the powdered sugar 1 cup at a time, beating on low speed after each addition. Add a few tablespoons of the heavy whipping cream as needed to keep the mixture smooth.
- When all the powdered sugar is incorporated, add the remaining heavy cream and the clear vanilla bean paste. Beat on low until combined, then switch to high speed and whip until the frosting is thick, fluffy, and holds stiff peaks.
- Pair the cooled cookies by matching hearts of similar size and shape. Place one cookie from each pair upside down.
- Pipe the frosting in a heart shape onto the center of each upside-down cookie, staying slightly away from the edges.
- Gently press the matching cookie on top to create whoopie pies, allowing the filling to spread to the edges.
- Serve immediately or chill the whoopie pies in an airtight container in the refrigerator for up to 4 days.
Notes
- If the batter feels too thin to hold a heart shape, chill it for 10 to 15 minutes before piping to help it firm up slightly.
- For cleaner edges, draw heart outlines on the underside of your parchment as a guide before piping.
- Allow the cookies to cool completely before filling to keep the frosting from melting and slipping out.
- You can make the cookies a day ahead and store them in an airtight container, then fill them the next day for freshest texture.