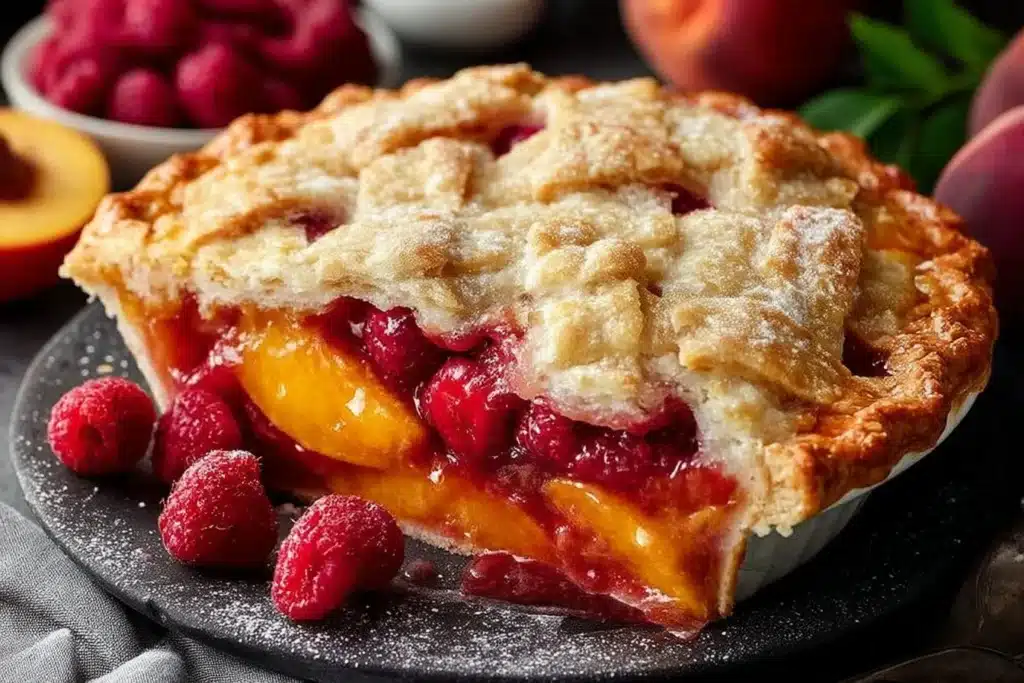
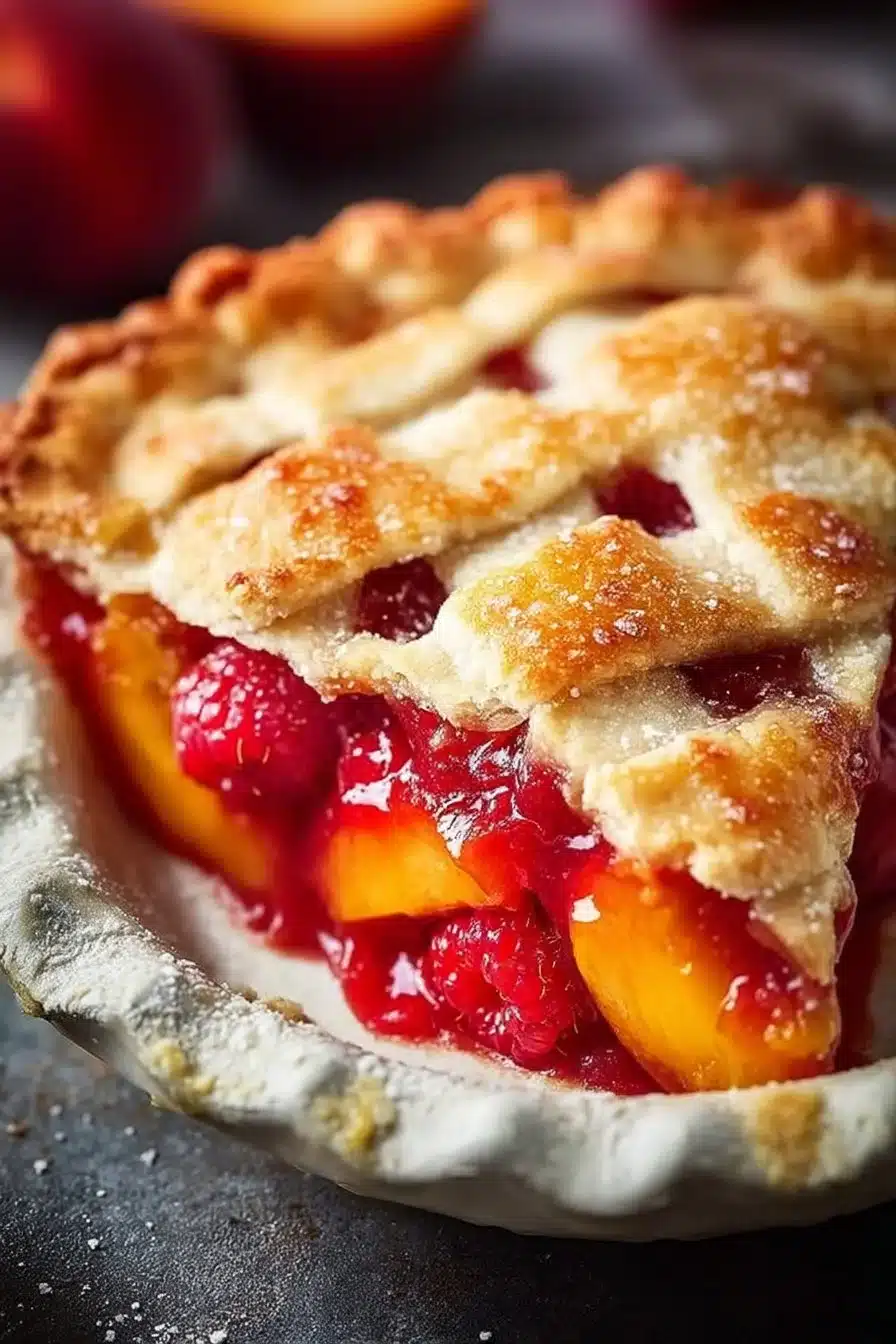
This peach raspberry pie is a tidy, everyday dessert that responds beautifully to hot, circulating air — whether you finish it in a roomy air fryer or bake it the traditional way. The high, dry heat crisps the top crust quickly so you get a golden, flaky shell with jammy, tender fruit inside. Using a single store-bought pie crust keeps the work minimal and cleanup light.
The payoff here is straightforward: crisp top, juicy but not runny filling, and a short ingredient list you can assemble in one bowl. If you like the idea of a fruit pie that browns fast and feels more like a weeknight treat than a weekend project, this version fits. For a different fruit twist, I also like the texture contrast in the brown-butter strawberry-peach pie recipe I use sometimes: brown butter strawberry-peach pie.
Table of Contents
- Why You’ll Love This Air Fryer Recipe
- Quick Kitchen Note
- What It Tastes Like
- Ingredients
- How to Make This Air Fryer Recipe
- Air Fryer Tips and Time-Saving Tricks
- Variations and Add-Ons
- Serving Ideas
- Storage and Reheating
- FAQs
- Conclusion
- Recipe Card
Why You’ll Love This Air Fryer Recipe
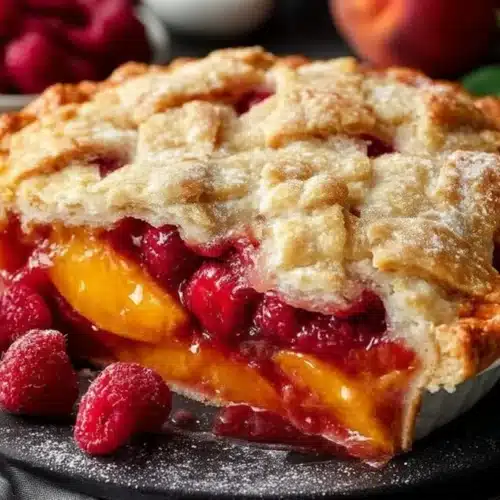
- Crisp top crust: the intense circulating heat browns the egg-washed crust quickly for a flaky, golden finish that snaps when you cut it.
- Tender, jammy filling: the mix of peaches and raspberries keeps the interior juicy without becoming soupy thanks to the cornstarch thickener.
- Minimal hands-on work: one bowl for the filling and a single pie crust — no complicated laminations or multiple toppings.
- Flavor balance: a touch of lemon and cinnamon lifts the fruit without overpowering it. For a richer chocolate-berry variation, check out this dark chocolate raspberry option: dark chocolate raspberry pie bars.
- Beginner-friendly finishing: the egg wash gives reliable color and shine, so you don’t need perfect shaping skills to get a bakery look.
Quick Kitchen Note
This recipe is worth making when peaches are in season and you want a dessert that looks fancy with minimal fuss. I often assemble the pie quickly, preheat the oven as the filling rests briefly, and then bake — the brief rest allows the cornstarch to start binding the juices so the filling sets better.
What It Tastes Like
Expect a crisp, buttery top crust and a soft, slightly jammy interior. The peaches bring a mellow sweetness, the raspberries add bright, tart pops, and the cinnamon with a squeeze of lemon gives a warm, slightly tangy background. The butter dotted on the filling melts into small glossy pockets of richness that make each bite feel rounded and satisfying. If you like lemon-raspberry brightness, see a layered riff here: lemon raspberry layered pie.
Ingredients
These ingredients are straightforward and designed to keep the filling balanced and the crust crisp. The cornstarch thickens the fruit juices so the filling stays sliceable; the egg wash helps the top crust brown evenly.
- 2 cups peaches, sliced
- 2 cups raspberries
- 1 cup sugar
- 1/4 cup cornstarch
- 1/2 teaspoon cinnamon
- 1 tablespoon lemon juice
- 1 tablespoon butter
- 1 pie crust (store-bought or homemade)
- 1 egg (for egg wash)
Air fryer-specific notes:
- No added oil is needed — the butter in the filling and the egg wash on the crust are enough to encourage browning.
- Slice peaches evenly (about 1/4-inch) so the filling cooks uniformly; uneven pieces can make the filling take longer to set.
- If your air fryer basket is small, use an oven-safe pie dish that fits; overcrowding with an oversized dish can block airflow and prevent crisping.
How to Make This Recipe
Follow these clear numbered steps to build the pie and get the visual cues you need for doneness. The method below stays faithful to the original bake directions and includes what to look for at each stage.
- Preheat the oven to 425°F (220°C). Place a rack in the lower-middle position so the bottom crust gets heat while the top browns. (If you plan to use an oven-safe pie dish in a large air fryer, make sure the dish fits before preheating.)
- In a large bowl, combine the sliced peaches, raspberries, sugar, cornstarch, cinnamon, and lemon juice. Stir gently until everything is evenly coated and the sugar starts to dissolve — the fruit should look glossy and slightly thickened from the cornstarch.
- Roll out the pie crust and fit it into a pie dish, trimming any excess and leaving a clean edge. Press the crust gently into the dish so there are no large bubbles. If your pie dish is slightly smaller than the dough, tuck the edges under and crimp to seal.
- Pour the fruit filling into the prepared crust and distribute it evenly. Dot the top of the filling with the tablespoon of butter in small pieces so the melted butter can baste the fruit as it bakes.
- Cover the filling with another crust layer or create a lattice top. If using a full top crust, cut a few slits to vent steam; for a lattice, weave strips and press the edges to seal. The venting matters — it lets steam escape so the crust crisps rather than becomes soggy.
- Beat the egg and brush the top crust lightly with the egg wash for even, glossy browning. Aim for a thin, even coat — too much egg can pool and burn at the edges.
- Bake in the preheated oven for 35–40 minutes, or until the crust is deep golden brown and the filling is visibly bubbling through vents or lattice openings. Visual cues: the juices should be actively bubbling (not just simmering), and the crust should be a rich golden color with no raw dough spots. If the edges brown too fast, tent them with foil for the last 10–15 minutes.
- Let the pie cool before serving. Cooling allows the cornstarch to finish setting so slices hold together; I wait at least 30 minutes on a wire rack for best results.
Variations and Add-Ons
- Swap the sugar for a slightly smaller amount of honey or maple syrup if you prefer a different sweetness profile — keep the cornstarch the same for thickening.
- Add a sprinkle of nutmeg with the cinnamon for warmer spice notes.
- Turn this into individual hand pies by cutting smaller circles of crust and using the same filling; reduce bake time a little if you make small pies (watch for golden edges).
- Serve with vanilla ice cream or a drizzle of heavy cream for richness.
Serving Ideas
- Serve warm with a scoop of vanilla ice cream for a classic pairing.
- A simple green salad with lemon vinaigrette balances the fruit’s sweetness for a light lunch spread.
- For a brunch-style board, cut into wedges and offer along with cheeses and sliced almonds. You can also pair it with an apple-based dip for a mixed-fruit spread: apple pie dip salsa.
Storage and Reheating
- Fridge: Cover and refrigerate any leftovers for up to 3 days. The filling will continue to set as it cools.
- Make-ahead value: You can assemble the pie and keep it chilled for a few hours before baking; bring it straight from the fridge to the preheated oven.
- Reheating: Warm slices gently in a preheated air fryer or conventional oven until heated through and the crust is crisp again. Avoid microwaving if you want to keep the crust flaky.
- Freezer: While the recipe doesn’t specify freezing, you can freeze an assembled, unbaked pie wrapped tightly and bake from frozen with an added 10–15 minutes — watch the crust color.
FAQs
Q: Can I make this ahead of time?
A: Yes. Assemble the pie and refrigerate for a few hours before baking. Chilling helps the filling bind and can improve texture.
Q: Do I need to preheat the oven?
A: The method calls for preheating to 425°F (220°C). That initial high heat helps the crust rise and brown properly.
Q: Can I use parchment or a liner in the pie dish?
A: For a pie in a dish, a liner isn’t needed. If you bake smaller hand pies on a tray, use parchment to prevent sticking and ease cleanup.
Q: How do I keep the crust from getting soggy?
A: Evenly coat the fruit with cornstarch and lemon juice so excess liquid is absorbed. Dotting with butter and venting the top also reduces sogginess.
Q: What if my oven runs hot?
A: If your oven runs hot, tent the pie edges with foil early and start checking for doneness a few minutes before the 35-minute mark.

Conclusion
This peach raspberry pie is a simple, satisfying dessert that rewards a quick, hot bake with a crisp crust and jammy fruit interior. If you want another take on similar flavors and home-baked charm, I like the more detailed method over at Peach Raspberry Pie – Simply Recipes for extra technique notes. For a crumb-topping spin that’s still approachable, see this Peach and Raspberry Pie Recipe with Crumb Topping. And if you enjoy seeing different home-baker versions, this Peach and Raspberry Pie Recipe – Desserts With Stephanie offers another easy finish option.
Peach Raspberry Pie
Ingredients
Fruit Filling
- 2 cups peaches, sliced Slice evenly about 1/4-inch thick.
- 2 cups raspberries
- 1 cup sugar Can be substituted with honey or maple syrup.
- 1/4 cup cornstarch Thickens the fruit juices.
- 1/2 teaspoon cinnamon Add nutmeg for warmer spice notes, if desired.
- 1 tablespoon lemon juice
- 1 tablespoon butter Dot the filling with small pieces.
Pie Crust
- 1 pie crust store-bought or homemade
- 1 egg for egg wash Gives color and shine to the crust.
Instructions
Preparation
- Preheat the oven to 425°F (220°C) and place a rack in the lower-middle position.
- In a large bowl, combine the sliced peaches, raspberries, sugar, cornstarch, cinnamon, and lemon juice. Stir gently until the fruit is glossy.
- Roll out the pie crust and fit it into a pie dish, trimming any excess.
- Pour the fruit filling into the prepared crust and dot the top with butter.
- Cover with another crust layer or create a lattice top, ensuring to vent steam.
- Beat the egg and brush the top crust lightly with the egg wash.
Baking
- Bake in the preheated oven for 35–40 minutes, until the crust is golden brown and filling is bubbling.
- Let cool for at least 30 minutes on a wire rack before serving.