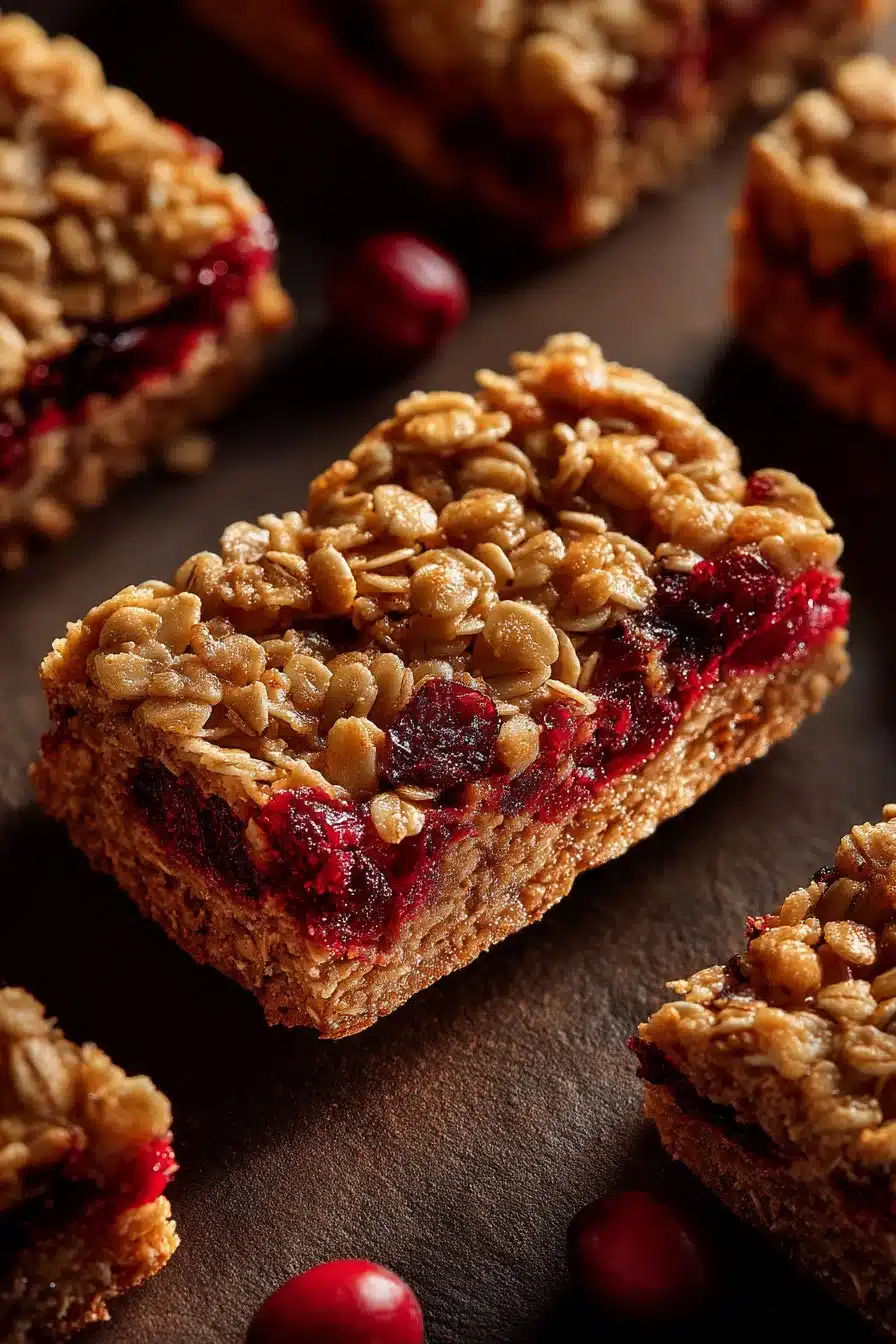
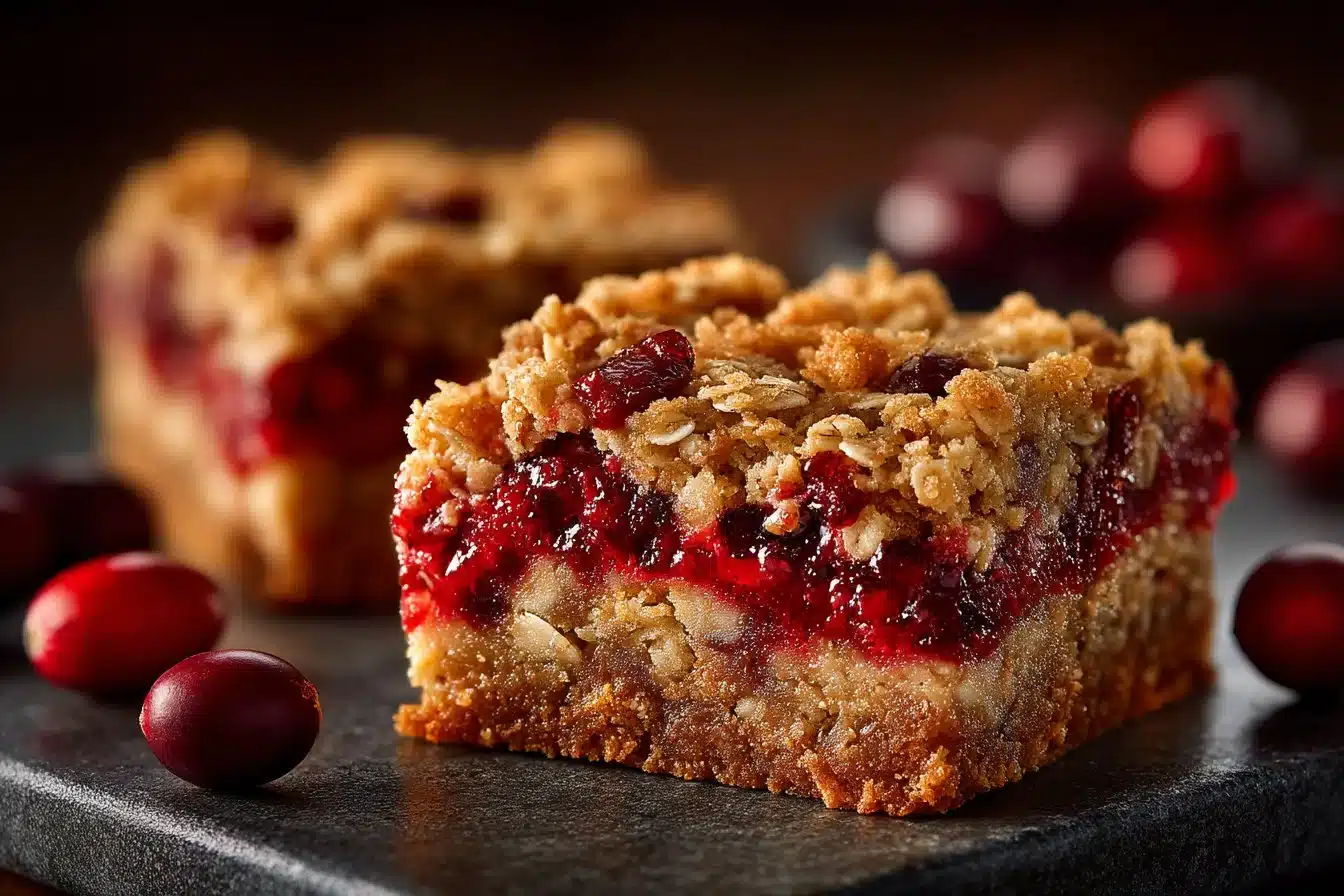
I kept a jar of raspberry jam on the counter all week just so I could press these oatmeal bars into the oven the minute I had a free afternoon. They bake up into an honest, butter-forward oat crust with a glossy jam layer that peeks through the crumbles — not too sweet, with a toasty oat aroma that fills the kitchen. If you want a simple, snackable bake that travels well, this is it.
These bars are sturdy enough to pack in a lunchbox yet tender when you bite in: the bottom crust sets firm while the top crumb stays slightly loose and sandy, giving a pleasant contrast to the jam. If you like the oat-forward texture in my cozy morning banana oat bars, you’ll recognize that same comforting chew here. I also love how the butter and brown sugar caramelize the oats similarly to my almond croissant cookie bars, but with a jammy center instead of almond paste.
Why You’ll Love This Recipe
- Bright jam center vs. toasty oat crust — the sweet-tart preserves cut through the brown-sugar richness for balanced flavor.
- Textural contrast — a firm, pressable base under a looser, sandy streusel-like top that browns but doesn’t dry out.
- Minimal equipment and steps — everything comes together in one bowl and a single 8×8 pan.
- Make-ahead friendly — these bars keep their texture after a day or two, so they’re great for lunches or snacks.
- Easy to customize — swap the preserves or use mixed berry jam to vary the acidity and sweetness.
The Story Behind This Recipe
I developed this as a no-fuss, jar-of-jam rescue — a way to use up odds of preserves while relying on pantry oats and butter. It’s intentionally straightforward: few ingredients, clear textures, and predictable results.
What It Tastes Like
These bars are moderately sweet with the warm caramel notes of brown sugar and butter. The oats and flour give a nutty, slightly chewy backbone, while the jam offers a bright, slightly tart burst. The aroma is buttery and toasted; you’ll notice the edges bubbling and smelling faintly caramelized when they’re close to done.
Ingredients You’ll Need
The key players here are old-fashioned rolled oats (for chew and structure), butter (for richness and browning), and fruit preserves (for the jammy center). Using melted butter binds the oat mixture without overworking it, so the topping stays crumbly rather than dense. If you prefer slightly softer oats, see how I use rolled oats in my banana oatmeal muffins for reference on texture — but stick to old-fashioned oats here for the best bite.
- 1 ½ cups old-fashioned rolled oats
- 1 cup all-purpose flour
- ¾ cup packed brown sugar
- ½ teaspoon baking soda
- ¼ teaspoon salt
- 10 tablespoons unsalted butter, melted
- 1 teaspoon vanilla extract
- ¾ cup fruit preserves or jam (raspberry, strawberry, or your choice)
How to Make Oatmeal Bars
- Preheat the oven to 350°F (175°C). Line an 8×8-inch baking pan with parchment paper, leaving an overhang for easy removal, or lightly grease it. This pan size yields 12 bars.
- In a large bowl, combine the oats, flour, brown sugar, baking soda, and salt. Toss with a fork or whisk so the brown sugar breaks up and the dry ingredients are evenly blended — the mix should look uniformly speckled and dry.
- Pour the melted butter and vanilla over the dry mix. Stir with a spatula until the mixture holds together in clumps but still has loose crumbs; you want a sandy, slightly sticky texture, not a wet dough. Stop as soon as most of the dry bits are moistened.
- Reserve about one-third of the oat mixture for the topping. Press the remaining two-thirds firmly and evenly into the bottom of the prepared pan — press with the bottom of a measuring cup or your hand so the base is compact and holds together when sliced. A firmly packed base prevents sogginess under the jam.
- Spoon the preserves gently over the crust and spread into an even layer, leaving a little space from the edges if the jam is very runny. Work slowly so you don’t disturb the pressed crust; a small offset spatula helps.
- Crumble the reserved oat mixture evenly over the jam. Press down lightly with your fingers so the topping adheres in places but remains crumbly — over-pressing will make the top too compact.
- Bake for 30–35 minutes. You’re looking for a golden brown top and jam that is bubbling at the edges; the center should no longer look wet. If the edges brown much faster than the center, tent loosely with foil for the last 5–10 minutes.
- Remove from the oven and let the bars cool completely in the pan (this can take 1–2 hours). Chilling briefly in the fridge speeds slicing. Use the parchment overhang to lift the slab from the pan, then cut into 12 squares.
Tips for Best Results
- Pack the base firmly: a compact bottom keeps the jam from seeping through and makes clean slices.
- Don’t overmix after adding butter; stop when the crumbs hold together. Over-mixing yields tough bars.
- If your jam is very runny, warm it briefly to loosen then blot any excess with a paper towel before spreading to avoid sogginess.
- Cool fully before slicing — warm bars are soft and will crumble. If you want neat edges, chill 30 minutes after cooling to room temperature. For more on getting the right oat chew, check this chewy oatmeal cookies guide.
- To keep the top from over-browning near the end, tent with foil loosely; golden, not dark brown, is your goal.
Variations and Substitutions
- Swap preserves: apricot or fig jam gives a more mellow sweetness; raspberry or tart cherry adds zing.
- Mix-ins: fold 2 tablespoons of chopped nuts into the topping for crunch — don’t add more or the crumble won’t bind.
- For a slightly softer top, reduce the reserved topping by 2 tablespoons of oats. For ideas on chewy oat textures, see this chewy blueberry cookie reference.
How to Serve It
Cut into 12 squares and serve at room temperature. These are lovely with a smear of extra jam on top or a thin dusting of powdered sugar for presentation. They pair well with milk or a strong coffee for breakfast, or a cup of tea as an afternoon snack.
How to Store It
- Room temperature: Store in an airtight container for up to 2 days. The top will remain pleasantly crumbly.
- Refrigerator: Keep for up to 5 days; chilling firms the bars and makes slicing cleaner. Bring to room temperature before serving for softer texture.
- Freezer: Wrap individual squares in plastic and freeze in a sealed bag for up to 2 months. Thaw in the fridge overnight and warm briefly if you prefer them softer.
Final Thoughts
These oatmeal bars are a small, reliable pleasure: simple to make, easy to adapt, and satisfying in that butter-and-jam, oat-forward way. They’re the kind of recipe I come back to whenever I want a homemade snack without fuss.
Conclusion
If you want a meal-prep take on oat bars with a similar pantry-friendly approach, check this Homemade Oat Breakfast Bars {Meal Prep Friendly!} for inspiration. For a different baked-oat take with breakfast flavors, see the Baked Oatmeal Breakfast Bars Recipe at Allrecipes. And if you like the soft, chewy style of oat squares, this Oatmeal Bars Recipe — Soft Baked & Healthy! explores that texture in detail.