The Memory Behind This Treat
The first time I made these Nutella Cheesecake Chocolate Cups, it was one of those winter afternoons when the sun disappears at 4 pm and everyone starts prowling the kitchen, “just looking” for something sweet. I remember standing at the counter with an almost-empty jar of Nutella, a block of cream cheese, and exactly one dark chocolate bar left in the pantry. I didn’t have the patience for a full cheesecake, and turning on the oven felt like too much commitment. So I started tinkering: a quick no-bake cheesecake filling in one bowl, melted chocolate in another, cupcake liners lined up like tiny blank canvases waiting to be filled. By the time the cups were chilling in the fridge, the whole kitchen smelled like a candy shop met a cozy bakery.
These Nutella Cheesecake Chocolate Cups quickly became my “just bring something chocolatey” answer for family dinners and laid-back game nights. They look like they belong in a fancy dessert case, but you make them with the kind of things you probably already have in your kitchen—cream cheese, sour cream, Nutella, and good dark chocolate. I still remember my sister biting into one and actually pausing mid-chew to say, “Wait, you made these today? Like, just today?” The best part is how practical they are: you mix the filling in one bowl, spoon, pour, and let the fridge do the hard work while you move on with your evening. They remind me a lot of why I love no-bake treats like my chocolate truffles and layered no-bake cheesecakes—simple steps, big payoff, and a whole lot of chocolate happiness in every bite.
How To Make It (Mix & Ingredients)
To make these Nutella Cheesecake Chocolate Cups, you’ll start by building a silky, no-bake cheesecake filling. Let your cream cheese sit at room temperature until it’s soft enough that a spoon glides through it easily—cold cream cheese will give you lumpy filling. Beat the cream cheese for about 1 minute until smooth, then add the Nutella and vanilla bean paste. The mixture should turn glossy and evenly chocolate-hazelnut in color, with no visible streaks. Finally, mix in the sour cream just until combined; it loosens the texture slightly and adds that subtle cheesecake tang without making the filling runny.
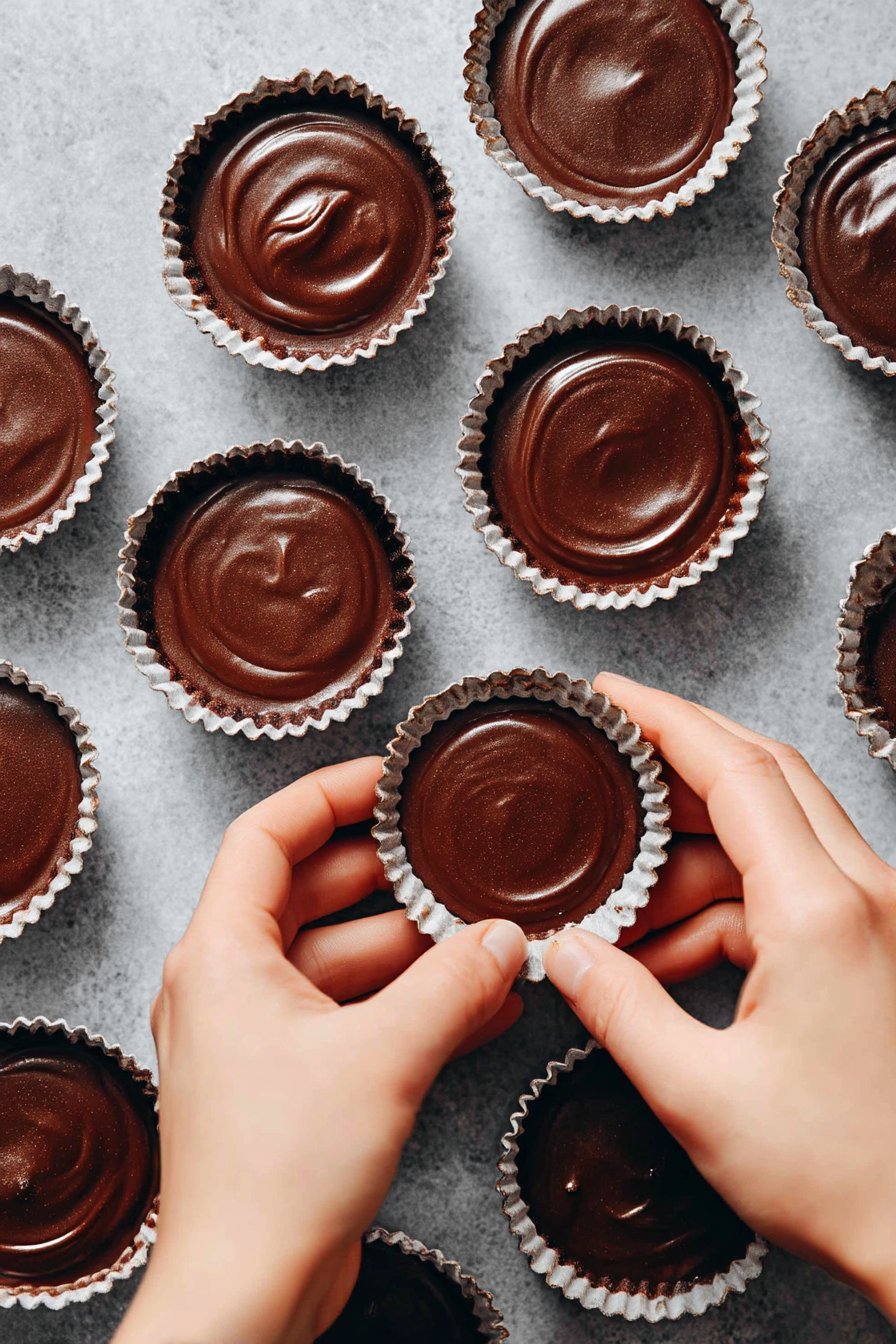
Instructions Process of Nutella Cheesecake Chocolate Cups
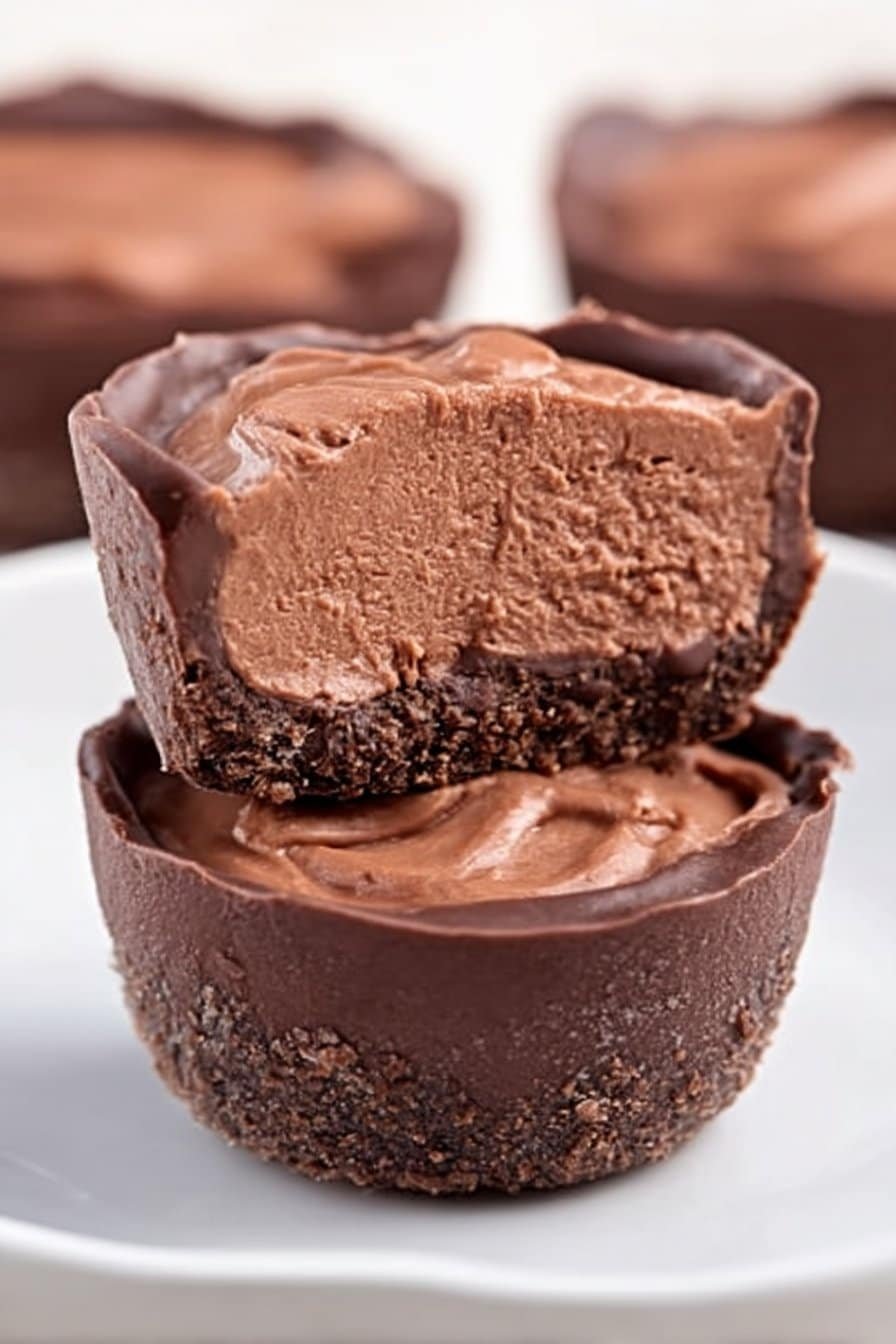
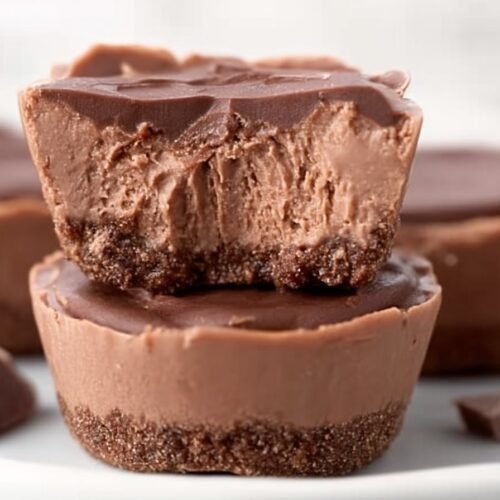
Next comes the chocolate shell that makes these Nutella Cheesecake Chocolate Cups so special. Use a good-quality dark chocolate and melt it gently in the microwave, stirring every 30 seconds so it doesn’t scorch on the bottom—if it smells a bit burnt, it is. You want the chocolate fully melted and pourable, but not piping hot; let it sit a minute so it doesn’t melt the filling on contact. Spoon a thin layer of chocolate into each cupcake liner and tilt or nudge it so it covers the base completely. Add a scoop of cheesecake filling into the center, being careful not to let it touch the sides so there’s space for that final chocolate blanket. Then cover generously with more melted chocolate, making sure it slides down the edges and seals everything in before you chill them to set into that crisp shell and creamy center.
Make-Ahead & Storage
Nutella Cheesecake Chocolate Cups are a make-ahead dream dessert, which makes them perfect for birthdays, holiday platters, or those “company’s coming” nights. You can prepare the cups fully, let them set for at least 2 hours, then keep them chilled in the refrigerator for up to 5 days. Store them in an airtight container, and if you can, use parchment between layers to prevent the chocolate shells from sticking or scuffing. For the neatest bites, let them sit at room temperature for about 5–10 minutes before serving so the cheesecake center softens slightly while the chocolate shell stays crisp. If you’re planning a mixed dessert tray with treats like my no-bake cheesecake bites or peanut butter cups, keep these Nutella Cheesecake Chocolate Cups in their paper liners until just before serving, so they stay protected.
For longer storage, these Nutella Cheesecake Chocolate Cups freeze beautifully. Once they’re fully set, place them on a baking sheet and freeze until firm, then transfer to a freezer-safe container or zip-top bag and freeze for up to 2 months. Thaw them overnight in the fridge, not on the counter, so the cheesecake filling defrosts slowly and stays creamy without weeping. The chocolate shell may develop a little light “bloom” (that pale, dusty look) after freezing, but that’s just cosmetic and doesn’t affect flavor. If you like planning ahead, you can even freeze them in smaller batches and pull out just a few at a time for last-minute dessert cravings or unexpected guests.
Best Ingredients & Party Variations
For the best Nutella Cheesecake Chocolate Cups, start with full-fat cream cheese at room temperature so it beats smooth and silky with no little lumps hiding in your filling. Use real Nutella rather than a generic chocolate spread—the hazelnut flavor is what makes these feel special and nostalgic. Dark chocolate in the 50–60% range melts smoothly and gives you that crisp snap without being bitter; if you go much darker, you may want to add a teaspoon of powdered sugar to the cheesecake mixture to keep everything balanced. I love using vanilla bean paste here because those tiny specks make the filling feel bakery-level, but real vanilla extract works just fine too. Sour cream is your secret weapon for a tangy, creamy center that doesn’t taste too heavy, so avoid swapping it for yogurt unless it’s very thick and not too sour.
When it comes to party variations, think of these Nutella Cheesecake Chocolate Cups as your little dessert wardrobe—they dress up easily. For a kids’ birthday, use milk chocolate instead of dark and top each cup with rainbow sprinkles or mini M&Ms as the chocolate sets. For holiday parties, stir in a tablespoon of Baileys or hazelnut liqueur to the cheesecake mixture and finish with shaved chocolate or toasted hazelnuts. A brunch or baby shower spread loves a lighter touch: swirl a teaspoon of raspberry jam into the cheesecake layer before you cover it with chocolate, or drizzle a tiny bit of salted caramel over the finished cups just before serving. If you want a show-stopping platter, make a trio: dark chocolate shells as written, milk chocolate shells with crushed hazelnuts, and white chocolate shells with a single fresh raspberry on top—simple changes, but they look like you went to pastry school.
Serving of Nutella Cheesecake Chocolate Cups
Conclusion
If you’re anything like me, desserts aren’t just about something sweet after dinner—they’re little memory makers. These Nutella Cheesecake Chocolate Cups are one of those recipes that magically turns an ordinary evening into a “remember when…” moment. Whether you set them out in the center of the table after Sunday dinner, surprise a friend with a plateful, or sneak one as a late-night fridge treat, they have a way of bringing people closer and sparking smiles.
I hope you feel inspired to whisk, melt, and spoon your way through this recipe, even if you’re not a “fancy dessert” person. You don’t need special skills or equipment—just a bit of patience, some chocolate, and the willingness to lick the spoon. Make them with your kids, your partner, your roommates, or just for yourself. You absolutely deserve that kind of joy.
For more delicious recipes like this, follow us on social media!
What exactly are Nutella Cheesecake Chocolate Cups?
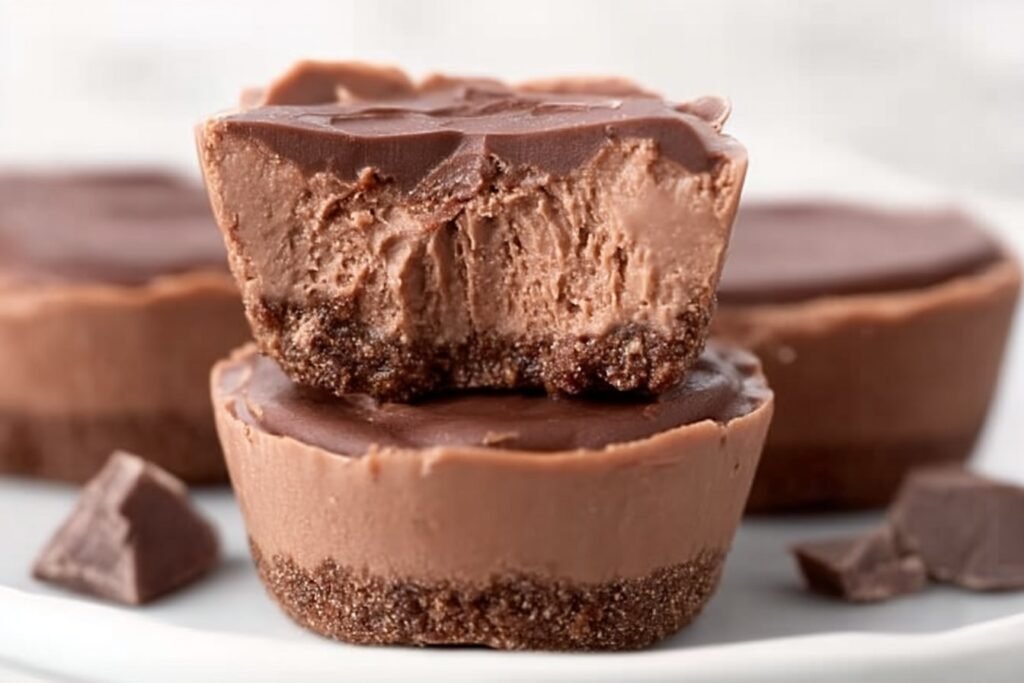
Nutella Cheesecake Chocolate Cups are individual no-bake desserts made with a crisp dark chocolate shell and a silky Nutella cheesecake filling tucked inside. The cheesecake layer combines cream cheese, Nutella, sour cream, and vanilla for a tangy, chocolate-hazelnut flavor. Everything sets up in cupcake liners, so you get perfectly portioned treats with very little fuss. They’re rich, creamy, and a little bit like a Ferrero Rocher met a mini cheesecake.
How do I store Nutella Cheesecake Chocolate Cups and how long do they last?
Store your Nutella Cheesecake Chocolate Cups in an airtight container in the refrigerator so the filling stays firm and the chocolate doesn’t get soft. They keep well for about 4–5 days in the fridge, and the flavor often improves by day 2 as everything settles. For longer storage, you can freeze them for up to 2 months. Freeze on a tray first, then transfer to a container or freezer bag so they don’t stick together. Let them sit at room temperature for about 10–15 minutes before serving so the cheesecake center softens slightly.
Can I change the chocolate or adjust the sweetness in this recipe?
Yes, you can absolutely swap the dark chocolate for milk chocolate if you want a sweeter Nutella Cheesecake Chocolate Cup, or even use a mix of both for balance. Keep in mind that milk chocolate is softer and sweeter, so the cups will taste richer and less intense in cocoa flavor. If you’d like them less sweet, stick with a higher percentage dark chocolate (around 60–70%). White chocolate also works, but it makes a much sweeter shell and can be a bit thicker to work with. No matter which chocolate you choose, melt it gently and stir often so it stays smooth and glossy.
Recipe
Nutella Cheesecake Chocolate Cups
Ingredients
Ingredients
- 8.8 oz cream cheese room temperature
- 1/2 cup Nutella
- 1/2 teaspoon vanilla bean paste
- 1/4 cup sour cream
- 3 1/2 cups dark chocolate chips or chopped dark chocolate
Instructions
- Line a 12-cup muffin pan with paper cupcake liners and set aside.
- Place the cream cheese in a large mixing bowl and beat with an electric mixer on medium speed for 1 minute, until smooth and creamy.
- Add the Nutella and vanilla bean paste to the cream cheese and beat until the mixture is smooth and evenly combined.
- Add the sour cream and beat briefly just until fully incorporated and silky; do not overmix.
- Place the dark chocolate in a heatproof bowl and microwave in 30-second increments, stirring well after each, until completely melted and smooth.
- Spoon 1 to 2 teaspoons of melted chocolate into the bottom of each cupcake liner, tilting the pan or using the back of the spoon to spread the chocolate to fully cover the base.
- Drop about 1 tablespoon of the Nutella cheesecake filling into the center of each cup, making sure the filling does not touch the sides of the liners so there is room for the chocolate shell.
- Spoon more melted chocolate over the cheesecake filling in each liner, letting it flow down the sides to fully cover and seal the filling under a chocolate layer.
- Gently tap the muffin pan on the counter to level the chocolate tops and release any air bubbles.
- Place the pan in the refrigerator and chill for 2 hours, or until the chocolate is completely set and the centers are firm.
- Serve chilled or slightly softened after a few minutes at room temperature, and store any leftovers covered in the refrigerator.
Notes
- Let the melted chocolate cool for 1 to 2 minutes before assembling so it is fluid but not hot enough to melt the filling.
- For easier removal, peel away the paper liners just before serving to keep the chocolate shells neat.
- These cups keep well in the refrigerator for up to 5 days or can be frozen in an airtight container for up to 1 month.