Halloween in my kitchen has always been about more than just candy—it’s about creating memories that feel a little silly, a little spooky, and always delicious. The first time I made a Monster Halloween Pretzel, I wasn’t sure how they’d turn out. I had pretzel rods lined up on parchment paper, bowls of melted candy in every color, and sprinkles scattered everywhere.
What started as a messy experiment with candy eyeballs quickly turned into laughter, goofy monster faces, and a treat that disappeared faster than I could take photos. That’s the magic of these pretzels—they’re easy enough for kids to help with, but fun enough that adults can’t resist joining in too. In this article, we’ll dive into the basics, decoration ideas, and storage tips for these festive snacks. By the end, you’ll be ready to whip up your own batch of colorful monster creations.
Why Monster Halloween Pretzels Are So Special
There’s something about combining the crunch of a salty pretzel with the sweetness of candy melts that makes every bite irresistible. But the real fun of a Monster Halloween Pretzel comes in the decorating. With just a few ingredients, you can create ghouls, mummies, or silly monsters that look like they belong on a haunted dessert table. It’s the kind of recipe that invites creativity—you can go bold with bright neon colors, keep it spooky with classic black and orange, or even go pastel for a “cute monster” vibe.
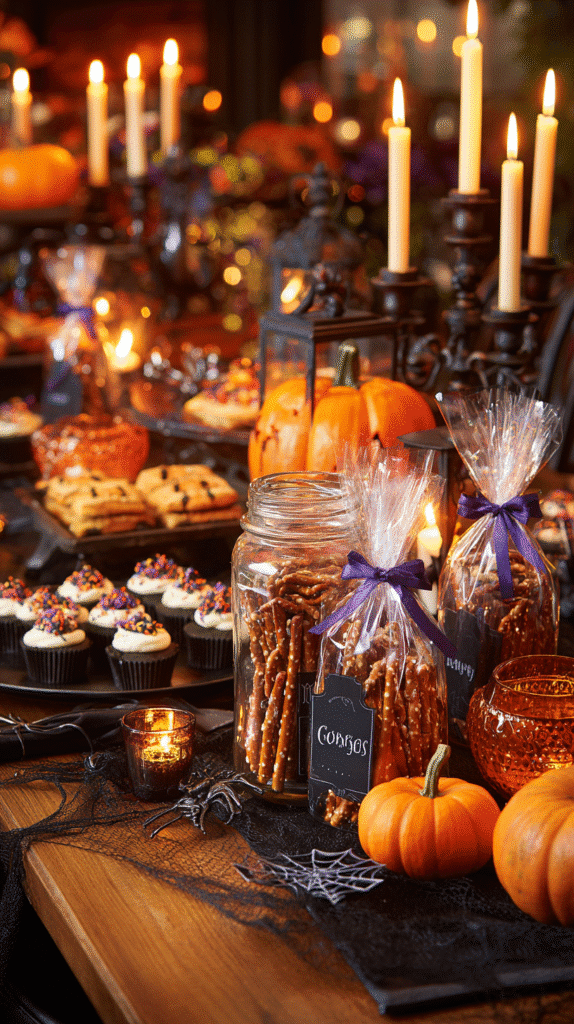
When I first styled them for a party, I noticed how well they paired with other Halloween treats. They made a perfect addition alongside my Halloween cupcakes and even looked great next to a batch of spider web brownies. The versatility of these pretzels is what makes them shine: you can serve them as party favors, line them up in treat bags, or pile them high on a tray for a centerpiece.
A Sweet & Spooky Tradition
Making a Monster Halloween Pretzel isn’t just about food—it’s about the ritual. Every year, I pull out the bowls, set up a decorating station, and let the kitchen turn into a mini monster factory. The best part? There’s no right or wrong way to make them. Some turn out hilarious, others look oddly creepy, but every single one is guaranteed to be delicious. And when the lights dim, and the party begins, these colorful creations always get the biggest reactions.
That’s why they’ve become one of my go-to Halloween traditions—simple, festive, and full of joy.
Monster Halloween Pretzel Ingredients
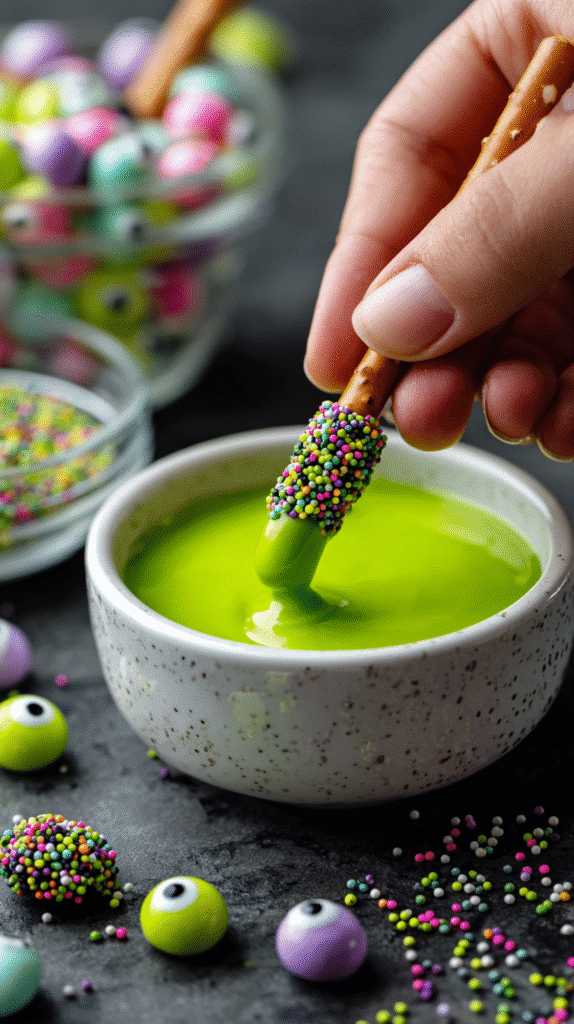
At the heart of every Monster Halloween Pretzel are just a handful of fun, colorful ingredients that you can find at almost any grocery store. The base starts with pretzel rods—they’re sturdy, easy to hold, and perfect for dipping. From there, candy melts bring the magic. These versatile discs melt smoothly in the microwave, making it simple to coat pretzels in spooky shades of green, purple, orange, or classic chocolate. Add a few drops of food coloring to white melts, and you’ll have a rainbow of possibilities for your monsters.
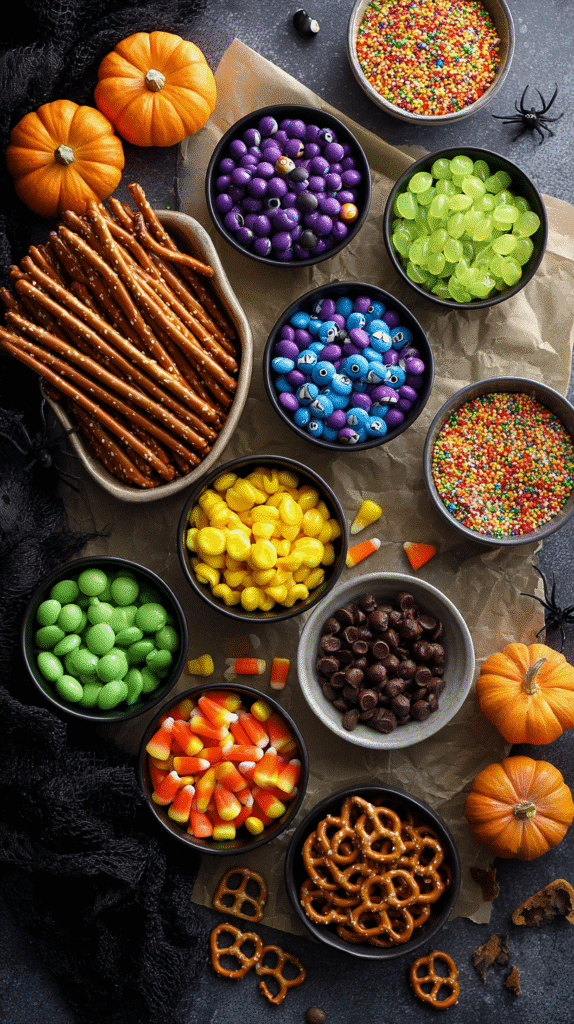
No monster would be complete without decorations. Candy eyeballs instantly transform a coated pretzel into a silly (or creepy!) character, while Halloween-themed sprinkles add texture and festive flair. For a party-ready look, I like to keep a few different sprinkle mixes on hand—pumpkins, bats, or even glow-in-the-dark styles if you can find them. The best part is how flexible the recipe is. You can make a dozen unique designs with just one batch of supplies.
Here’s a quick breakdown of the essentials:
| Ingredient | Purpose |
|---|---|
| Pretzel Rods | Sturdy base for dipping and decorating |
| Candy Melts | Smooth coating in a variety of colors |
| Food Coloring | Adds custom shades to white melts |
| Halloween Sprinkles | Festive textures like pumpkins, bats, and glitter |
| Candy Eyeballs | Brings the “monster” to life |
Tools & Setup for Success
The process is as much about prep as it is about decorating. Before melting your candy, set up two sheets of parchment paper—one for dipping and one for drying. Small microwave-safe bowls are ideal for melting wafers in different colors, while spoons or small spatulas help spread the coating evenly. For clean drizzles, you can even make a quick DIY piping bag by cutting the corner of a Ziploc bag.
A baking sheet or cutting board under your parchment makes moving the pretzels around easier, especially if you’re cooling them in the fridge. Cleanup is minimal since everything sits on wax paper, which means more time to enjoy your creations.
One thing I love about this recipe is that the tools are so basic. If you’ve ever made my easy sugar cookies or even tried simple fudge recipes, you’ll notice the setup feels very familiar. It’s fuss-free, which makes it perfect for baking with kids or hosting a Halloween treat-making night.
With everything ready, you’ll have the perfect monster-making station that’s as much fun as the final bites.
Creative Ideas for Decorating
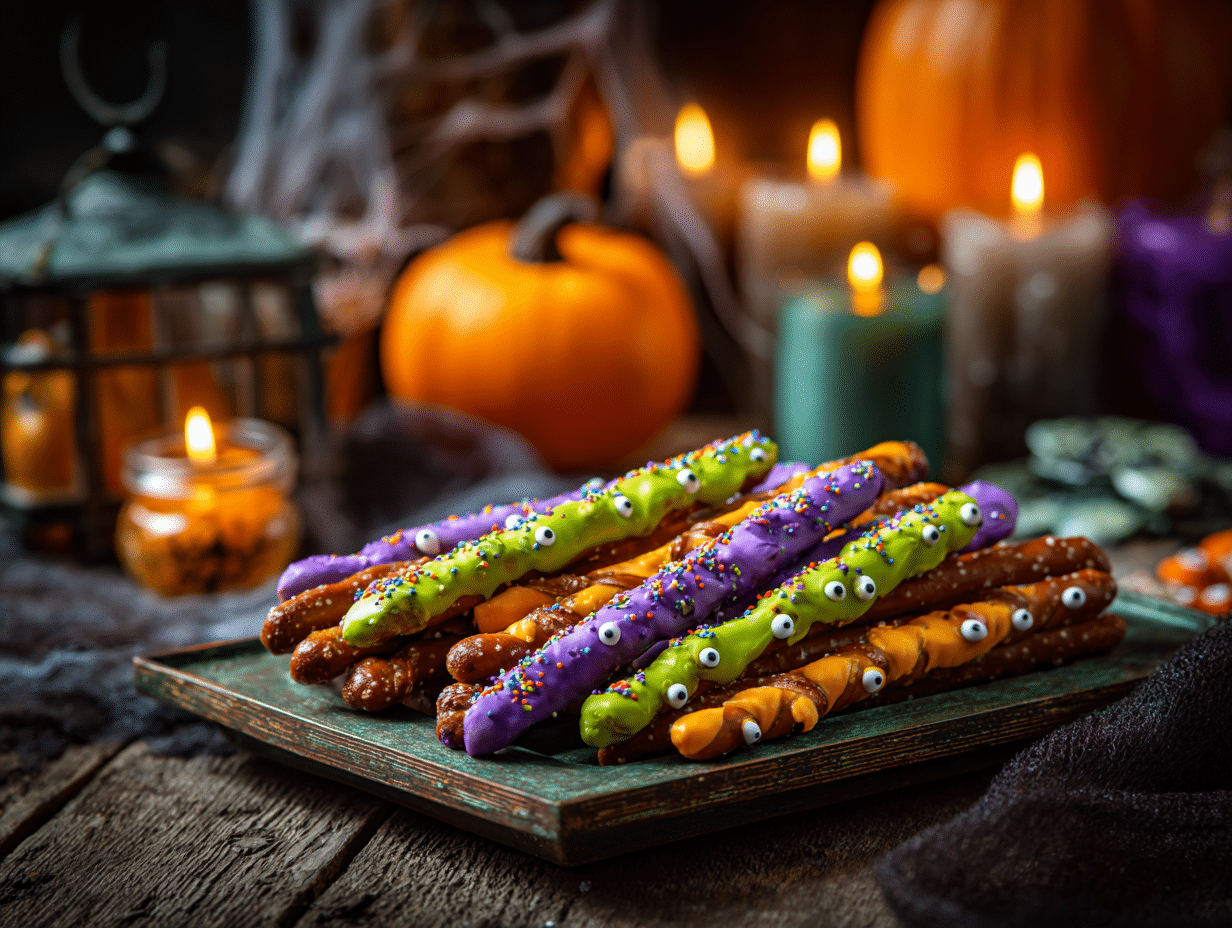
This is where a Monster Halloween Pretzel really comes to life. Once your pretzels are dipped and coated, the decorating fun begins. Monsters can be silly, scary, or even downright goofy—there are no rules. One of my favorite designs is the classic mummy: coat the pretzel in white candy melt, let it dry, then drizzle more white across like bandages before sticking on two candy eyeballs. Suddenly, you’ve got a pretzel with personality!
Another fun option is to make colorful monsters. Use bright green, orange, or purple candy melts as the base, then sprinkle on candy confetti or glittery sugar for texture. Place eyeballs in unexpected spots—three on top for a goofy alien look, or one in the middle for a cyclops effect. The more variety you create, the more exciting your snack table will look.
If you’re planning a party spread, I recommend mixing in other themed treats like Halloween bark or pairing with creepy cupcakes for a dessert table that wows. Not only do the pretzels add a pop of color, but they also balance sweet and salty in a way guests love.
Techniques That Make It Fun
The best part about making Monster Halloween Pretzels is that anyone can do it. Even if you’ve never melted candy before, the process is simple. Dip each pretzel rod into melted candy, tap off the excess, and lay it on parchment to dry. While the coating is still wet, add sprinkles or eyeballs so they stick firmly. Once set, you can drizzle another color on top for extra detail.
There are two main drizzle techniques. With the spoon method, dip a spoon into melted candy and move it side-to-side over the pretzel for a bold, zig-zag effect. For cleaner lines, make a quick piping bag with a Ziploc—snip a tiny corner, fill with candy melt, and squeeze over the pretzel for precise stripes or swirls.
The key is to have fun with it. Some pretzels will look polished, others might turn out wild, but every single one will taste incredible. And honestly? The ones that look the funniest usually get the biggest laughs. That’s what makes these treats so perfect for Halloween—they’re tasty, but they also become little edible works of art.
Perfect for Parties and School Events
One of the best things about a Monster Halloween Pretzel is how easy it is to share. Their long shape makes them perfect for standing in a jar like spooky wands or laying across a platter for a dessert table centerpiece. They travel well too, which makes them a favorite for classroom parties or Halloween potlucks. Simply slide each pretzel into a clear treat bag, tie it with an orange or black ribbon, and you’ve got an instant party favor that looks like it came from a bakery.
When I hosted a Halloween movie night, I set up a “monster bar” where guests could decorate their own pretzels with candy eyes and sprinkles. It was an instant hit and made the evening feel interactive. Paired with other themed treats like pumpkin spice donuts or Halloween cookies, the pretzels rounded out a spread that kept everyone coming back for seconds.
The balance of salty and sweet also makes them a great option for guests who don’t want something overly sugary but still crave a festive bite. They really do check all the boxes—cute, fun, delicious, and practical.
Storage & Make-Ahead and Tips
If you’re prepping ahead of time, these pretzels are very forgiving. Once decorated, let them dry completely and then store them in an airtight container. They’ll stay fresh at room temperature for about a week, though you can pop them in the fridge if your kitchen is warm. Just be sure to separate layers with parchment paper so the decorations don’t stick together.
For make-ahead parties, I like to finish a batch two or three days early. That way, I can focus on other party details without stressing about last-minute snacks. If your candy melts ever get too thick while decorating, just reheat in the microwave for a few seconds and stir until smooth again.
By the time Halloween rolls around, your monster pretzels will be ready to steal the show. They’re simple, reliable, and always a crowd-pleaser—everything you want in a holiday recipe.
Frequently Asked Questions About Monster Halloween Pretzel
What is the Monster Halloween Pretzel recipe?
The Monster Halloween Pretzel recipe is a fun Halloween treat made by dipping pretzel rods in melted candy, then decorating them with sprinkles and candy eyeballs. It’s less about exact measurements and more about creativity, making it a perfect activity for kids and adults alike.
What ingredients are needed for Monster Halloween Pretzels?
You’ll need pretzel rods, candy melts (or chocolate wafers), food coloring, Halloween sprinkles, and candy eyeballs. These basics let you create a variety of silly, spooky, or colorful monster designs.
Can I use pretzel twists instead of rods?
Yes! While pretzel rods are sturdier and easier to decorate, pretzel twists work well too. They’re especially fun for bite-sized monster treats. Just dip, coat, and decorate in the same way.
How do I store Monster Halloween Pretzels?
Store decorated pretzels in an airtight container at room temperature for up to a week. If it’s warm in your kitchen, you can refrigerate them, but always separate layers with parchment to avoid sticking.
Conclusion
There’s nothing like a Monster Halloween Pretzel to bring laughter and sweetness to the spooky season. They’re easy to make, endlessly customizable, and guaranteed to be the hit of any Halloween table. Whether you’re serving them at a party, handing them out as favors, or just enjoying a fun family baking night, these pretzels are more than a recipe—they’re a memory in the making.
So grab some candy melts, line up your pretzel rods, and let your creativity run wild. This Halloween, skip the complicated desserts and make something that’s fun, festive, and unforgettable. Your monster pretzels might not all look perfect, but that’s the point—they’ll taste amazing and make everyone smile.
Want more snack ideas and recipe inspo? Follow along over on Pinterest for new flavor combos and meal-prep guides, or join the cozy kitchen chats on Facebook. Let’s keep making snacks that taste like joy — and feel like home.
Monster Halloween Pretzel – A Fun & Spooky Treat for All Ages
Ingredients
- 12 pretzel rods
- 1 cup white candy melts
- 1 cup orange candy melts
- 1 cup green candy melts
- Food coloring optional, for tinting white melts
- 1/2 cup Halloween sprinkles
- 1/4 cup candy eyeballs
- Parchment or wax paper
Instructions
- 1. Line two baking sheets with parchment paper.
- 2. Melt candy melts in separate bowls according to package directions. Stir until smooth. Add food coloring if desired.
- 3. Dip each pretzel rod into melted candy, coating about 2/3 of the rod. Tap lightly to remove excess.
- 4. Place dipped pretzels on parchment paper and add sprinkles or candy eyeballs while coating is still wet.
- 5. Let pretzels set at room temperature for 10–15 minutes, or place in the fridge for faster setting.
- 6. For mummy-style pretzels, drizzle white candy melt across a coated pretzel and add eyeballs near the top.
- 7. Once dry, serve immediately or store in an airtight container.