The Practical Why Behind It
Mini Caramel Apple Cheesecake Bites are not just cute, they are strategic. Baking cheesecake in a muffin tin means the smaller portions set faster and more evenly, so you avoid the heartbreak of a cracked full size cheesecake. You also skip water baths and fussy springform pans, yet you still get that classic creamy center. Portion control becomes automatic, which is especially handy for parties, bake sales, or a dessert table that already includes richer treats like layered brownies or peanut butter pie bars. Each bite is already plated in its own wrapper, so cleanup feels blessedly light.
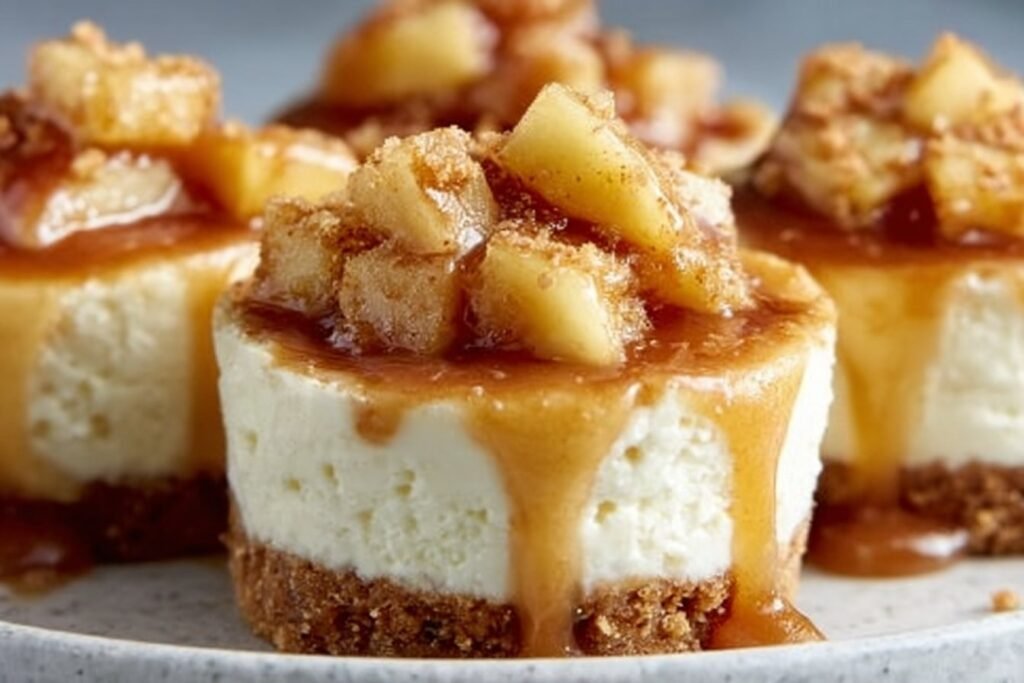
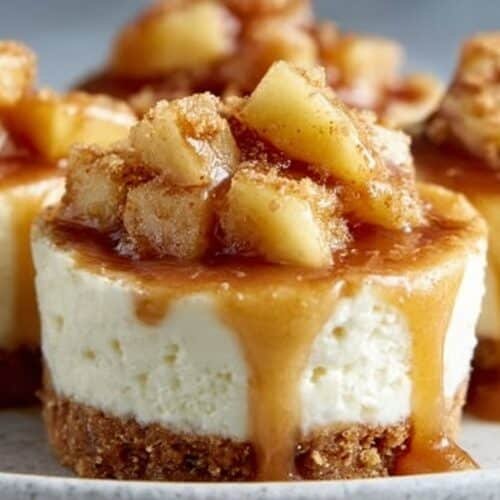
From a flavor and texture standpoint, the structure of these Mini Caramel Apple Cheesecake Bites works hard behind the scenes. The quick baked graham crust gives you a crisp, buttery base that holds its shape without turning soggy under the apple topping. Cooking the apples with brown sugar, butter, and cinnamon before assembly concentrates their flavor and drives off excess moisture, so the cheesecake layer stays velvety, not weepy. A short bake at a moderate 325°F lets the cream cheese and eggs set gently, which keeps the texture smooth and prevents overbaking at the edges. The final drizzle of caramel acts like a glossy little flavor blanket, tying together the tart fruit, sweet filling, and toasty crumbs in one balanced, handheld dessert that actually behaves the way you need it to in real life.
Step-by-Step Method
Start by preheating your oven to 325°F and lining a standard muffin tin with paper liners so your Mini Caramel Apple Cheesecake Bites release cleanly. Mix the graham cracker crumbs with the melted butter until the texture feels like damp sand that holds together when you pinch it. Spoon about 1 tablespoon into each muffin cup, then press it down firmly with the back of a spoon or the bottom of a small glass to form an even crust. Bake the crusts for 5 to 7 minutes, just until set and fragrant, then let them cool while you make the cheesecake layer so they do not turn soggy.
For the cheesecake filling, beat the softened cream cheese with the sugar until perfectly smooth, scraping the bowl so no lumps hide at the bottom. Add the vanilla bean paste, then the eggs one at a time, mixing on low so you do not whip in too much air, which can cause cracks. The batter should look silky and pourable, almost like thick cake batter. Divide the cheesecake mixture over the cooled crusts, filling each cup about two thirds full, and gently tap the pan on the counter to pop any air bubbles before baking.
While the cheesecakes bake, cook the apple topping so it is ready to meet the caramel. In a skillet, melt the butter, then stir in the brown sugar and cinnamon until glossy and syrupy, and finally add your chopped apples. Cook just until the apples are tender but still hold their shape, then cool the mixture completely so it does not melt the cheesecake tops. When the Mini Caramel Apple Cheesecake Bites are baked with a slight jiggle in the centers, cool them to room temperature, then chill for at least 1 hour. Right before serving, spoon the cooled cinnamon apples over each bite, drizzle with caramel sauce, and if you want extra flair, add a tiny pinch of flaky salt like I do on my salted caramel desserts for that final bakery style finish.
Make-Ahead and Storage Notes
Mini Caramel Apple Cheesecake Bites are very make ahead friendly, which makes them perfect for parties, holidays, or those weeks when you know dessert is nonnegotiable. For the best flavor and texture, bake them fully, cool to room temperature, then chill at least 4 hours before serving. You can make the cheesecake portion up to 2 days ahead, then add the caramel and apple topping a few hours before serving so everything tastes fresh and the apples stay pretty. If you like to plan in stages, you can also make just the graham crusts a day in advance, keep the pan tightly covered in the fridge, then fill and bake the next day.
Once your Mini Caramel Apple Cheesecake Bites are chilled and topped, store them in an airtight container in the refrigerator for up to 4 days. Arrange them in a single layer, or separate layers with parchment so the caramel does not glue everything together. The crust will soften a little over time, but the bites still taste delicious and cozy, especially if you enjoy colder, creamier cheesecakes. For longer storage, freeze the baked and cooled cheesecakes without the caramel apple topping for up to 2 months, well wrapped in plastic and then in a zip top bag or container. Thaw in the fridge overnight, then top with freshly warmed caramel and sautéed apples so they taste as bright and silky as the day you baked them, much like I recommend for my mini pumpkin cheesecakes.
Variations and How to Serve It
You can play with these Mini Caramel Apple Cheesecake Bites quite a bit without losing that cozy fall personality. For a salted caramel twist, sprinkle a few flakes of sea salt over the warm caramel and apples before they set. If you want extra crunch, add finely chopped toasted pecans or walnuts on top of each bite, or press some into the graham cracker crust before baking. For a more intense apple flavor, mix a spoonful of apple butter into the cheesecake batter, or swap in spiced apple cider for part of the vanilla. You can also turn these into a lighter treat by using low fat cream cheese and a drizzle of warm homemade caramel instead of a heavy sauce.
These Mini Caramel Apple Cheesecake Bites shine on a dessert board with fresh apple slices, dark chocolate squares, and maybe a batch of brownie bites or no bake cheesecake bars. Serve them slightly chilled so the cheesecake is creamy but not firm, and the caramel stays soft and glossy. For holidays, nestle each bite in a pretty paper liner, then dust with a touch of cinnamon sugar just before serving. If you are entertaining, set up a little topping bar with crushed pretzels, extra caramel, whipped cream, and chopped nuts so everyone can decorate their own. They also travel well, so they work beautifully for potlucks, school gatherings, or any night when you want an easy, hand held dessert that still feels special.

Instructions Process of Mini Caramel Apple Cheesecake Bites
Conclusion
The sweetest thing about baking, at least for me, is how something as simple as creaming cheese and sugar can turn into a memory that sticks around far longer than dessert. These little bites are just that kind of treat. You pull the pan from the oven, the caramel bubbles softly around the edges, and suddenly everyone is drifting into the kitchen to “just try one.” Before you know it, you are standing around the counter together, talking, laughing, and reaching for seconds.
I love recipes that do not just taste good, but feel like an occasion, even on an ordinary Tuesday. A batch of Mini Caramel Apple Cheesecake Bites is easy enough for a cozy night in, pretty enough for a party tray, and special enough to share with the people you love most. I hope you tie on your favorite apron, turn on some music, and give these a try soon. Then tell me how they turned out, and what little moments they helped you celebrate.
For more delicious recipes like this, follow us on social media!

Serving of Mini Caramel Apple Cheesecake Bites
Recipe
Mini Caramel Apple Cheesecake Bites
Ingredients
Ingredients
- 1 1/2 cups graham cracker crumbs
- 1/2 cup unsalted butter melted
- 16 oz cream cheese softened
- 1/2 cup granulated sugar
- 1 tsp vanilla bean paste
- 2 large eggs room temperature
- 1 cup peeled and diced apple
- 1/2 cup packed brown sugar
- 2 tbsp unsalted butter
- 1 tsp ground cinnamon
- 1/2 cup caramel sauce plus more for drizzling
- 1 cup whipped cream for topping
Instructions
- Preheat the oven to 325°F. Line a standard 12 cup muffin tin with paper liners.
- In a medium bowl, combine the graham cracker crumbs and melted butter and stir until the mixture resembles damp sand and holds together when pressed.
- Divide the crumb mixture evenly among the muffin cups, using about 1 tbsp per cup, and press firmly into an even layer to form crusts.
- Bake the crusts for 5 minutes, then remove from the oven and let cool slightly while you prepare the cheesecake filling.
- In a large bowl, beat the softened cream cheese with the granulated sugar until smooth and creamy with no lumps.
- Beat in the vanilla bean paste, then add the eggs one at a time, mixing on low speed just until combined after each addition. Do not overmix.
- Divide the cheesecake batter evenly over the cooled crusts, filling each muffin cup about two thirds full. Gently tap the pan on the counter to release any air bubbles.
- Bake the cheesecake bites for 18 to 20 minutes, or until the centers are set with a slight jiggle when you gently shake the pan.
- Remove the pan from the oven and let the cheesecakes cool in the pan to room temperature.
- While the cheesecakes bake or cool, make the apple topping. In a medium saucepan over medium heat, melt 2 tbsp butter.
- Add the brown sugar and cinnamon to the melted butter and stir until the mixture is smooth and bubbly.
- Stir in the diced apples and cook, stirring occasionally, for 5 to 7 minutes, until the apples are tender and coated in a thick, glossy sauce.
- Remove the pan from the heat and let the apple mixture cool completely to room temperature.
- Once the cheesecakes have cooled to room temperature, transfer the pan to the refrigerator and chill the cheesecakes for at least 1 hour, or until fully set.
- When ready to serve, remove the chilled cheesecake bites from the muffin tin and peel away the liners.
- Spoon a small amount of the cooled cinnamon apple mixture onto the center of each cheesecake bite.
- Drizzle each topped cheesecake with caramel sauce and add a dollop of whipped cream on top.
- Serve chilled and refrigerate any leftovers in an airtight container.
Notes
- Make sure the cream cheese is fully softened to avoid lumps in the cheesecake batter.
- Let the apple topping cool completely so it does not melt or sink into the cheesecake tops.
- Chill the cheesecakes thoroughly before topping and serving for the best texture.
- Store leftovers in the refrigerator for up to 4 days or freeze un-topped cheesecakes for up to 2 months.