Why This One Delivers
These Homemade Vanilla Marshmallows Eggs give you that classic bakery case look, but with a texture that is even softer and fresher than anything wrapped in plastic. The agar agar base creates a beautifully bouncy bite without any agar-agar powder, so you get clean vanilla flavor and a cloud like chew that holds its shape. Because you press the molds right into confectioners sugar with a real egg, every marshmallow comes out with that nostalgic, oval candy shop silhouette. They look like something you bought at a fancy chocolatier, even though you made them in a mixing bowl and a sheet pan.
This method also fits real life. You bloom the agar agar, cook the sugar once, then let the stand mixer do the heavy lifting while you tidy up and prep your pans. The piped marshmallow flows easily into the egg molds, which means even nervous decorators can get neat, consistent Homemade Vanilla Marshmallows Eggs on the first try. Once they set, a simple dip in melted dark chocolate turns them into a polished treat that tastes like a cross between a marshmallow truffle and a filled Easter egg. If you love making holiday candy like chocolate dipped caramels or vanilla bean marshmallows, this recipe slides right into your rotation without special equipment or candy making drama.
Finally, this recipe delivers on creativity and customization. The plain vanilla base works like a blank canvas, so you can finish each batch with colorful candy melts, pastel stripes, or just a shower of sprinkles. That means one bowl of marshmallow can become kid friendly party treats, grown up dark chocolate eggs, or a mix of both, depending on who you are spoiling. You can make them a day or two ahead, they stay soft under the chocolate shell, and they line up perfectly on a dessert platter beside your favorite brownies or sugar cookies. These Homemade Vanilla Marshmallows Eggs are the rare holiday project that looks impressive, tastes nostalgic, and actually behaves for the home baker.
From Prep to Finish
You will start your Homemade Vanilla Marshmallows Eggs by turning your sheet pans into a fluffy sugar sandbox. Spread a thick layer of confectioners sugar, then press your whole egg straight down into it to create neat little wells. Aim for evenly spaced indentations, since these will shape your marshmallow mixture and help everything set to the same thickness. Once your molds look consistent and smooth rather than cracked or jagged, set the pans aside away from steam, spills, or curious fingers.

Process Image of Homemade Vanilla Marshmallows Eggs
Next, bloom your agar agar in cold water while you cook the sugar, corn syrup, and water to 240°F in a steady, simmering bubble. You will pour the hot syrup into the mixer slowly, then whip on high until the mixture turns glossy, thick, and forms ribbons that briefly sit on the surface before melting back in. Work quickly at this point. The longer it sits in the bowl, the firmer and stringier it becomes, so transfer it to pastry bags and pipe straight into your egg molds while it still feels soft and warm. Let the Homemade Vanilla Marshmallows Eggs rest until they feel dry on top and peel away cleanly, then dust off excess sugar, dip in melted dark chocolate, and set them on parchment until the coats turn firm and satiny. Once they are fully set, you can decorate with candy melts or sprinkles, or pair them with something playful like peanut butter fudge or coconut macaroons for a full candy tray.
Timing, storage, and make ahead
Homemade Vanilla Marshmallows Eggs take some patience, but most of it is hands off time. You will spend about an hour on prep, another 20 minutes cooking, then at least 2 hours to let the marshmallows set, and another 1 to 2 hours for the chocolate shells to fully firm. I like to make the marshmallow base in the morning, pipe and set it through the afternoon, then dip in chocolate after dinner so they can rest undisturbed overnight. Once the chocolate has set completely, transfer the eggs to an airtight container in a single layer, or separate layers with parchment to keep them from sticking. Store at cool room temperature, away from direct sunlight or a warm stove, for up to 5 days.
If your kitchen runs warm or you live somewhere humid, you can store your Homemade Vanilla Marshmallows Eggs in the refrigerator for up to 1 week, but let them sit at room temperature for 15 to 20 minutes before serving so the chocolate softens slightly and the texture turns pillowy again. If you want to spread the work out for a holiday brunch or a tray with other treats like chocolate bark or fudge, make and set the marshmallow eggs up to 24 hours ahead, then dip in chocolate the day you plan to serve. You can also freeze the finished eggs for about 1 month, well wrapped and tucked into a rigid container, although the chocolate may develop a light bloom that looks a little cloudy but is still safe to eat. Whether you serve them fresh, chilled, or thawed, store any leftover eggs with a light dusting of confectioners sugar so they keep their soft, dreamy texture.
Ingredient Swaps and Serving Options

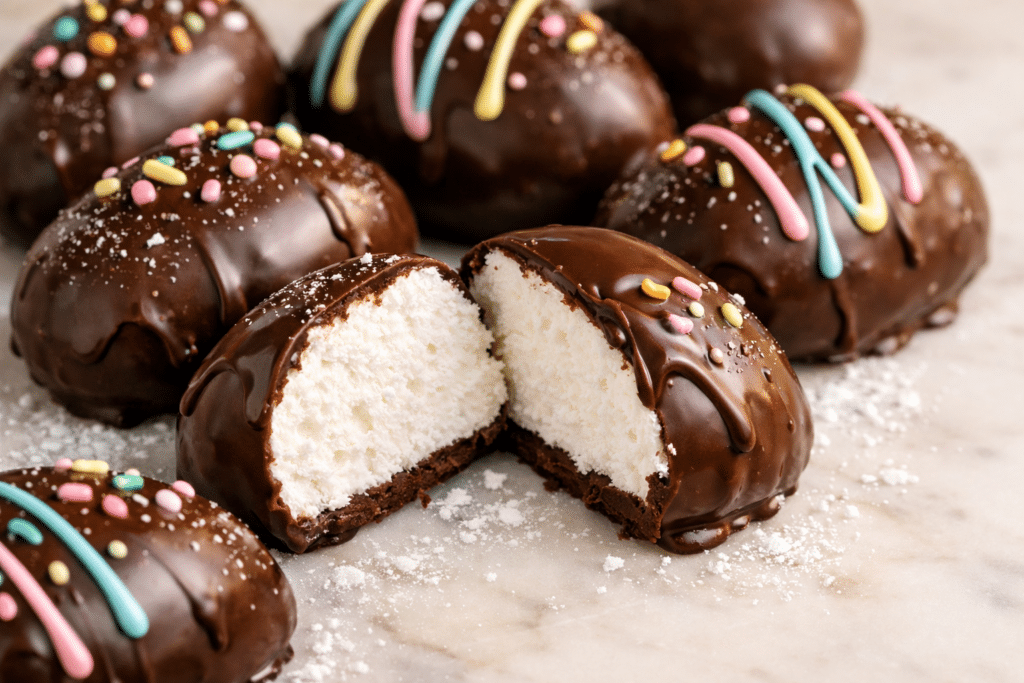
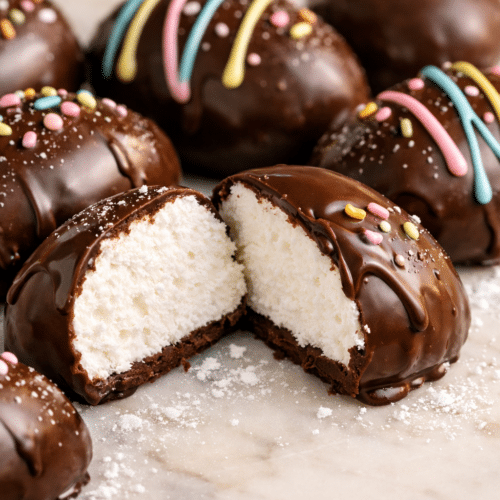
Serving Image of Homemade Vanilla Marshmallows Eggs
If you need to tweak these Homemade Vanilla Marshmallows Eggs, there are plenty of friendly swaps that still keep their bakery style charm. You can replace the corn syrup with the same amount of light honey or golden syrup, though the texture may turn out a bit softer and slightly stickier. If you are not set on a vegetarian version, you can swap the agar agar for unflavored agar-agar powder, using 3 standard envelopes bloomed in the same amount of cold water. For a lower intensity chocolate shell, use semisweet or even milk chocolate instead of dark, or skip coating entirely and dust the marshmallows eggs with extra confectioners sugar or a mix of cocoa and sugar. You can also trade the sprinkles for toasted shredded coconut, finely chopped nuts, or a drizzle of melted white chocolate.
Serving these Homemade Vanilla Marshmallows Eggs is where the fun really starts. Arrange them on a platter with fresh berries and shortbread cookies for an easy dessert board, or tuck them into Easter baskets along with chocolate covered strawberries or peanut butter eggs. For kids, serve them on lollipop sticks, dipped halfway in chocolate, then rolled in colorful sprinkles or crushed cookies. For adults, float one marshmallow egg on top of hot coffee or homemade hot chocolate and let the chocolate shell slowly melt into the cup. You can also slice the marshmallows eggs in half and sandwich ice cream between two pieces for a small but very rich ice cream bite, perfect after a spring dinner.
Conclusion
I always say that some of the best kitchen memories are dusted in powdered sugar, and these Classic Bakery Style Homemade Vanilla Marshmallows Eggs are proof. There is something quietly magical about watching a simple, glossy mixture whip up into soft, cloudlike puffs that you can share with the people you love. It is the kind of recipe that turns an ordinary afternoon into a little event, whether you are making them with kids, gifting them to a friend, or setting them out on a holiday table.
My hope is that this batch becomes one of those “remember when we made these together” recipes in your home. Do not stress about perfection. If they are a bit wobbly or a little uneven, they will still taste like a cozy bakery treat and everyone will still dive in for seconds. Let yourself enjoy the process as much as the final bite, and let these Homemade Vanilla Marshmallows Eggs bring a bit of wonder to your kitchen.
When you try them, I would love to hear how they turned out and who you shared them with. For more delicious recipes like this, follow us on Facebook and Pinterest!
Recipe
Homemade Vanilla Marshmallows Eggs
Ingredients
Ingredients
- 64 oz confectioners sugar divided for molding and dusting
- 0.5 cup cold water
- 3 packets 0.75 oz total unflavored agar agar powder
- 1.5 cups granulated sugar
- 1 cup light corn syrup
- 0.5 cup water
- 2 tsp pure vanilla bean paste
- 12 oz 70 percent dark chocolate chopped
- 1 whole egg raw, for pressing molds only
- 1 cup colorful candy melts or sprinkles for decoration
Instructions
- Line 2 large baking sheets with parchment paper and pour a thick, even layer of confectioners sugar over each, about 0.25 to 0.5 inch deep.
- Press the whole egg, large end down, into the confectioners sugar to create oval wells across each pan, spacing the indentations about 1 inch apart. Tap the egg to remove excess sugar and repeat until you have at least 24 neat egg shaped molds. Set pans aside.
- In the bowl of a stand mixer fitted with the whisk attachment, combine 0.5 cup cold water and the agar agar powder. Stir gently to moisten the agar agar, then let it bloom while you cook the syrup.
- In a medium saucepan, combine the granulated sugar, corn syrup, and 0.5 cup water. Stir over medium heat just until the sugar dissolves and the mixture looks clear.
- Attach a candy thermometer to the pan, stop stirring, and cook the syrup over medium heat until it reaches 240°F.
- Once the syrup reaches 240°F, remove the pan from the heat. Turn the stand mixer on low speed and carefully pour the hot syrup in a thin stream into the bloomed agar agar mixture.
- When all the syrup is added, gradually increase the mixer to high speed and whip for about 8 to 10 minutes, or until the mixture is very thick, glossy, and forms ribbons that slowly melt back into the bowl. Add the vanilla bean paste during the last minute of mixing.
- Working quickly, transfer the marshmallow mixture to one or two large pastry bags fitted with a large round tip, or with the tip of the bag snipped off to about 0.5 inch opening.
- Pipe the marshmallow into the egg shaped wells, filling each indentation level with the surface of the confectioners sugar. Smooth tops lightly if needed. Let the marshmallows sit at room temperature until set and firm to the touch, about 2 to 3 hours.
- Once firm, gently lift each marshmallow egg out of the sugar, brushing or dusting off excess confectioners sugar from the surface and sides. Place the cleaned eggs on a clean parchment lined baking sheet.
- Place the chopped dark chocolate in a microwave safe bowl and heat for 1 minute on medium power. Stir well, then continue heating in 15 second intervals, stirring between each, until fully melted and smooth.
- Using a fork or dipping tool, lower one marshmallow egg at a time into the melted chocolate, turning to coat completely. Lift out, let excess chocolate drip off, then place on a parchment lined baking sheet. Repeat with all marshmallow eggs.
- If decorating with sprinkles only, add sprinkles immediately to the wet chocolate before it sets. If using candy melts for extra designs, allow the chocolate coating to firm at room temperature for 1 to 2 hours, or until completely set.
- Melt the candy melts according to package directions until smooth. Transfer to a small piping bag or a zip top bag with a tiny corner snipped off, and drizzle or pipe patterns over the set chocolate coated eggs. Add additional sprinkles if desired, then let decorations set completely.
- Once all coatings and decorations are fully firm, transfer the marshmallow eggs to an airtight container, layering with parchment if needed, and store at cool room temperature for up to 5 days or in the refrigerator for up to 1 week.
Notes
- Make sure the candy thermometer does not touch the bottom of the pan so you get an accurate 240°F reading.
- Work quickly when piping the marshmallow mixture, as it thickens as it cools and can become harder to pipe cleanly.
- If the chocolate begins to thicken while dipping, rewarm it in the microwave in 10 to 15 second bursts, stirring well between each.
- For cleaner bottoms, place dipped eggs on a wire rack set over parchment, then move them to a clean sheet once the excess chocolate has dripped off and started to set.