The Memory Behind This Treat
The first time I discovered the joy of Homemade Coconut Mounds Bars, it was during a cozy family gathering. We were all nestled around the kitchen table, the smell of chocolate and coconut filling the air, creating an ambiance that was both comforting and nostalgic. My grandmother, known for her knack for turning simple ingredients into delightful treats, introduced me to these homemade gems. She had a way of making everything feel special, even a humble batch of candy bars.
One rainy Saturday, as the rain gently tapped against the windows, I decided to recreate those precious moments. The sweetness of shredded coconut combined with the richness of melted chocolate brought back memories of laughter and warmth, as if my grandmother was right there beside me, guiding my hands. These bars were not just a snack; they were a connection to cherished family traditions and a reminder of love shared through food.
What I love most about making these chocolate coconut bars is how they bring together everyone’s favorite flavors with such ease. They’re perfect for gifting, which I often do, wrapping each bar in parchment paper tied with a rustic twine. Whether you’re making these for a special occasion or just to savor a bit of nostalgia, these bars promise to create new memories while honoring the old ones. For more chocolatey adventures, try pairing them with my classic Chocolate Truffle recipe, another of my grandmother’s specialties.
How To Make It (Mix & Ingredients)
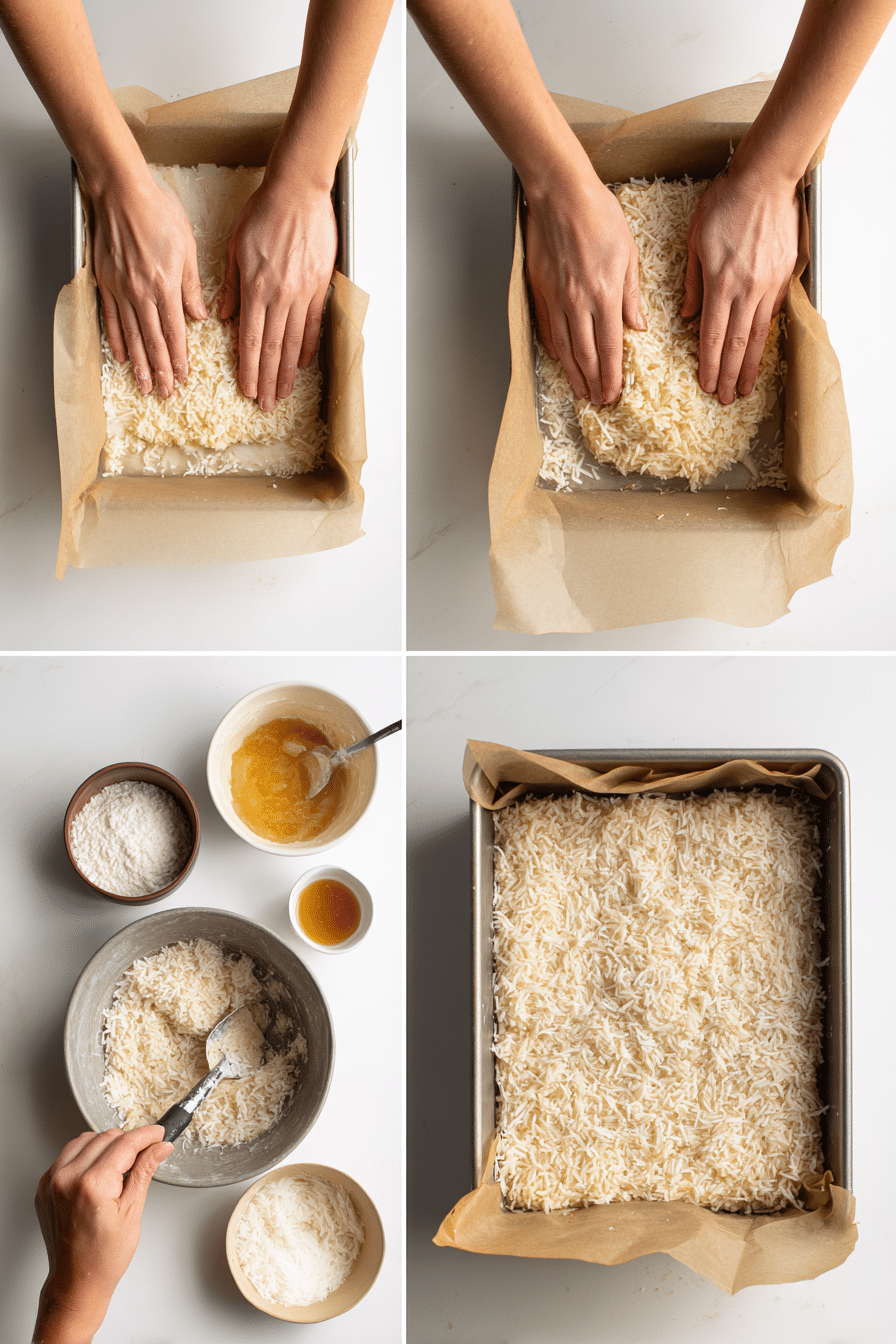
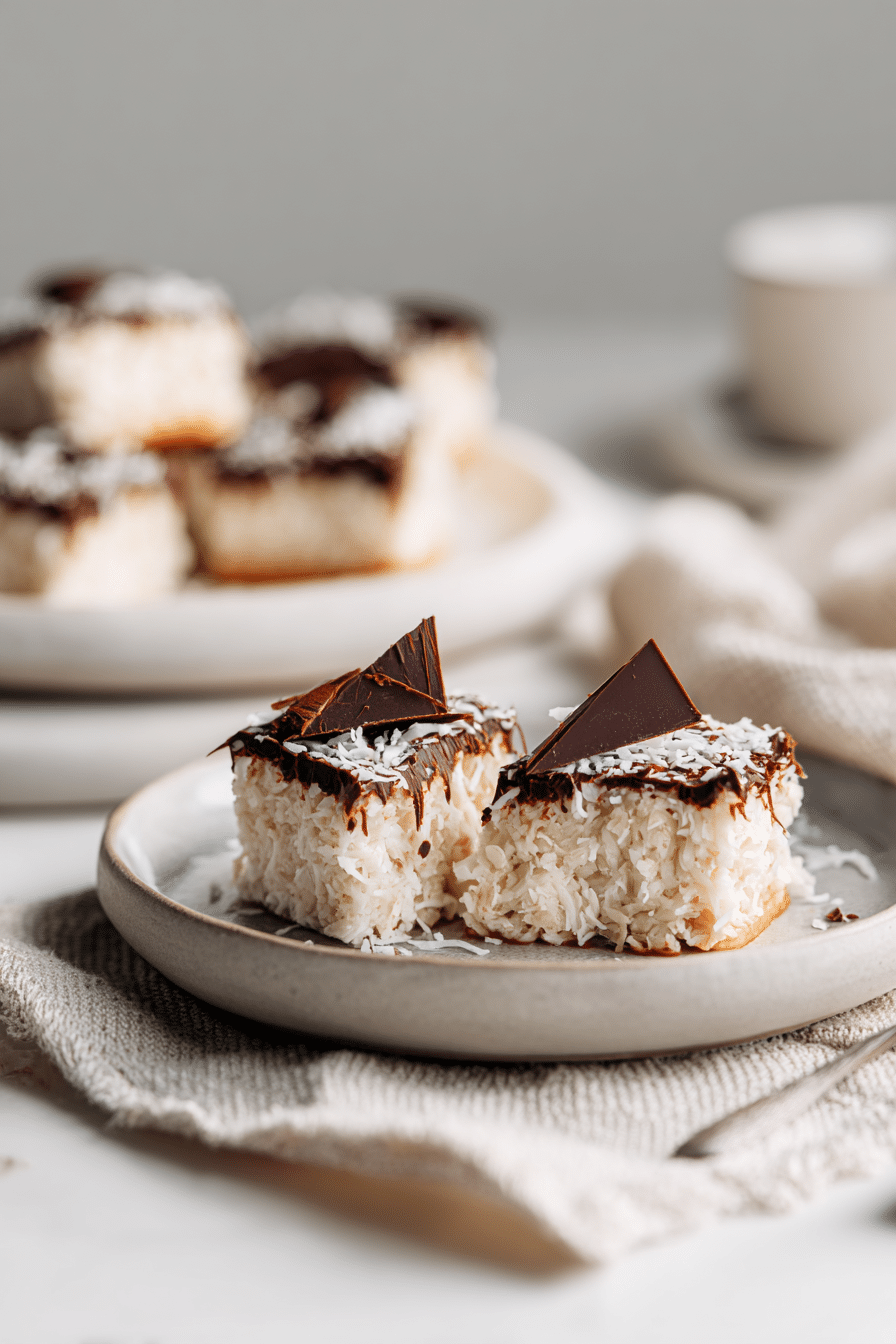
Crafting your own Homemade Coconut Mounds Bars is simpler than you might think. First, let’s dive into the heart of these treats—the gooey coconut filling. In a large mixing bowl, combine 3 cups of sweetened shredded coconut with a can of sweetened condensed milk. Add in 1/2 teaspoon of pure vanilla extract and a pinch of salt. These ingredients meld together to create a thick, sticky mixture that’s the essence of our favorite coconut candy. Press this dreamy blend into an 8×8-inch baking pan lined with parchment paper, smoothing the top to ensure even layers. Pop it in the freezer for about 30 minutes, allowing it to firm up nicely.
Instructions Process of Homemade Coconut Mounds Bars
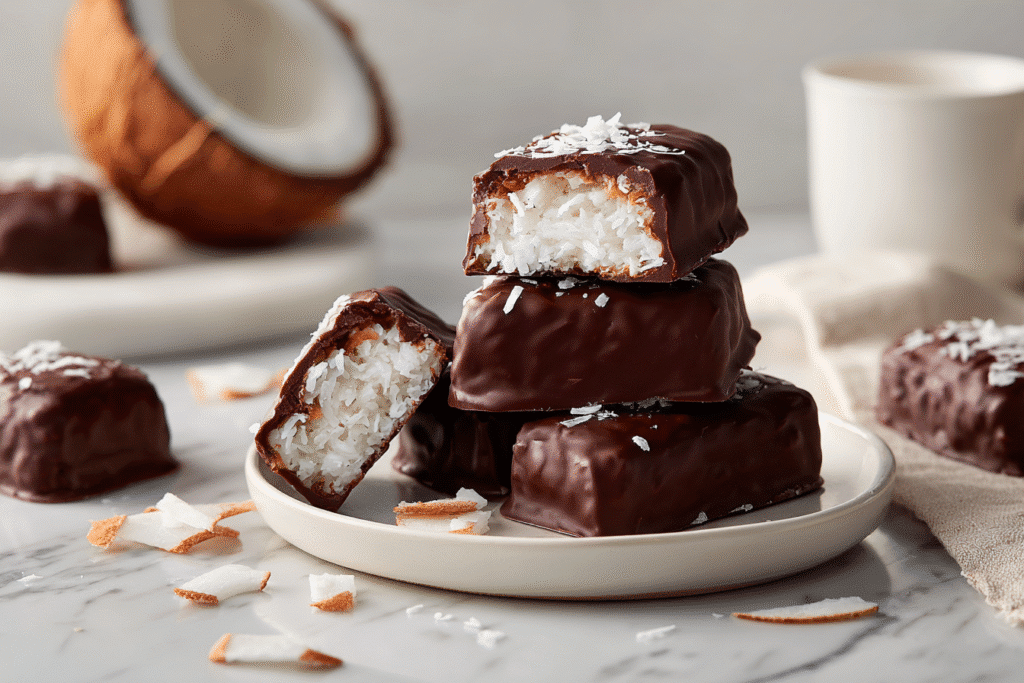
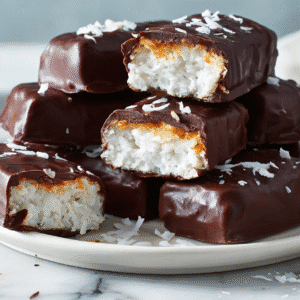
Next, it’s time to transform this coconut block into bars. Carefully lift the mixture from the pan using the parchment paper as a guide. With a sharp knife, slice it into 12 to 16 evenly sized bars. Aim for precision here—it’ll pay off when you coat them in chocolate. Keep these bars in the freezer while you prepare the chocolate coating to ensure they maintain their shape.Now for the chocolate magic. Combine 2 1/2 cups of semi-sweet or dark chocolate chips with a tablespoon of coconut oil in a microwave-safe bowl. Whether you prefer the depth of dark chocolate or the sweetness of semi-sweet, either will complement the coconut beautifully. Microwave in 30-second bursts, stirring in between, until you achieve a silky smooth consistency. This glossy chocolate coating will envelop each bar, providing that perfect contrast to the sweet coconut center.
Make-Ahead & Storage
When it comes to these Homemade Coconut Mounds Bars, a little planning goes a long way. You can easily prepare the coconut filling in advance. Just press the mixture into your lined pan, cover it with plastic wrap, and let it chill in the freezer until you’re ready to make the magic happen. This step not only saves time but also ensures that your bars hold their shape when it’s time to coat them in chocolate.
If you’re looking to stock up on these delightful treats, you’re in luck. Once your bars are fully set and dipped in their rich chocolate coating, store them in an airtight container. You can keep them at room temperature for up to a week, though hiding them from eager snackers might be the real challenge! For longer storage, place the bars in the refrigerator for up to 2 weeks, or freeze them for up to 3 months. Just make sure to layer them with parchment paper to prevent sticking.
Whether you’re prepping for an event or just want a sweet treat on standby, these bars are perfect for making ahead. Imagine pulling out a batch during an impromptu gathering and watching the smiles spread as friends and family bite into the chewy coconut bliss. Have a batch ready and you’ll always have a little homemade joy at your fingertips.
Best Ingredients & Party Variations
Creating Homemade Coconut Mounds Bars is all about choosing the best ingredients to ensure that every bite is as delicious as the last. For the coconut filling, I recommend using sweetened shredded coconut, which provides just the right amount of sweetness and chewy texture. Pair this with a can of sweetened condensed milk—its creamy consistency binds the coconut perfectly, ensuring your bars hold their shape. A dash of pure vanilla extract and a pinch of salt round out the flavors, enhancing the natural sweetness without overpowering it.
When it comes to the chocolate coating, opt for semi-sweet or dark chocolate chips. They bring a rich, balanced flavor that complements the sweet coconut filling. If you prefer a smoother coating, add a tablespoon of coconut oil to the melted chocolate. This not only aids in achieving a glossy finish but also echoes the coconut theme beautifully.
Now, let’s talk about party variations. For a fun twist, try adding toasted almonds to the coconut mixture for extra crunch, reminiscent of an Almond Joy. Another variation is to sprinkle a little sea salt on top of the chocolate coating for a sophisticated, salty-sweet combo. If you’re hosting a themed gathering, use colored chocolate melts to match your decor—imagine vibrant pink or blue bars that are as festive as they are tasty! Whether you’re enjoying these treats as is or with a personalized spin, they’re sure to be a hit.
Serving of Homemade Coconut Mounds Bars
Conclusion
Whipping up a batch of homemade coconut Mounds bars is more than just a sweet endeavor; it’s a delightful journey that brings a sense of nostalgia and joy to your kitchen. As you bite into the creamy coconut filling wrapped in luscious chocolate, you’ll be reminded of the small pleasures that can transform an ordinary day into a special one. This recipe is perfect for creating cherished moments with family and friends, whether you’re sharing stories over coffee or indulging in a midnight snack.
I encourage you to give this recipe a try and let it become a beloved treat in your home. The process is simple, the results are irresistible, and the memories you’ll create are priceless. Plus, there’s a certain magic in knowing you’ve crafted something so delicious from scratch.
For more delicious recipes like this, follow us on social media! Let’s continue this sweet journey together.
Can I use unsweetened coconut for Homemade Coconut Mounds Bars?
Absolutely! If you prefer a less sweet version, unsweetened shredded coconut can be a great substitute. Just keep in mind that the texture might be slightly different, and you may want to add a bit more sweetened condensed milk to help bind the filling. Taste as you go and adjust for your preferred sweetness. The balance of flavors is key, so don’t hesitate to experiment a bit.
How do I store Homemade Coconut Mounds Bars?
These bars are best stored in an airtight container. You can keep them at room temperature if you’ll eat them within a few days, but for longer storage, pop them in the fridge. If you’re thinking ahead, they also freeze wonderfully. Just wrap them individually and store in a freezer-safe bag. This way, you’ll have a sweet treat ready anytime!
Can I make these Homemade Coconut Mounds Bars vegan?
Yes, you can! Use vegan chocolate chips and replace the sweetened condensed milk with a vegan version, which is often available in stores or can be made at home using coconut milk. Ensure all your ingredients align with your dietary preferences, and you’ll have a delicious vegan treat. The texture and flavor will be just as delightful, with that same indulgent coconut and chocolate combo.
Recipe
Homemade Coconut Mounds Bars
Ingredients
Ingredients
- 3 cups sweetened shredded coconut
- 1 can 14 oz sweetened condensed milk
- 1/2 teaspoon pure vanilla bean paste
- Pinch of salt
- 2 1/2 cups semi-sweet or dark chocolate chips
- 1 tablespoon coconut oil optional
Instructions
- In a large mixing bowl, combine shredded coconut, sweetened condensed milk, vanilla bean paste, and salt. Stir until thick and sticky.
- Line an 8x8-inch baking pan with parchment paper and press the coconut mixture evenly into the pan. Freeze for 30 minutes.
- Lift the set coconut mixture from the pan and cut into 12 bars. Return bars to the freezer.
- Melt chocolate chips and coconut oil in a microwave-safe bowl in 30-second intervals, stirring until smooth.
- Dip each bar into the melted chocolate to coat all sides. Place on a parchment-lined baking sheet.
- Refrigerate dipped bars for 20 to 30 minutes until chocolate is set.
Notes
- Store bars in an airtight container in the refrigerator for up to 1 week.