The Practical Why Behind It
I created this Healthy Kit Kat Recipe (Gluten Free, Vegan) for those moments when you want the real snap and crunch of a candy bar, but you also want to feel good about what is in it. Instead of mystery ingredients, you work with almond flour, coconut sugar, and dark chocolate, so you control the sweetness and the quality of the chocolate. Baking the wafer layer in the oven gives you that crisp, shattery texture that no freezer only method can quite copy. It feels indulgent, but the ingredients lean more toward pantry friendly, whole foods. You still get a candy bar experience, just without the sugar crash.
The method itself is designed for a regular home kitchen, not a candy factory. You roll the dough between parchment sheets, so nothing sticks and you skip complicated equipment. Cutting those neat rectangles with a pizza cutter keeps things even and stress free, and baking just 8 to 10 minutes makes this project realistic on a busy afternoon. The layered fudge filling and chocolate coating are simply melted and stirred, which makes this a great stepping stone if you are new to homemade candy or maybe already love my homemade Twix bars. You end up with a tray of bars that look impressive, store well in the fridge or freezer, and taste like a childhood favorite in a slightly more grown up outfit.
From a practical nutrition angle, every part of this Healthy Kit Kat Recipe (Gluten Free, Vegan) pulls its weight. Almond flour or tigernut flour brings a little protein and fiber, peanut butter or Sunbutter adds healthy fats and keeps you satisfied longer, and dark chocolate gives you that deep cocoa hit with fewer additives. Using coconut sugar instead of refined white sugar creates a gentler sweetness that will not dominate the bar. The recipe also happens to be friendly for gluten free and dairy free guests, so you can set out a plate at gatherings and watch everyone reach for seconds without needing a separate dessert. It is a candy bar you can proudly say you baked, not just unwrapped.
Step-by-step method
To start this Healthy Kit Kat Recipe (Gluten Free, Vegan), preheat your oven to 350 degrees F and line a baking sheet with parchment. In a medium bowl, whisk together the almond flour, coconut sugar, ground flax, and salt until no clumps remain, since any dry pockets will make your wafers bake unevenly. Add the melted coconut oil, water, and vanilla paste, first stirring with a spatula until the dough clumps together, then switching to your hands to gently knead. You are aiming for a soft, playdough like texture that holds together when pressed, not a crumbly mess and not an oily puddle.
Place the dough between two sheets of parchment, and roll it out to about ⅛ inch thickness, rotating the sheet occasionally so you do not end up with a thick center and thin edges. Use a sharp knife or pizza cutter to slice rectangles about 3½ by ¾ inch, then peel away the extra dough and set it aside to reroll. Slide the whole parchment sheet, with the cut rectangles still snug against each other, onto your baking tray, and bake for 8 to 10 minutes, just until the edges turn lightly golden. Once out of the oven, separate the cookies with your knife while they are still soft, then cool them for 5 to 10 minutes on the pan before moving to a rack so they crisp fully. While they cool, gently melt the dark chocolate with the peanut butter, stir until glossy, and let it thicken until it looks like frosting, not sauce.

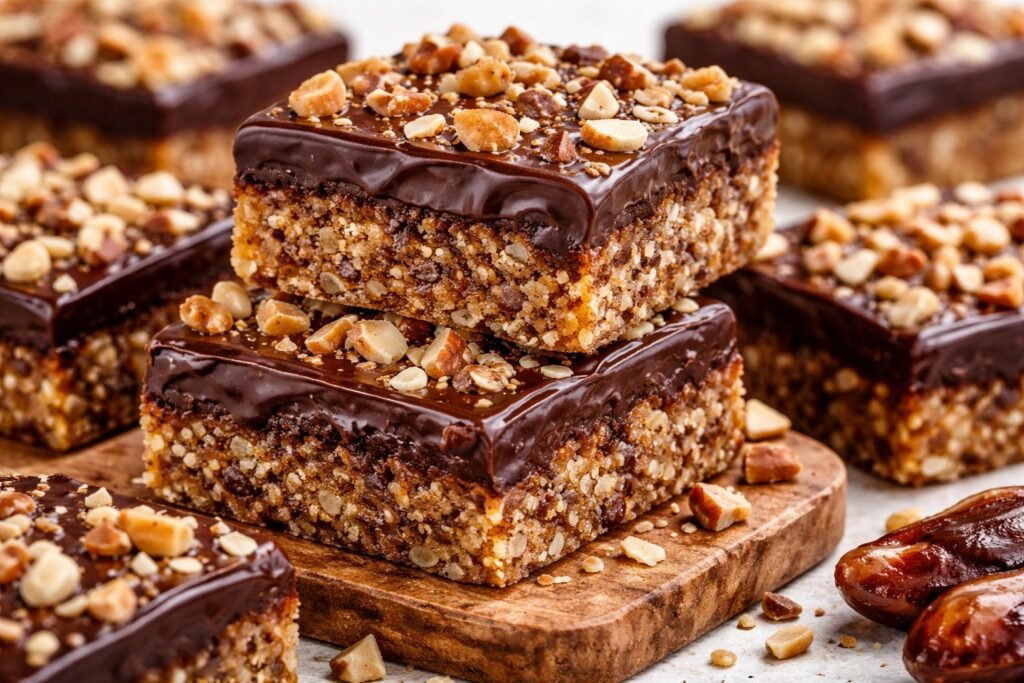
Process Image of Healthy Kit Kat Recipe (Gluten Free, Vegan)
Now it is time to stack that classic Kit Kat inspired crunch. Spread a thin layer of the chocolate peanut butter mix on top of one cookie, place a second one on top, spread a second layer, then crown it with a third cookie so you have three wafers and two fudge layers. Set each assembled bar on a parchment lined tray and freeze until very firm, about 20 to 30 minutes, so they can hold up to dipping the way my no bake Twix bars do. Melt the remaining dark chocolate with the coconut oil until smooth and fluid, then dip or generously spoon it over each frozen stack, letting the extra chocolate drip back into the bowl. Return your coated bars to the tray, chill until the chocolate shell snaps, and you will have crisp, layered perfection in a Healthy Kit Kat Recipe (Gluten Free, Vegan) that looks and tastes like it came from a candy shop.
Make-Ahead and Storage Notes
One of my favorite things about this Healthy Kit Kat Recipe (Gluten Free, Vegan) is how well it fits into a prep ahead routine. You can bake the wafers and let them cool completely, then store them in an airtight container at room temperature for up to 3 days before dipping. I like to tuck a little piece of parchment between layers so the delicate cookies stay crisp and do not chip. If your kitchen runs humid, keep the container in a cool, dry cupboard rather than near the stove, or the wafers can soften. You can also make the chocolate peanut butter filling a day ahead, chill it in the fridge, then let it sit on the counter 10 to 15 minutes so it softens slightly before spreading.
Once you fully assemble and coat your bars, store them in a single layer in a covered container, or stack them gently with parchment between layers. In the fridge, they keep well for about 1 week, and the chocolate stays snappy while the centers stay crunchy. For longer storage, freeze the bars for up to 2 months, and let them sit on the counter 10 to 20 minutes before biting in so the flavor of the dark chocolate and nut butter really blooms. If you like ice cold candy, you can even enjoy them straight from the freezer for an extra crisp snap, just like my homemade Twix style bars. Since this Healthy Kit Kat Recipe (Gluten Free, Vegan) sets in the fridge or freezer, it also travels well in lunchboxes or snack boxes with a small ice pack tucked in beside it.
Variations and How to Serve It

Serving Image of Healthy Kit Kat Recipe (Gluten Free, Vegan)
You can take this Healthy Kit Kat Recipe (Gluten Free, Vegan) in so many fun directions. For a classic candy bar vibe, keep the almond flour base as written and simply swap the peanut butter for Sunbutter to make it nut free. If you want a lighter flavor, use half dark chocolate and half dairy free milk chocolate, just remember the coating will be a bit softer so chill the bars well before slicing. Add a pinch of cinnamon to the cookie dough for a warm, cozy note, or stir a tablespoon of finely chopped nuts or cacao nibs into the fudge layer for extra crunch. For a more indulgent treat, drizzle the finished bars with a little leftover melted chocolate in a zigzag pattern, just like a bakery case favorite.
To serve, think about temperature and texture first. These bars taste best when the chocolate has fully set, so let them firm in the fridge for at least 20 to 30 minutes, then let them sit at room temperature 5 minutes before biting in, which keeps the cookie crisp and the fudge layer creamy. If you are building a dessert board with my homemade Twix style bars or crispy chocolate bark, cut each bar into smaller fingers so everyone can sample a few treats. Pack them in lunchboxes wrapped in parchment, tucked into a small container with an ice pack if your kitchen runs warm. For an easy dinner party dessert, break the bars into chunky pieces and serve over dairy free vanilla ice cream with a sprinkle of flaky salt, so every bite shows off the crispy layers that make this Healthy Kit Kat Recipe (Gluten Free, Vegan) so special.
Conclusion
If you had told younger me that one day I would have a tray of gooey, chocolate coated, shatteringly crisp bars cooling on my counter that just happened to be gluten free, vegan, and a little better for my body, I would have laughed and reached for another store bought candy. Yet here we are, turning a nostalgic favorite into a recipe you can share with everyone at the table. This Healthy Kit Kat Recipe (Gluten Free, Vegan) is one of those little kitchen miracles that feels both fun and a tiny bit empowering.
I hope you use this recipe as an excuse to slow down for an afternoon. Make it with kids who want to dip and drizzle, with a friend who loves a project, or solo with your favorite playlist on and a cup of coffee nearby. Slice the bars, pass them around, and watch how quickly they spark stories about childhood treats and “remember when” moments.
When you try it, let yourself enjoy every crunchy, chocolatey bite. You made this. At home. From scratch. And I absolutely believe you can do it again and again.
For more delicious recipes like this, follow us on Facebook and Pinterest!
Recipe

Healthy Kit Kat Recipe (Gluten Free, Vegan)
Ingredients
Ingredients
- 1 1/4 cups blanched almond flour or tigernut flour
- 3 tablespoons coconut sugar
- 1 tablespoon ground flaxseed
- 1/8 teaspoon fine sea salt
- 3 tablespoons melted coconut oil
- 1 tablespoon water
- 1 teaspoon vanilla bean paste or vanilla bean paste
- 2 tablespoons dark chocolate chips or chopped dark chocolate
- 3 tablespoons creamy peanut butter or Sunbutter
- 1 cup dark chocolate chips or chopped dark chocolate
- 1/2 tablespoon coconut oil
Instructions
- Preheat the oven to 350°F and line a baking sheet with parchment paper.
- In a medium mixing bowl, whisk together the almond flour, coconut sugar, ground flaxseed, and salt until well combined.
- Add the 3 tablespoons melted coconut oil, water, and vanilla bean paste to the dry ingredients. Stir with a spatula until a dough forms, then use your hands to gently knead it into a smooth, cohesive dough.
- Place the dough between two sheets of parchment paper and roll it out to about 1/8 inch thickness.
- Using a sharp knife or pizza cutter, cut the dough into rectangles about 3 1/2 inches long and 3/4 inch wide. Peel away and reserve the scrap dough to reroll for more rectangles.
- Slide the parchment with the cut rectangles onto the prepared baking sheet, keeping the rectangles close together, and bake at 350°F for 8 minutes, or until the edges are just lightly golden.
- Remove the baking sheet from the oven. While the cookies are still soft, use the knife or pizza cutter to separate them slightly, then let them cool on the baking sheet for 5 to 10 minutes. Transfer the cookies to a wire rack to cool completely and crisp.
- Place 2 tablespoons dark chocolate and the 3 tablespoons peanut butter in a small heat safe bowl. Melt gently in the microwave in short bursts, stirring between each, until smooth, or melt over a small saucepan of simmering water.
- Stir the chocolate peanut butter mixture until glossy, then let it cool for about 10 minutes until thickened to a frosting like consistency.
- To assemble each bar, spread a thin layer of the chocolate peanut butter mixture on top of one cookie wafer. Top with a second cookie, spread another thin layer of the mixture, then place a third cookie on top to create a three layer stack with two fudge layers.
- Place each assembled stack on a parchment lined baking sheet and freeze for 20 to 30 minutes, or until very firm.
- When the stacks are almost firm, place the remaining 1 cup dark chocolate and 1/2 tablespoon coconut oil in a small saucepan. Melt over low heat, stirring constantly, until smooth, then remove from the heat.
- Working one stack at a time, remove the cookie stacks from the freezer and dip each into the melted chocolate, turning to coat all sides, or spoon chocolate over them while holding them on a fork and let excess drip back into the pan.
- Set the coated bars back onto the parchment lined baking sheet and refrigerate or freeze until the chocolate shell is fully set and firm.
- Drizzle any remaining melted chocolate over the tops of the bars, then chill briefly again before serving.
Notes
- For a nut free version, use tigernut flour instead of almond flour and Sunbutter instead of peanut butter.
- Use dark chocolate that is dairy free to keep the recipe fully vegan.
- If the dough cracks while rolling, press it back together with your hands and reroll between parchment.