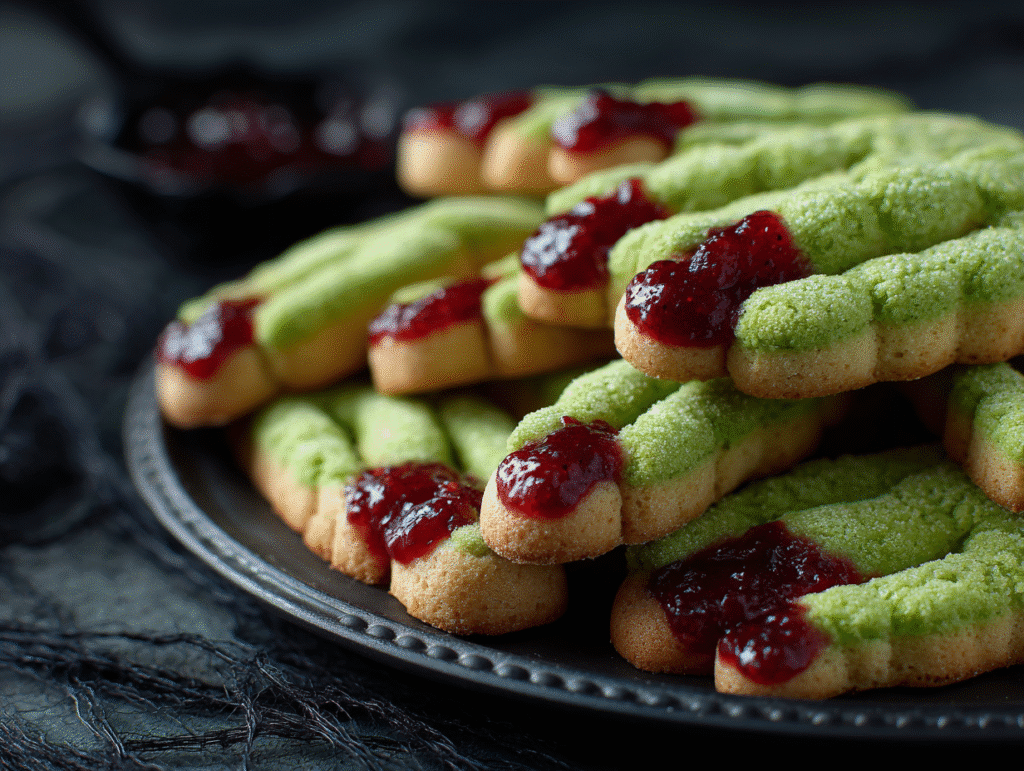
If you’ve been hunting for the ultimate Halloween finger recipe, you’ve just found it. These creepy-cute cookie fingers are the kind of treat that makes guests gasp before they grin. Inspired by classic witch fingers and a touch of zombie flair, this recipe is all about buttery shortbread, a splash of green tint, and almonds that turn into realistic “nails.”
We’ll cover everything—from mixing the perfect dough to shaping fingers so real they might give you chills. Whether you’re baking for a party or a spooky night in, you’ll have a batch ready to haunt your dessert table in no time.
Spooky Origins of the Halloween Finger Recipe
A sweet story from my kitchen
I still remember my first Halloween finger recipe attempt—it was years ago, in a cramped apartment kitchen, with my best friend holding up a photo of witch fingers she’d found online. The “nails” kept sliding off, and our green dough looked more like swamp sludge. But the laughter, the flour on our faces, and the moment the first perfectly creepy finger came out of the oven? Pure magic.
That’s why I love these cookies—they’re not just a dessert, they’re a memory maker. Over time, I’ve learned tricks to get sharp knuckle creases, glossy nails, and just the right spooky shade.
Why these cookies are the ultimate Halloween crowd-pleaser
A good Halloween finger recipe should be easy enough for beginners but impressive enough for seasoned bakers. This one nails it—pun intended. The buttery shortbread base means a melt-in-your-mouth texture, while a few drops of green food coloring set the eerie tone. Almonds make ideal “nails,” and a quick brush of red gel or jam gives that perfect gory touch.
I’ve also tested ways to keep the fingers from spreading too much in the oven, so they hold their lifelike shape. Serve them with a hot cider or next to a platter of pumpkin spice cupcakes for a themed dessert spread. If you’re building a bigger Halloween menu, they pair wonderfully with monster eye cookies for a sweet-and-spooky double act.
Crafting the Perfect Creepy Cookie Fingers
Mixing the dough for spooky success
The foundation of a great Halloween finger recipe is a smooth, sturdy dough that holds its shape. Start with softened unsalted butter and fine granulated sugar—cream them together until light and fluffy. This step traps air in the mixture, giving your cookies that melt-in-your-mouth texture. Beat in an egg and a splash of vanilla extract for depth. For the spooky vibe, add green gel food coloring at this stage so the color is evenly distributed.

Gently mix in all-purpose flour and a pinch of salt until the dough forms. The key? Don’t overmix, or you’ll lose the delicate crumb these cookies are famous for. If you’ve ever made classic sugar cookies, the texture should feel similar—soft but not sticky. Chill the dough for at least 30 minutes; this keeps the fingers from spreading during baking.

Shaping and detailing your witch fingers
Once chilled, portion the dough into walnut-sized balls and roll them into finger-length logs. Lightly pinch in two spots to create “knuckle” joints, then use a small knife to score fine lines for wrinkles. Press a whole almond firmly at one end for the “nail,” making sure it sticks well. For extra eerie realism, you can brush a little cocoa powder into the creases before baking.

Arrange the fingers on a parchment-lined baking sheet, spacing them about an inch apart. If you’ve mastered pumpkin roll cakes before, you’ll find the patience and precision here just as satisfying. At this point, your tray will already look like something straight from a witch’s kitchen.
Baking and Decorating for Maximum Spook Factor
Getting the bake just right
For this Halloween finger recipe, the magic number is 325°F (160°C). Bake the cookies for 15–18 minutes, just until the edges are lightly golden. You don’t want them to brown too much—pale, eerie fingers are the goal. If you’re wondering how long to bake Halloween cookies in general, aim for that light edge color rather than a firm top; they’ll continue to set as they cool.
Keep a close eye after the 14-minute mark, especially if your oven runs hot. Overbaking can make them dry and brittle instead of soft with a gentle snap. This method works well for most shaped cookies, much like when you’re making gingerbread men where shape integrity matters.
Adding the gory finishing touches
Once the cookies are cool enough to handle, it’s time for the fun part. Remove the almond “nails” carefully, dab a little red gel icing or raspberry jam on the nail bed, then press the almond back in. The jam oozes slightly, creating a realistic “bloody” look. You can also brush a thin layer of edible gold dust on the nails for a witchy glam effect.
If you want zombie fingers, swap green food coloring for a sickly gray-green mix and dust with cocoa for a “dirt” look. Arrange them on a black platter or serve alongside Halloween bark for a striking party centerpiece. Remember, presentation sells the illusion—guests eat with their eyes first, and these cookies deliver the shock factor.
Variations, Storage, and Party-Perfect Tips
Fun twists on the classic finger
The beauty of this Halloween finger recipe is how easy it is to adapt. For ghost cookies, skip the food coloring, shape the dough into finger-like logs, and dip them in white candy melts once baked. Dot on mini chocolate chip “eyes” before the coating sets. If you’ve been asking, “What can I make for Halloween?”, this is a great answer—quick, memorable, and crowd-pleasing.
For a cookie cake twist, press the dough into a rectangular pan and bake for 18–20 minutes, then cut into finger shapes while still warm. Just remember, cookie cakes need a little extra cooling time before decorating so they don’t crumble.
Storing and serving your creepy creations
To keep your Halloween finger cookies fresh, store them in an airtight container at room temperature for up to five days. You can also freeze the shaped, unbaked dough for up to a month—just thaw slightly before baking.
If you’re wondering “How many minutes should I put cookies in the oven?”, stick with the 15–18 minute range for fingers, but reduce to 12–14 minutes for smaller, thinner shapes like ghost fingers. For party presentation, stack them in a shallow basket lined with black tissue paper or arrange them around a bubbling cauldron punch bowl. Pairing them with black cat cupcakes creates a themed dessert table that will have everyone reaching for seconds—no spell required.

FAQ‘s About Halloween finger recipe
How to make zombie fingers?
Use the same dough base but tint it with a gray-green mix, dust the knuckles with cocoa powder, and add chocolate shavings for “dirt.”
How to make cookie fingers?
Shape chilled cookie dough into logs, pinch for knuckles, score wrinkles, and press almonds as nails before baking.
How long to bake Halloween cookies?
Bake at 325°F (160°C) for 15–18 minutes, or until edges are just turning golden.
How many minutes should I put cookies in the oven?
Most shaped cookies, including witch fingers, bake in 15–18 minutes; smaller cookies need 12–14 minutes.
What can I make for Halloween?
Cookie fingers, ghost cookies, monster eye treats, black cat cupcakes, and themed cake pops are always a hit.
How long do you cook ghost cookies for?
Bake for 12–14 minutes, as they’re usually smaller than witch fingers.
How many minutes to bake cookie cake?
Bake for 18–20 minutes, then cool completely before slicing into shapes.
Conclusion
A Halloween finger recipe is more than just a quirky dessert—it’s a conversation starter, a table centerpiece, and a memory your guests will talk about long after the night is over. With its buttery shortbread base, eerie almond nails, and just the right touch of “gory” jam, this treat strikes the perfect balance between creepy and delicious.
The beauty is in its versatility: you can make them witchy, zombie-like, or even ghostly with a few simple tweaks. Whether you’re baking with kids, entertaining friends, or putting together a themed dessert table, these cookies promise to be a hit. So preheat that oven, roll up your sleeves, and let your spooky baking magic begin.
They’re perfect for meal prep, endlessly adaptable, and surprisingly satisfying. For more baking inspiration, join the Taste to Rate community on Pinterest where I pin new flavor twists and creative spins, or catch the behind-the-scenes magic on Facebook to see what’s baking in real time.

Halloween Finger Recipe That’s Frighteningly Delicious
Ingredients
- 1 cup unsalted butter softened
- 1 cup granulated sugar
- 1 large egg
- 1 tsp vanilla extract
- 2 2/3 cups all-purpose flour
- 1/2 tsp salt
- Green gel food coloring
- Whole almonds
- Raspberry jam or red gel icing
Instructions
- 1. Cream butter and sugar until light and fluffy.
- 2. Add egg, vanilla, and food coloring; mix well.
- 3. Mix in flour and salt until dough forms.
- 4. Chill dough for 30 minutes.
- 5. Shape into finger-sized logs, pinch for knuckles, and score wrinkles.
- 6. Press an almond at one end for the nail.
- 7. Bake at 325°F (160°C) for 15–18 minutes until edges are golden.
- 8. Cool slightly, remove almond, add jam, and replace almond.