Why This One Delivers
These Greek yogurt brownies deliver because they respect what you actually love about brownies. They keep that deep cocoa flavor and soft, fudgy middle, while swapping part of the fat for Greek yogurt and applesauce so you still get moisture without a heavy, greasy feel. You whisk everything in simple bowls, no mixer, no melted butter timing to worry about. The batter lands in a classic 8 by 8 inch pan, which means reliable thickness, even baking, and those perfect corner pieces everyone fights over. Every bite tastes like a bakery treat, but the recipe leans lighter so a second square feels like a treat, not a regret.
Texture is where these Greek yogurt brownies really shine. The yogurt gives them a tender crumb and a slightly tangy backdrop that makes the chocolate taste richer, the way a splash of cream makes coffee taste deeper. The unsweetened applesauce locks in moisture so you do not need large amounts of oil, and the optional dark chocolate chips bring back just enough indulgence for true brownie lovers. You also get flexible ingredients that you already have, from all purpose or whole wheat flour to either granulated or coconut sugar. If you enjoy my lighter chocolate desserts like flourless chocolate cake or small batch chocolate lava cakes, these brownies will slide right into your regular baking rotation and feel just as special.
From Prep to Finish
From the moment you pull out the bowl to the moment you slice into that fudgy tray, these Greek Yogurt Brownies stay comfortingly simple. Start by really prepping your pan, either with parchment or a thorough greasing, so you can lift the brownies out cleanly for neat squares. Whisk your Greek yogurt, applesauce, sugar, eggs, and vanilla until the mixture looks silky and unified, with no streaks of egg or yogurt. In a separate bowl, combine your dry ingredients and break up any cocoa clumps with the back of a spoon, or you will find surprise bitter spots later. When you mix wet and dry, stir gently until just combined, and stop as soon as you no longer see dry flour, so your brownies stay tender and fudgy, not tough.

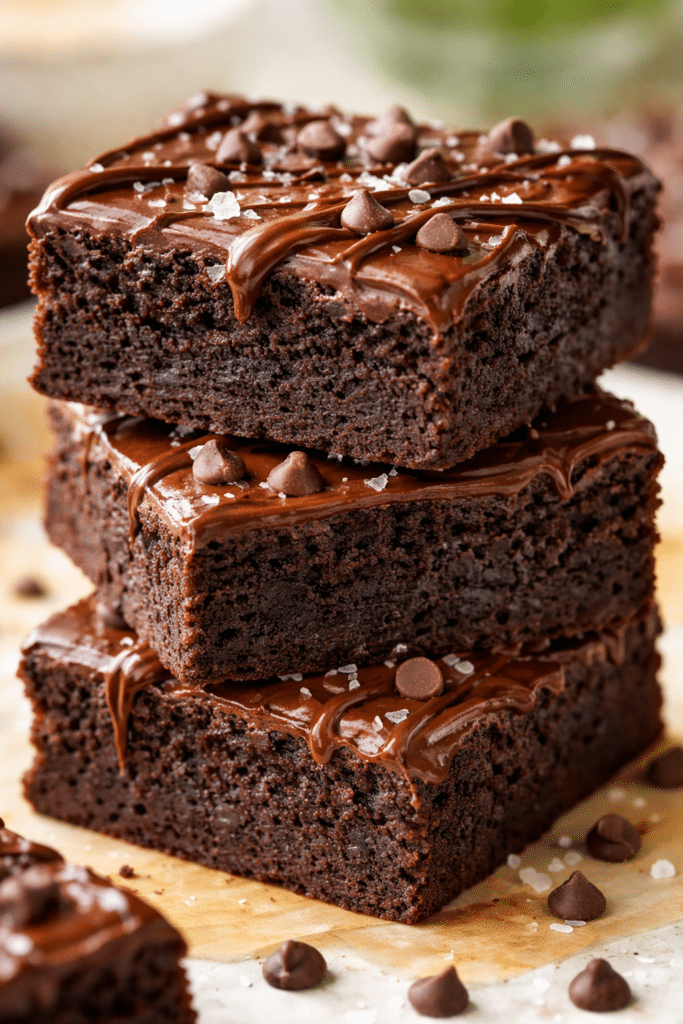
Process Image of Greek Yogurt Brownies
Once the batter is ready, it will look thick and almost mousse like, and that is exactly what you want for rich Greek Yogurt Brownies. Use a spatula to nudge it into the corners of your pan, then take a second to smooth the top so it bakes evenly and develops that classic brownie sheen. Bake on the center rack so the top does not scorch before the middle has time to set. Begin checking at 25 minutes and look for a toothpick that comes out with moist, sticky crumbs, not shiny wet batter. Let the pan cool on a rack until just warm, then lift the whole slab out before cutting, which helps you get those clean, bakery style edges. If you love make ahead desserts like this, these brownies keep beautifully in an airtight container at room temperature, much like a good tray of chocolate chip blondies or chewy pumpkin bars.
Timing, Storage, and Make Ahead
These Greek Yogurt Brownies keep a wonderfully moist and fudgy texture, so timing and cooling matter. Let them cool in the pan for at least 10 minutes, then move them to a rack and cool completely before cutting. If you slice while they are warm, they will taste great but the pieces may look a little messy. At room temperature, your Greek Yogurt Brownies keep well for about 2 days in an airtight container. I like to line the container with parchment and place a small sheet between layers so the tops stay shiny and do not stick.
If you need to keep them longer, store them in the refrigerator for up to 5 days, well covered. Because of the yogurt, chilling actually helps them taste extra fudgy, a bit like a denser snack cake. For longer storage, freeze the brownies for up to 2 months. Cut them into squares, wrap each piece tightly, then place them in a freezer safe bag or container. Thaw on the counter for about 30 minutes, or warm a single square in the microwave for 10 to 15 seconds until the chocolate aroma hits your nose and the center feels just soft.
Ingredient Swaps and Serving Options

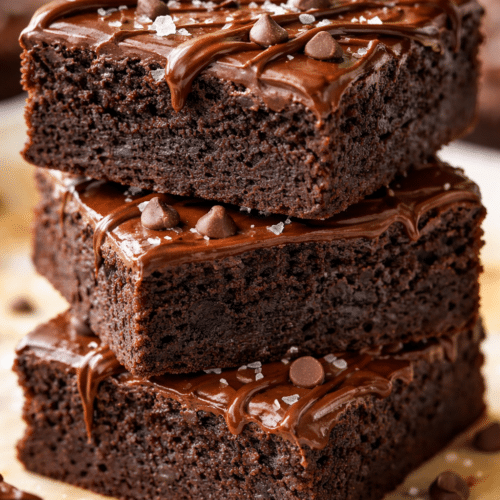
Serving Image of Greek Yogurt Brownies
Greek Yogurt Brownies are wonderfully flexible, so you can easily adjust them to fit what you already have in the kitchen. If you only have nonfat yogurt, use it and add 1 tablespoon of neutral oil or melted butter to keep that fudgy bite. You can trade the applesauce for mashed banana for a deeper sweetness, or use a mix of yogurt and pumpkin puree for a cozy, less sweet brownie that tastes a bit like my pumpkin spice loaf had a chocolatey cousin. For the flour, a whole wheat pastry flour or white whole wheat flour keeps things tender, while a 1 to 1 gluten free blend also works if you avoid gluten. If you love a darker chocolate flavor, use extra dark cocoa powder and swap some of the chocolate chips for chopped dark chocolate.
Serving these Greek Yogurt Brownies is where the fun really starts. For a lighter finish, top each square with a spoonful of vanilla Greek yogurt and a few fresh berries, just like I do with my flourless chocolate cake when I want it to feel a bit dressed up but not too heavy. For something more indulgent, warm a brownie for 10 to 15 seconds in the microwave and add a scoop of vanilla ice cream or a swirl of whipped cream, then shower it with a few extra chocolate chips. You can also crumble cooled brownies over yogurt parfaits or layer small brownie squares into a trifle dish with pudding or mousse for an easy dinner party dessert. Whether you keep them simple for weekday snacks or dress them up for guests, these brownies play just as nicely as a classic chocolate chip blondie or any bakery style bar on your dessert plate.
Conclusion
Every time I pull a pan of these Greek Yogurt Brownies from the oven, my kitchen smells like a little neighborhood bakery and my table fills up faster than I can grab plates. There is something quietly magical about a recipe that feels comforting enough for a Tuesday night, yet special enough to serve on birthdays, movie nights, or “just because” gatherings with friends. You slice them, pass them around, and suddenly people linger a little longer, talk a little softer, and smile a lot wider.
I hope you feel how approachable this recipe really is. You do not need fancy equipment or pastry school skills, just a bowl, a spoon, and a bit of curiosity. If you have been craving a cozy chocolate dessert that leans a little lighter but still tastes like an afternoon treat from your favorite bakery, this is your sign to preheat the oven and give it a try. When you do, I would love to hear how you served them and who you shared them with.
For more delicious recipes like this, follow us on Facebook and Pinterest!
Recipe
Greek Yogurt Brownies
Ingredients
Ingredients
- 1/2 cup plain Greek yogurt
- 1/2 cup unsweetened applesauce
- 1/2 cup granulated sugar or coconut sugar
- 2 large eggs
- 1 teaspoon vanilla bean paste
- 1/2 cup all-purpose flour or whole wheat flour
- 1/2 cup unsweetened cocoa powder
- 1/4 teaspoon baking powder
- 1/4 teaspoon salt
- 1/2 cup dark chocolate chips
Instructions
- Preheat the oven to 350°F.
- Grease or line an 8x8 inch baking pan with parchment paper.
- In a medium bowl whisk together the Greek yogurt, applesauce, sugar, eggs, and vanilla bean paste until smooth.
- In a separate bowl whisk together the flour, cocoa powder, baking powder, and salt until well combined and no cocoa lumps remain.
- Add the dry ingredients to the wet ingredients and stir with a spatula until just combined and no dry flour is visible.
- Fold in the dark chocolate chips.
- Spread the batter evenly into the prepared baking pan, smoothing the top.
- Bake for 25 to 30 minutes, or until a toothpick inserted in the center comes out with a few moist crumbs.
- Cool the brownies in the pan for 10 minutes, then transfer to a wire rack to cool completely.
- Cut into 16 squares and serve.
Notes
- Do not overmix the batter or the brownies can turn cakey instead of fudgy.
- Begin checking the brownies at 25 minutes since ovens vary.
- Store leftover brownies in an airtight container at room temperature for 2 days or refrigerate for up to 5 days.