Why This One Delivers
These Gluten Free Tiramisu Brownies give you that polished bakery case look with none of the fussy pastry school drama. You get a thick, fudgy brownie base that bakes up sturdy enough to hold a full layer of mascarpone cream, so every slice cuts into clean, defined layers instead of collapsing into a chocolate puddle.
The brownie layer bakes up thick, fudgy, and stable, with chewy edges and a soft, truffle like center. It has enough structure to support that cloud of mascarpone cream without sinking or turning gummy. Using melted butter, real cocoa powder, and espresso powder builds a deep mocha flavor in every bite, so it tastes like more than just a simple chocolate bar with frosting. The batter uses simple pantry staples, so you get that professional finish without specialty flours or hard to find ingredients. If you have made classic gluten free brownies or tiramisu before, this will feel like the best kind of mash up.
The tiramisu topping is designed to be both luxurious and practical. Mascarpone and heavy cream whip into a light, spoonable mousse that sets nicely once chilled, so your slices will cut cleanly instead of oozing across the plate. A touch of brewed espresso brings that unmistakable tiramisu flavor, but the ratio stays gentle enough that kids and coffee shy friends can still enjoy it. The whole dessert chills in the same pan, which makes it perfect for potlucks, holidays, or anytime you want a make ahead dessert that looks polished. Serve these Gluten Free Tiramisu Brownies straight from the fridge and you get defined layers, neat edges, and that little sift of cocoa on top that makes them look like they came from a favorite neighborhood bakery.
From Prep to Finish
You will start these Gluten Free Tiramisu Brownies the same way you would any cozy brownie recipe, with a simple batter that comes together in two bowls. Whisk your melted butter, sugar, eggs, and vanilla bean paste until the mixture looks thick and glossy, almost like pale caramel that slowly ribbons off the whisk. In a second bowl, combine the gluten free flour, cocoa, and espresso powder, then fold the dry mix into the wet until no flour streaks remain and the batter looks smooth and shiny.
The batter will be thick and fudgy, almost like soft frosting, so use an offset spatula or the back of a spoon to push it into the corners of your parchment lined pan and smooth the top into an even layer. Bake just until the center no longer jiggles, the top looks set and slightly shiny, and a toothpick comes out with a few moist, fudgy crumbs. That usually takes about 20 to 25 minutes, but start checking at 18 so you do not overbake. Let the brownie layer cool completely in the pan on a rack until the bottom of the pan feels room temperature, usually at least 45 to 60 minutes, so the tiramisu topping does not melt on contact.

Process Image of Gluten Free Tiramisu Brownies
While the base cools, you will whip up the tiramisu layer that turns these into bakery style stars. Beat the mascarpone with powdered sugar and a touch more vanilla until it looks silky, lump free, and easily falls off the spatula in soft waves. Separately whip the cold heavy cream to stiff peaks. When you lift the beaters, the peaks should stand straight up without drooping. Gently fold the whipped cream into the mascarpone so you keep as much air as possible, which gives that cloud like texture you expect from tiramisu. Add the cooled espresso and fold only until just combined to avoid deflating the mixture or making it runny.
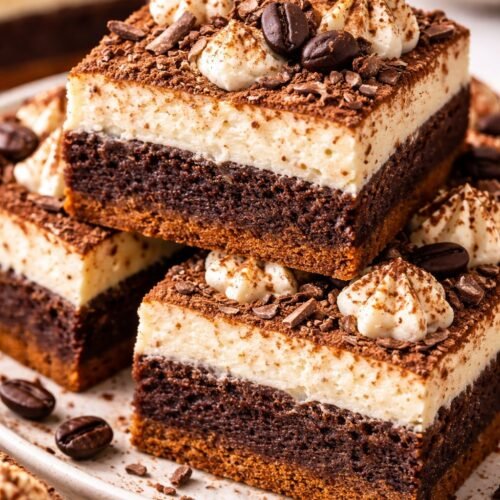
Spread the cream over the brownie base in thick, even swoops, making sure it reaches all the edges and sits in a level layer about as thick as the brownie itself. Chill for at least 2 hours so the layers set and slice cleanly. For very tidy edges, aim for 4 hours or overnight. Right before serving, dust generously with cocoa powder, cut into neat squares with a sharp knife, and enjoy your Gluten Free Tiramisu Brownies cold from the fridge, just like the best bakery case treat.
Timing, Storage, and Make-Ahead
Your Gluten Free Tiramisu Brownies need a little patience to reach their full bakery style glory, but most of the time is completely hands off. The brownie base bakes in about 20 to 25 minutes, then you want it completely cool before adding the tiramisu layer, usually at least 45 to 60 minutes at room temperature. You will know it is ready when the pan no longer feels warm on the bottom.
After you spread on the mascarpone cream, chill the pan for at least 2 hours so the layers set enough to slice into clean squares. For the neatest edges and a filling that keeps its shape on a dessert platter, I like to chill them 4 hours or even overnight, then dust with cocoa right before serving so it stays pretty and does not absorb into the cream.
Stored properly, these brownies keep beautifully and the flavors bloom even more. Cover the pan tightly with plastic wrap or transfer slices to an airtight container, then refrigerate for up to 4 days. Since the topping uses mascarpone and cream, always keep Gluten Free Tiramisu Brownies chilled and only leave them out for about 1 to 2 hours during serving. The tiramisu layer should feel cool and softly firm to the touch, not loose or weepy.
If you want to plan ahead, you can bake the brownie base a day in advance, cool it, wrap it well, and refrigerate. The next day, prepare the tiramisu layer, spread it over the brownie, and chill. This schedule works especially well for holidays and busy weekends. You can also slice leftover brownies and freeze them for up to 2 months. Wrap each piece well, freeze on a tray until firm, then transfer to a container. Thaw in the refrigerator before enjoying a cold, coffee kissed treat straight from the fridge.
Ingredient swaps and serving options

Serving Image of Gluten Free Tiramisu Brownies
These Gluten Free Tiramisu Brownies are pretty forgiving, so you can absolutely play with ingredients without losing that bakery style finish. For the base, you can use any 1 to 1 gluten free flour blend that already contains xanthan gum. If your blend does not have xanthan gum, add a pinch so the brownies hold their shape. For an even fudgier bite, replace a few tablespoons of the flour with extra cocoa, or swirl in a handful of chocolate chips right before baking.
If you like a deeper coffee kick, bump the espresso powder up to 2 tablespoons or brush the cooled brownie layer with an extra tablespoon or two of brewed espresso before adding the cream. Let the coffee soak in and cool completely so it does not soften the top of the brownie too much. Need a dairy free spin? Use a rich vegan butter for the brownie base, swap mascarpone for a thick dairy free cream cheese, and whip chilled coconut cream in place of the heavy cream. The flavor will shift more toward mocha cheesecake, but your Gluten Free Tiramisu Brownies will still taste like something from a tiny Italian bakery.
You also have plenty of room to customize the topping and how you serve them. Replace the mascarpone with full fat cream cheese for a tangier finish, or use part mascarpone and part ricotta for a rustic, slightly more airy texture with tiny, pleasant curds. For a kid friendly pan, swap the brewed espresso for cooled decaf coffee or even chocolate milk, then use less espresso powder in the batter so the coffee flavor stays very gentle.
Just before serving, you can finish each square with chocolate curls, a few espresso beans, or a dollop of lightly sweetened whipped cream, similar to how I dress up my flourless chocolate torte and mocha brownie cups. Serve these chilled from the fridge for clean slices and a firm, mousse like topping, or let them sit at room temperature for 10 to 15 minutes if you want a softer, creamier tiramisu layer that feels extra luxurious with a cup of coffee.
Conclusion
When I pull this pan from the oven and that mix of chocolate, espresso, and vanilla fills the kitchen, it always reminds me why I love baking so much. A simple afternoon of whisking, folding, and layering turns into something you can share with people you love, and these neat little squares somehow feel both casual and special at the same time.
I hope these Gluten Free Tiramisu Brownies find their way into your own memories too. Maybe they become your go to “I brought dessert” recipe, or the sweet tradition you make for birthdays, book clubs, and rainy Sundays. If you have been nervous about gluten free baking, let this be the recipe that shows you it can be just as indulgent, luscious, and crowd pleasing as any bakery treat.
If your oven is free and your coffee is hot, this is your sign to preheat, grab your mixing bowls, and give this recipe a try. Then tuck a square in the fridge for tomorrow, because these brownies might be even better the next day when the coffee and cocoa have had time to really settle in together.
Recipe
Gluten Free Tiramisu Brownies
Ingredients
Ingredients
- 1/2 cup gluten free all purpose flour
- 1/3 cup unsweetened cocoa powder
- 1 tablespoon espresso powder
- 1 cup granulated sugar
- 2 large eggs room temperature
- 1/2 cup unsalted butter melted and slightly cooled
- 1 1/2 teaspoons vanilla bean paste divided
- 1 cup mascarpone cheese softened
- 3/4 cup heavy whipping cream cold
- 1/3 cup powdered sugar
- 1/4 cup brewed espresso or strong coffee cooled
- Unsweetened cocoa powder for dusting
Instructions
- Preheat the oven to 350°F and line an 8x8 inch baking pan with parchment paper, leaving a slight overhang for easy removal.
- In a medium bowl, whisk together the melted butter, granulated sugar, eggs, and 1 teaspoon of the vanilla bean paste until the mixture is thick, smooth, and glossy.
- In a separate bowl, whisk the gluten free flour, cocoa powder, and espresso powder until well combined and no cocoa lumps remain.
- Add the dry ingredients to the wet ingredients and stir with a spatula just until a thick, smooth batter forms and no streaks of flour remain.
- Scrape the batter into the prepared pan and spread it into an even layer, smoothing the top with a spatula.
- Bake for 20 to 25 minutes, or until the top looks set and shiny and a toothpick inserted near the center comes out with a few moist crumbs.
- Place the pan on a wire rack and let the brownie layer cool completely in the pan until the bottom of the pan feels room temperature.
- In a medium bowl, beat the mascarpone cheese, powdered sugar, and the remaining 1/2 teaspoon vanilla bean paste with a hand mixer until smooth, silky, and lump free.
- In a separate bowl, whip the cold heavy whipping cream to stiff peaks using a hand mixer on medium high speed.
- Gently fold the whipped cream into the mascarpone mixture in two additions, using a spatula and turning the bowl as you go to keep the mixture light and airy.
- Drizzle the cooled brewed espresso over the mascarpone mixture and fold gently just until fully combined and the cream is smooth and thick.
- Spread the tiramisu cream evenly over the cooled brownie layer, smoothing the top into a level layer.
- Cover the pan and refrigerate for at least 2 hours, or until the tiramisu layer is set and firm enough to slice cleanly.
- Just before serving, dust the top generously with unsweetened cocoa powder, then cut into 9 squares and serve chilled.
Notes
- For the cleanest slices, chill the brownies 4 hours or overnight and wipe the knife clean between cuts.