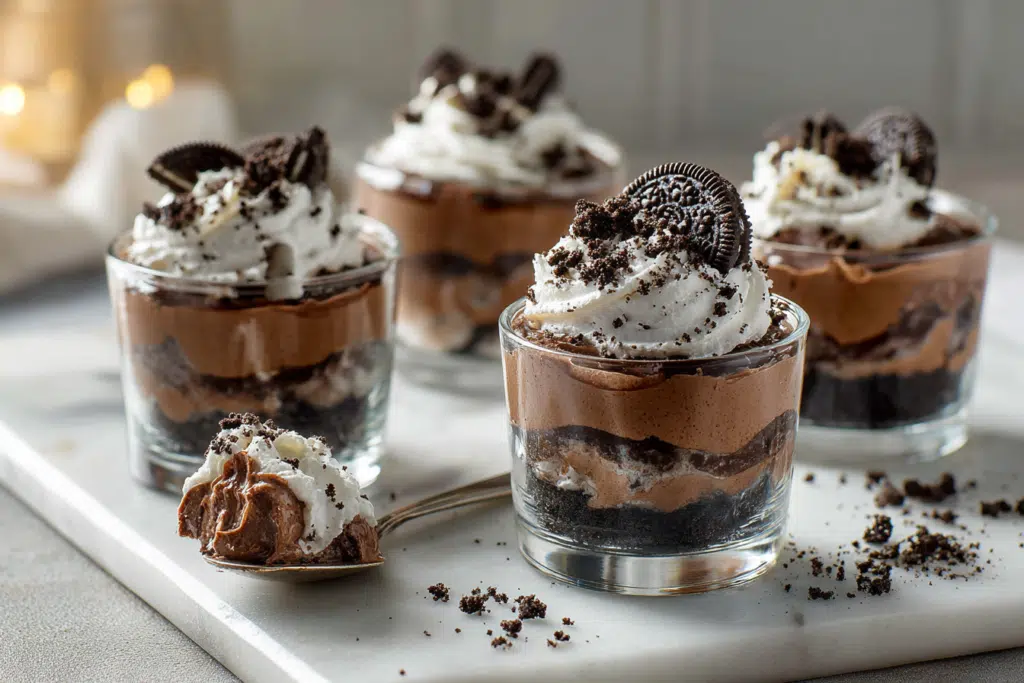
When you promise Decadent Oreo Chocolate Mousse Cups for Effortless Indulgence, you need a dessert that actually feels luxurious but behaves like a weeknight recipe. These little cups hit that sweet spot. You get a crunchy, buttery Oreo base, a cloud of silky chocolate mousse, and just enough garnish to look restaurant worthy without any pastry school drama. The value here is simple: you use familiar supermarket ingredients, no raw eggs, and no fiddly gelatin, yet the result tastes like something you linger over with a tiny spoon.
In this recipe, we will walk through what makes these mousse cups special, from the contrast of textures to the deep chocolate flavor that does not taste flat or overly sweet. You will see how each ingredient earns its place, plus a few smart swaps if you need to adjust for taste, budget, or pantry gaps. Then we will move step by step through the process, from crushing Oreos and melting chocolate to folding whipped cream without deflating it into chocolate soup. Finally, we will cover how far ahead you can assemble, how to store leftovers so the base stays crisp, and how to serve these cups for everything from a casual family treat to a tidy little dinner party dessert.
Questions & Answers
Q1: Can I use milk chocolate instead of dark chocolate?
You can use milk chocolate, but you need to adjust for sweetness and structure. Milk chocolate has more sugar and less cocoa, so the mousse can taste overly sweet and feel a bit softer. If you use milk chocolate, reduce any added sugar in the recipe by about one third and chill the mousse cups a little longer to help them set. Taste the melted chocolate before you fold in the whipped cream so you can tweak the sweetness early. For a balanced flavor, many cooks like a mix of half dark and half milk chocolate, which keeps the mousse rich but less intense.
Q2: How do I keep the Oreo crust from getting soggy?
The key is to pack the Oreo crumbs tightly and use enough melted butter to coat them well. When the fat from the butter surrounds the crumbs, it creates a barrier that slows down moisture from the mousse. Press the crumbs firmly into the bottom of each cup with the back of a spoon or a small glass so you get a dense, even layer. Chill the crust for at least 15 minutes before adding the mousse, which helps the butter re firm and set the base. If you plan to store the cups longer than 24 hours, you can add the mousse closer to serving time to keep the texture snappy.
Q3: My mousse turned grainy, what went wrong?
Grainy mousse usually comes from overheated chocolate or cream that was over whipped. If chocolate gets too hot, it can seize and form tiny lumps that never fully smooth out, even when you fold in the cream. Melt the chocolate gently over barely simmering water or in short microwave bursts, stirring often, and stop heating as soon as it is almost fully melted. With the cream, whip only to soft or medium peaks; stiff peaks are more likely to clump and deflate when folded. When you combine the two, start by stirring a small spoonful of cream into the chocolate to loosen it, then fold the rest in with slow, broad strokes.
Q4: How far in advance can I make these mousse cups?
You can assemble these mousse cups up to 24 hours ahead for the best texture and flavor. The mousse actually benefits from a good chill, which allows the chocolate to firm up and the flavors to mellow and blend. Cover each cup loosely with plastic wrap so the surface does not dry out and so the fridge does not add any stray odors. If you want to keep the Oreo base extra crisp, you can prepare the crumbs and mousse separately, then assemble them a few hours before serving. Add any whipped cream topping or cookie garnish right before they hit the table so everything looks fresh and stays in place.
Why You Will Love Decadent Oreo Chocolate Mousse Cups for Effortless Indulgence
Decadent Oreo Chocolate Mousse Cups for Effortless Indulgence bring together three things most home cooks want on a busy day: rich flavor, fast assembly, and a forgiving method. You get a crisp, buttery Oreo crumb at the bottom, a silky chocolate mousse on top, and just enough whipped cream or extra crumbs for contrast. The texture hits all the right notes, from the gentle crunch of the cookie base to the cool, airy mousse that melts as soon as it hits your tongue. You can make these in small glasses, ramekins, or even disposable cups if you want a no dishwashing dessert. They look fancy enough for guests, but the actual work feels closer to making a quick pudding.
The flavor profile of Decadent Oreo Chocolate Mousse Cups for Effortless Indulgence leans deep and chocolatey, with a hint of salt and the nostalgic taste of cookies and cream. Dark chocolate gives the mousse a grown up intensity, while the Oreos keep it familiar and fun. You can control the sweetness easily by choosing semi sweet or dark chocolate and by adjusting how many cookies you use in the base and topping. If you prefer a lighter taste, you can fold in a bit more whipped cream, which softens the chocolate and makes the mousse extra cloud like. The recipe also works well with flavored sandwich cookies, so you can play with mint, peanut butter, or seasonal varieties without changing the method.
On a practical level, Decadent Oreo Chocolate Mousse Cups for Effortless Indulgence fit neatly into real life schedules. You can prepare the mousse and crumb base in about 20 to 25 minutes, then let the cups chill while you handle dinner or get ready for guests. The individual portions make serving effortless, with no last minute slicing or messy plating. The cups hold well in the fridge for a day or two, so they are ideal for make ahead entertaining or a weekend treat you stretch across a couple of nights. If you keep cream, chocolate, and a sleeve of Oreos in the pantry, you are never more than a short chill time away from a dessert that feels restaurant worthy without restaurant level effort.
Ingredients and Flavor Notes
The heart of these Decadent Oreo Chocolate Mousse Cups for Effortless Indulgence is a short, honest ingredient list that works hard. Classic Oreo cookies form the base and add crunch, salt, and deep cocoa flavor that keeps the mousse from tasting flat. You can use regular, double stuffed, or a good store brand chocolate sandwich cookie, but avoid flavored ones here, they fight with the mousse. Melted dark chocolate, around 60 to 70 percent, gives the mousse its structure and grown up richness. If you prefer a gentler chocolate note, use half dark and half semisweet, but keep the total weight the same so the mousse still sets properly.

Heavy cream does the lifting in these Decadent Oreo Chocolate Mousse Cups for Effortless Indulgence, both for the mousse and the fluffy topping. You want cream that whips, at least 30 to 35 percent fat, very cold from the fridge so it traps air and holds soft peaks. If you only have lighter cream, plan to whip it a bit longer and expect a slightly softer set, or fold in a spoonful of mascarpone for extra body. A small amount of sugar, usually powdered or very fine, sweetens the cream without making it grainy. Taste as you go, the mousse should taste a touch darker than you like, because the whipped cream and Oreo crust will add sweetness.
Eggs are optional but useful if you want a classic French style mousse with extra silk and volume. If you use them, separate the eggs, whisk the yolks into the warm chocolate for richness, and whip the whites with a pinch of sugar for lightness, then fold very gently. For a no egg version of Decadent Oreo Chocolate Mousse Cups for Effortless Indulgence, simply skip the eggs and rely on well whipped cream and properly cooled chocolate, the texture will be slightly denser but still lush. A pinch of fine salt and a splash of real vanilla extract tie everything together and sharpen the chocolate. You can also slip in a teaspoon of instant espresso powder, it will not taste like coffee, it just deepens the chocolate and makes the whole cup taste more grown up.
How to Make Decadent Oreo Chocolate Mousse Cups for Effortless Indulgence
Start by crushing your Oreos into fine crumbs, about the texture of damp sand, so they pack neatly into the cups. Stir the crumbs with just enough melted butter to clump when you pinch them, then spoon a couple of tablespoons into each serving glass. Press the crumbs down with the back of a spoon or a small glass to form a firm base, but do not pound them or they will turn rock hard in the fridge. Chill the cups while you prepare the mousse so the crust sets and keeps its shape under the filling.

Melt your chocolate gently over a pan of barely simmering water or in short microwave bursts, stirring until smooth and glossy, then let it cool until it feels just warm to the touch. While it cools, whip cold heavy cream with a little sugar and vanilla to soft peaks, where the cream holds shape but the tip still curls over. In a separate bowl, whisk your egg yolks or mascarpone with a spoonful of the cooled chocolate to loosen it, then fold in the rest of the chocolate. Fold a third of the whipped cream into the chocolate mixture to lighten it, then gently fold in the remaining cream, turning the bowl and lifting from the bottom so you keep as much air as possible.
Spoon or pipe the chocolate mousse over the chilled Oreo bases, filling the cups almost to the top. Tap each cup lightly on the counter to settle the mousse and release any large air pockets, but do not overdo it or you will lose the light texture. Cover the cups loosely with plastic wrap so it does not touch the surface, then chill for at least 2 hours, or up to overnight, until the mousse feels softly set when you press the side of the glass. Just before serving, top with a small cloud of freshly whipped cream, a sprinkle of crushed Oreos, and a few larger cookie chunks for crunch, then serve straight from the fridge while the contrast between crisp base and silky mousse is at its best.
Common Questions About Oreo Mousse Cups
Q: Can I make Decadent Oreo Chocolate Mousse Cups for Effortless Indulgence without eggs?
Yes, you can make these mousse cups without eggs by using mascarpone or cream cheese to add body. Whisk room temperature mascarpone with a little powdered sugar until smooth, then blend it with the cooled melted chocolate. Fold in the whipped cream as usual, taking care not to overmix so the mousse stays light. The texture will be slightly denser and cheesecake like, but still rich and very satisfying.
Q: How do I keep the Oreo crust from getting soggy?
Use just enough melted butter to coat the crumbs so they form a firm base that resists the moisture from the mousse. Press the crumbs into the cups and chill them for at least 15 minutes before adding the filling, which helps the butter set and form a barrier. Avoid pouring in very warm mousse, since heat will melt the butter and soften the crust. If you plan to store the cups longer than a day, add a thin layer of melted chocolate over the crust, let it set, then add the mousse.
Q: Can I use different flavors of Oreos in Decadent Oreo Chocolate Mousse Cups for Effortless Indulgence?
You can swap in flavored Oreos to change the character of the dessert without adjusting the method. Mint Oreos give a cool, refreshing note under the dark chocolate mousse, while peanut butter Oreos create a candy bar effect. Just keep the crumb texture the same, whether you use classic, flavored, or double stuffed cookies. Taste the crumbs before adding sugar to the mousse, since some Oreo flavors are sweeter and may need a lighter hand with extra sweetness.
Q: How far ahead can I assemble Decadent Oreo Chocolate Mousse Cups for Effortless Indulgence?
You can assemble the full cups up to 24 hours in advance and keep them covered in the fridge. For the best texture, prepare the Oreo bases and chocolate mousse the day before, but add the whipped cream topping and final cookie garnish within 2 hours of serving. If you need to work even further ahead, make the mousse up to 2 days in advance, store it in a covered bowl, and whisk briefly before spooning into freshly prepared crusts. This way, the crust stays crisper and the mousse keeps its airy, silky feel.
Make-Ahead, Storage, and Serving Tips
For truly Decadent Oreo Chocolate Mousse Cups for Effortless Indulgence, plan at least 4 hours of chill time, or overnight if you can. Assemble the crumb base and mousse, then cover each cup tightly so they do not pick up fridge odors. If you want the Oreo layer to stay a bit crunchier, add only half the crumbs at the bottom, chill the mousse, then sprinkle the rest on top right before serving. The mousse keeps its best texture for about 2 days, after that it starts to deflate slightly, though it still tastes good. If the mousse looks a bit loose after folding in the whipped cream, chill it in the bowl for 20 to 30 minutes, then pipe or spoon it into the cups.

For storage, keep the Decadent Oreo Chocolate Mousse Cups for Effortless Indulgence in the coldest part of your fridge, not in the door where temperature fluctuates. Use glass or sturdy plastic cups rather than flimsy paper, which can soften and leak moisture into the crumbs. If you garnish with whipped cream, add it within 4 hours of serving so it stays billowy and does not weep. Leftovers hold well for up to 3 days, but the cookie layer will soften into more of a cake like base, so label them as “pudding cups” on day 3 and no one will complain. Do not freeze the mousse cups, the texture turns grainy and the cream can separate as they thaw.
To customize Decadent Oreo Chocolate Mousse Cups for Effortless Indulgence, swap classic Oreos for flavored ones, or mix in a spoonful of peanut butter or hazelnut spread to the warm chocolate before folding. For a lighter version, use part Greek yogurt in place of some cream, but understand the mousse will taste tangier and set a bit firmer. You can also layer in fresh raspberries or sliced strawberries between the crumbs and mousse for a sharper, fruity contrast. For serving, pull the cups from the fridge about 10 minutes before dessert so the chocolate flavor opens up and the mousse feels silkier on the tongue. Finish with a tiny pinch of flaky salt or a single Oreo half on top, and serve with small spoons so everyone slows down and actually tastes what you made.
FAQ
-
Can I make these mousse cups without eggs or gelatin?
You can make Decadent Oreo Chocolate Mousse Cups for Effortless Indulgence without eggs or gelatin by relying on whipped cream for structure. Use good quality dark chocolate, at least 50 percent cocoa, so the mousse firms up as the chocolate sets. Fold the cooled melted chocolate gently into softly whipped cream, and chill for at least 3 hours so it thickens properly. If you want extra insurance, add 1 to 2 teaspoons of cornstarch to the cream before whipping, which helps it hold longer without weeping. -
How can I prevent the mousse from turning grainy or splitting?
Use room temperature chocolate and cool it slightly before folding it into the cream, so the temperature contrast does not shock the mixture. Whip the cream only to soft or medium peaks, since over whipped cream turns grainy fast once you add chocolate. Fold with a wide spatula, turning the bowl as you go, and stop as soon as the streaks disappear to avoid knocking out too much air. If it still looks a bit lumpy, pass the mousse through a fine mesh sieve, then chill, and the texture usually smooths out. -
What are the best Oreos and chocolate to use?
For Decadent Oreo Chocolate Mousse Cups for Effortless Indulgence, regular Oreos give the cleanest flavor and texture, while double stuff can make the base a bit too sweet and soft. Crush the cookies quite fine for the bottom layer, but keep a few chunkier bits for garnish so you get some crunch. Choose a bar of dark or semisweet chocolate instead of chips, since bar chocolate melts smoother and tastes cleaner. If you like a deeper cocoa edge, mix 70 percent chocolate with a little milk chocolate to keep the mousse from tasting harsh. -
How far ahead can I assemble and how should I store them?
You can fully assemble the mousse cups up to 24 hours ahead, which makes them handy for guests or busy days. Cover each cup loosely with plastic wrap so the mousse does not pick up fridge odors and the Oreo layer does not dry out. For best texture, store them in the coldest part of the refrigerator, not in the door where the temperature swings. Add final whipped cream swirls and extra Oreo crumbs just before serving, so the topping stays fluffy and the cookie pieces keep their crunch.
Conclusion
Decadent Oreo Chocolate Mousse Cups for Effortless Indulgence prove that you do not need fancy equipment or pastry school skills to plate something that feels restaurant worthy. You crushed cookies into a buttery base, whisked warm cream into chocolate until glossy, then folded in softly whipped cream for that cloud light texture. The steps stay simple, but the contrast of crunchy Oreo crumbs, silky mousse, and cool whipped topping keeps every spoonful interesting.
The real strength of these cups lies in how flexible they are. You can build them in tiny shot glasses for a tasting tray, in sturdy jars for lunchbox treats, or in stemmed glasses for a dinner party dessert that looks like it took all afternoon. The recipe also invites small twists, like a pinch of espresso powder in the chocolate, a splash of vanilla in the cream, or a sprinkle of flaky salt on top. Keep the basic method in your back pocket, then adjust the details to suit your guests, your pantry, or your mood, and let these little cups quietly steal the show.
Recipe

Decadent Oreo Chocolate Mousse Cups for Effortless Indulgence
Ingredients
- 24 Oreo cookies finely crushed (about 2 cups crumbs), plus extra for garnish if desired
- 6 tbsp unsalted butter melted
- 1/8 tsp fine sea salt
- 8 oz dark or semisweet chocolate 60–70% cacao, chopped
- 2 tbsp granulated sugar reduce to 1 tbsp if using milk chocolate
- 1 tsp pure vanilla extract
- 2 cups heavy whipping cream cold, divided
- Optional garnish: additional whipped cream extra crushed Oreos, or chocolate shavings
Instructions
- Prepare the Oreo base: In a medium bowl, combine the finely crushed Oreo cookies, melted butter, and salt. Stir until all crumbs are evenly coated and the mixture resembles damp sand.
- Form the crusts: Divide the crumb mixture evenly among 8 small glasses, ramekins, or dessert cups. Press the crumbs firmly into the bottom of each cup with the back of a spoon or the base of a small glass to create a dense, even layer.
- Chill the bases: Place the cups in the refrigerator for at least 15 minutes to allow the butter to firm up and set the crust.
- Melt the chocolate: Place the chopped chocolate in a heatproof bowl. Set the bowl over a saucepan of barely simmering water (do not let the bottom of the bowl touch the water) or microwave in 20–30 second bursts, stirring between each, until almost fully melted. Remove from heat and stir until smooth and completely melted.
- Sweeten and flavor: While the chocolate is still warm but not hot, stir in the granulated sugar and vanilla extract until dissolved and smooth. Let the mixture cool to just slightly warm or room temperature; it should be fluid but not hot to the touch.
- Whip the cream: In a large chilled bowl, add 1 1/2 cups of the cold heavy cream. Using a hand mixer or stand mixer, whip on medium speed until soft to medium peaks form. The cream should hold its shape but still look smooth and slightly droopy at the tips, not stiff or grainy.
- Loosen the chocolate: Add a large spoonful of the whipped cream to the cooled melted chocolate and stir briskly to lighten and loosen the mixture. This makes it easier to fold in the remaining cream without deflating it.
- Fold the mousse: Gently fold the remaining whipped cream into the chocolate mixture in 2–3 additions, using slow, broad strokes with a spatula. Turn the bowl as you fold, stopping as soon as no streaks of cream remain and the mixture looks smooth and airy.
- Fill the cups: Remove the chilled Oreo bases from the refrigerator. Spoon or pipe the chocolate mousse evenly over the crumb layers, smoothing the tops if desired.
- Chill to set: Cover each cup loosely with plastic wrap and refrigerate for at least 1 1/2 hours, or until the mousse is set and well chilled. For a firmer mousse, chill up to 24 hours.
- Make optional topping: Just before serving, whip the remaining 1/2 cup heavy cream to soft peaks with a small pinch of sugar if desired.
- Garnish and serve: Top each mousse cup with a dollop of whipped cream, a sprinkle of extra crushed Oreos, and/or chocolate shavings. Serve chilled.
Notes
To keep the Oreo crust from getting soggy, pack the crumbs firmly and chill the bases before adding the mousse; for maximum crunch, assemble the layers within a few hours of serving.
If using milk chocolate only, reduce the granulated sugar by about one third to prevent the mousse from becoming overly sweet.
Avoid grainy mousse by melting the chocolate gently and whipping the cream only to soft or medium peaks; over-heated chocolate or over-whipped cream can create a rough texture.
These cups can be made up to 24 hours in advance. Add whipped cream and cookie garnish just before serving so they look fresh and the toppings hold their shape.