

The Story Behind These Chocolate Mousse Brownies
A dessert that changed my idea of brownies forever
I still remember the first time I made chocolate mousse brownies—it was for a Sunday dinner that I was already running late for. I had a batch of chocolate brownies with avocado in the oven and realized I wanted something more…elegant. So I whipped up a quick mousse using semi-sweet chocolate and heavy cream, spread it over the cooled brownies, and chilled it while I got dressed. That night, it was the mousse layer that stole the show.
People always ask me, “Are these brownies or mousse?” And my answer is—yes. It’s a hybrid. A chocolatey, creamy, fudgy hybrid that melts on your tongue.
What makes chocolate mousse brownies special isn’t just the combination of textures—it’s the contrast of rich and light, dense and airy, all in one bite. The cool mousse complements the chewy brownie perfectly, creating a balance that’s far more satisfying than either alone.
Why chocolate mousse brownies just work
You’ve probably seen brownie mousse cups at cafés or elegant dessert bars. There’s a reason this dessert is trending—it feels elevated, but it’s surprisingly easy to make at home. You don’t need any fancy techniques, and the ingredients are pantry staples: butter, cocoa, eggs, and a touch of heavy cream for the mousse.
The best part? They’re incredibly versatile. You can make them in a pan, spoon them into cups for single servings, or even transform them into a layered brownie trifle with whipped cream and fruit.
And if you’re wondering whether these brownies hold up in the fridge or freezer—the answer is a strong yes. The mousse sets beautifully when chilled, which means you can make them the night before and still wow your guests the next day. They also adapt easily with flavor swaps like raspberry, espresso, or even mint.
If you love rich chocolate desserts like my strawberry ganache or cherry coffee cake, this one fits right into your comfort zone—only with an extra creamy twist.
How to Make the Perfect Brownie Base for Mousse
The foundation of every great chocolate mousse brownie
Let’s be honest—no mousse, no matter how fluffy, can save a dry or cakey brownie. So before you even think about the mousse layer, you need a brownie that’s rich, chewy, and sturdy enough to hold its own under a blanket of chocolate creaminess.
The key is balance. Too much flour and you’ll end up with cake. Too much fat and the brownie becomes greasy, not fudgy. The goal is a firm yet tender bite that contrasts the lightness of the mousse without collapsing under it.
Here’s what I’ve learned from testing (and yes, eating) dozens of pans over the years:
- Use unsweetened cocoa powder for an intense chocolate punch without adding more fat
- Add melted dark chocolate into the batter for richness and depth
- Whisk eggs and sugar until pale and thick—this adds a natural lift without leaveners
- Skip the baking powder. You want dense, not fluffy.
If you’re craving a gluten-free option, you can even try adapting the base with the method from my gluten-free wacky cake, which substitutes flour cleverly without sacrificing moisture.
Don’t overbake—here’s how to know they’re done
Even if you’ve nailed the ingredients, baking time can make or break your chocolate mousse brownies. Overbake them, and the texture will turn dry after chilling. Underbake, and the center won’t support the mousse. The sweet spot? 20–24 minutes at 325°F.
Check them a few minutes early. The edges should be set, the top shiny and cracked, and the center should still have the slightest jiggle. A toothpick inserted 2 inches from the edge (not the center!) should come out with moist crumbs, not raw batter.
Once they’re out of the oven, let them cool completely before you add the mousse layer. Rushing this part is a recipe for a melty mess. And trust me, that dreamy mousse deserves a solid foundation.
If you enjoy chocolate pairings like in my lemon cream cheese dump cake recipe, you’ll love how the slightly bitter cocoa base here perfectly complements the silky, sweet mousse we’ll make next.
Creating the Silky Chocolate Mousse Layer
Smooth, stable, and rich—without the fuss
Let’s talk mousse. Not the kind that requires a candy thermometer or gelatin sheets—just good old-fashioned, whipped-to-perfection chocolate cream that sets beautifully over brownies. The magic formula? A combination of melted chocolate, whipped cream, and just a touch of sugar.
This mousse is made to complement—not overpower—the brownie base. You want it light and airy but still chocolatey enough to hold its own. Here’s my go-to method:
- Start by melting semi-sweet or bittersweet chocolate (the better the chocolate, the better the mousse).
- Let it cool slightly, then fold in freshly whipped heavy cream—not too stiff, just soft peaks.
- Add a touch of vanilla extract and a pinch of salt to balance the sweetness.
- Gently fold everything together until smooth and uniform.
No eggs, no gelatin, no hassle. It’s stable enough to chill for hours, even overnight, without weeping or separating. And unlike some overly airy versions, this one has body—making it ideal for slicing cleanly with the brownies.
Need a dairy-free version? Swap the heavy cream with full-fat coconut cream for a mousse that’s every bit as dreamy.
For a decadent twist, you can even spike the chocolate with a teaspoon of instant espresso, or fold in a swirl of blueberry ganache or biscoff banana pudding to add complexity. These small touches take the basic chocolate mousse recipe from classic to unforgettable.
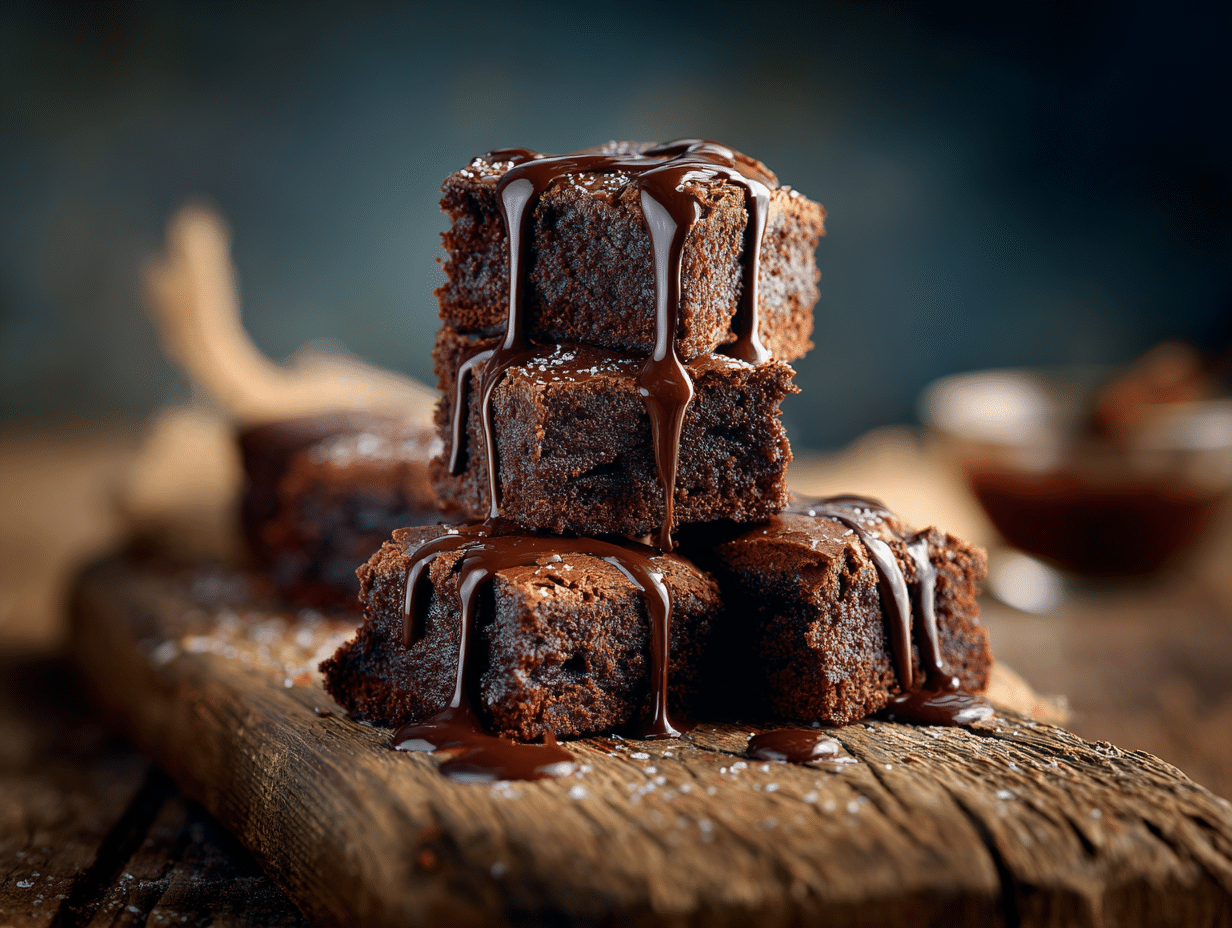
Getting that clean, bakery-style look
Once your brownies are fully cooled and your mousse is ready, spread the mousse in a thick, even layer over the brownie base. Use an offset spatula to smooth the top like frosting. For ultra-clean edges when slicing, chill the assembled brownies for at least 2 hours—overnight is best.
Right before serving, I like to garnish with a dusting of cocoa powder or shaved chocolate. If you’re feeling fancy, a dollop of whipped cream or a fresh berry on each slice adds visual appeal without extra effort.
Want to impress guests? Serve them in individual cups like brownie mousse cups—just layer small brownie squares and mousse in glasses for a café-style dessert.
Creative Ways to Serve Chocolate Mousse Brownies

Chocolate mousse brownie trifle, cake, and more
Once you’ve mastered the base recipe, it’s time to get creative. Chocolate mousse brownies are endlessly adaptable—ideal for casual gatherings or holiday tables. Let’s talk variations that not only look stunning but also extend your batch into multiple servings.
Chocolate Mousse Brownie Trifle: Cut your brownies into cubes, then layer them in a trifle bowl or glasses with mousse, whipped cream, and berries. Think of it like a dessert lasagna. Each spoonful gives you a bite of rich brownie, smooth mousse, and creamy topping. It’s a great make-ahead option and perfect for potlucks or birthdays.
Chocolate Mousse Brownie Cake: Instead of spreading mousse on top, double the batch and stack two brownie layers with mousse in between. Add a final mousse coat on top and chill until firm. Finish with a ganache drip or berries for a celebration-worthy centerpiece. This idea plays especially well with the flavors in my lemon tiramisu for contrast.
Brownie Mousse Cups: Bake brownie batter in muffin tins, press down the centers, and fill with mousse. Chill and top with whipped cream or ganache. These travel well and are easy to serve individually—great for parties or kids’ events.
If you’re feeling adventurous, swirl in flavored layers like strawberry cream cheese or drizzle a fruit compote in the trifle layers for an unexpected twist.
Storing, freezing & repurposing leftovers
Mousse brownies store beautifully in the fridge for up to 5 days. Just cover the pan tightly to prevent the mousse from picking up fridge odors.
Want to freeze them? Go for it. Slice into squares and freeze in a single layer, then transfer to an airtight container. They’ll keep well for up to 1 month. Thaw overnight in the fridge for best texture.
Got leftovers? Don’t let them go to waste—crumble them into parfaits, layer into sundaes, or use them as a surprise base in other layered desserts. They’re also amazing repurposed into frozen pops: just cut small cubes, skewer with sticks, and freeze.
If you’ve ever loved rich combinations like those in my matcha chocolate bar, you’ll appreciate how versatile and flavor-pairing-friendly these brownies are.
FAQs About Chocolate Mousse Brownies
Easy chocolate mousse brownies FAQs
Yes! You can simplify this dessert by using a boxed brownie mix and topping it with a 2-ingredient mousse (melted chocolate + whipped cream). Chill well and you’re done—no fancy tools or baking skills required.
How do I make brownie mousse cups?
Bake brownie batter in muffin tins, let cool, and press down the center with a spoon. Pipe or spoon chocolate mousse into the well. Chill, top with whipped cream, and garnish with sprinkles, berries, or shaved chocolate.
Can I turn this into a chocolate mousse brownie cake?
Absolutely. Use the brownie as a cake layer, double the mousse, and stack with mousse in the middle and on top. It’s elegant, sliceable, and holds well after chilling. Add ganache or berries for decoration.
What is a chocolate mousse brownie trifle?
It’s a layered dessert made of cubed brownies, chocolate mousse, whipped cream, and sometimes fruit or ganache. Assemble in a large bowl or individual glasses for an eye-catching presentation. Great for parties!
What’s the best brownie mousse recipe?
The one in this article combines a classic fudgy brownie base with a no-gelatin, egg-free mousse. It’s rich but light, sturdy yet creamy—and perfect for chilling and slicing.
How do I make classic chocolate mousse for topping brownies?
Melt high-quality chocolate and let it cool. Whip heavy cream until soft peaks form, then gently fold into the chocolate with a splash of vanilla. Chill until set. That’s it!
Conclusion: A Brownie That’s Worth the Whisk
Whether you’re baking for a special occasion or simply want to treat yourself, these chocolate mousse brownies deliver every time. They combine the chewy satisfaction of a brownie with the silky indulgence of mousse—and they’re endlessly adaptable.
Try them as bars, trifles, or mousse cups. Serve them at parties or keep a secret stash in your freezer. No matter how you make them, they never fail to impress.
If you loved this, you’ll definitely want to explore more cozy bakes like croissant chocolate chip cookie or chocolate brownies with avocado for even more chocolatey comfort.
Happy baking—and even happier eating.
For more colorful, health-forward creations and behind-the-scenes peeks into my test kitchen, connect with me on Facebook and see what’s brewing daily on Pinterest. Your next favorite recipe might just be a scroll away.
Chocolate Mousse Brownies: The Ultimate Indulgent Dessert
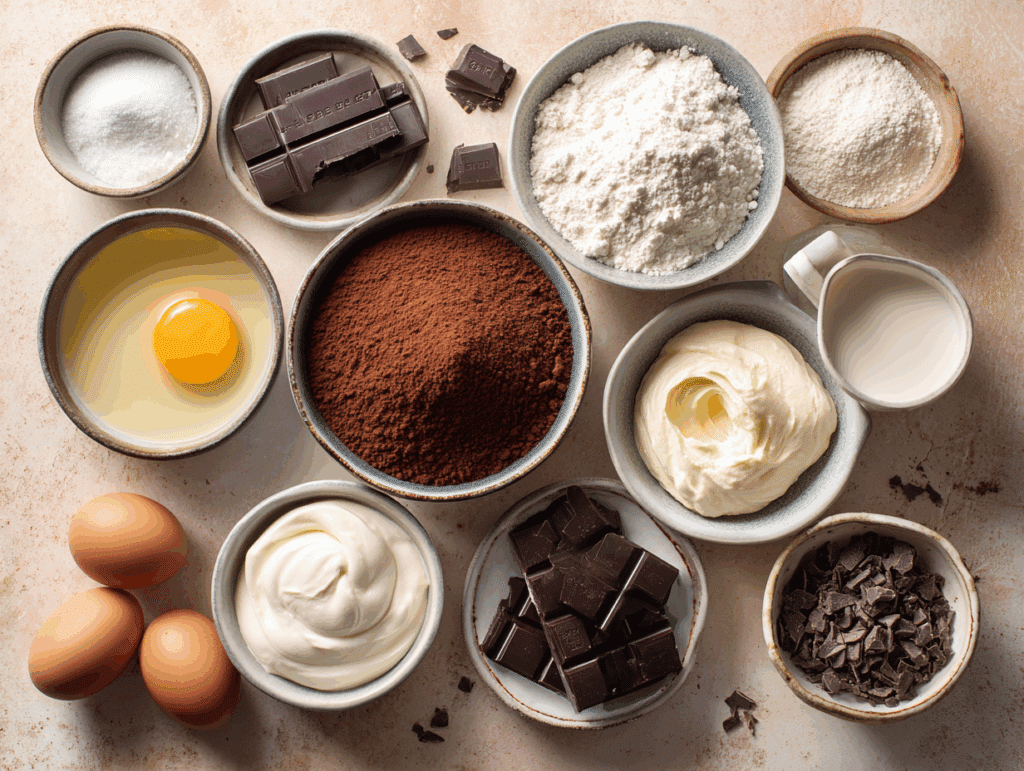
Ingredients
For the Brownie Layer:
- 1/2 cup unsalted butter melted
- 1 cup granulated sugar
- 2 large eggs
- 1 tsp vanilla extract
- 1/3 cup unsweetened cocoa powder
- 1/2 cup all-purpose flour
- 1/4 tsp salt
- 1/4 cup melted dark chocolate
For the Mousse Layer:
- 1 1/4 cups heavy whipping cream cold
- 1 cup semi-sweet chocolate chips or chopped chocolate
- 1 tsp vanilla extract
- Pinch of salt
Instructions
- 1. Preheat oven to 325°F (165°C). Line an 8×8-inch pan with parchment paper.
- 2. In a bowl, whisk melted butter, sugar, eggs, and vanilla until smooth and pale.
- 3. Sift in cocoa powder, flour, and salt. Mix until just combined. Fold in melted chocolate.
- 4. Spread the batter evenly into the prepared pan. Bake for 20–24 minutes or until edges are set and center is slightly fudgy.
- 5. Let the brownie cool completely in the pan.
- 6. For the mousse, melt chocolate in the microwave or over a double boiler. Let it cool slightly.
- 7. In a cold mixing bowl, whip cream with vanilla and salt until soft peaks form.
- 8. Fold whipped cream gently into melted chocolate until fully incorporated.
- 9. Spread mousse evenly over the cooled brownies. Chill for at least 2 hours or overnight.
- 10. Slice and serve with whipped cream or berries if desired.


1 thought on “Chocolate Mousse Brownies: The Ultimate Indulgent Dessert”