Before we get into recipes and techniques, let me tell you how this all started.
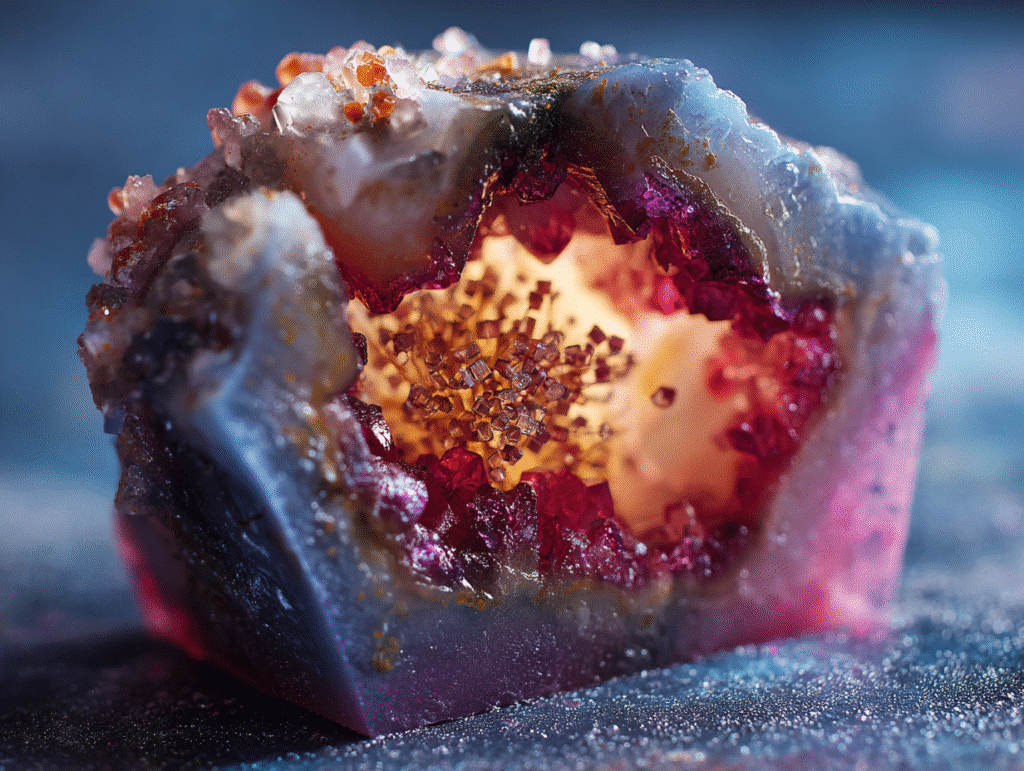
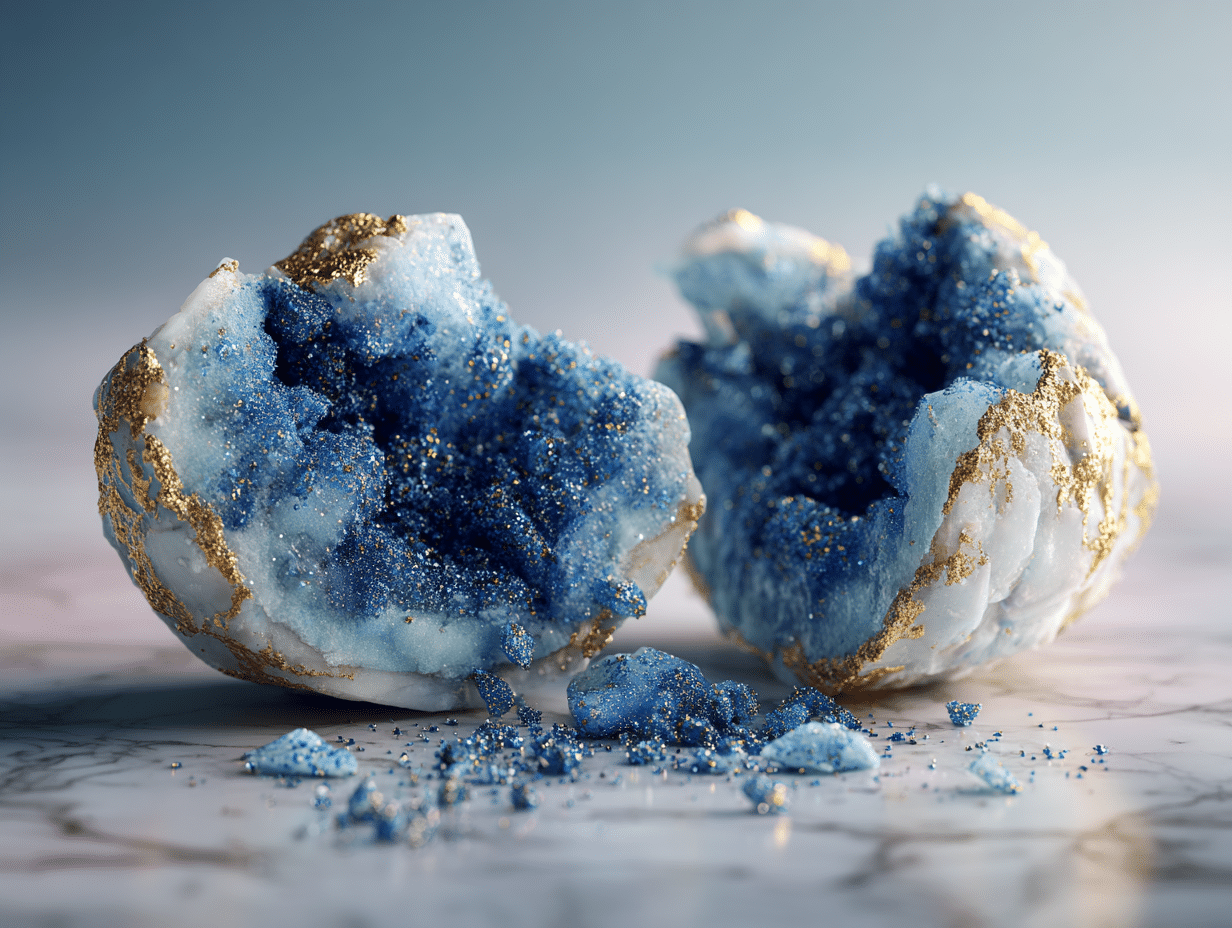
When I was about eight years old, I remember smashing open a dusty, boring-looking rock during a school field trip. Inside? Glittering, purple crystals. My jaw dropped. That was my first geode—and it never left me. Years later, while working on a food styling shoot, someone brought in a glittery dessert centerpiece. It looked like a geode, but it was entirely edible. And just like that, the idea of making my own candy geode began to sparkle in my mind.
Creating candy geodes brings together two things I absolutely love: the wonder of nature and the magic of sweets. It’s one of those recipes that feels like a mini science experiment, an art project, and a dessert all in one. The best part? It looks super impressive but is surprisingly easy to make in your own kitchen.
If you’ve ever been enchanted by the glimmering insides of a crystal rock, you’re going to fall hard for candy geodes. These sugary creations mimic the raw beauty of natural geodes—but they’re made entirely of ingredients you can eat. From kids to bakers to geology lovers, there’s something thrilling about cracking open one of these edible rocks to reveal what’s inside.
And just like my chocolate truffle bark or easy no-bake marshmallow fudge, this recipe proves that beautiful doesn’t have to mean complicated. You’ll be surprised how sugar, water, and food coloring can turn into something that rivals nature’s art.
Now let’s explore what makes candy geodes so dazzling—and how you can make them yourself.
What Makes Candy Geodes So Special?
There’s something hypnotic about the way candy geodes shimmer. The sugar crystals catch the light just like real quartz or amethyst, and when made in vibrant colors like teal, lavender, or even gold, they almost look too pretty to eat.
But it’s more than just good looks. What sets candy geodes apart is how they connect fun with science. They’re built using a supersaturated sugar solution that forms real edible crystals over time. Watching them grow is half the fun—and a perfect way to get kids curious about chemistry.
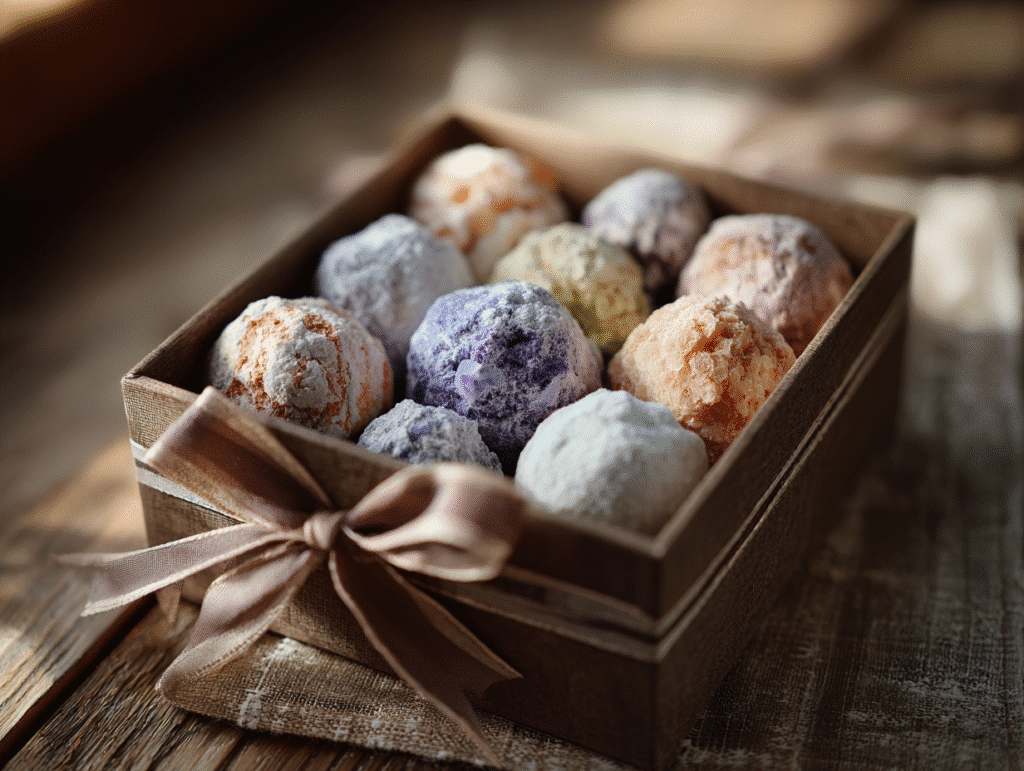
These sweet sculptures have also become a huge hit at parties. They make stunning cake toppers, wedding favors, or edible centerpieces. I’ve even gifted small ones wrapped in parchment and tied with twine as holiday gifts—far more delightful than store-bought candy bags.
And perhaps the most charming thing about them? No two candy geodes are ever exactly alike. Just like nature’s geodes, every batch holds its own surprise, making each one a unique treasure.
Making a Candy Geode – Step-by-Step
Ingredients and Tools You’ll Need
You don’t need fancy tools or rare ingredients to make a candy geode. In fact, most of what you’ll use is already in your kitchen. Here’s what you’ll need to get started:
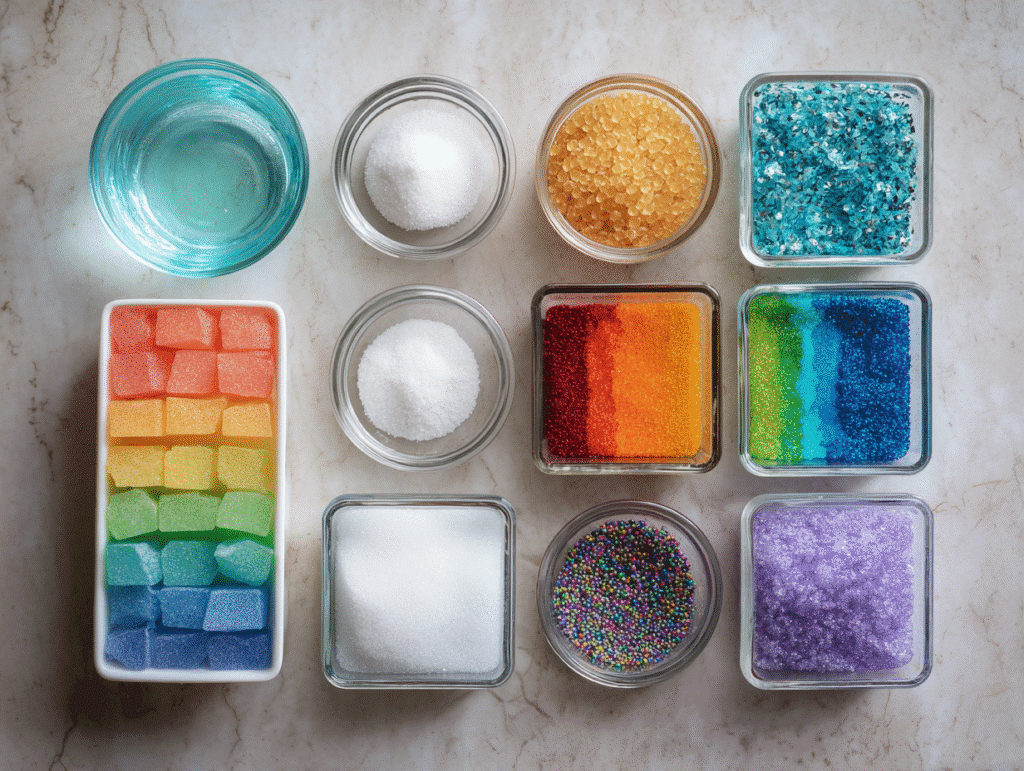
- 2 cups of granulated sugar
- 1/2 cup water
- Light corn syrup (optional, helps prevent crystallization on the sides)
- Gel food coloring (jewel tones like amethyst or sapphire work beautifully)
- Edible glitter or luster dust (for added sparkle)
- Small silicone bowl molds or cupcake molds
- Edible glue or corn syrup (to adhere crystals to the surface)
- Clean paintbrush
- Candy thermometer (optional, for precision)
Making a candy geode is a two-part process: growing the crystals and assembling the geode. The fun lies in how the sugar behaves when it’s cooled in just the right environment. You’re basically controlling the environment to mimic natural crystal growth—only tastier!
Step-by-Step Guide to Make a Candy Geode
1. Prepare Your Mold Base
Use a silicone mold shaped like a half-dome or small bowl. Paint a thin layer of edible glue or corn syrup inside, then sprinkle a few coarse sugar crystals at the base—these serve as your “seed crystals” and encourage growth.
2. Make the Supersaturated Solution
In a saucepan, combine 2 cups of sugar with 1/2 cup water. Heat slowly, stirring until the sugar dissolves completely. Do not let it boil too fast. For an extra smooth finish, add 1 tablespoon of corn syrup.
Once the solution is fully clear and sugar is dissolved, remove from heat and add your food coloring. Use a few drops at a time until you get a rich, gemstone tone.
3. Pour and Let It Grow
Carefully pour the syrup into your mold, over the seed crystals. Let the molds sit undisturbed at room temperature for 24–48 hours. Over time, the sugar will form stunning crystal clusters. Don’t refrigerate—they need warmth to grow!
4. Drain and Dry
After crystals have formed, carefully pour out any excess syrup. Allow the geodes to dry for another 24 hours until they’re firm and crunchy.
5. Add the Wow Factor
Once dry, brush the crystal edges with a tiny bit of edible glitter or luster dust. This gives your candy geode a realistic and magical shimmer. If you like a chocolate shell, you can coat the back of the geode in tempered chocolate for contrast and structure.
And just like that, you’ve created your own edible crystal cave!
Candy geodes aren’t just about the final look—half the fun is watching them grow. Kids especially love checking on their “crystals” every few hours. If you’re baking with young ones, this recipe makes a perfect edible science experiment.
If you enjoy hands-on, visual recipes like this one, don’t miss my creative baking for kids section or try one of my beginner-friendly bakes that brings big results with minimal stress.
Tips, Tricks, and Fun Variations
Troubleshooting Common Candy Geode Issues
Even though making a candy geode is a straightforward process, a few hiccups might pop up. Here’s how to handle them like a pro:
- Crystals didn’t grow well? Your sugar solution may not have been saturated enough. Reheat and add more sugar until it stays dissolved just at the boiling point—then try again.
- Crystals are too small or uneven? This usually happens when the mold is disturbed during growth. Let the mold sit completely still, away from vibrations or drafts.
- Candy looks cloudy or dull? Use clear gel food coloring rather than liquid dye. It gives the crystals a more vivid, glassy look.
- Sticky or wet geodes? Humidity can ruin the structure. After draining the syrup, dry the molds in a low-humidity room or near a gentle fan.
If a batch flops, don’t stress. It’s all part of the experiment—and trust me, your second try will be ten times better. As with many beginner-friendly treats, the learning curve is short, and the satisfaction is huge.
Flavor and Color Ideas to Customize Your Candy Geode
One of the most fun aspects of making candy geodes is turning them into edible art. Here are some easy ways to give them flair:
- Color Themes: Use jewel tones like amethyst purple, emerald green, or aquamarine blue. You can also do ombré effects by pouring in two colors side by side.
- Flavored Sugar: Add a drop or two of peppermint, raspberry, or vanilla extract after removing the sugar syrup from heat. This infuses your crystals with a delicious surprise.
- Edible Glitter & Gold Dust: A tiny dusting of luster dust transforms your geode from fun to fabulous. Use a clean, dry paintbrush to apply it after drying.
- Chocolate Shell Variation: Once crystals are dry, coat the back of your candy geode with melted white or dark chocolate. This adds flavor and helps mimic the earthy “rock” layer found in real geodes.
When I made a batch for my niece’s birthday, I dusted the edges with silver shimmer and paired it with a dark chocolate base. It was the hit of the dessert table—and far easier than making a full cake! If you’re looking for other show-stopping ideas for parties, check out my holiday treats or try decorated cookies that sparkle just as much.
Candy Geodes for Learning and Gifting
Candy Geode as a STEAM Activity
If you’ve ever wanted to sneak science into something sweet, candy geodes are the ultimate kitchen project. They’re an edible way to teach kids about geology, crystal formation, and the chemistry of supersaturated solutions—all while having a blast.
As the crystals grow, kids can observe how time, temperature, and even food coloring impact the shape and texture. It’s a hands-on, visual lesson in patience and observation. Plus, unlike most science experiments, the end result is completely edible and wildly satisfying.
Teachers and homeschooling parents love using this recipe for STEAM week. It blends science and art perfectly, and the “wow” moment of seeing the crystals form? Unbeatable. You can even turn it into a mini geology unit by pairing the project with real geode samples or simple rock charts.
Need more inspiration for edible learning activities? My kids baking section is filled with fun recipes that double as lessons—and don’t miss my creative edible gifts for projects like these with presentation in mind.
Wrapping, Gifting, and Celebrating with Edible Geodes
Candy geodes aren’t just fun to make—they’re also gorgeous to give. Here are a few easy and thoughtful ways to turn your homemade crystal creations into stunning gifts:
- Mini Favor Bags: Wrap small geodes in clear cellophane and tie with twine or ribbon. Add a hand-written tag for that artisanal touch.
- Edible Party Favors: Use them as birthday or shower favors. Guests will be amazed to learn they’re completely edible and homemade.
- Cake Decorations: Use your candy geode as the crown jewel of a birthday cake. Nestle it into frosting like a gemstone bursting from the center.
- Gift Box Ready: Pair a few geodes in a kraft box with parchment dividers. Add a note like “Break open and enjoy!”—because yes, you can crack them like real rocks.
For best results, store your candy geodes in a cool, dry place in airtight containers. They’ll keep for up to two weeks—plenty of time to impress your recipients or sneak a few bites yourself.
If you’re into edible crafts that look as good as they taste, don’t miss my birthday dessert ideas or browse the edible gifts collection for even more sparkly, homemade magic.
FAQs About Candy Geodes
How valuable is a geode?
Natural geodes can range in value from a few dollars to thousands depending on size, rarity, and crystal type. While a candy geode won’t earn you cash, its real value lies in the creativity, education, and delight it brings to the table.
Is geode edible?
Real geodes are made of minerals and stone—not edible. But a candy geode is a completely safe, edible version made from sugar and food coloring that looks like the real thing and tastes like rock candy.
What is so special about geodes?
Geodes are fascinating because they look plain on the outside but hold sparkling crystal formations inside. Candy geodes recreate this natural surprise, giving you a treat that’s just as exciting to crack open and explore.
Is a geode rock rare?
Some geodes—especially those with rare minerals—are considered rare. The good news? Candy geodes let you experience that same sense of discovery without the scarcity or the rock hammer.
How to tell if a geode is real?
A real geode feels hollow when tapped and often has a slightly lighter weight than expected. Candy geodes, on the other hand, are made from sugar and designed purely for aesthetics and taste.
Can geodes have diamonds?
No, diamonds don’t typically form in geodes. They form under extreme pressure and heat, unlike the quartz or amethyst crystals in most geodes. But you can add diamond-like sparkle to your candy geode using edible glitter or silver dust!
Which rock is edible for humans?
Technically, no rock is edible. However, candy geodes give you the fun of rock-breaking with none of the risk. They’re sugar sculptures designed to be safely enjoyed and shared.
Conclusion
Making a candy geode is more than just baking—it’s crafting, experimenting, and gifting all at once. Whether you’re exploring the science behind crystals with your kids, decorating a birthday cake, or simply creating something beautiful, candy geodes deliver joy in every sparkle.
They’re surprisingly easy to make, endlessly customizable, and always a conversation starter. So grab your sugar and molds—it’s time to turn your kitchen into a crystal cave of sweet wonders.
For more colorful, health-forward creations and behind-the-scenes peeks into my test kitchen, connect with me on Facebook and see what’s brewing daily on Pinterest. Your next favorite recipe might just be a scroll away.
Candy Geode: How to Make Sweet Crystal Magic at Home
Ingredients
- 2 cups granulated sugar
- 1/2 cup water
- 1 tbsp light corn syrup optional
- Gel food coloring
- Edible glitter or luster dust
- Edible glue or corn syrup
- Silicone molds
- Clean paintbrush
Instructions
- 1. Brush the inside of your silicone mold with edible glue. Add a pinch of sugar crystals as “seeds.”
- 2. In a pot, combine sugar, water, and corn syrup. Heat until sugar dissolves completely.
- 3. Remove from heat and stir in gel food coloring.
- 4. Pour syrup gently into the prepared mold.
- 5. Let sit undisturbed for 24–48 hours to form crystals.
- 6. Pour out excess syrup and let dry another 24 hours.
- 7. Brush dried crystals with glitter or dust. Optionally, coat the back with melted chocolate.