
The Practical Why Behind It
There is a very real, very practical reason to make your own Cadbury Creme Bites at home, and it goes beyond the fun of licking the spoon. When you control the recipe, you control the sweetness, the chocolate quality, and even the size. Store candies can lean extra sugary with thinner chocolate and a filling that sometimes tastes more sticky than creamy. Here, that butter and powdered sugar base gives you a soft, rich center that holds its shape but still melts on your tongue. Plus, this homemade version uses mini liners, so each bite stays neat, portable, and perfect for lunch boxes or dessert trays.
From a time and budget angle, this big batch saves you money compared with buying multiple packages of seasonal candies. One recipe makes 48 Cadbury Creme Bites, which is perfect for class parties, office platters, or a freezer stash for late night cravings. Using corn syrup keeps the filling smooth and stable, so it does not crystallize, and the microwave method for the chocolate means no fussy tempering on a busy day. The colored portion of creme gives you that classic “yolk” look without any extra steps besides a quick stir of food coloring. If you already love making small batch sweets like truffles or peanut butter buckeyes, these will slide right into your candy routine.
There is also the convenience factor that every home baker secretly craves. Because everything is portioned in mini muffin cups, you do not need special molds or advanced candy skills. You layer, chill, and you are done. The set chocolate shell makes them sturdy enough to travel to potlucks or tuck beside cakes and cookies on a dessert spread, right next to treats like homemade fudge or no bake cookies. In other words, Cadbury Creme Bites give you bakery style charm, gift ready presentation, and dependable results with simple pantry ingredients.
Step-by-step method
Start by lining a mini muffin pan with 48 parchment paper liners so your Cadbury Creme Bites release cleanly once chilled. Gently melt half of your milk chocolate in a microwave safe bowl, starting with 30 seconds on high, then stirring and heating in 20 second bursts until smooth and glossy. Spoon or pipe a thin layer of this melted chocolate into the bottom of each liner, then gently tap the pan on the counter so the chocolate levels out and reaches the edges. Slide the pan into the refrigerator while you make the creme filling, so that first chocolate layer can firm up and support the filling.
For the creme center, beat the butter and light corn syrup in a stand mixer until smooth and creamy, then add the milk, vanilla bean paste, and salt. Mix in the powdered sugar a cup at a time so it does not fly everywhere, scraping down the bowl as needed, until you have a stiff, fondant like mixture that still feels pliable. Transfer about two thirds of this white creme into a piping bag. Tint the remaining third with the orange and yellow gel food colors until you get a rich yolk shade, then scoop that into a second piping bag. Snip the tip of the white bag to about a half inch and pipe a generous circle of white creme over each chilled chocolate base, leaving a tiny border for the chocolate to creep around later.
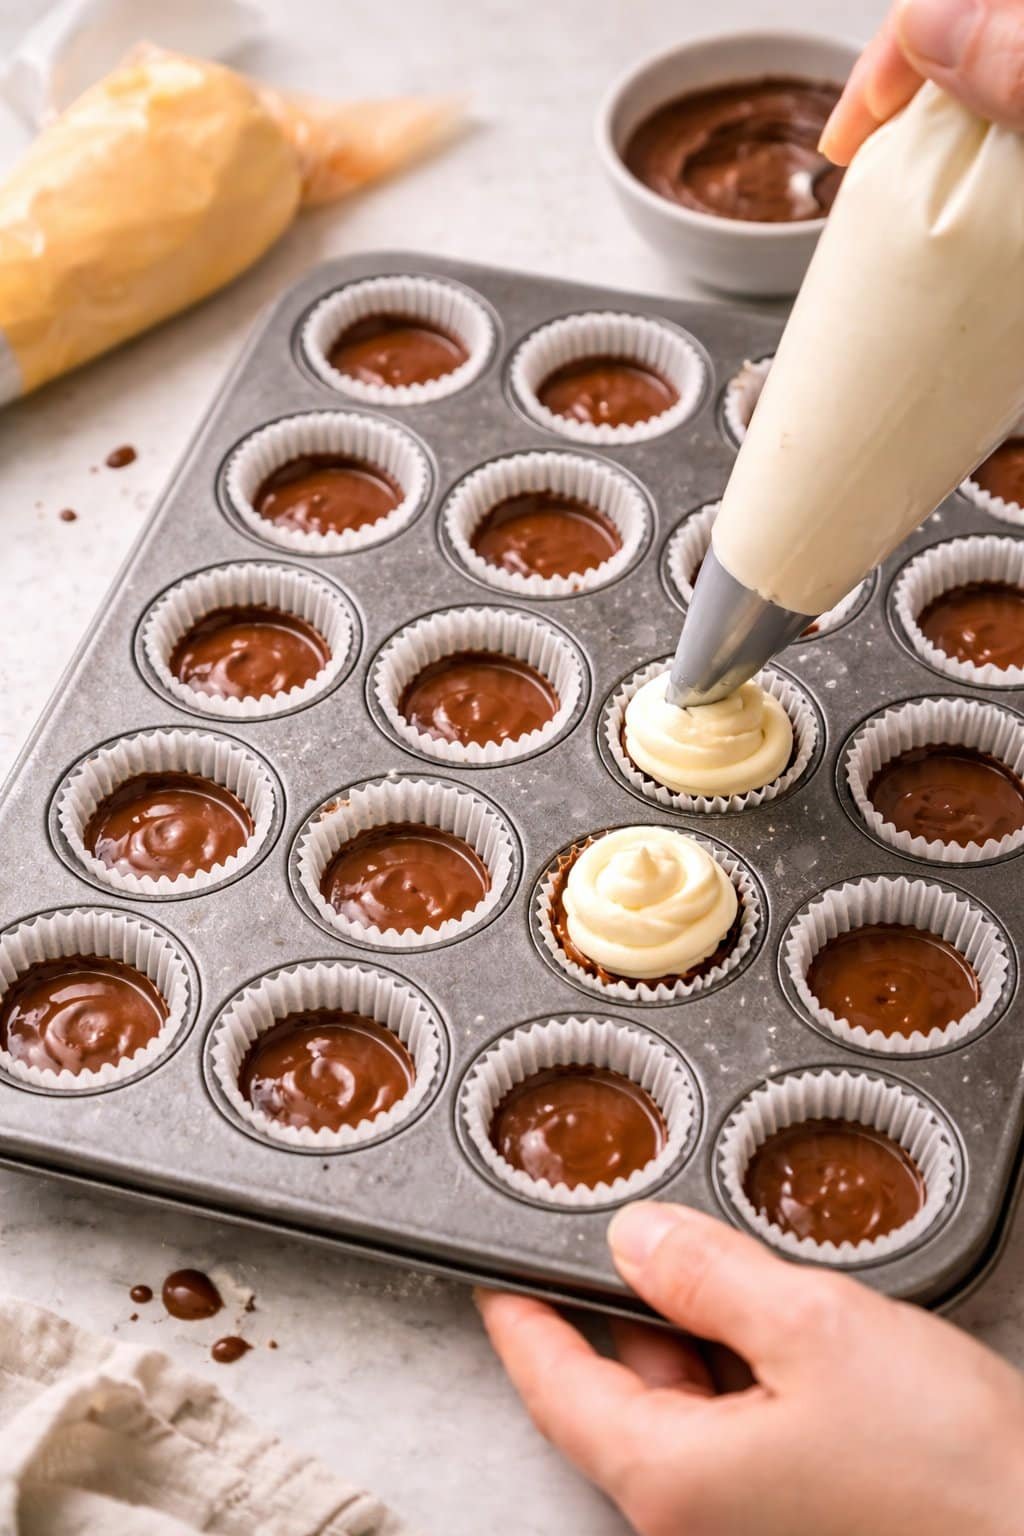
Process Image of Cadbury Creme Bites
To mimic the classic Cadbury center, snip a slightly smaller opening on the orange creme bag and pipe a little dot into the middle of each white pool. Melt the remaining milk chocolate using the same gentle intervals you used before, then pour it into a clean piping bag for easy control. Pipe the chocolate directly over the centers, letting it flow to the edges and completely cover the creme layers. Give the pan another light tap to smooth the tops, then chill the bites for about 30 minutes, or until the chocolate is fully set and the cups pop out of the liners cleanly. If you enjoy making seasonal candy, this same method works beautifully for peanut butter cups or even a mini version of my favorite chocolate covered caramels.
Make-Ahead and Storage Notes
Cadbury Creme Bites are a dream make ahead candy, which makes them perfect for parties, holidays, and gift boxes. Since the center is basically a rich butter and powdered sugar fondant, it actually benefits from a little time to firm up. You can make the full batch up to 1 week in advance, then keep them in an airtight container in the refrigerator. I like to layer them between sheets of parchment so the chocolate shells stay neat and glossy. Let them sit at room temperature for about 10 to 15 minutes before serving so the creme softens slightly and tastes extra luscious.
For longer storage, these Cadbury Creme Bites freeze surprisingly well. Arrange them in a single layer on a baking sheet, freeze until solid, then transfer to a freezer bag or container with parchment between layers. They will keep for up to 2 months in the freezer without losing flavor, although the chocolate may pick up a bit of surface bloom over time, which is harmless and only visual. Thaw them in the refrigerator overnight, then bring them to room temperature for a few minutes before you pass them around. If you plan an Easter dessert board or want to pair them with something like homemade truffles or peanut butter eggs, this make ahead approach will save you a lot of last minute stress.
Variations and How to Serve It

Serving Image of Cadbury Creme Bites
Once you master the basic Cadbury Creme Bites, you can start to play. For a sweeter candy shop feel, use white chocolate for the bottom or top layer, or both, and keep the classic creme center. If you love a deeper flavor, swap half of the milk chocolate for dark chocolate, which balances the sweetness of the filling. You can also stir a drop or two of peppermint or almond extract into a portion of the white creme, then pipe a few liners with that flavored batch and label them so your taste testers know what they are biting into. For extra fun, sprinkle a pinch of sea salt or a few festive sprinkles onto the tops right after piping the final chocolate, while it is still glossy.
These Cadbury Creme Bites are perfect for Easter dessert boards, classroom parties, or a make ahead treat for the office. Arrange them in mini paper cups on a pretty tray, and let them sit at room temperature for about 10 to 15 minutes so the chocolate softens just slightly for a cleaner bite. You can tuck a few into cello bags with ribbon as sweet party favors, or line a gift tin with parchment and pack them in layers. For a full spring dessert spread, serve them alongside something bright and fruity, like a lemon bar or a simple vanilla bean cheesecake, to cut through the richness. Leftovers keep well in the refrigerator, and you can pull out a few at a time for an easy bite size dessert whenever a craving hits.
Conclusion
Every time I make these, I end up with sticky fingers, a quiet kitchen, and a tray of glossy little bites that seem to disappear faster than I can set them down. That is the real magic of baking at home: you turn a few simple ingredients into a memory. Whether you are sharing them after school, tucking them into a dessert board, or sneaking one with your morning coffee, these Cadbury Creme Bites have a way of bringing people together around the counter for “just one more.”
I hope you feel excited to try these in your own kitchen. You do not need fancy tools or professional training, just a bit of curiosity and a sweet tooth. Let this be the recipe you reach for when you want something fun, nostalgic, and irresistibly shareable. Pull out a pan, invite a helper or two, and make a little moment of your own.
If you loved this cozy baking project, I would love to have you bake along with me. For more delicious recipes like this, follow us on Facebook and Pinterest!
Recipe

Cadbury Creme Bites
Ingredients
Ingredients
- 32 oz milk chocolate chopped and divided
- 1 cup light corn syrup
- 1/2 cup unsalted butter softened
- 2 tbsp milk
- 2 tsp vanilla bean paste
- 1/2 tsp salt
- 6 cups powdered sugar
- 2 drops orange gel food coloring
- 1 drop yellow gel food coloring
Instructions
- Line a mini muffin pan with 48 parchment paper mini cupcake liners and set aside.
- Place 16 ounces of the milk chocolate in a microwave safe bowl and heat on high for 30 seconds.
- Stir the chocolate well, then continue heating in 20 second increments, stirring after each, until melted and smooth.
- Spoon or pipe a thin layer of melted chocolate into the bottom of each lined mini muffin cup.
- Gently tap the pan on the counter so the chocolate spreads evenly and reaches the edges of the liners.
- Refrigerate the pan for 10 to 15 minutes, until the chocolate layer is firm.
- In the bowl of a stand mixer, beat the softened butter and light corn syrup on medium speed until smooth and combined.
- Add the milk, vanilla bean paste, and salt, then mix until fully incorporated.
- With the mixer on low speed, gradually add the powdered sugar, one cup at a time, mixing until a stiff but pliable creme forms.
- Transfer about two thirds of the white creme mixture to a piping bag and set aside.
- Add the orange and yellow gel food coloring to the remaining creme in the mixer bowl and mix until the color is uniform and deep orange.
- Transfer the orange creme mixture to a second piping bag.
- Remove the chilled chocolate lined pan from the refrigerator.
- Cut the tip of the white creme piping bag so the opening is about 1/2 inch wide.
- Pipe a generous layer of white creme over each chocolate base, leaving a small border around the edges.
- Cut a slightly smaller opening in the orange creme piping bag.
- Pipe a small dot of orange creme into the center of each white creme layer to mimic a yolk.
- Place the pan back in the refrigerator for 5 to 10 minutes so the creme layers firm slightly.
- Add the remaining 16 ounces of milk chocolate to the bowl with any leftover melted chocolate.
- Microwave the chocolate on high in 20 second increments, stirring after each, until completely melted and smooth.
- Transfer the melted chocolate to a clean piping bag.
- Pipe melted chocolate over each creme filled cup, covering the filling completely and filling to the top of the liners.
- Gently tap the pan on the counter to level the tops and release any air bubbles.
- Refrigerate the Cadbury Creme Bites for 30 minutes, or until the chocolate is fully set.
- Once set, carefully peel away the liners and serve, or store the bites in an airtight container in the refrigerator until ready to enjoy.
Notes
- If the creme mixture feels too stiff to pipe, mix in an additional 1 to 2 teaspoons of milk until it softens slightly.
- For cleaner layers, chill briefly between adding the white creme, orange creme, and final chocolate layer.
- Store Cadbury Creme Bites in an airtight container in the refrigerator for up to 1 week, or freeze for up to 2 months.