
Looking for a wildly colorful, creamy, crunchy dessert that brings back your childhood cereal cravings? These Fruity Pebbles Cheesecake Tacos blend the playful crunch of cereal with the rich indulgence of no-bake cheesecake—all packed into mini taco shells. This article explores everything from the origin of this viral dessert to how you can customize it, plus expert tips to make it bakery-worthy at home.
My Story Behind Fruity Pebbles Cheesecake Tacos
Childhood Meets Creativity
Growing up, Fruity Pebbles were my thing. The louder the cereal crunched and the brighter the colors popped, the better. I used to sneak a handful from the pantry after school—no milk, just straight from the box. Fast forward a couple of decades (and a whole career in food styling), and somehow those nostalgic rainbow pebbles found their way back into my kitchen—but this time, as Fruity Pebbles Cheesecake Tacos.
This recipe was a happy accident. I was prepping a dessert board for a kid’s birthday shoot, and I had leftover mini marshmallows, cream cheese, and a bright cereal mix. The idea just clicked: what if tacos, but dessert… and wild? I rolled a hot marshmallow-cereal mix over a spoon to make a shell, filled it with tangy no-bake cheesecake, and topped it with even more cereal. That first bite? Creamy, crunchy, sweet, and just a little bit genius. My husband called them “dangerously good,” and I’ve been obsessed ever since.
Why This Combo Works
Fruity Pebbles Cheesecake Tacos are playful, but they’re also surprisingly balanced. The cereal adds crunch and a hit of nostalgic flavor, while the cheesecake filling is creamy and not too sweet. Plus, they’re customizable. You can make your taco shells from cereal or tortillas, keep them chilled for a firmer bite, or go wild with toppings.
They’re perfect for birthdays, potlucks, or even a “just because” treat. And if you’re a fan of bold desserts that double as conversation starters, this one’s a must-try. I love that these tacos are easy to assemble but still feel extra—and if you’re like me, you believe dessert should always feel a little special.
Curious about more fun mashups? My Fruity Pebbles Cheesecake Bars are another reader favorite. And if you’re a fan of cereal-based creations, check out these Rainbow Cereal Cookie Sandwiches for even more nostalgia in every bite.
Fruity Pebbles Cheesecake Taco Ingredients & Shell Guide
Building the Perfect Cheesecake Filling
Let’s start with the dreamy part: the cheesecake. For these Fruity Pebbles Cheesecake Tacos, the filling should be silky, rich, and light enough to pair with the crunch of cereal. Here’s what you’ll need:
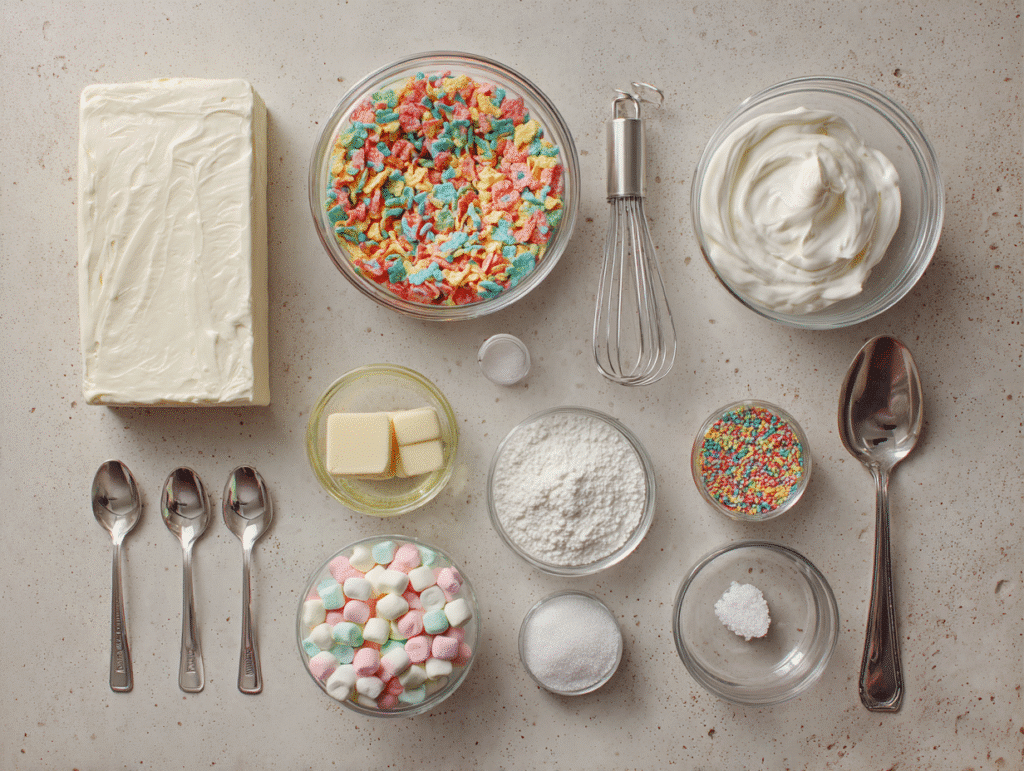
- 8 oz cream cheese, softened
- ¼ cup powdered sugar (adjust to taste)
- 1 tsp vanilla extract
- 1½ cups whipped topping (or whipped cream)
- Pinch of salt
- Optional: 2 tbsp marshmallow fluff for an extra sweet boost
Beat the cream cheese until smooth and fluffy. Add the sugar, vanilla, and salt, then slowly fold in the whipped topping. You’re aiming for a light and airy texture—think mousse, not brick-style cheesecake. Let this chill in the fridge for at least 30 minutes while you prepare your taco shells.
The great part? This cheesecake base is totally no-bake. And because it’s not overly sweet, it plays perfectly with the sugary crunch of Fruity Pebbles. For a fun twist, fold a small handful of crushed cereal directly into the mix before piping it into the shells.
Making the Taco Shells
There are two ways to create your “taco” shell—both delicious, both easy:
1. Cereal & Marshmallow Shells
This version is a cousin of the classic cereal treat. Melt 2 tablespoons of butter and 2 cups of mini marshmallows in a pan over low heat. Once melted, stir in 3 cups of Fruity Pebbles and mix to coat. Quickly press scoops of the warm mixture over a wooden spoon handle or taco mold to form a shell. Let them cool on a wire rack.
2. Cinnamon-Sugar Tortilla Shells
Cut small flour tortillas into 4–5” rounds. Fry in a bit of oil until golden and immediately dip them in cinnamon-sugar. While warm, fold gently over a spatula handle or taco stand to set their shape. For an extra cereal kick, roll the rim in crushed Fruity Pebbles once they’re cooled.
Want a cereal treat without the marshmallows? Try my Fruity Pebbles Treats Without Marshmallows for a sweet shell alternative using white chocolate or nut butter as a binder.
Both shell styles work great—it just depends if you’re in the mood for crunchy or chewy. Either way, once filled, the textures hit all the right notes.
Curious about more no-bake ideas? Explore my No-Bake Dessert Collection for more playful and party-ready sweets.
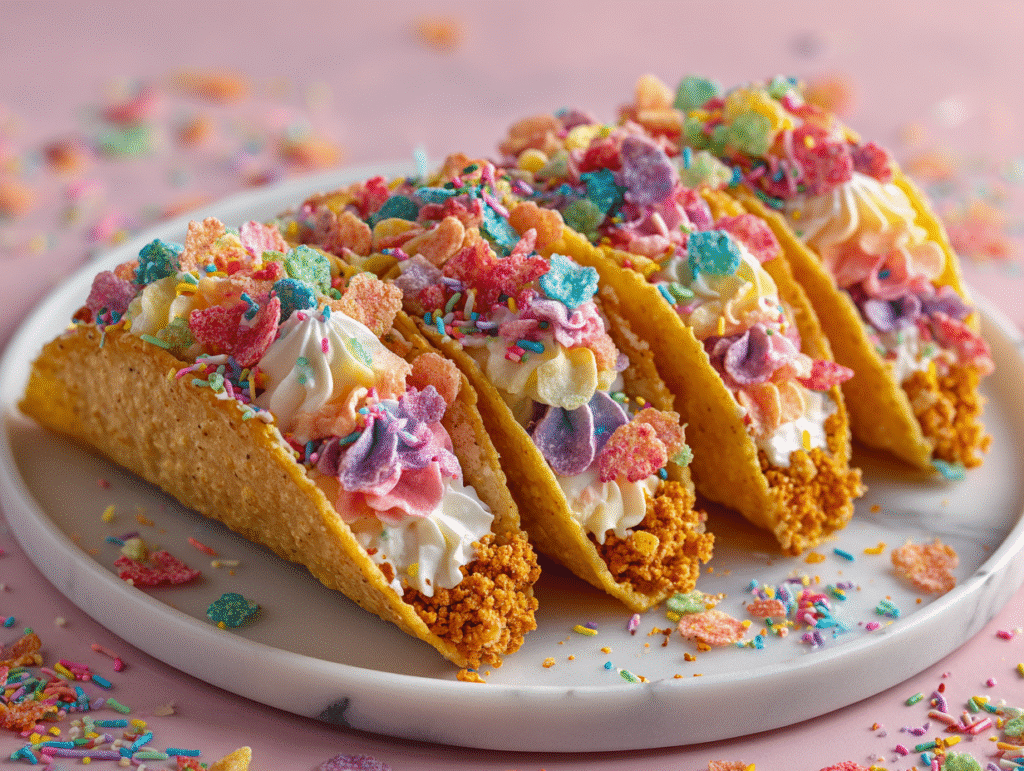
Step-by-Step: Assembling Fruity Pebbles Cheesecake Tacos
Filling and Finishing Like a Pro
Now that your cheesecake filling is chilled and your taco shells are crisp and ready, it’s time to bring these Fruity Pebbles Cheesecake Tacos to life.
Start by transferring the cheesecake filling into a piping bag (or use a zip-top bag with the corner snipped). Pipe the mixture generously into each taco shell, creating that signature soft swirl that peeks just over the top.
This is where the fun kicks in: dip the exposed filling side into a bowl of crushed Fruity Pebbles. You want that colorful crunch clinging to the edges like edible confetti. You can also sprinkle extra cereal over the top or press it along the sides for a full 360-degree coating.

Make sure you chill the tacos again for 15–30 minutes before serving. This helps the filling set up just enough to hold its shape without hardening—especially if you’re making these ahead for a party tray or dessert table.
For added flair, drizzle with white chocolate, dust with edible glitter, or top with whipped cream and a cherry. They’re already eye-catching, but the extra details take them from fun to fabulous.
Looking for another vibrant dessert you can prep in advance? You’ll love my Mini No-Bake Cheesecake Cups for similar flavor in bite-sized form.
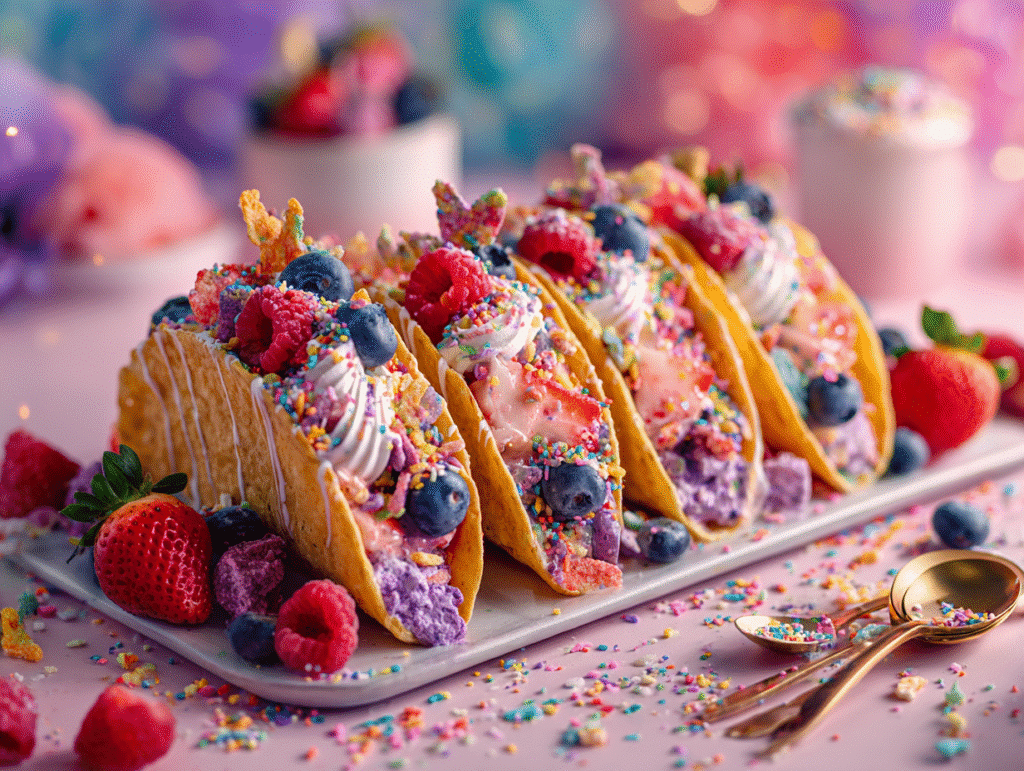
Optional Add-Ons
Want to level up your Fruity Pebbles Cheesecake Tacos even more? Try folding one of these extras into the filling, or layering them right on top:
- Crushed freeze-dried strawberries for a pop of tang
- Swirls of raspberry or strawberry jam
- Mini chocolate chips
- Marshmallow cream
- A dab of peanut butter (trust me—it pairs surprisingly well with the cereal)
Keep the filled tacos in the fridge until serving to help everything stay firm. Serve chilled, not frozen—though a quick 5-minute freeze can help them firm up fast if you’re in a rush.
And yes, they are as addictive as they look.
Still craving creative cereal desserts? My Fruit Loop Cheesecake Bars bring the same energy in sliceable, shareable form.
Variations, Storage, and Pro Tips
Fun Flavor Variations
The best part about these Fruity Pebbles Cheesecake Tacos? They’re wildly easy to customize. Once you’ve nailed the base, the possibilities are endless. Here are a few tried-and-true spins I love:
Chocolate Pebbles + Cocoa Cheesecake
Swap Fruity Pebbles for Cocoa Pebbles and add a tablespoon of cocoa powder to the filling. Top with mini chocolate chips and a chocolate drizzle for a brownie-meets-breakfast vibe.
Fruit Loops + Lemon Zest Cheesecake
Switch out the cereal and zest half a lemon into your cheesecake base. The citrus cuts through the sweetness and makes the flavor pop.
Peanut Butter Cereal + Whipped PB Cheesecake
Use peanut butter-flavored cereal and blend 2 tablespoons of peanut butter into your cheesecake base. Top with banana chips for a full-blown childhood throwback.
Cinnamon Toast Crunch + Caramel Cheesecake
Use cinnamon-sugar tortilla shells and swirl caramel sauce into the filling. Finish with a sprinkle of sea salt for balance.
Like creating over-the-top desserts? My Cereal Milk Tres Leches Cake is another colorful, bold crowd-pleaser that follows the same “fun first” rule.
Storing and Serving
Let’s talk logistics. These tacos are best served chilled but freshly filled.
Here’s what works:
| Element | Storage Time | Best Method |
|---|---|---|
| Unfilled shells | 4–5 days | Airtight at room temp |
| Cheesecake filling | 3–4 days | Refrigerated, sealed |
| Assembled tacos | 1–2 days | Refrigerated in a tray |
Pro Tip: Line a storage container with parchment paper and stand your tacos upright so they don’t get smushed. If stacking, add parchment between layers.
Avoid freezing the finished tacos—the cereal gets soggy and the cheesecake turns grainy. If you want to prep ahead, store the shells and filling separately, then assemble the day of your event.
Need an easy, freezer-safe cereal dessert instead? Try my Frozen Fruity Pebble Yogurt Bites for a quick-grab treat that holds up perfectly in the freezer.
FAQs About Fruity Pebbles Cheesecake Tacos
Can I make Fruity Pebbles Cheesecake Tacos ahead of time?
Yes! You can prepare the cheesecake filling up to 3 days in advance and store it in the fridge. The cereal taco shells can be made 4–5 days ahead and kept in an airtight container. For best texture, assemble the tacos the day you plan to serve them.
What can I use instead of marshmallows for the cereal shell?
If you want to avoid marshmallows, you can use melted white chocolate or a mix of honey and nut butter to bind the Fruity Pebbles. Just press into taco shapes quickly before it sets.
Can I use store-bought mini taco shells instead?
Yes, you can use mini flour tortillas. Fry them until golden, coat in cinnamon sugar, and shape while warm into taco shells. Then fill them with cheesecake and top with crushed cereal for crunch.
How do I keep the Fruity Pebbles from getting soggy?
To keep them crunchy, don’t assemble the tacos too far in advance. Chill the filling first, then pipe into shells just before serving. Storing the cereal shells separately from the filling preserves their texture.
Can I freeze Fruity Pebbles Cheesecake Tacos?
It’s not recommended. Freezing affects the texture of both the cheesecake and cereal shells. The cereal becomes chewy and the filling may separate after thawing. For best results, keep them refrigerated.
Can I flavor the cheesecake filling differently?
Absolutely! Try adding lemon zest, cocoa powder, or even a swirl of fruit jam to change the flavor profile. You can also fold in crushed cereal for extra texture.
Conclusion
Fruity Pebbles Cheesecake Tacos are more than a viral dessert—they’re the perfect balance of playful and indulgent. Whether you go all-in with cereal shells or keep it simple with cinnamon tortillas, these rainbow-hued tacos are always a hit. The cheesecake filling is rich, the crunch is satisfying, and the whole thing comes together in under 30 minutes.
Whether you’re whipping these up for a birthday bash, Taco Tuesday twist, or just for yourself (no judgment!), they’re guaranteed to bring smiles. I hope you love making them as much as I do—and don’t forget to chill them for that perfect bite.
For more colorful, health-forward creations and behind-the-scenes peeks into my test kitchen, connect with me on Facebook and see what’s brewing daily on Pinterest. Your next favorite recipe might just be a scroll away.
Fruity Pebbles Cheesecake Tacos – Amazing No-Bake Dessert for All Ages
Ingredients
- 8 oz cream cheese softened
- ¼ cup powdered sugar
- 1 tsp vanilla extract
- 1½ cups whipped topping
- Pinch of salt
- 2 tbsp marshmallow fluff optional
- 3 cups Fruity Pebbles cereal
- 2 cups mini marshmallows
- 2 tbsp butter
- Optional: tortillas cinnamon sugar, mini chocolate chips, jam drizzle
Instructions
- 1. In a mixing bowl, beat softened cream cheese until fluffy.
- 2. Add powdered sugar, vanilla, and salt. Mix until smooth.
- 3. Fold in whipped topping until light and airy. Chill for 30 minutes.
- 4. In a pot over low heat, melt butter and mini marshmallows.
- 5. Stir in Fruity Pebbles until evenly coated.
- 6. Scoop cereal mixture and mold over a spoon handle or taco form. Let cool to form taco shells.
- 7. Fill a piping bag with cheesecake filling. Pipe into each cereal shell.
- 8. Dip or sprinkle with extra Fruity Pebbles on top. Chill 15–30 minutes.
- 9. Optional: Drizzle with chocolate, add mini chips, or fruit preserves.
- 10. Serve chilled and enjoy!


