The Memory Behind This Treat
The first time I tasted Martha Washington Candies, it was like stepping into a time machine back to my grandmother’s cozy kitchen, where the air was always alive with the scent of something sweet and special. I remember her pulling out a tin filled with these delightful morsels, and the way her eyes twinkled as she watched us sneak one after another. It’s as if each candy held a secret promise of comfort and indulgence, wrapped in chocolate.
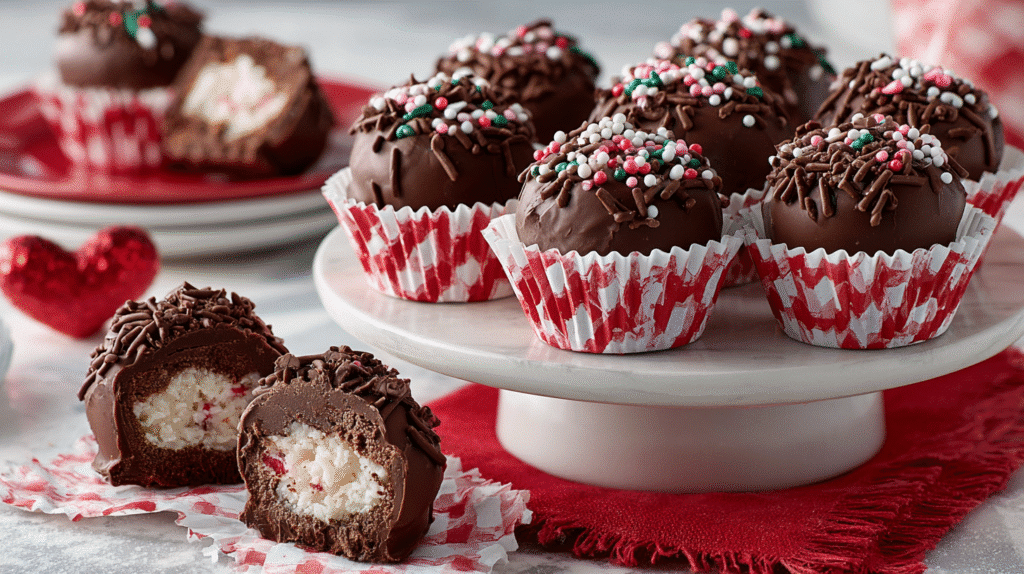
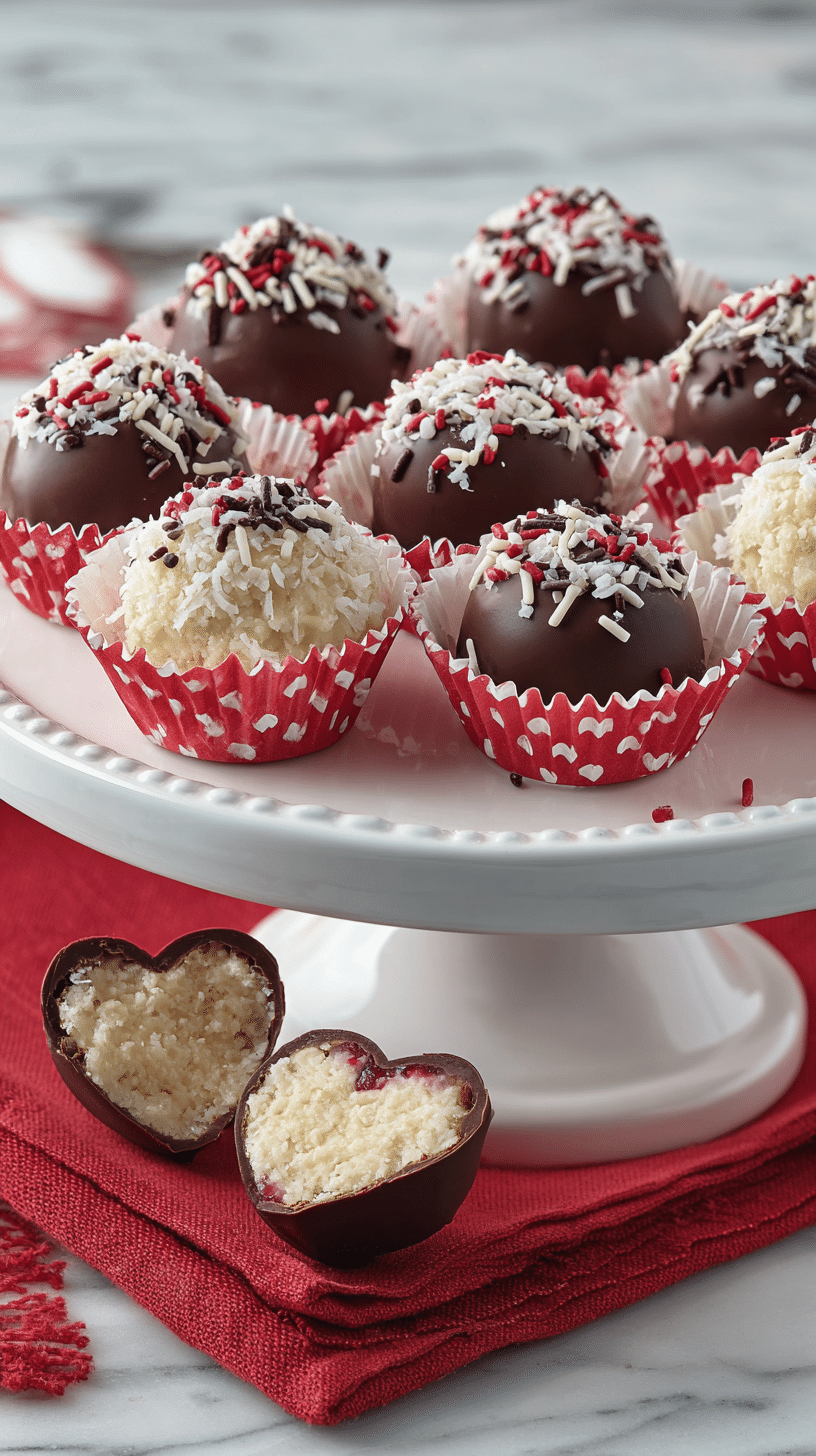
These candies are more than just a holiday treat; they’re a story, a tradition passed down through generations. While the coconut, pecans, and maraschino cherries meld into a perfect bite, it’s the care and love that truly come through. Each step, from chilling the mixture to dipping the balls in velvety chocolate, is a nod to those who’ve made them before us. For a special twist, try using dark chocolate coating for a richer experience.
Making Martha Washington Candies is a tradition in itself. Whether for Christmas or a simple Sunday afternoon, they transform any moment into a celebration. As you roll the mixture into balls, you might find yourself reminiscing or crafting new memories to share with loved ones. And isn’t that the sweetest part of baking? To take part in something timeless, knowing you’re adding your own chapter to its history.
How To Make It (Mix & Ingredients)
Creating Martha Washington Candies is like taking a sweet trip back in time, with each step bringing you closer to a heartwarming treat. Let’s dive into the mixing magic. First, grab a large mixing bowl—your trusty sidekick for this recipe. Begin by combining all the goodies: melted butter, powdered sugar, and vanilla extract. Stir in the sweetened shredded coconut and sweetened condensed milk until you’ve got a smooth, dreamy mixture. It might get a little sticky, but remember, that’s part of the charm!

Next, it’s time to add the pecans and maraschino cherries. Chop those cherries into small, juicy pieces, and blot them dry with paper towels. Nobody likes a soggy candy! Mix the pecans and cherries into your base, letting the colors and textures mingle like a holiday party in a bowl. Once everything is well combined, let this festive blend chill in the fridge for at least two hours. Patience here is key; it gives the flavors a chance to meld beautifully.
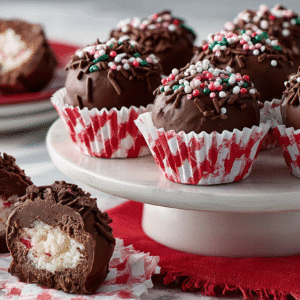
Now for the fun part—shaping and dipping! After the mix is chilled, roll it into walnut-sized balls. A tip: slightly damp hands can make this easier. Return these beauties to the fridge for a quick 20-minute chill while you melt your candy coating. Follow the package instructions, ensuring it’s silky smooth. Dip each ball into the coating, letting the excess chocolate drip off. Place them on a parchment-lined baking sheet and watch as they set into glossy, irresistible bites. There you have it, a piece of edible nostalgia ready to be enjoyed!
Also Read: Discover the Magic of Fall-Inspired Apple Cider Cheesecake
Make-Ahead & Storage
One of the beautiful aspects of Martha Washington Candies is their versatility in preparation and storage. These delightful treats are perfect for planning and can easily be made ahead of time, making them an excellent choice for busy holiday seasons. You can prepare the candy mixture up to a week in advance. Simply store the mixture in an airtight container and refrigerate until you’re ready to shape and dip them in chocolate.
Once you’ve dipped your candies and allowed the chocolate to set, storing them is a breeze. Keep the candies in an airtight container at room temperature, and they’ll stay fresh and delicious for up to 2 weeks. If you prefer to keep them longer or need to prepare them well in advance, you can also freeze the completed candies. Just place them in a single layer in a freezer-safe container, separating layers with parchment paper. They’ll last in the freezer for up to 3 months, allowing you to enjoy a taste of nostalgia whenever the craving strikes.
For those who love to share the joy of Martha Washington Candies during festive gatherings or as homemade gifts, this make-ahead convenience is a lifesaver. Imagine pulling out a perfectly preserved batch to impress your holiday guests or to wrap up as thoughtful, edible presents. This flexibility not only enhances your holiday baking but also makes the process enjoyable and stress-free.
Best Ingredients & Party Variations
When crafting Martha Washington Candies, using the best ingredients elevates this nostalgic treat into something truly special. Start with fresh, unsweetened shredded coconut if you prefer a less sweet bite. It balances beautifully with the richness of the sweetened condensed milk. For the pecans, toasting them lightly before adding them to the mixture can enhance their nutty flavor, providing a delightful contrast to the sweet cherries. Speaking of cherries, ensure your maraschino cherries are drained and dried thoroughly to avoid a soggy candy center.
Now, let’s talk about party variations to make your Martha Washington Candies the star of any gathering. If you’re looking to add a touch of elegance, consider replacing the maraschino cherries with dried cranberries or chopped dried apricots. These variations offer a sophisticated twist with a hint of tartness. You can also experiment with the chocolate coating. Try using dark chocolate for a more intense flavor or white chocolate for a sweet contrast. Feeling adventurous? Add a sprinkle of sea salt on top for that perfect sweet and salty combo.
Whether you stick to the traditional recipe or explore new flavor avenues, these candies are sure to be a hit. For more delightful treats to add to your dessert table, consider trying some classic chocolate truffles or homemade fudge.
FAQ’s About Martha Washington Candies
What are Martha Washington Candies?
Martha Washington Candies are delightful, old-fashioned treats that bring a touch of nostalgia to any occasion. These candies feature a rich blend of coconut, pecans, and cherries, all enveloped in a luscious chocolate coating. They are named after Martha Washington, adding a charming historical twist to your dessert spread. Perfect for the holidays, these candies are as beautiful as they are delicious, making them a standout addition to any cookie tray.
Is candy making difficult?
Making Martha Washington Candies is surprisingly easy, even for beginners. The process primarily involves mixing, chilling, and dipping, which are straightforward and forgiving steps. As long as you follow the instructions, you’ll find that the recipe is approachable and hard to mess up. Even if your dipping isn’t perfect, the taste will more than make up for it.
Can you freeze Martha Washington Candies?
Yes, you can freeze Martha Washington Candies, which is fantastic if you want to prepare them in advance. To freeze, layer the candies in an airtight container with parchment paper between layers to prevent sticking. They can be frozen for up to 3 months. Just make sure to thaw them at room temperature before serving so they maintain their delightful texture.
What is the unhealthiest candy ever?
While it’s hard to crown a single candy as the “unhealthiest,” candies high in sugars and artificial additives often top the list. Many commercially available candies are packed with corn syrup, hydrogenated oils, and artificial dyes. However, the beauty of making your own, like Martha Washington Candies, is that you control the ingredients and can choose high-quality, natural options. Everything in moderation is key to enjoying your sweets without guilt.
Conclusion
As you wrap up your adventure with Martha Washington Candies, I hope you’ve found joy in recreating a piece of sweet history. There’s something truly magical about how a simple treat can bring people together, sparking conversations and creating memories that last a lifetime. Whether you’re sharing these candies at a holiday gathering or simply enjoying them on a cozy afternoon, you’re participating in a tradition that’s as rich and delightful as the candies themselves.
I wholeheartedly encourage you to try your hand at this recipe. Let your kitchen fill with the warmth and sweetness that only homemade confections can bring. Don’t worry about achieving perfection; it’s the love and effort that count the most.
For more delicious recipes and heartwarming culinary tales, be sure to follow us on social media. I can’t wait to share more of these delightful journeys with you!
Martha Washington Candies: Sweet History in Every Bite
Ingredients
- 1 cup butter melted
- 1 pound powdered sugar
- 1 tablespoon vanilla bean paste
- 14 ounces shredded coconut sweetened
- 14 ounces sweetened condensed milk
- 10 ounces maraschino cherries drained and chopped
- 3 cups finely chopped pecans
- 16 ounces candy coating
Instructions
- 1. Chop cherries into small pieces and blot dry with paper towels.
- 2. In a large bowl, mix all ingredients except for the candy coating.
- 3. Chill the mixture for at least two hours.
- 4. Shape into walnut-sized balls and refrigerate for 20 minutes.
- 5. Line a baking sheet with parchment paper and melt the candy coating according to package instructions.
- 6. Use dipping tools to coat the balls in chocolate, tap off excess, and place on the lined baking sheet to set.
- 7. Continue dipping until all balls are covered.
- 8. Store candies in an airtight container at room temperature for up to 2 weeks.