Halloween is all about magic, mystery, and treats that bring a smile—and nothing says festive and fun like a batch of cookie Halloween cat creations. In this article, I’ll walk you through the story behind these cookies, why they’ve become a seasonal favorite in my kitchen, and how you can make them too. From the ideal dough to creative decorating tips, we’ll cover it all. Whether you’re baking for a party, your kids, or just a cozy night in, these cat-shaped cookies will cast a delicious spell on everyone who tries them.
Why Halloween Cookies Bring Me Joy
When I think of Halloween, I think of sugar-dusted countertops, cookie cutters scattered like confetti, and the smell of warm spice filling the air. One of my earliest Halloween memories is baking gingerbread cats with my grandma. She had this old, bent cookie cutter that made the most charming little felines—somehow always slightly crooked, always perfect. We’d ice them in black and orange, adding candy eyes and tiny whiskers with licorice strings. It was messy, chaotic, and completely magical.
Fast forward to today, and those memories still inspire my seasonal baking. A few years ago, I recreated those cookies for my niece’s Halloween party. She’s a cat lover (understatement of the century) and insisted her party theme be “spooky kittens.” I couldn’t resist. I crafted a whole batch of cookie Halloween cat treats—black cocoa dough for that deep color, cinnamon and ginger for warmth, and royal icing for the finishing flair. They were a hit! Since then, these cookies have become a seasonal staple at our house, right alongside our favorite Frankenstein Cookie Balls and Pumpkin Sugar Cookies.
Why Cat-Shaped Cookies Are Halloween Must-Haves
So what makes cat cookies so special this time of year? First, black cats are a classic Halloween symbol. They’re mysterious, a little mischievous, and downright adorable when turned into cookies. Whether you’re going for spooky or sweet, there’s endless room to get creative. You can make them realistic with glossy black icing and golden eyes, or playful with pastel colors and fun expressions. And since cats are flexible in shape, you can adjust them to fit whatever theme you’re going for—vampire cats, witchy cats, even mummy cats.
They’re also perfect for kids. Every time I bake these, my niece insists on helping decorate. We set up a little “cookie studio” with bowls of sprinkles, edible eyes, and food pens. She names each one—Shadow, Midnight, Pumpkin Tail—and proudly serves them like she’s running her own haunted bakery. It’s become one of our favorite traditions, right up there with decorating Peanut Butter Spider Cookies and drizzling spooky red icing on Blood Splatter Cookies.
Crafting the Purr-fect Cookie Dough
The Ideal Base Dough for Halloween Cookies
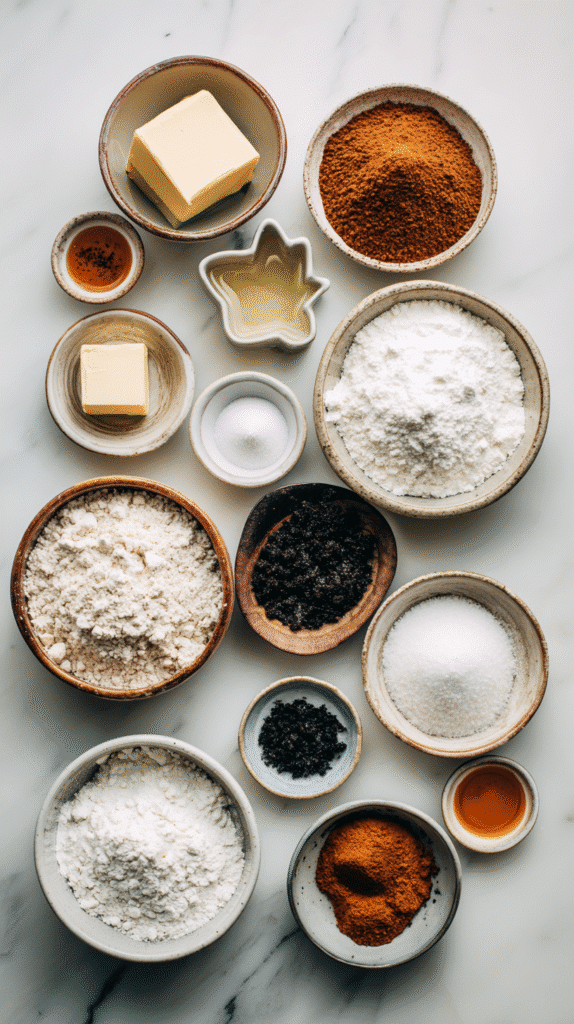
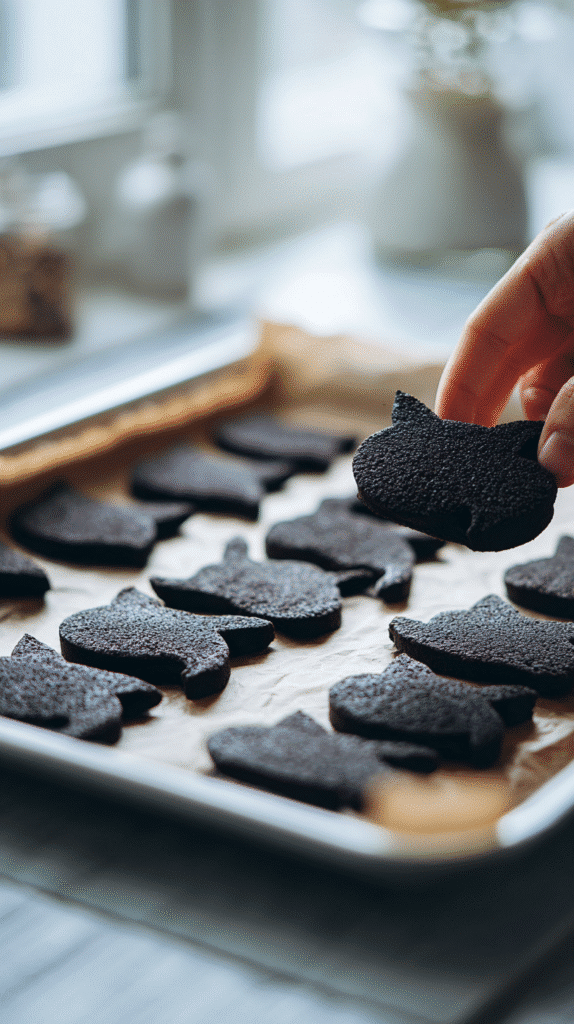
Let’s get one thing straight: not all cookie doughs are cut out for cat-shaped cookies. You need a dough that’s sturdy enough to hold intricate shapes but still buttery and flavorful. For my cookie Halloween cat recipe, I alternate between two tried-and-true bases—classic sugar cookie dough and a lightly spiced gingerbread dough. Both work beautifully, but gingerbread gives you that deep fall aroma that just screams Halloween.
The trick to shape-holding dough is balance: enough flour to support the structure, but not so much that the cookies turn out dry. Another non-negotiable? Chill your dough. Seriously, don’t skip this step. Chilling helps prevent spreading, which is especially important when you’re dealing with detailed cat shapes—curved tails, pointed ears, and tiny paws.
When I’m in the mood for something more festive, I use dark cocoa powder to turn the dough a rich black. It’s a natural base for spooky black cats and pairs perfectly with fall spices like cinnamon and ginger. If you’re after a subtle kick, a dash of clove or nutmeg adds complexity without overpowering.
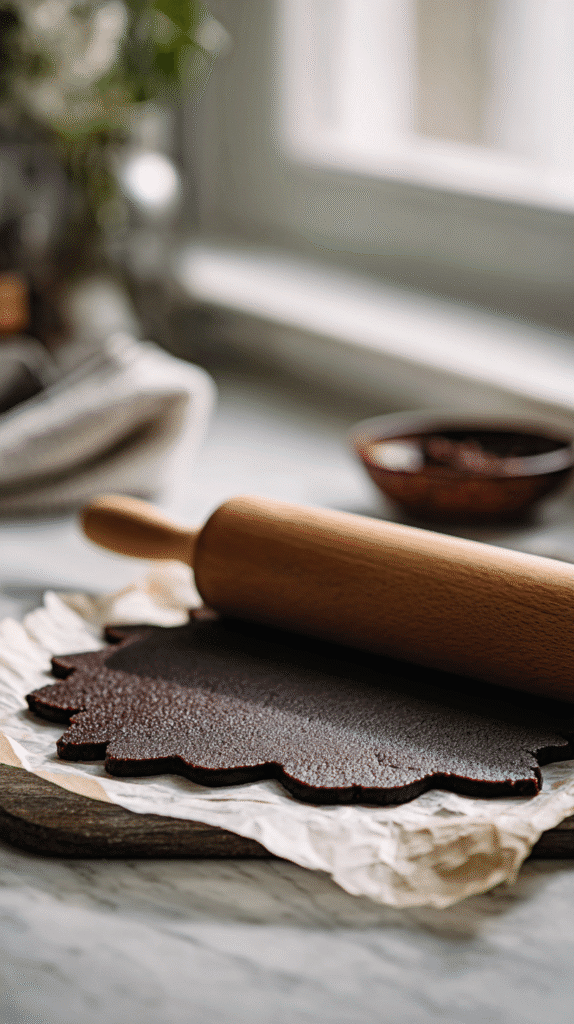
Want a pro tip? Roll your dough between two sheets of parchment for an even surface and zero mess. Then use your favorite cat-shaped cookie cutter to bring those spooky felines to life.
You’ll find a similar approach in my Gingerbread Latte Cookies, which also hold their shape beautifully, making them perfect for decorative cookies. And for a gooey center surprise, check out the technique used in my Slime-Filled Halloween Cookies.
Adding the Spooky Flavors
Sure, the shape is fun—but flavor is what keeps everyone coming back for seconds. Halloween isn’t just about sugar; it’s about flavor. My go-to is a cocoa-gingerbread hybrid that brings warm spice and a deep chocolatey note in every bite. Think molasses meets brownie—but in cookie form.
Start with softened butter and dark brown sugar to set that rich foundation. From there, add in unsweetened cocoa powder, ground cinnamon, ginger, and just a pinch of allspice. The cocoa gives your black cats their signature shade, while the spices keep things interesting. If you’re aiming for visual drama, black food coloring gel takes things to the next level without affecting taste.
Want to go full seasonal mode? Swap out half the butter with pumpkin puree for a subtle pumpkin twist. The flavor is mild but incredibly comforting—and perfect if you’re pairing these with a PSL.
Decorating Your Cookie Halloween Cat Creations
Tools You’ll Need for Decorating
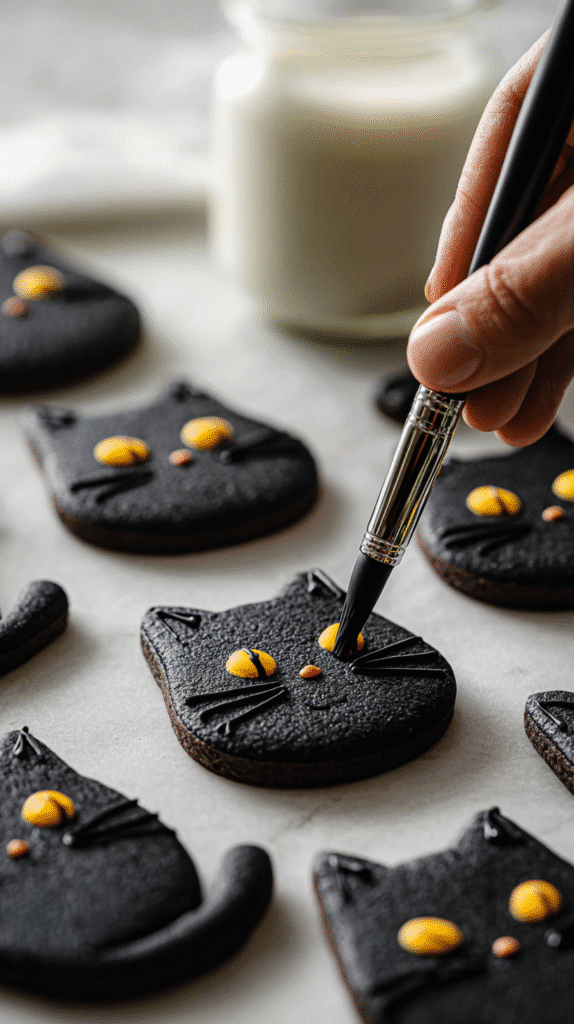
Now that your cookies are baked and cooled, it’s time to make some magic. Decorating cookie Halloween cat treats is where your creativity gets to shine. Whether you’re going for cute, creepy, or downright dramatic, the right tools make all the difference.
Start with the basics: cat-shaped cookie cutters (you can find silhouettes, curled tails, or sitting cat designs), small piping bags or squeeze bottles, and a few essential piping tips—#1 for fine lines and #3 for flooding. I highly recommend using gel-based food coloring for bold hues without thinning your icing.
Next, stock up on edible decorations. I always keep a stash of edible candy eyes (because what’s a Halloween cookie without them?), silver sugar pearls, and food-safe paintbrushes. Food markers are also super handy for sketching in fur texture or adding tiny whiskers. If you’re going for sparkle, a touch of edible glitter or shimmer dust adds that extra flair.
Your icing options will depend on your style and skill level. Royal icing gives a smooth, professional finish and dries hard, making it ideal for layering and detailing. Buttercream, on the other hand, is softer and more flavorful—but better for simpler designs. I usually use royal icing for outlining and flooding, then layer on buttercream details for dimension.
Fun Halloween Themes to Try
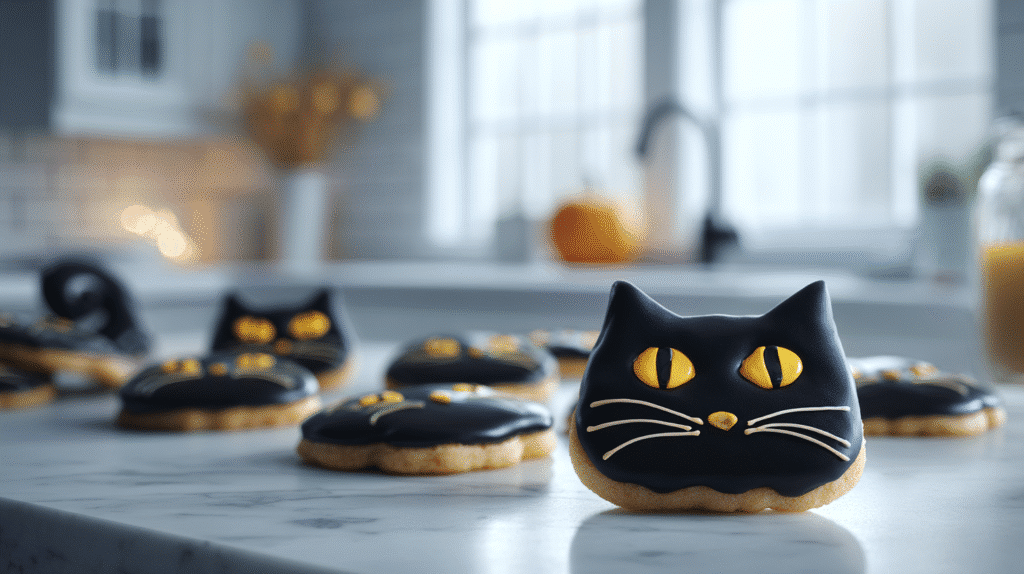
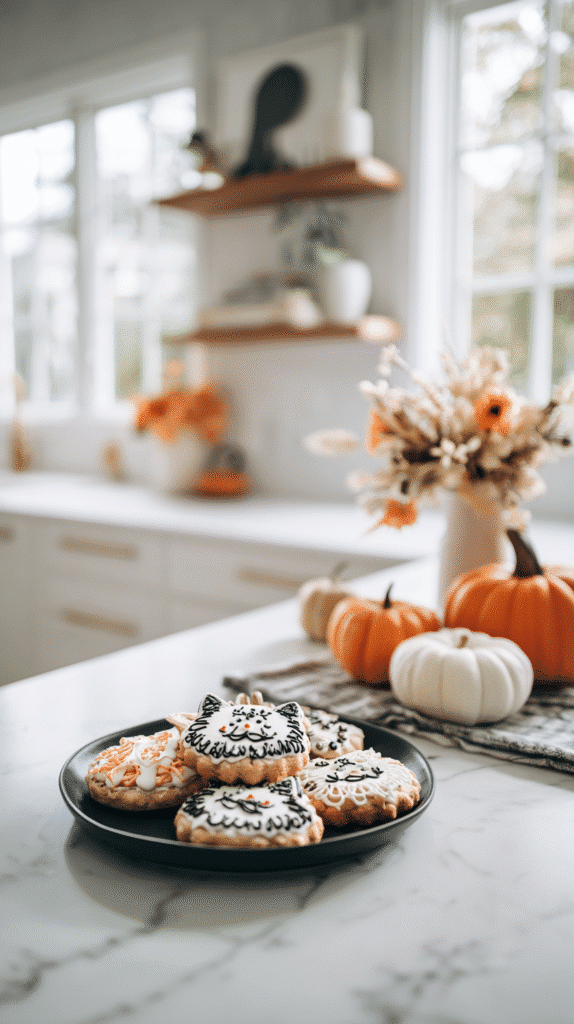
Here’s where the fun really begins—transforming those cookies into characters. The simplest (and always crowd-pleasing) option is the black cat. Flood your cookie with jet-black royal icing, then add golden eyes using yellow icing or edible paint. A tiny dot of white gives the eyes dimension, and a pink or red candy nose makes the face pop.
Want something cuter? Go with pastel cat cookies in lavender, peach, or mint green, and decorate them with little witch hats or capes. Kids especially love mummy cats—white icing bandages and tiny peeking eyes make them adorable and spooky all at once.
For more advanced decorators, try layering icing to create fur texture, or use stiff piping to make “fluffy” tails. You can even add vampire fangs or ghostly auras using white shimmer dust and translucent icing.
Hosting a Halloween party? Display your creations as a cookie platter featuring a haunted house theme. Surround the cat cookies with mini pumpkins, bats, and stars for a festive edible centerpiece. Bonus: offer small piping bags for guests to decorate their own.
If you’re planning your dessert table around themed treats, coordinate them with other goodies like the Black Velvet Halloween Cake or Halloween Chocolate Chip Cookies for a cohesive—and delicious—Halloween spread.
Serving & Storing Your Cat Cookies
Presentation Tips That Wow
You’ve baked them, you’ve decorated them, now it’s time to show off your cookie Halloween cat creations in the most magical way possible. Presentation transforms your cookies from tasty treats into a Halloween spectacle—and trust me, it’s easier than you think.
For party tables, arrange your cookies on a tiered black or silver stand layered with parchment or cheesecloth for that spooky touch. Scatter candy eyeballs, plastic spiders, or mini pumpkins between them for a haunted-house vibe. Want to add real drama? Place your display near a fog machine or some dry ice for eerie mist—just make sure food doesn’t touch the ice directly.
Serving for kids? Try packaging the cookies individually in clear cellophane bags tied with orange, black, or purple ribbon. Add a tag that says “Boo Bites” or “From the Haunted Bakery.” These make perfect favors for school parties or trick-or-treat night.
Pairing your cookies with drinks turns your Halloween snack table into a whole experience. I love serving them with spiced apple cider, “witches’ brew” punch, or cold milk in potion-labeled glass bottles. Bonus points if you use black and white striped paper straws or vintage-style glassware.
Make-Ahead and Storage Tips
Here’s the beauty of cookie Halloween cat treats—they’re easy to prep ahead of time and they store like a dream.
If you’re baking for a party, you can make the dough up to 3 days in advance. Just wrap it tightly in plastic wrap and store in the fridge. For longer storage, freeze the dough (rolled flat and wrapped) for up to 3 months. Let it thaw in the fridge overnight before cutting and baking.
After baking, allow your cookies to cool completely before decorating. If you’re using royal icing, give the decorated cookies at least 6–8 hours to dry fully before stacking or packaging.
Once decorated, store cookies in a single layer in an airtight container at room temperature for up to 1 week. If you need to stack them, place parchment or wax paper between layers to protect the icing. Buttercream-decorated cookies should be eaten within 3–4 days and stored in the fridge to maintain texture and freshness.
Want to freeze decorated cookies? Yes, you can! Just make sure the icing is 100% dry. Then wrap each cookie gently in plastic wrap and place in a single layer in a freezer-safe container. They’ll stay fresh for 2–3 weeks. To thaw, remove the cookies from the container and let them come to room temperature while still wrapped—this prevents condensation from ruining the icing.
Frequently Asked Questions About Cookie Halloween Cat Treats
What is a good Halloween name for a cat?
If you’re naming a Halloween cat—or a cookie inspired by one—go with spooky, playful options like Salem, Shadow, Pumpkin Whiskers, or Midnight. Other fun names? Boo, Hex, Luna, or Spooky Paws. These names work well for pets, party themes, or even labeling your cookies at a Halloween dessert table.
Is there a Halloween cookie show?
Yes! Halloween-themed baking shows often include cookie episodes. One popular example is Halloween Baking Championship on Food Network, where contestants decorate eerie cookies in creative ways. Watching a few episodes can spark ideas for your own cookie Halloween cat designs.
Is it okay for cats to eat cookies?
No, cats should never eat cookies made for humans. Many cookie ingredients—like sugar, chocolate, and spices—are harmful to felines. Even “simple” cookies may include dairy or preservatives that upset your cat’s stomach. If you want to treat your furry friend, stick to cat-safe homemade snacks or vet-approved store-bought goodies.
How to make Halloween gingerbread cookies Disney-style?
Start with a traditional gingerbread dough, then use Disney-themed cookie cutters—think Jack Skellington, Mickey Pumpkin, or Minnie Witch. For decoration, use bright royal icing to recreate their features. Add candy bows, edible glitter, and iconic details. You can find tons of inspiration from Disney parks’ seasonal treats online.
What does it mean when cats do cookies?
You’re probably referring to “making biscuits,” a kneading motion cats do with their paws. It’s a comforting behavior that reminds them of nursing as kittens. So when a cat “makes cookies” on your lap, it’s a sweet sign of affection and trust—not a signal for baked goods!
Conclusion
From mixing dough and shaping adorable silhouettes to icing glowing eyes and spooky whiskers, making cookie Halloween cat treats is one of my favorite fall rituals. These cookies aren’t just cute—they’re crowd-pleasers with bold flavors and playful designs that capture the magic of Halloween. Whether you’re baking for your kids, your friends, or just your own sweet tooth, this recipe brings joy to the kitchen and beyond.
So grab your cookie cutters, crank up the spooky playlist, and let’s make some memories—one purr-fect Halloween cookie at a time.
If you’re inspired to try this recipe, I’d love to see your creations! Share them with me on Facebook or pin your version on Pinterest so we can keep the baking (and sipping) community growing together. With just a few simple steps, you can transform your daily pick-me-up into something extraordinary.

Cookie Halloween Cat: The Purr-fect Spooky Sweet Treat
Ingredients
- 2 ½ cups all-purpose flour
- 1/3 cup dark cocoa powder
- 1 tsp cinnamon
- ½ tsp ginger
- ½ tsp baking soda
- ¼ tsp salt
- ¾ cup unsalted butter softened
- ¾ cup dark brown sugar
- 1 large egg
- 1 tsp vanilla extract
- Black gel food coloring optional
- Royal icing or buttercream for decorating
- Edible eyes candy accents, food markers
Instructions
- 1. Whisk flour, cocoa, spices, baking soda, and salt in a bowl.
- 2. Cream butter and sugar until fluffy, then add egg and vanilla.
- 3. Mix in dry ingredients gradually to form dough.
- 4. Add black gel coloring if desired and chill for 1 hour.
- 5. Roll dough to ¼” thickness and cut cat shapes.
- 6. Bake at 350°F for 8–10 minutes; cool completely.
- 7. Decorate using royal icing or buttercream.
- 8. Add eyes, whiskers, or Halloween accents.
- 9. Let icing dry fully before storing or serving.