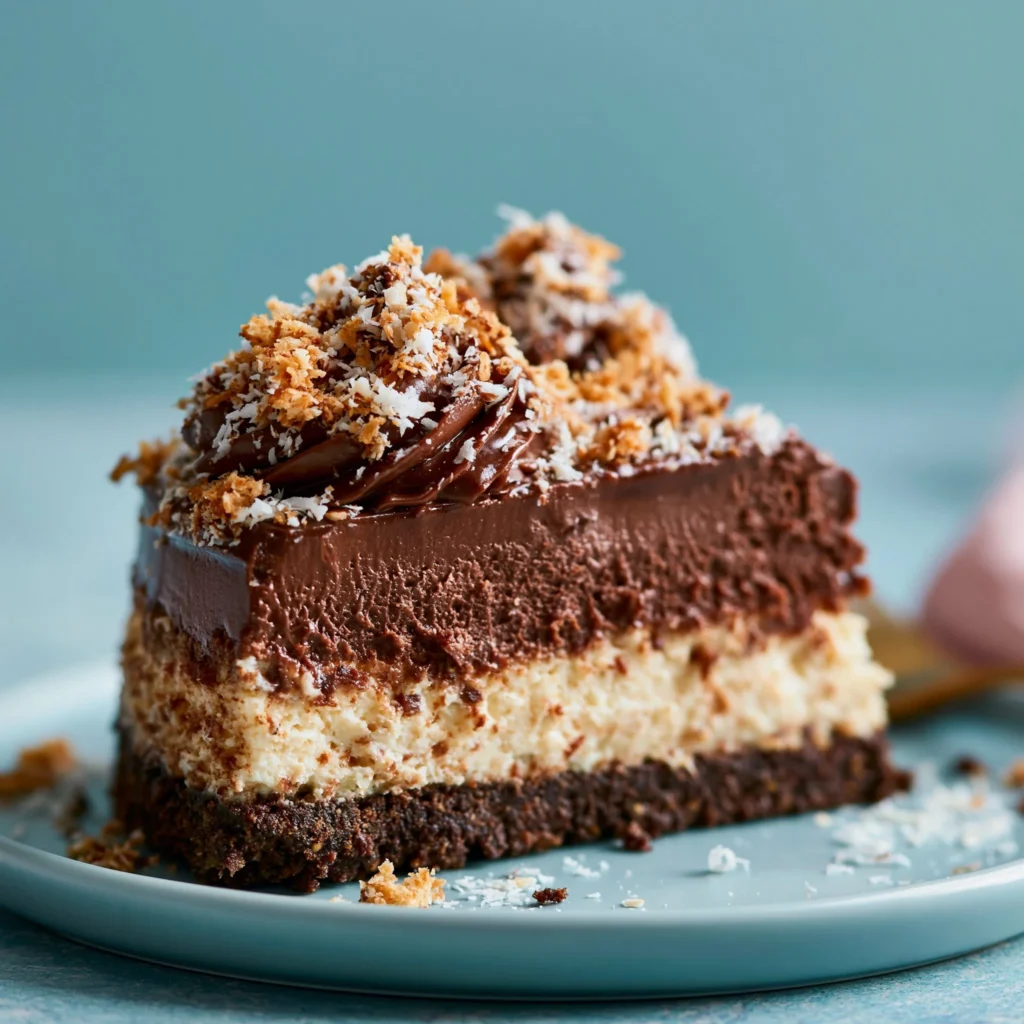
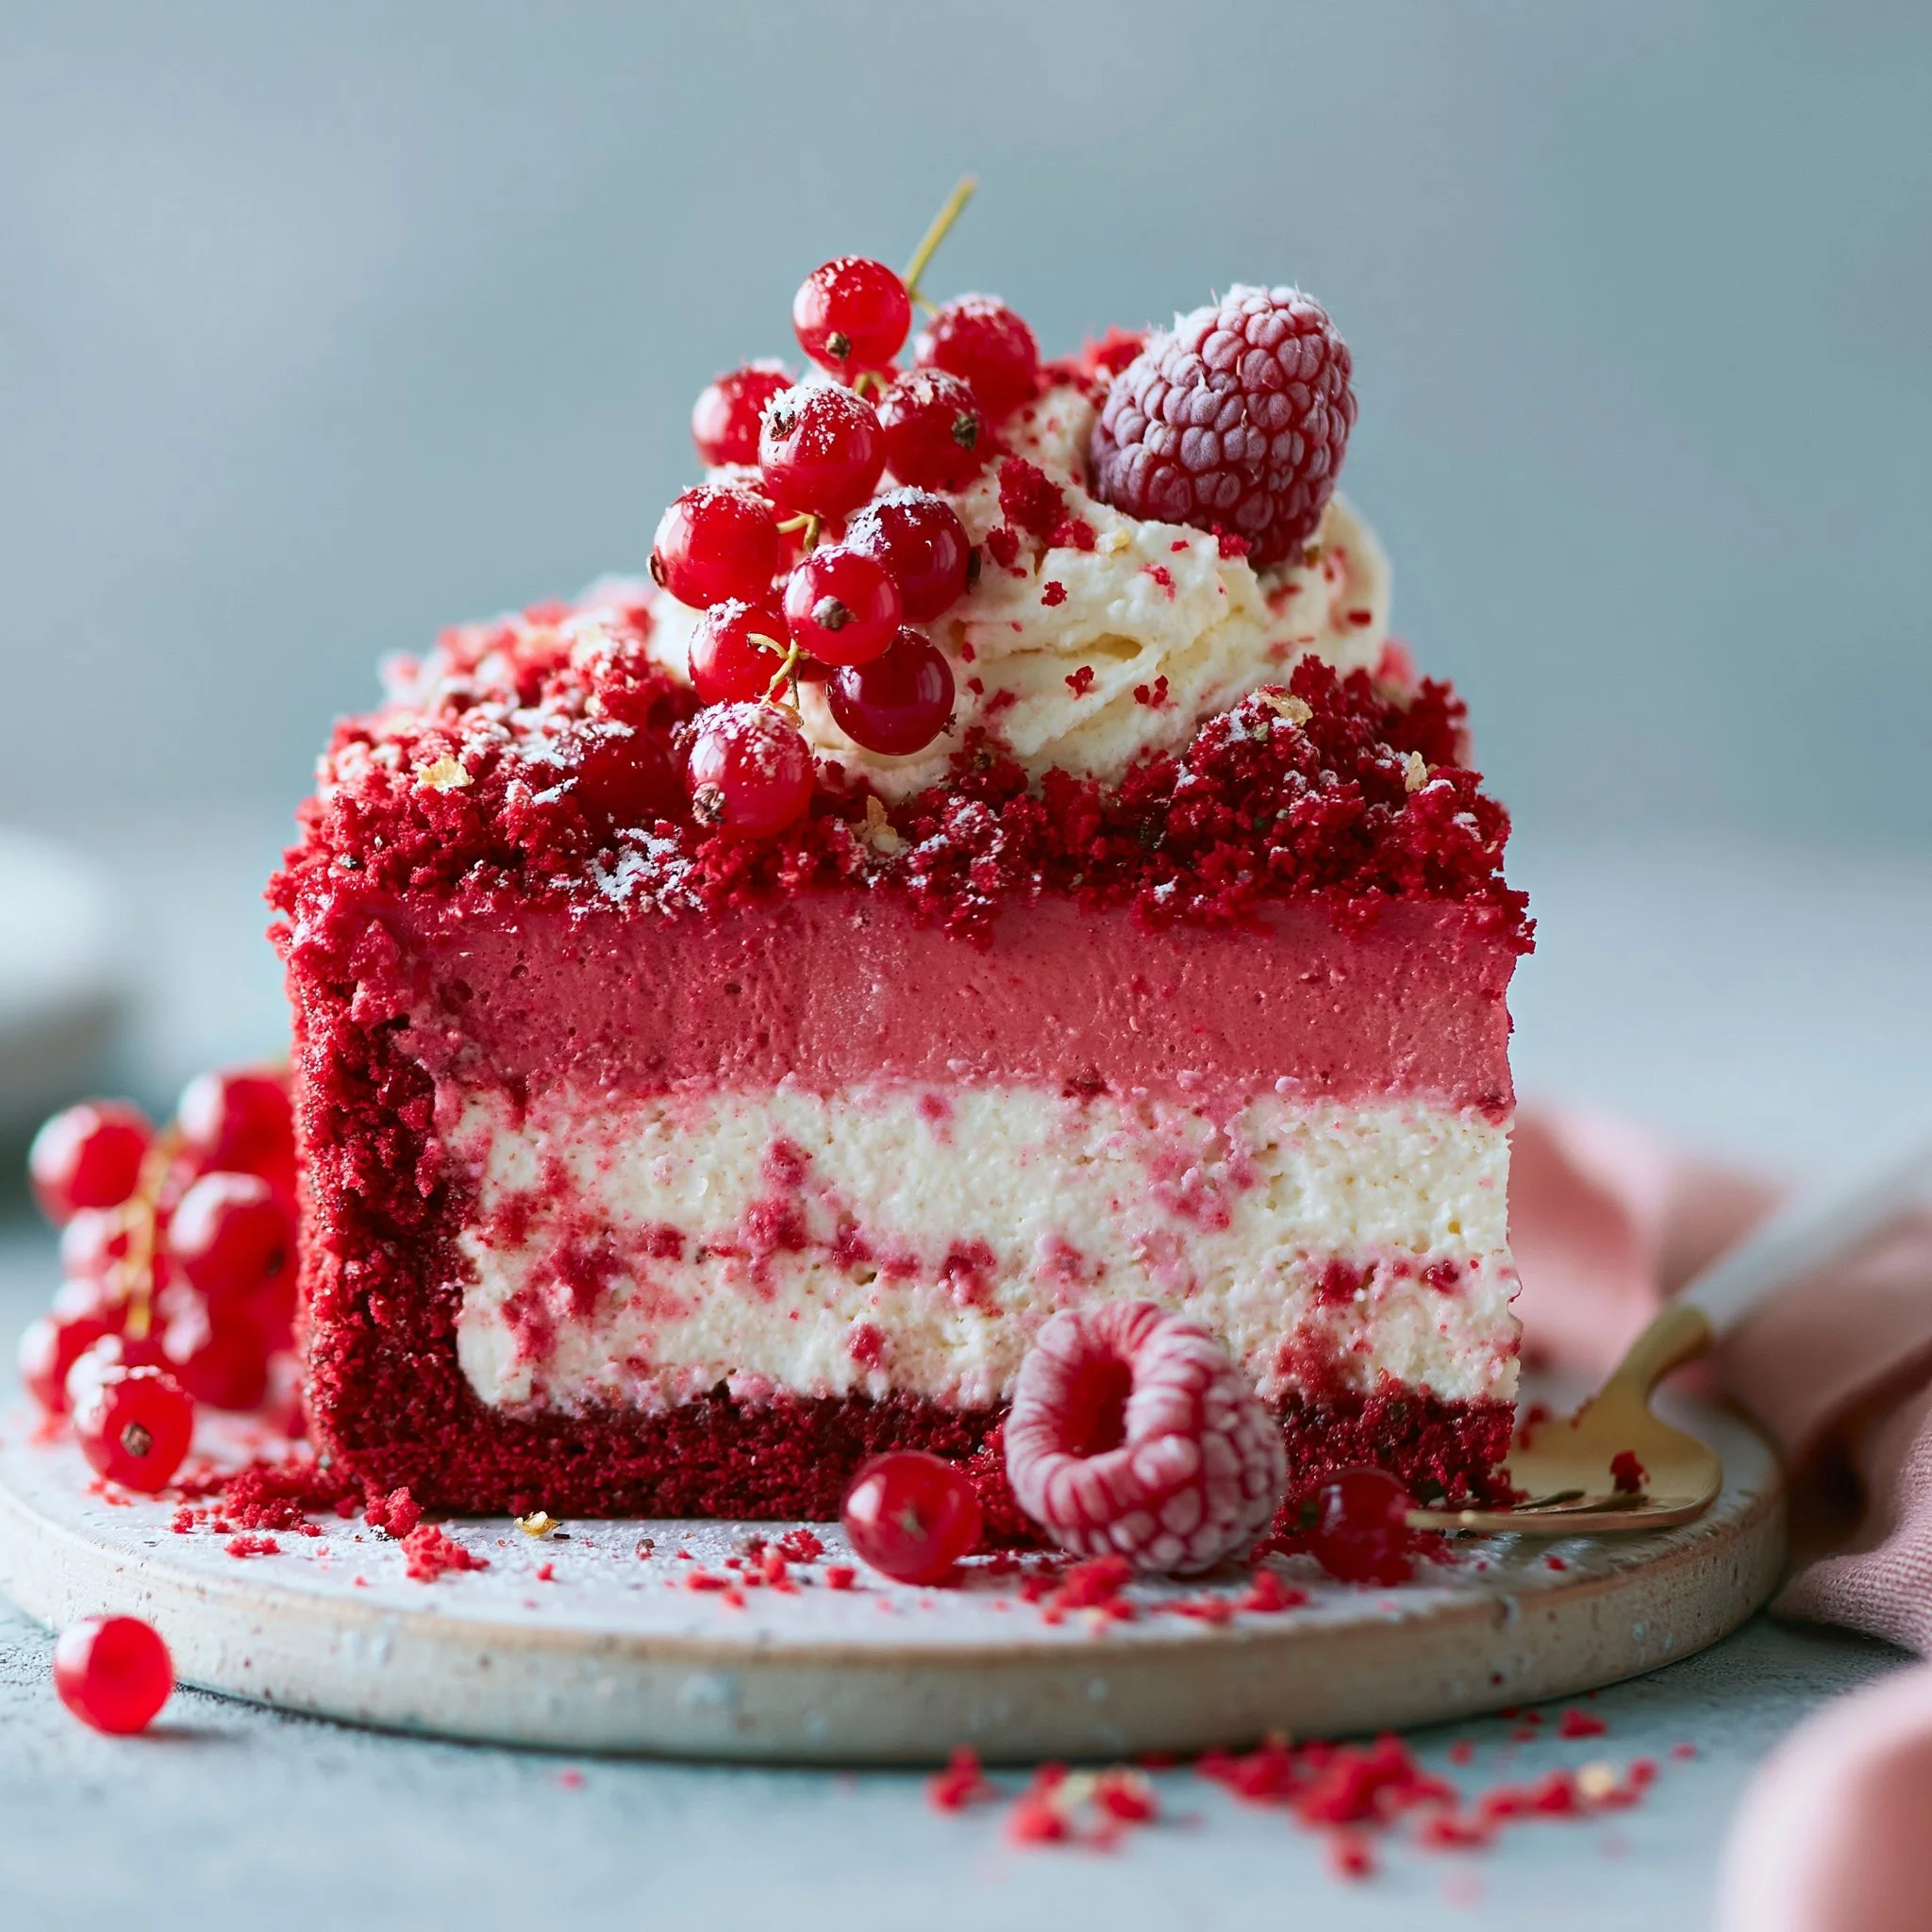
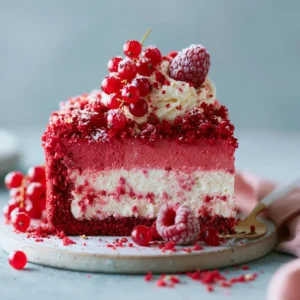
The first time I tested this “knock you naked” red velvet cheesecake, I knew it was going to be a repeat-maker the moment I ran a knife around the springform and saw that clean, dramatic red-and-cream slice. You get a plush red velvet cake base, a thick cheesecake layer that bakes up smooth and pale, and a cloud of whipped cream on top—no fussy water bath, no complicated filling.
It’s also the kind of dessert that looks like you spent all day on it, but the shortcut cake mix keeps the base easy and reliable. If you want the full printable version to keep on hand, I keep it updated right here: Knock You Naked Red Velvet Cheesecake recipe.
Why You’ll Love This Recipe
- Big texture contrast: tender red velvet cake on the bottom, dense-yet-creamy cheesecake in the middle, and soft, airy whipped topping on top.
- A true showpiece in a 9" springform: the layers bake right in the same pan, so the sides slice clean and look bakery-level.
- Make-ahead friendly: the cheesecake layer needs a chill (4 hours), which means it’s actually better when you plan ahead.
- Balanced sweetness: the cheesecake is lightly sweetened (⅔ cup sugar) and the whipped cream is just barely sweet—so it doesn’t taste like frosting.
- Easy to decorate: red velvet cake crumbs turn into a quick garnish that makes the whole thing look intentional.
- Simple ingredient list: no specialty chocolates or candy add-ins—just classic red velvet + cheesecake + vanilla whipped cream.
The Story Behind This Recipe
This one came from wanting a viral-style, high-impact dessert without the usual chaos—so I leaned on a box red velvet mix for a consistent base, then baked a straightforward cream cheese layer right over it. After a few tests, chilling the cake layer first (before adding the cheesecake batter) was the little trick that kept the layers neat and the slice photo-worthy.
What It Tastes Like
You’ll smell vanilla first (from both the cheesecake and whipped topping), then that unmistakable cocoa-leaning red velvet aroma when you cut in. The cheesecake layer is rich but not heavy-heavy—more creamy and clean, with a gentle tang from sour cream—while the cake base stays soft and springy. Overall sweetness is moderate, and the cold slice (straight from the fridge) gives you the best contrast between the firm cheesecake and the tender red velvet underneath.
Ingredients You’ll Need
This recipe is built around three parts: a red velvet cake base (cake mix keeps it easy), a classic baked cheesecake layer (cream cheese + sour cream for tang and smoothness), and a vanilla whipped cream topping (lightens the whole slice). Make sure your cream cheese is properly softened so it beats silky instead of lumpy, and use cold heavy cream so the topping whips up quickly and holds.
- 1 box red velvet cake mix (plus eggs, oil, and water as directed)
- 9" springform pan, greased
- 16 oz cream cheese, softened
- ⅔ cup granulated sugar
- 2 large eggs
- ⅓ cup sour cream
- 1 tbsp all-purpose flour
- 1 tsp vanilla extract
- ¼ tsp salt
- 2 cups heavy whipping cream
- 4 tbsp powdered sugar
- 2 tsp vanilla extract
- Optional: red velvet cake crumbs for garnish
How to Make Knock You Naked Red Velvet Cheesecake – The Best Viral Dessert of 2025
Bake the red velvet cake base (first layer).
Preheat your oven to 350°F (175°C). Grease a 9" springform pan well. Prepare the red velvet cake mix according to the box directions (using the eggs, oil, and water it calls for), then pour the batter into the pan.
Bake for 30–32 minutes, until a toothpick comes out clean. The top should look set and spring back lightly when tapped.Cool, level, and chill the cake.
Let the cake cool completely. If the top domed, level it so the cheesecake layer sits flat (a flat base is what gives you those crisp layers when sliced). Chill the cake in the fridge while you mix the cheesecake—this helps keep the cake from loosening when you pour the batter on top.Mix the cheesecake layer until smooth (don’t overdo it).
Lower the oven temperature to 325°F (163°C). In a mixing bowl, beat the softened cream cheese with the granulated sugar until smooth and creamy—scrape the bowl so you don’t get little cream cheese streaks.
Add the eggs one at a time, mixing just until each disappears. Then mix in the sour cream, flour, vanilla, and salt. The batter should look thick, glossy, and lump-free.Prep the pan sides and add the cheesecake batter.
Line the inside sides of the springform with parchment (this makes releasing the cheesecake much cleaner). Pour the cheesecake batter over the chilled cake base and smooth the top.Bake the cheesecake layer.
Bake for 55–60 minutes, until the center is just set—it shouldn’t look wet, but it should still have a slight jiggle in the very middle when you gently nudge the pan. Avoid baking until it’s fully firm in the oven; that’s when cheesecake tends to tighten up and lose that creamy texture.Cool, then chill until fully cold.
Let the cheesecake cool at room temperature first, then refrigerate for 4 hours to set. If you’re in a hurry and want it extra firm for topping and slicing, freeze for at least 1 hour. (I’ve also made a similar layered vibe in my red velvet cheesecake swirl cake, but this one is all about that clean stacked look.)Whip the topping.
In a cold mixing bowl, beat the heavy whipping cream with powdered sugar and vanilla until soft peaks form. You want it billowy and spreadable—not stiff and chunky.Finish and garnish.
Spread or pipe the whipped topping over the fully chilled cheesecake. Sprinkle with red velvet cake crumbs if you saved any (it’s a simple garnish that makes the slice look extra intentional). Slice and serve chilled. If you love red velvet in general, my go-to starting point is the best red velvet cake—it’s a great reference for that classic flavor.
Tips for Best Results
- Soften the cream cheese fully. If it’s still cool in the center, you’ll fight lumps that never quite beat out, and the cheesecake layer won’t look as smooth when sliced.
- Level the cake layer. Even a slight dome can make the cheesecake layer thicker on one side, which shows up in every slice.
- Mix the eggs in gently. Once the eggs go in, mix only until combined. Overmixing can make the cheesecake puff, then settle unevenly as it cools.
- Bake until “just set,” not “fully firm.” The center should have a small wobble; it will finish setting as it cools and chills.
- Chill before topping and slicing. Cold cheesecake cuts cleanly and supports the whipped cream without smearing.
- Use a cold bowl for whipped cream. It reaches soft peaks faster and stays fluffy while you spread it.
Variations and Substitutions
- Cake mix brand: Any standard red velvet cake mix works here—just prepare it exactly as the box directs.
- Garnish: Red velvet crumbs are the easiest finish; if you skip them, the whipped topping still looks pretty on its own.
- Prefer a no-bake vibe? This recipe is baked, but if you’re craving a chilled, creamy dessert, my no-bake Biscoff cheesecake scratches that itch with a totally different flavor profile.
How to Serve It
Serve this one cold from the fridge—that’s when the cheesecake layer slices into crisp, tidy wedges and the red velvet base feels extra plush. I like cutting slices on the smaller side because it’s rich, then letting plates sit for 5 minutes so the whipped topping relaxes slightly.
If you’re serving it for brunch or a shower, it pairs beautifully alongside a simple coffee setup (and if you love cheesecake-meets-cake ideas, this coffee cake cheesecake is another crowd-pleaser in a totally different direction).
How to Store It
- Refrigerator: Store covered in the fridge so the whipped cream stays fresh and the cheesecake doesn’t pick up fridge smells. This dessert is best served chilled.
- Make-ahead timing: Bake and chill the cake/cheesecake layers first, then add the whipped topping once it’s fully cold (topping a warm cheesecake will melt the cream).
- Freezer (short firm-up): Freezing for at least 1 hour is great if you need it extra firm for clean layering or tidy slices. After that, return to the fridge to serve.
Final Thoughts
If you want one dessert that looks dramatic the moment you lift out the springform ring, this is it: red velvet cake, creamy cheesecake, and a soft vanilla whipped cap that makes every bite feel complete.
Conclusion
If you’re on a red velvet cheesecake kick, you might also enjoy this Red Velvet Cheesecake for another classic take. For general dessert inspiration when you’re planning your next baking weekend, I like browsing Desserts – Zoe Dishes. And if you’re looking for a different “viral” style bar dessert to balance out your cheesecake rotation, these Slutty Brownies are a fun one to try next.
Knock You Naked Red Velvet Cheesecake
Ingredients
For the Red Velvet Cake Base
- 1 box red velvet cake mix Plus eggs, oil, and water as directed
- 1 each 9" springform pan, greased
For the Cheesecake Layer
- 16 oz cream cheese, softened Ensure it is well softened
- ⅔ cup granulated sugar
- 2 large eggs Add one at a time
- ⅓ cup sour cream
- 1 tbsp all-purpose flour
- 1 tsp vanilla extract
- ¼ tsp salt
For the Whipped Topping
- 2 cups heavy whipping cream Use cold cream
- 4 tbsp powdered sugar
- 2 tsp vanilla extract
- optional red velvet cake crumbs for garnish If saved from the cake
Instructions
Bake the Red Velvet Cake Base
- Preheat your oven to 350°F (175°C). Grease a 9" springform pan well.
- Prepare the red velvet cake mix according to the box directions and pour the batter into the pan.
- Bake for 30–32 minutes until a toothpick comes out clean.
Cool, Level, and Chill the Cake
- Let the cake cool completely, then level it if domed.
- Chill in the fridge while mixing the cheesecake.
Mix the Cheesecake Layer
- Lower the oven temperature to 325°F (163°C). Beat the softened cream cheese with granulated sugar until smooth.
- Add eggs one at a time, mixing just until combined. Mix in sour cream, flour, vanilla, and salt.
Prep Pan Sides and Add Cheesecake Batter
- Line the sides of the springform with parchment.
- Pour cheesecake batter over the chilled cake base.
Bake the Cheesecake Layer
- Bake for 55–60 minutes until the center is just set.
Cool and Chill
- Let cool at room temperature, then refrigerate for 4 hours.
Whip the Topping
- In a cold mixing bowl, beat heavy whipping cream with powdered sugar and vanilla until soft peaks form.
Finish and Garnish
- Spread or pipe the whipped topping over the chilled cheesecake.
- Sprinkle with red velvet crumbs if using.