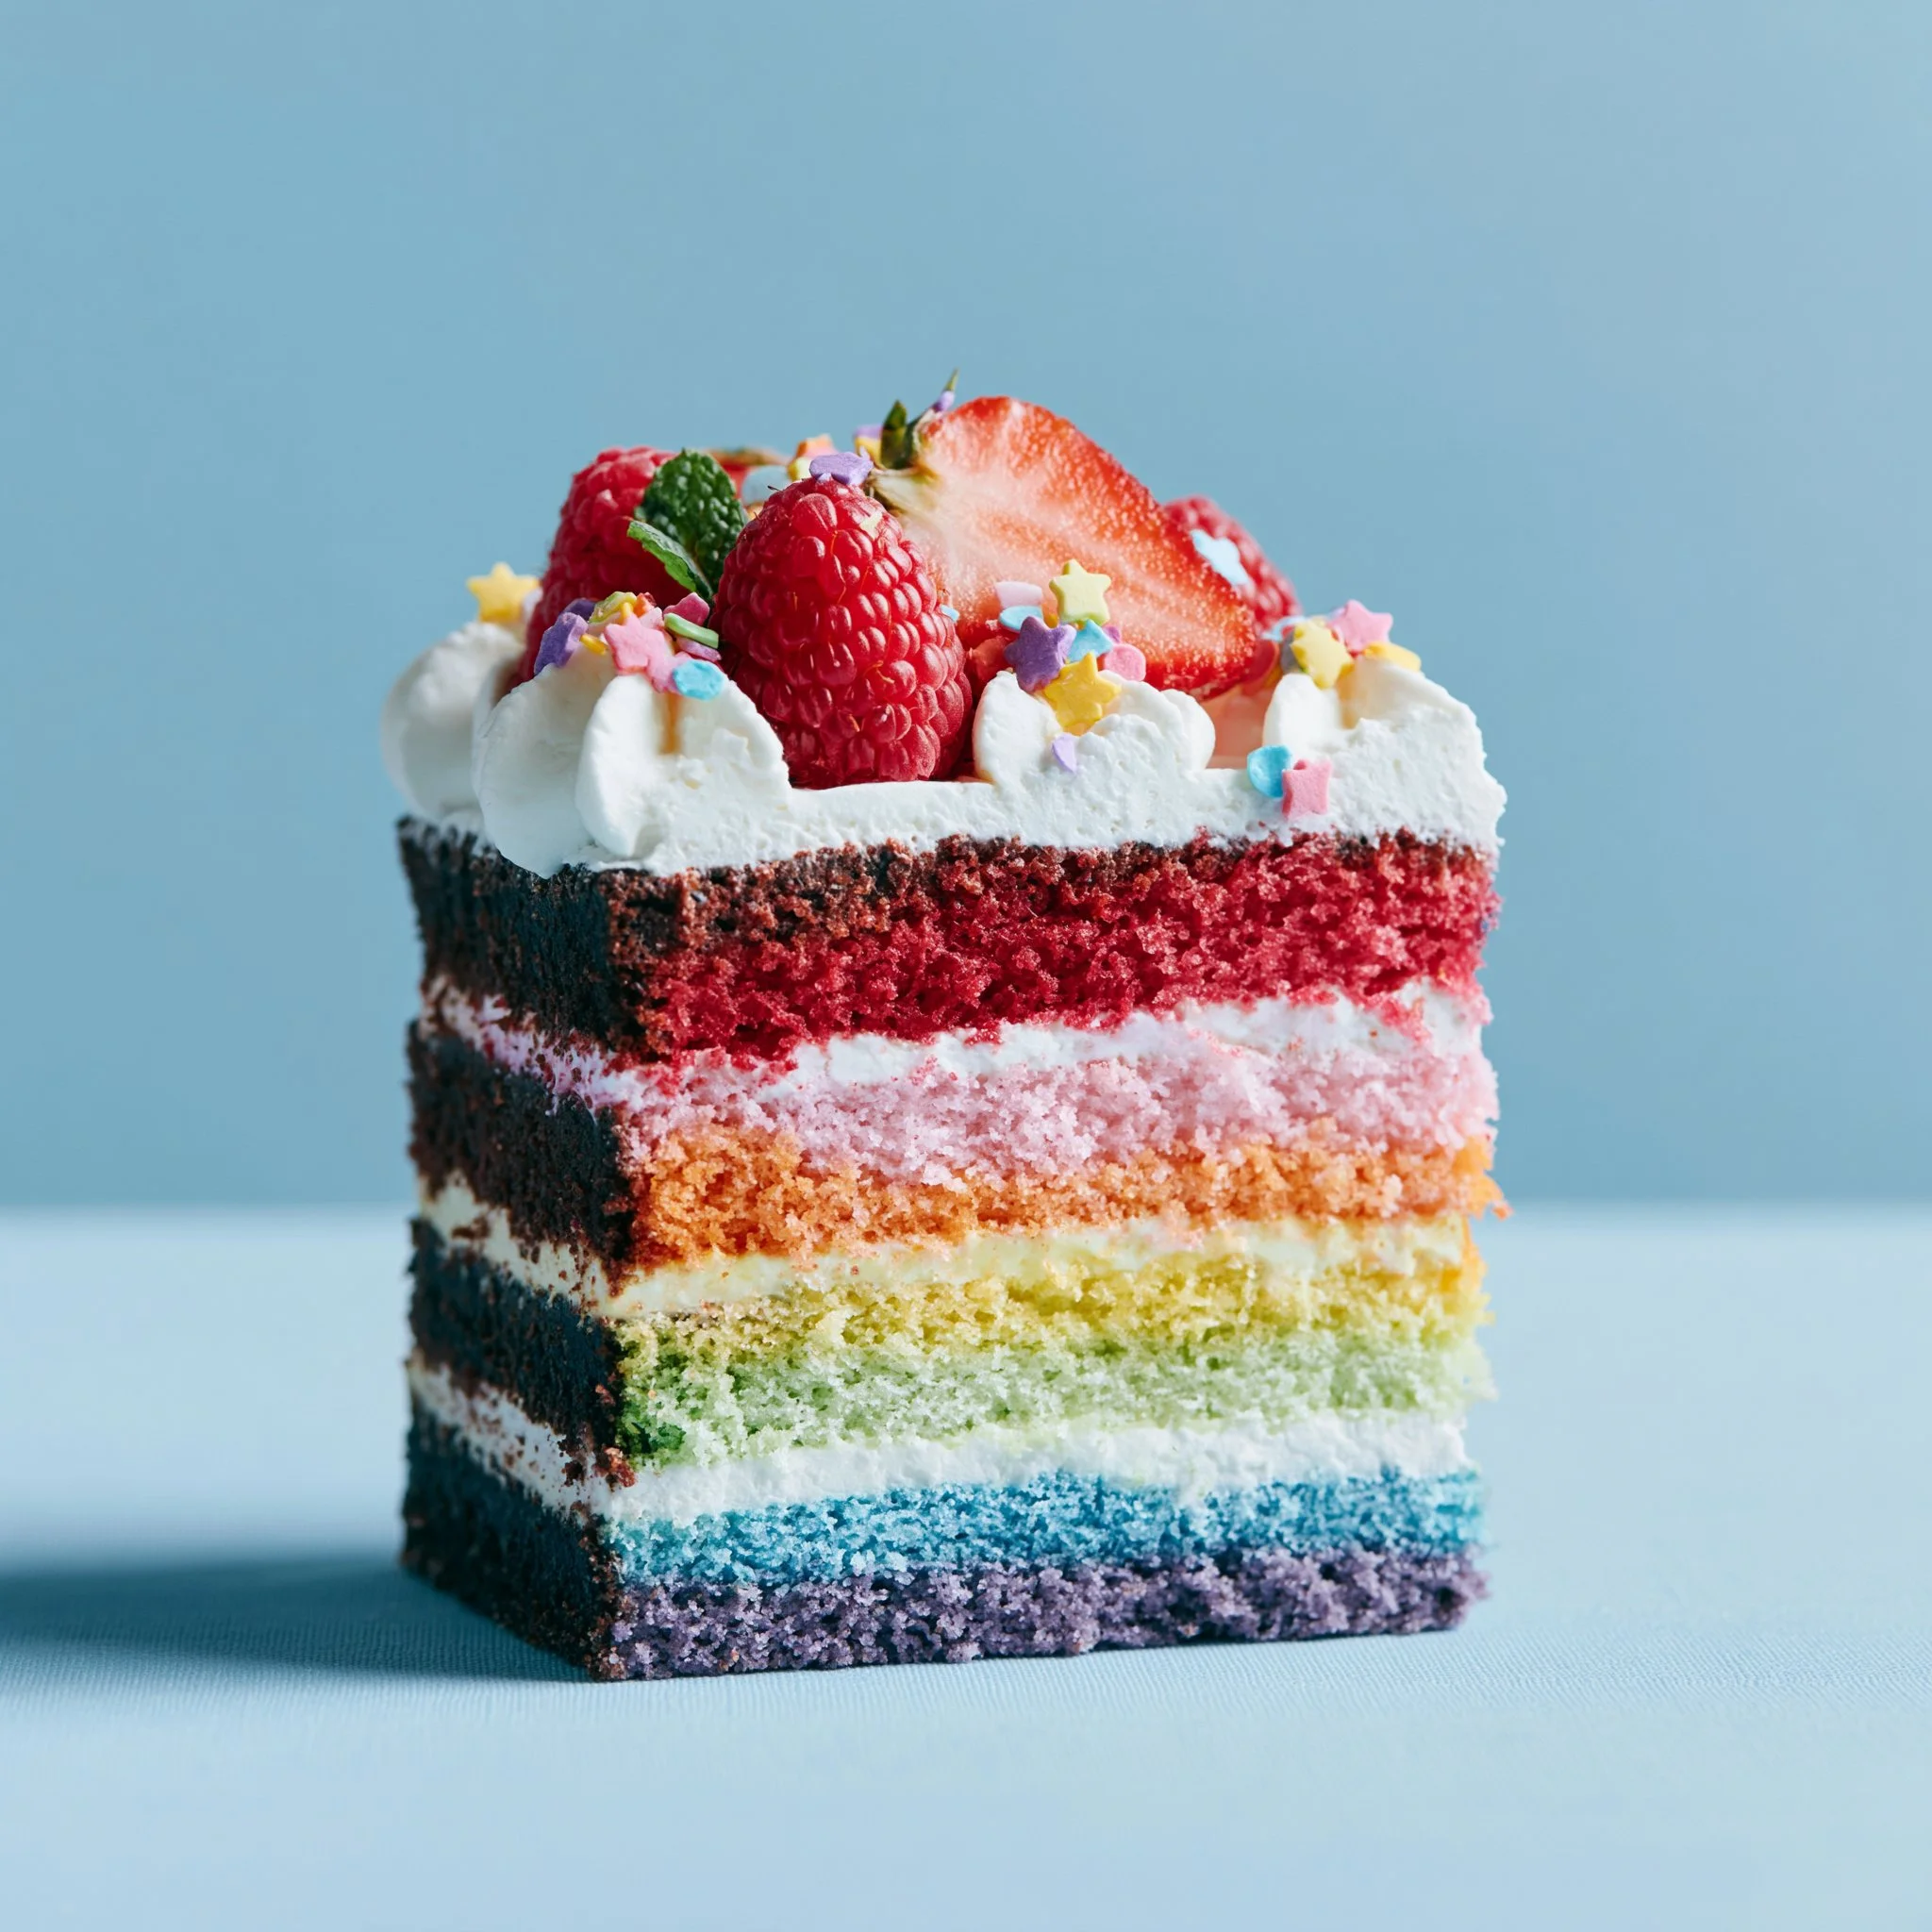
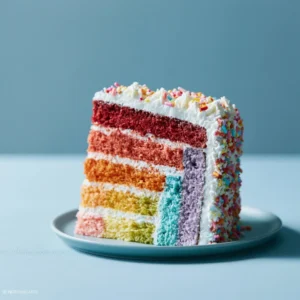
There’s something extra satisfying about a cake that looks like a celebration before you’ve even sliced it. This Chocolate Rainbow “Moonbow Cake” is exactly that—six cocoa-rich layers tinted into bright, moody colors, stacked high and finished with a clean coat of vanilla frosting.
The best part is the contrast: a deep chocolate crumb (thanks to plenty of cocoa powder and brown sugar) against a creamy, sweet vanilla finish. It cuts into neat stripes, smells like chocolate cake the second you open the oven, and it’s honestly simpler than it looks once your batter is mixed—kind of like making one cake, then playing with color.
Why You’ll Love This Recipe
- Real chocolate flavor, not just “chocolate-colored.” With ¾ cup cocoa powder, the layers bake up dark and fragrant even after you tint them.
- That slice moment is guaranteed. Six colored layers (red through purple) make a true rainbow stripe effect without fancy piping—just divide, color, bake.
- Tender, plush crumb. Buttermilk plus butter keeps the cake soft and moist, with a fine texture that stacks well.
- Vanilla frosting makes the colors pop. The pale frosting gives clean contrast, so your “moonbow” layers stand out when you cut in.
- Built for birthdays and parties. If you love showstopper chocolate desserts like my chocolate caramel toffee crunch cake, this one brings the same drama—just in stripes.
The Story Behind This Recipe
I wanted a rainbow cake that still tasted like a grown-up chocolate cake—deep cocoa, not overly sweet—so this version starts with a classic butter-and-sugar base, then gets split into six bowls for coloring. It’s the same batter the whole way through, which keeps the process calm and predictable, even though the finished cake looks like you worked all day.
What It Tastes Like
This cake is moderately sweet with a clear cocoa bitterness (in a good way) that keeps every bite from feeling sugary, especially once it’s layered with vanilla frosting. The crumb is soft and buttery, not fluffy-dry, and the buttermilk gives it a subtle tang that makes the chocolate smell richer. Chilled slices hold sharp, colorful stripes; at room temp, the frosting turns creamy and the cake feels extra tender.
Ingredients You’ll Need
This recipe is all about a strong chocolate base that can handle food coloring without tasting flat. Cocoa powder brings the depth, while granulated sugar + brown sugar give sweetness and a slightly caramel edge. Buttermilk keeps the batter smooth and the baked layers tender. Use softened butter (not melted) so the creamed mixture gets light and sets you up for a cake that bakes evenly.
- 1 ¾ cups all-purpose flour
- 1 ½ teaspoons baking powder
- ½ teaspoon baking soda
- ½ teaspoon salt
- ¾ cup unsweetened cocoa powder
- 1 cup granulated sugar
- ½ cup brown sugar
- 1 cup unsalted butter, softened
- 4 large eggs
- 1 teaspoon vanilla extract
- 1 cup buttermilk
- Food coloring (red, orange, yellow, green, blue, purple)
- Vanilla frosting
How to Make Chocolate Rainbow Cake “Moonbow Cake”
Heat the oven and prep your pans.
Preheat to 350°F (175°C). Grease and flour multiple round cake pans so the colored layers release cleanly—this matters because dark cocoa cakes can cling at the edges if the pans aren’t well-coated.Mix the dry ingredients.
In a bowl, whisk together the flour, baking powder, baking soda, salt, and cocoa powder until the cocoa looks fully blended (no streaks). The mixture should look uniformly deep brown.Cream butter and sugars until fluffy.
In a second bowl, beat the softened butter, granulated sugar, and brown sugar until the mixture lightens and looks airy. You’re looking for a visibly fluffier texture, not a wet paste.Add eggs and vanilla.
Beat in the eggs one at a time, letting each one disappear before adding the next, then stir in the vanilla extract. If your batter looks a little curdled at this stage, don’t panic—it smooths out once the dry ingredients and buttermilk go in.Alternate dry ingredients and buttermilk.
Add the dry mixture and buttermilk in alternating additions, mixing just until the batter is smooth and thick. Stop as soon as you don’t see dry pockets; overmixing can make the layers bake up tougher.Divide into six bowls.
Split the batter as evenly as you can into six separate bowls. This is what gives you even stripes, like the tidy layers you’d want in something like chocolate cake with cherry pie filling—except here, the payoff is color.Tint each bowl.
Color the bowls red, orange, yellow, green, blue, and purple. Aim for bold color in the batter; cocoa darkens it, so the batter should look slightly more vivid than you want the baked layers to be.Fill the pans.
Pour each colored batter into the prepared cake pans. If you’re baking multiple layers at once, keep the amounts consistent so they bake evenly. Tap the pans lightly on the counter to level the batter and knock out big air bubbles.Bake.
Bake for 25–30 minutes, until the tops look set and a toothpick inserted into the center comes out clean (a few moist crumbs are fine, but you don’t want wet batter). The layers will smell distinctly chocolatey when they’re close to done.Cool completely, then frost and stack.
Let the cakes cool, then frost with vanilla frosting between each layer and all over the outside. For the cleanest stripes when you slice, make sure the layers are fully cool before you start stacking—warm cake + frosting equals sliding.
Tips for Best Results
- Really cream the butter and sugars. When the butter and both sugars turn lighter and fluffy, the cake bakes up softer and the layers feel less dense.
- Go stronger on color than you think. Cocoa powder mutes food coloring, so a pale-looking batter often bakes into a “where did the rainbow go?” situation.
- Mix just until smooth once the flour goes in. Overmixing after adding flour can make the cake lose that tender, plush crumb.
- Let the layers cool before frosting. If they’re even a little warm, the vanilla frosting will melt and your layers can drift.
- For neater slices, chill briefly after frosting. A slightly firmed frosting coat helps you get crisp rainbow stripes—similar to how clean bars cut in my chocolate cherry cheesecake bars.
Variations and Substitutions
- Color palette: Keep the same six-bowl method, but switch to any six shades you love (still using the same food coloring approach). The cake will remain chocolate-forward either way.
- Frosting flavor: Stick with vanilla frosting for the highest contrast against the dark, colorful layers. A darker frosting will hide the rainbow effect once sliced.
How to Serve It
Slice with a long, sharp knife and wipe the blade between cuts to keep the colors clean. I love serving this at cool room temperature so the vanilla frosting is creamy but not droopy. If you’re building a dessert table, pair it with something more casual and scoopable like chocolate caramel dump cake so guests have options.
How to Store It
Store the frosted cake covered in the refrigerator so the vanilla frosting stays stable between the layers. For the nicest texture, let slices sit out for a few minutes before eating so the cake softens slightly and the chocolate aroma comes through. If you want to work ahead, you can bake the layers, cool them completely, and frost once they’re fully cooled (this keeps the colors sharp and the frosting smooth). Leftover slices also freeze well when wrapped to prevent the frosting from picking up freezer odors.

Final Thoughts
This is the kind of cake that looks bold and playful, but still eats like a proper chocolate layer cake—rich cocoa, tender crumb, and just enough vanilla frosting to keep every bite balanced. If you take your time dividing and coloring the batter, the rest is straightforward stacking and frosting.
Conclusion
If you enjoy seeing how other bakers approach this exact style, Sam’s Chocolate Rainbow Cake “Moonbow Cake” guide is a great companion read for color inspiration and layering ideas. And if you’re in a buttermilk-chocolate mood after this, her Chocolate Buttermilk Bundt Cake is another smart way to lean into that cocoa-and-tang combination. For more cake browsing, the roundup of Bundt cake recipes is handy when you want something a little simpler than stacking six layers.
Chocolate Rainbow Moonbow Cake
Ingredients
Dry Ingredients
- 1.75 cups all-purpose flour
- 1.5 teaspoons baking powder
- 0.5 teaspoon baking soda
- 0.5 teaspoon salt
- 0.75 cup unsweetened cocoa powder
Wet Ingredients
- 1 cup unsalted butter, softened
- 1 cup granulated sugar
- 0.5 cup brown sugar
- 4 large eggs
- 1 teaspoon vanilla extract
- 1 cup buttermilk
Food Color and Frosting
- Food coloring (red, orange, yellow, green, blue, purple)
- Vanilla frosting
Instructions
Preparation
- Preheat the oven to 350°F (175°C) and grease and flour multiple round cake pans.
- In a bowl, whisk together the flour, baking powder, baking soda, salt, and cocoa powder until fully blended.
Mixing Ingredients
- In a second bowl, cream the softened butter, granulated sugar, and brown sugar until airy and fluffy.
- Beat in the eggs one at a time and stir in the vanilla extract.
- Add the dry mixture and buttermilk in alternating additions until the batter is smooth.
Coloring and Filling Pans
- Divide the batter into six bowls and tint each bowl with the food coloring.
- Pour each colored batter into the prepared cake pans evenly.
Baking
- Bake for 25–30 minutes or until the tops are set and a toothpick comes out clean.
- Let the cakes cool completely before frosting.
Frosting and Serving
- Frost each layer with vanilla frosting, stacking as you go.
- For neat slices, chill the cake briefly after frosting.