
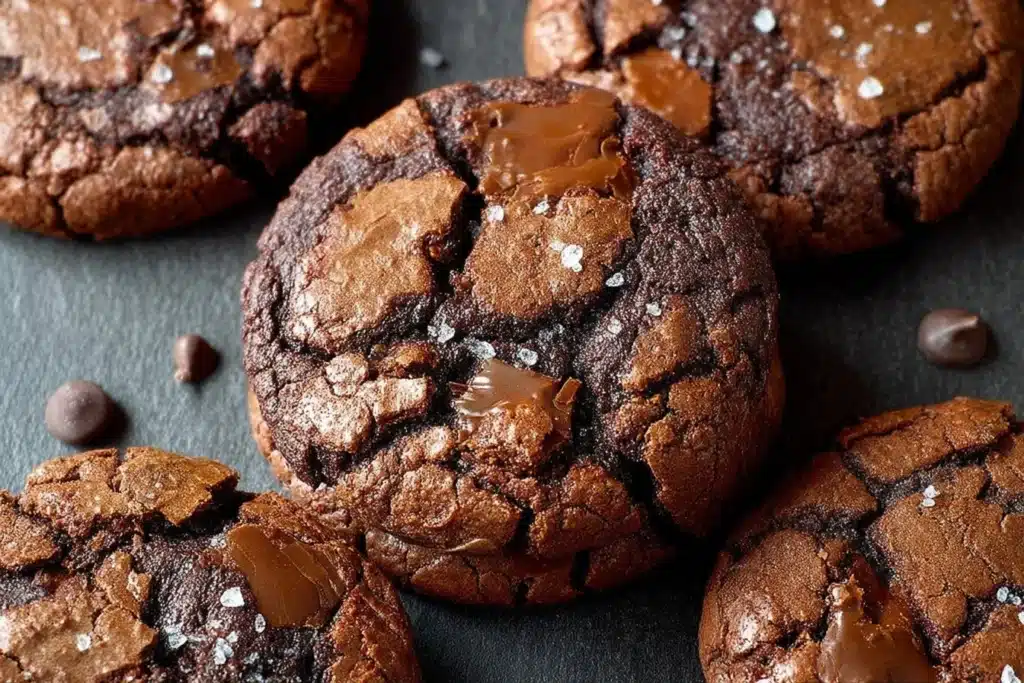
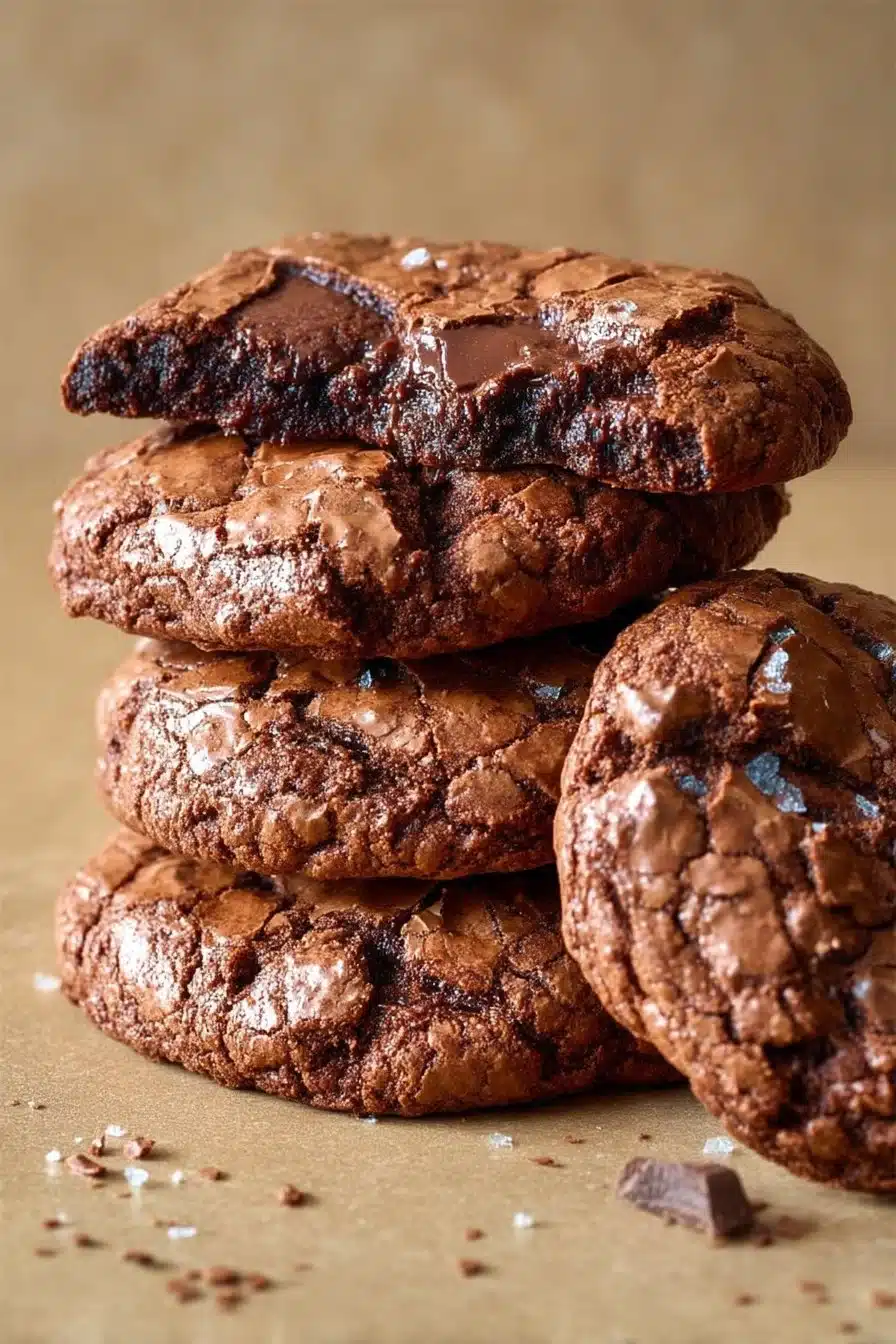
I never set out to make a cookie that tasted like a brownie, but when dense, crackly, chocolatey bites come out of your oven with glossy tops and soft, fudgy centers, you stop planning and start eating. These brownie cookies bake up with that signature deep cocoa aroma, a slight coffee lift, and edges that give way to a molten interior — they’re worth the 30 minutes they take from start to finish.
They’re also oddly forgiving: the dough chills quickly, scoops easily, and keeps a shiny surface if you don’t over-refrigerate. If you like the idea of sandwiching cookie dough or turning these into a richer treat, I’ve linked a couple of related riff ideas for reference like my brownie cookie dough sandwich cookies that use the same fudgy logic.
Why You’ll Love This Recipe
- Deep, layered chocolate: melted dark chocolate plus Dutch-process cocoa creates a bitter-sweet backbone that never tastes flat.
- Glossy, crackled tops with gooey centers: short bake time produces set edges and bottoms while the interior stays soft and fudgy.
- Coffee-enhanced chocolate flavor: 3/4 teaspoon instant coffee quietly amplifies the chocolate without making these taste like coffee.
- Fast chilling, easy scooping: the dough firms in about 20–30 minutes so you can bake the same day without long rests.
- Excellent for sharing or making ahead: the dough can be shaped and chilled briefly, then baked fresh for a warm, just-out-of-oven experience; see one way to play with this concept in my note on brownie cookie dough sandwiches.
The Story Behind This Recipe
This started as a test to capture brownie texture in cookie form: dense, fudgy interior and a shiny cracked top. A few tweaks — melted chocolate plus cocoa, a touch of coffee, and a short bake — produced the exact brownie-ish bite I wanted without needing a pan of brownies.
What It Tastes Like
These are moderately sweet with an intense dark-chocolate focus and a warm cocoa aroma. The first bite gives you a slight crisp at the edge, then a chewy, almost brownie-like center that firms as it cools. The instant coffee brightens the chocolate, and the chocolate chips add pockets of molten chocolate that contrast with the dense dough.
Ingredients You’ll Need
A quick note on the key ingredients: melted dark chocolate and Dutch cocoa combine for depth and silkiness — don’t skip the chocolate. The eggs whipped with the sugars add air and structure so the cookies aren’t batter-dense; beating until the sugar is mostly dissolved is important for a smooth texture. If you must swap, light brown sugar instead of the specified brown will work, but changing the chocolate type (to a very pale milk chocolate) will noticeably soften the cocoa punch.
- 3/4 cup white granulated sugar ((150g))
- 1/4 cup brown sugar ((50g))
- 2 large eggs, room temperature
- 1/3 cup unsalted butter, melted ((74g))
- 1/3 cup dutch cocoa powder ((25g))
- 200 g dark chocolate
- 3/4 cup all-purpose flour ((103g))
- 3/4 tsp baking powder
- 1/2 tsp salt
- 3/4 tsp instant coffee powder
- 3/4 tsp vanilla extract
- 1/2 cup chocolate chips (dark/semi/milk – your choice (90g))
How to Make Brownie Cookies
- Prep and beat the sugars with eggs: In a large bowl, combine the white and brown sugar with the two room-temperature eggs. Beat with a hand mixer or stand mixer for about 5 minutes until the mixture lightens slightly and the sugar is mostly dissolved — test by rubbing a little between your fingers; it should not feel grainy. The mixture should look glossy and a bit airy, not syrupy.
- Melt chocolate, butter and coffee: In a heatproof bowl or small saucepan, combine the melted butter, chopped dark chocolate (or chips) and the instant coffee powder. Melt together gently in the microwave in short bursts (15–20 seconds) or over low heat, stirring frequently until smooth. Remove from heat and let it cool for a minute; it should be warm but not piping hot.
- Add cocoa and cool slightly: Stir the Dutch cocoa powder into the warm chocolate mixture until fully incorporated. Let the mixture cool until it’s just warm to the touch — warm enough to stay pourable but not so hot that it will cook the eggs when combined.
- Combine the chocolate with the egg mixture: Pour the chocolate-cocoa mixture into the beaten eggs and sugars. Beat until completely combined and silky; the batter will be thick and glossy. Mix in the vanilla.
- Fold in dry ingredients and chips: Add the all-purpose flour, baking powder, salt and the chocolate chips. Fold gently until just combined — the dough should be dense and scoopable, not overworked. A few streaks of flour are fine if they disappear with a gentle fold.
- Chill briefly for scoopable dough: Cover the dough and refrigerate until it just slightly firms so you can scoop it cleanly, about 20–30 minutes. Don’t leave it much longer or the dough can dry and the shiny tops won’t form.
- Preheat and portion: While the dough chills, preheat the oven to 350°F (177°C). Line a baking sheet with parchment or a silicone mat. Use a 1.5-tablespoon cookie scoop to portion dough about 2 inches apart; the cookies won’t spread much.
- Bake to the texture you like: Bake for 10–12 minutes. For gooey, fudgy centers bake ~10 minutes; for slightly more set cookies bake ~12 minutes. You’re looking for set bottoms and edges but a still-moist-looking center. Avoid overbaking — the cookies will continue to set as they cool.
- Encourage the crackle: After you take the pan from the oven, give the baking sheet a quick, confident drop or “bang” onto the counter (one firm but controlled drop). This helps the tops crack and form that shiny finish.
- Cool and store: Let cookies cool on the pan for a few minutes, then transfer to a wire rack. They’ll firm up more over the next few hours. Once cool, store in an airtight container.
(If you want a different decorative or mix-in approach, see a playful double-chocolate idea I experimented with in my double chocolate variation.)
Tips for Best Results
- Beat the eggs and sugars long enough: five minutes gives a glossy, slightly aerated base; stopping too soon leaves a grainy mouthfeel.
- Don’t overheat the chocolate: if it’s too hot when combined with eggs, it can thin the batter or partially cook the eggs — aim for warm, not hot.
- Chill just enough: 20–30 minutes firms the dough for neat scooping but keeps moisture; over-chilling dries the surface and ruins the shiny tops.
- Watch the bake time closely: these go from fudgy to firm quickly. Start checking at 9–10 minutes if your oven runs hot.
- Refresh the shine: that post-bake “bang” is a small trick that encourages more prominent cracks and a glossy finish.
(For a simple mix-in mindset and low-effort cookie strategy, check a 3-ingredient cookie trick I often return to.)
Variations and Substitutions
- Chocolate chips: use dark for more bittersweet contrast, semi-sweet for balance, or milk for sweeter pockets. Each choice changes the overall sweetness and mouthfeel.
- Dark chocolate percentage: 60–70% gives a deep flavor; higher-cacao bars produce a more bitter result. Don’t substitute with white chocolate unless you want a very different, much sweeter cookie.
- Make them larger or smaller: keep bake times roughly the same per thickness — smaller scoops will need less time, larger ones a minute or two more.
How to Serve It
Serve warm with a cold glass of milk or a small scoop of vanilla ice cream to play off the intense chocolate. For a party, arrange on a platter with a few whole chocolate squares and a dusting of cocoa powder; the contrast of glossy tops and soft centers makes them visually appealing. These are also nice tucked into lunch boxes once fully cooled.
How to Store It
Store cooled cookies in an airtight container at room temperature for up to 3 days; they maintain a fudgy interior but will firm slightly. For longer storage, freeze baked cookies in a single layer on a sheet, then transfer to a freezer bag for up to 2 months. To serve from frozen, rewarm in a 300°F oven for 5–7 minutes or microwave a single cookie for 10–15 seconds to restore that just-baked gooeyness. If you need to prepare dough ahead, shape and freeze the scooped dough on a tray, then bake from frozen adding a couple of extra minutes to the bake time.

Final Thoughts
These brownie cookies do exactly what they promise: glossy-cracked tops, a fudgy inside, and an honest, layered chocolate flavor. They’re quick to pull together, forgiving in the oven, and perfect for anyone who wants brownie satisfaction in a portable, shareable cookie.
Conclusion
If you want another riff on a stamped or shaped brownie-cookie hybrid, I like the technique shown in Stamped Brownie Cookies – Apt. 2B Baking Co.. For a faster, fudgy approach with similar goals, see the 20 Minute Fudgy Chocolate Brownie Cookies – Frosting and Fettuccine. Sally’s take on brownie cookies is a reliable reference for texture and timing in a slightly different format: My Favorite Brownie Cookies – Sally’s Baking Addiction.


