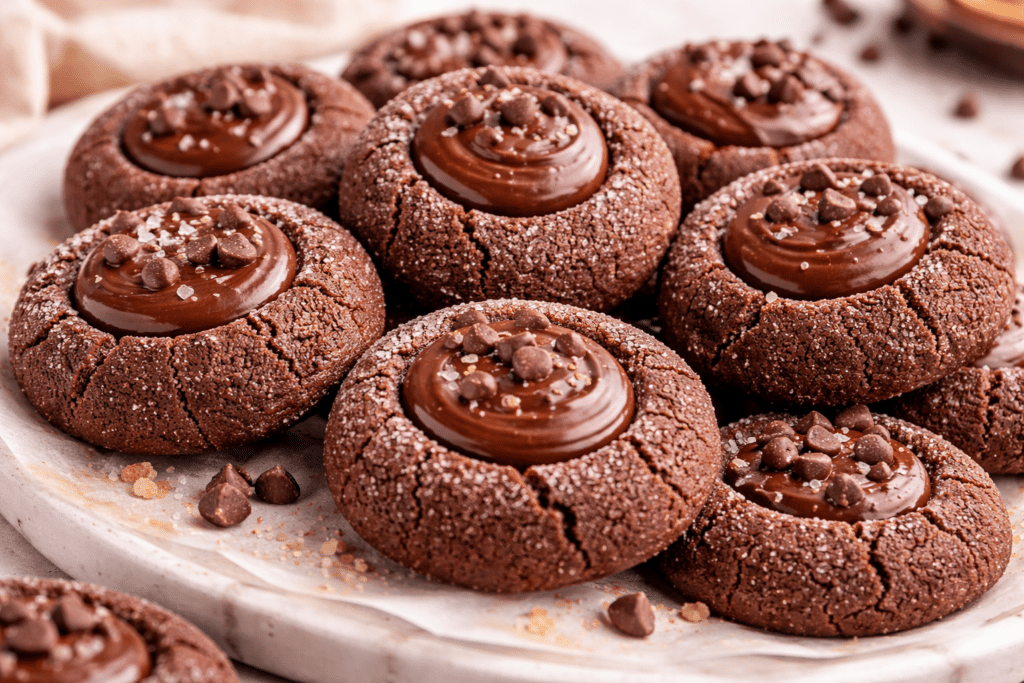
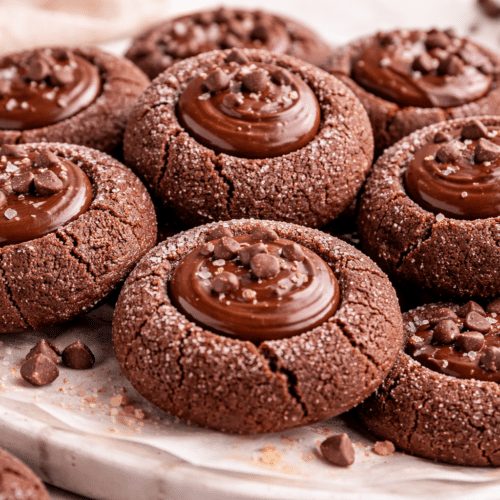
Chocolate Thumbprint Cookies are the kind of treat that look bakery-fancy but come together in a simple mixing bowl at home. Picture a tender, cocoa-rich cookie with a soft, brownie-like bite, filled with a glossy, fudgy center that stays smooth instead of turning hard and chalky. These are the cookies you bring to a party and quietly watch disappear first.
This recipe focuses on two things: deep chocolate flavor and texture that feels almost truffle-like in the middle. The cookie base bakes up slightly crisp at the edges and soft in the center, so it cradles the warm puddle of chocolate without spreading flat. The filling is quick to stir together, sets just enough to hold its shape, and keeps that melt-on-your-tongue feel even after the cookies cool.
We will walk through exactly which ingredients matter most, why room temperature butter and a bit of cocoa powder make such a difference, and how to swap in what you already have in your pantry. You will see how to shape the thumbprints so they do not crack, how to keep the centers from sinking or leaking, and how to time the filling so it settles into a smooth pool.
Finally, you will get make-ahead tips, storage tricks to keep them soft for days, and easy serving ideas, from holiday platters to after-dinner coffee.
Why You Will Love Chocolate Thumbprint Cookies
Chocolate Thumbprint Cookies are what you bake when you want something that looks a little special but feels easy and familiar. Think of them as the cookie version of a truffle: a tender, cocoa-rich shell with a soft, fudgy center that melts against your tongue.
The cookie itself is buttery and just slightly crisp on the edges, with a shortbread-style crumb that breaks cleanly when you bite. Inside the thumbprint, the chocolate filling stays smooth and glossy, not hard or chalky. When you sink your teeth in, you get a gentle snap from the cookie, then a slow, creamy chocolate finish.
These cookies are not overly sweet. The dough has enough sugar to brown and taste like a real treat, but the cocoa and a pinch of salt keep everything balanced. The filling leans more toward dark chocolate than candy bar sweet, so you can eat two or three without feeling overwhelmed.
From a practical standpoint, this recipe is built for real life. The dough is soft but sturdy enough to roll without crumbling. Chilling is brief and predictable, so you do not have to plan a full day ahead. The thumbprints hold their shape in the oven, which means your cookies come out looking neat and uniform without any fancy tools.
The recipe is also forgiving. If your kitchen is warm, a few extra minutes in the fridge will bring the dough back in line. If you press too deep and crack a cookie, you can pinch it back together before baking and it will still bake up pretty. The chocolate center is simply stirred together and spooned in, so there is no need for a candy thermometer or special technique.
You will also love how flexible these Chocolate Thumbprint Cookies are. You can use dark, semisweet, or milk chocolate in the center, depending on who you are baking for. A sprinkle of flaky salt, crushed nuts, or colored sugar on top lets you shift them from casual afternoon snack to holiday cookie tray without changing the base recipe.
Most of all, these cookies stay good. The centers stay soft for days, the edges keep a gentle bite, and the flavors settle into that deep, cozy chocolate that makes you want to put on a pot of coffee or heat up some milk for hot cocoa.
Ingredients and Flavor Notes
Chocolate Thumbprint Cookies use simple pantry ingredients, but each one pulls real weight in the final texture and flavor. Here is what matters, and where you can safely swap.

Butter: flavor and tender crumb
Use unsalted butter so you can control the salt. Softened butter creams with sugar to trap air, which keeps the cookies from baking up dense and tough. It also carries the chocolate flavor and gives the edges that delicate, shortbread-style snap.
Salted butter works in a pinch. Just reduce the added salt slightly and taste the dough if you are comfortable doing so.
Sugar: structure and subtle chew
Granulated sugar helps the cookies hold their shape so the thumbprint well does not collapse. It also encourages a faintly crisp edge while the centers stay soft.
If you prefer a touch of caramel depth, swap up to one third of the granulated sugar for light brown sugar. More than that and the cookies will spread more and lose that neat thumbprint shape.
Flour and cocoa: chocolate base
All-purpose flour keeps the cookies tender but sturdy enough to cradle the fudgy center. Measure it lightly, without packing, so the dough does not turn dry.
Use unsweetened cocoa powder for the cookie dough. Natural cocoa gives a classic, brownie-like flavor. Dutch-process cocoa will taste darker and smoother, with less tang. Either works, but do not use hot cocoa mix, which contains sugar and milk powder and will throw off the dough.
Egg yolk: richness and binding
Many thumbprint cookies use only the yolk. The fat in the yolk adds richness and a melt-in-the-mouth bite, while also helping the dough come together. If you only have whole eggs, use the yolk in the dough and save the white for brushing over the cookies or another recipe.
Vanilla and salt: rounding the chocolate
A full teaspoon of vanilla might seem like a lot for a small batch, but it softens any harshness from the cocoa and makes the chocolate taste fuller. Salt is just as important. It sharpens the chocolate flavor and keeps the cookies from tasting flat or overly sweet.
Fudgy center: chocolate and cream
The filling is a simple ganache-style mixture: good-quality chocolate and warm cream. Use semi-sweet or dark chocolate chips or chopped bars. Semi-sweet gives a familiar, kid-friendly sweetness; darker chocolate makes the center taste like truffle.
Heavy cream is ideal for a thick, glossy center that stays soft at room temperature. In a pinch, you can use half-and-half, but the filling will be slightly looser and less rich.
A tiny pinch of salt in the filling keeps it from tasting sugary, and a drop of vanilla or a splash of coffee adds depth without turning the cookies into mocha.
How to Make Chocolate Thumbprint Cookies with Soft Fudgy Centers
Start by bringing your butter and egg to room temperature. Soft butter blends smoothly with sugar and helps the cookies hold their shape instead of spreading flat. Line two baking sheets with parchment and set your oven rack in the center so the heat is even.

Cream the butter and sugar together until the mixture looks pale and fluffy, about 2 to 3 minutes with a hand mixer. You want the sugar to dissolve slightly so the dough feels silky, not sandy. Beat in the egg yolk and vanilla until fully combined, scraping down the bowl so no streaks remain. Sift in the dry ingredients and mix on low just until the dough comes together in a soft, slightly tacky ball. Overmixing will make the cookies tough instead of tender.
Scoop the dough into small balls, about 1 tablespoon each. Roll them between your palms so the surface is smooth, then coat lightly in granulated sugar if you like a faint crunch around the edges. Space the balls a couple of inches apart on the baking sheets.
To make the “thumbprint,” press a rounded ½ teaspoon measure, the back of a small spoon, or your knuckle into the center of each ball. Push gently but firmly until you see a neat well with a thicker rim around the edge. If the dough cracks, pinch or smooth it back together. A deep, clean indentation is what keeps the fudgy center from spilling out.
Chill the shaped cookies for about 15 minutes while you heat the oven. This quick chill helps them keep their shape and gives you a softer, more defined center.
Bake just until the edges look set and the tops lose their raw shine, usually 9 to 11 minutes. The cookies should still feel soft in the middle; they will firm up as they cool. If the wells puff up in the oven, press them again lightly with the back of a spoon while the cookies are still warm.
Let the Chocolate Thumbprint Cookies cool on the sheet for 5 minutes, then move them to a rack. Once they are just barely warm, fill each center with your warm chocolate ganache or fudgy filling so it settles into a glossy pool.
Make-Ahead, Storage, and Serving Tips
Chocolate Thumbprint Cookies are very forgiving, which makes them perfect for planning ahead, gifting, and last‑minute dessert plates.

Make-ahead strategies
Chill the dough:
Shape the dough into balls, place them on a parchment-lined baking sheet, and press the thumbprints. Cover tightly and refrigerate for up to 48 hours before baking. Let the chilled cookies sit at room temperature for about 10 minutes so they bake evenly.
Freeze unbaked cookies:
Arrange shaped, indented dough balls on a tray and freeze until firm, about 1 hour. Transfer to a freezer bag, press out the air, and freeze for up to 2 months. Bake from frozen, adding 1 to 2 extra minutes. Make the chocolate filling fresh while they bake.
Freeze fully baked cookies:
Bake and fill the cookies, let them cool completely, then freeze in a single layer until solid. Stack in an airtight container with parchment between layers. Thaw at room temperature; the centers will soften again as they warm.
Storage and texture
Room temperature:
Store cooled Chocolate Thumbprint Cookies in an airtight tin or container at cool room temperature for 4 to 5 days. The chocolate centers will stay soft and fudgy, not hard like candy.
Keep them from drying out:
If your kitchen is dry, tuck a small piece of sandwich bread or a marshmallow into the container to keep the cookies tender. Replace it every day or two.
Fixing common issues:
- Cracks too wide: The dough was likely too cold or too dry. Next time, let the dough warm slightly before shaping, or add 1 to 2 teaspoons of milk to the dough.
- Centers sinking or overflowing: The indent was too shallow or you overfilled. Aim for a deep, neat well and fill it just below the rim.
- Dry, cakey cookies: They baked too long. Pull them as soon as the edges look set and the tops lose their raw shine.
Customization and serving ideas
- Roll the dough balls in finely chopped nuts, cocoa, or sanding sugar before baking for extra crunch and contrast.
- Swap the chocolate filling for salted caramel, raspberry jam, or hazelnut spread, but keep the same quantity so the structure holds.
- Serve on a platter with fresh berries and a bowl of lightly whipped cream or vanilla ice cream. The warm, soft centers against something cold make these simple cookies feel like a plated dessert.
FAQ
- Why did my Chocolate Thumbprint Cookies crack when I pressed the centers?
A little cracking is normal, but big splits usually mean the dough was too cold or too dry. Let the shaped balls sit at room temperature for 5 to 10 minutes before pressing, and use the pad of your thumb or the back of a ½ teaspoon, pressing slowly instead of jabbing. If the dough feels crumbly, work in 1 to 2 teaspoons of milk or cream until it feels soft like playdough. - How do I keep the fudgy centers soft instead of firm or grainy?
Warm the chocolate and cream gently and stir until completely smooth and glossy, with no streaks. If it looks dull or sandy, microwave in 5-second bursts and stir again. Spoon the filling into the cookies while both the cookies and ganache are still slightly warm so it settles into a silky pool. Let them set at cool room temperature, not in the fridge, for the softest bite. - Can I make Chocolate Thumbprint Cookies ahead of time or freeze them?
Yes. Baked, filled cookies keep in an airtight tin at cool room temperature for 3 to 4 days. For longer storage, freeze the baked cookie shells (without filling) in a single layer, then move to a freezer bag for up to 2 months. Thaw at room temperature and fill with fresh ganache the day you plan to serve for the best texture and shine. - How can I adjust the sweetness or use different chocolate?
Use semi-sweet chocolate for a classic balance, bittersweet if you prefer a darker, less sweet center, or milk chocolate if you like a softer, sweeter bite. If the cookies taste too sweet overall, swap a few tablespoons of granulated sugar in the dough for brown sugar and choose a darker chocolate for the filling. Taste the ganache before filling and add a pinch of salt to sharpen the flavor if needed.
Conclusion
Chocolate Thumbprint Cookies prove that a small cookie can carry a lot of comfort. You get a tender, cocoa-rich base with a soft, fudgy center that stays slightly gooey even after the cookies cool. The contrast in textures is what makes these cookies so satisfying, from the first crack of the shell to the melt of the filling.
The most important keys to success are simple: chill the dough so the cookies hold their shape, press the thumbprints gently so they do not crack, and watch the bake time closely so the centers stay soft. A smooth, glossy filling comes from warm cream poured over finely chopped chocolate and stirred patiently until silky.
These Chocolate Thumbprint Cookies work for almost any occasion, from holiday trays to weeknight treats. Dress them up with a sprinkle of flaky salt, crushed peppermint, or colorful sprinkles, or keep them plain and let the chocolate speak for itself. Bake a batch, share a warm plate, and let this little cookie become one of your go-to chocolate traditions.
Recipe
Chocolate Thumbprint Cookies with Soft Fudgy Centers
Ingredients
- 1 cup 2 sticks, 226 g unsalted butter, softened to room temperature
- 3/4 cup 150 g granulated sugar
- 1 large egg at room temperature
- 1 large egg yolk at room temperature
- 2 tsp pure vanilla extract
- 1 3/4 cups 220 g all-purpose flour, spooned and leveled
- 1/2 cup 45 g unsweetened cocoa powder (natural or Dutch-process)
- 1/2 tsp baking powder
- 1/2 tsp fine sea salt
- 2 –3 tbsp milk as needed (whole or 2%) to soften the dough if dry
- For the chocolate filling
- 1 cup 170 g chopped semisweet or dark chocolate, or semisweet chocolate chips
- 1/2 cup 120 ml heavy cream
- 2 tbsp 28 g unsalted butter, cut into small pieces
- 1 tsp pure vanilla extract
- Pinch of fine sea salt
- Optional toppings
- Flaky sea salt for sprinkling
- Finely chopped nuts or colored sugar for garnish
Instructions
- Preheat the oven to 350°F (175°C). Line 2 baking sheets with parchment paper.
- In a medium bowl, whisk together the flour, cocoa powder, baking powder, and salt until well combined. Set aside.
- In a large mixing bowl, beat the softened butter and granulated sugar with a hand mixer or stand mixer on medium speed until light and fluffy, 2–3 minutes.
- Add the egg, egg yolk, and vanilla to the butter mixture. Beat on medium speed until smooth and well combined, scraping down the bowl as needed.
- Add the dry ingredients to the wet ingredients in two additions, mixing on low speed just until combined. If the dough seems crumbly or too stiff to roll, mix in 1–3 tablespoons of milk, 1 tablespoon at a time, until the dough holds together smoothly and feels soft but not sticky.
- Cover the bowl and chill the dough in the refrigerator for 20–30 minutes, just until slightly firm and easy to handle.
- Scoop about 1 tablespoon of dough (about 20 g) and roll it into a smooth ball between your palms. Place the balls on the prepared baking sheets, spacing them about 2 inches apart.
- Using your thumb or the back of a small measuring spoon (1/2 teaspoon), gently press a deep indentation into the center of each dough ball. If the edges crack, lightly pinch or smooth them back together.
- Bake one sheet at a time for 10–12 minutes, until the cookies are set around the edges but still soft in the centers. The indentations may puff slightly.
- Immediately after removing the cookies from the oven, use the back of the measuring spoon again to gently press and redefine the center wells while the cookies are still hot. Let the cookies cool on the baking sheet for 5 minutes, then transfer to a wire rack to cool completely.
- While the cookies cool, make the chocolate filling. Place the chopped chocolate in a heatproof bowl. In a small saucepan, heat the heavy cream over medium heat just until it begins to steam and small bubbles form around the edges; do not boil.
- Pour the hot cream over the chocolate. Let sit undisturbed for 2–3 minutes to soften, then add the butter, vanilla, and a pinch of salt. Stir slowly with a spatula or whisk until the mixture is completely smooth and glossy.
- Let the chocolate filling cool at room temperature for 10–15 minutes, stirring occasionally, until it thickens slightly but is still pourable and spoonable.
- Spoon about 1 teaspoon of the chocolate filling into the center of each cooled cookie, letting it pool and level in the thumbprint. If desired, lightly tap the baking sheet on the counter to help the filling settle into a smooth surface.
- While the chocolate is still soft, sprinkle the tops with flaky sea salt, chopped nuts, or colored sugar if using.
- Allow the filled cookies to sit at room temperature for 1–2 hours, or until the chocolate centers are set but still soft to the touch. Store the cookies in an airtight container at room temperature for up to 4 days.
Notes
If your kitchen is warm, chill the dough a bit longer so the cookies hold their shape and the thumbprints do not spread flat.
To prevent cracks, roll the dough balls very smooth and press the indentation slowly and gently.
If the filling seems too thin, let it cool a few more minutes before spooning; if it thickens too much, briefly warm it over a pan of hot water and stir until smooth.
The cookies can be made ahead: bake and cool the cookies, then fill them the same day you plan to serve for the glossiest centers.
For longer storage, refrigerate the cookies in an airtight container for up to 1 week; bring to room temperature before serving so the centers soften.