
Why This One Delivers
If you want a bakery style Easter dessert without turning on the oven, these Robin’s Egg Fudge Jars are your shortcut. You get neat, layered jar desserts that look like they came from a pastry case, but you can pull them together in under half an hour with simple pantry ingredients.
These Robin’s Egg Fudge Jars give you that bakery style, layered dessert look without turning your kitchen into a construction zone. You get three distinct textures in every spoonful: a buttery graham cracker base that actually holds together, a rich chocolate fudge ribbon that sets firm but still feels silky, and a light cheesecake mousse that tastes like a mashup of no bake cheesecake and whipped cream clouds. Because the fudge comes from chocolate chips and sweetened condensed milk, it sets quickly and cleanly, so you do not end up with runny layers bleeding into each other. The pastel blue mousse sits beautifully on top, which means you can prep these hours ahead and still have picture perfect swirls when guests arrive.
From a practical standpoint, the ingredients for these Robin’s Egg Fudge Jars are easy to find, and most are probably already in your pantry and fridge. Melted butter in the crumbs instead of whole graham crackers in the jar keeps you from wrestling with crust that will not stay put. Using vanilla bean paste in both the fudge and mousse layers gives a bakery level flavor boost, and it saves you from scraping actual vanilla beans on a busy holiday morning. The candy coated mini eggs on top are more than just cute decoration, their crunch balances the soft mousse and fudge, the same way nuts would in a brownie sundae but in a much more festive spring way.
These Robin’s Egg Fudge Jars also deliver on flexibility, which is what I always want from a holiday dessert. You can scale the recipe easily by grabbing more jars, and you can make them in anything from petite shot glasses to tulip jars, the layers still read beautifully. They travel well for potlucks since each serving is tucked safely into its own jar, no slicing or serving utensils required. If you already love make ahead treats like my layered cheesecake cups or chocolate mousse parfaits, this recipe will feel just as approachable, with that extra touch of playful Easter charm.
From Prep to Finish
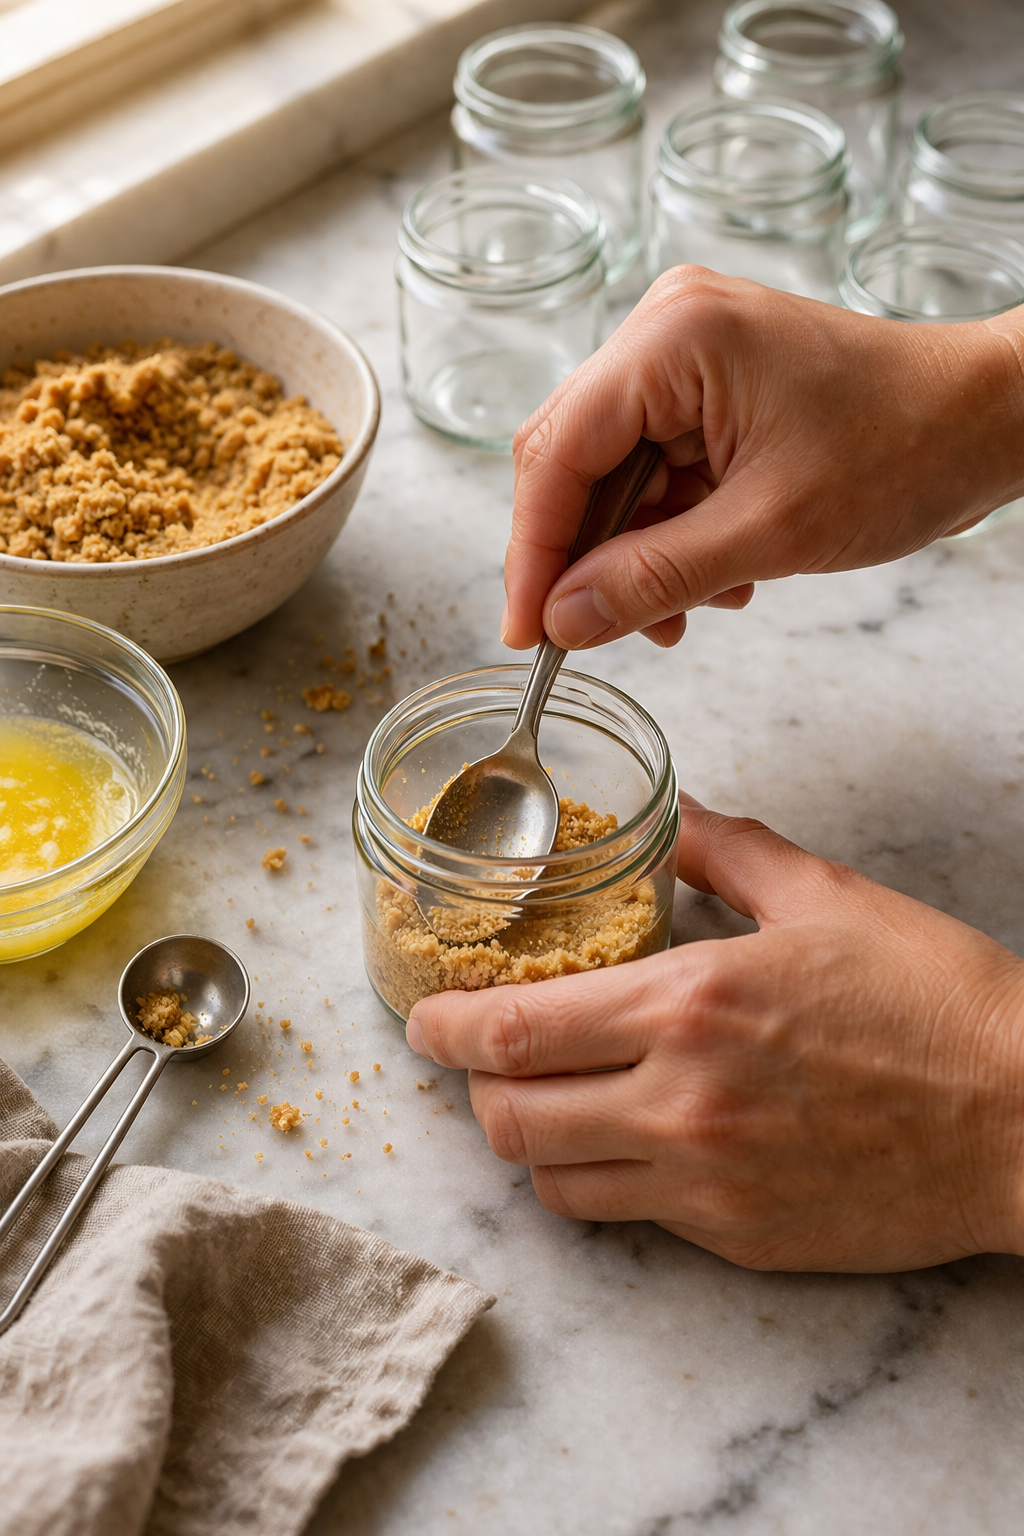
Once you have everything measured and your jars lined up, these Robin’s Egg Fudge Jars move from ingredients to dessert faster than your fridge can fully chill them. Start with the graham cracker crumbs, sugar, and melted butter, and really work that mixture together so every crumb looks glossy and damp. When you press it into the jars, use the back of a spoon or the bottom of a small measuring cup to compact it firmly. A loose crust will float up into the fudge, so you want it tight and level before you slide the jars into the fridge for a quick chill.
For the fudge layer, the key is gentle heat and steady stirring. Microwave the chocolate chips and sweetened condensed milk in short bursts, and stop as soon as you can stir it smooth and shiny. Overheating can make the chocolate grainy, and once that happens, there is no rescuing it. Spoon a modest layer over the crust, then tilt each jar a bit to nudge the fudge into an even blanket that reaches the edges. The 15 minute chill helps it firm just enough so the mousse floats on top instead of sinking in.
Process Image of Robin’s Egg Fudge Jars
The pastel blue cheesecake mousse pulls everything together. Beat the cream cheese until it is completely lump free before you add the powdered sugar and vanilla, or you will chase tiny bumps for the rest of the day. Whip the cream in a separate chilled bowl until it holds stiff peaks that stand straight up, then fold it in with a soft touch so the mousse stays airy and cloudlike. Add the food coloring a drop at a time until you reach that robin egg shade you love, then spoon or pipe it gently over the cooled fudge. After an hour in the fridge, all that is left is a flourish of whipped cream, a handful of speckled candy eggs, and your spoon.
Timing, Storage, and Make-Ahead
You can assemble Robin’s Egg Fudge Jars in about 25 minutes, but they do need chill time for the layers to set. Plan on at least 1 hour in the fridge after you add the blue cheesecake mousse so the texture turns silky and scoopable with a spoon. If you are serving these for Easter brunch or a spring dessert table, I like to build the jars early in the day, then add the whipped cream and speckled eggs right before guests arrive so everything looks perky and fresh.
For storage, cover each jar with its lid or with plastic wrap, then refrigerate. The crust, chocolate fudge, and cheesecake mousse layers keep beautifully for up to 3 days in the fridge, which makes Robin’s Egg Fudge Jars very handy for busy holiday weekends. Wait to top with whipped cream and candy eggs until the day you plan to serve, especially if you are using a softer candy shell, so the colors stay bright and the whipped cream does not deflate or pick up fridge odors.
To make these fully ahead, you can prepare the jars without toppings up to 24 to 48 hours before serving. The graham cracker crust stays crisp, and the fudge layer firms up into a rich, truffle like base that only gets better with a little rest. If you need to work even further ahead, assemble just the fudge and crust layers, refrigerate, and whip up the blue mousse the night before your event, similar to how you might prep the fillings for layered Easter trifles or mini cheesecake cups. When you are ready, finish each jar with a generous swirl of whipped cream and a few candy eggs, then serve them chilled right from the fridge.
Ingredient Swaps and Serving Options
Ingredients Image of Robin’s Egg Fudge Jars
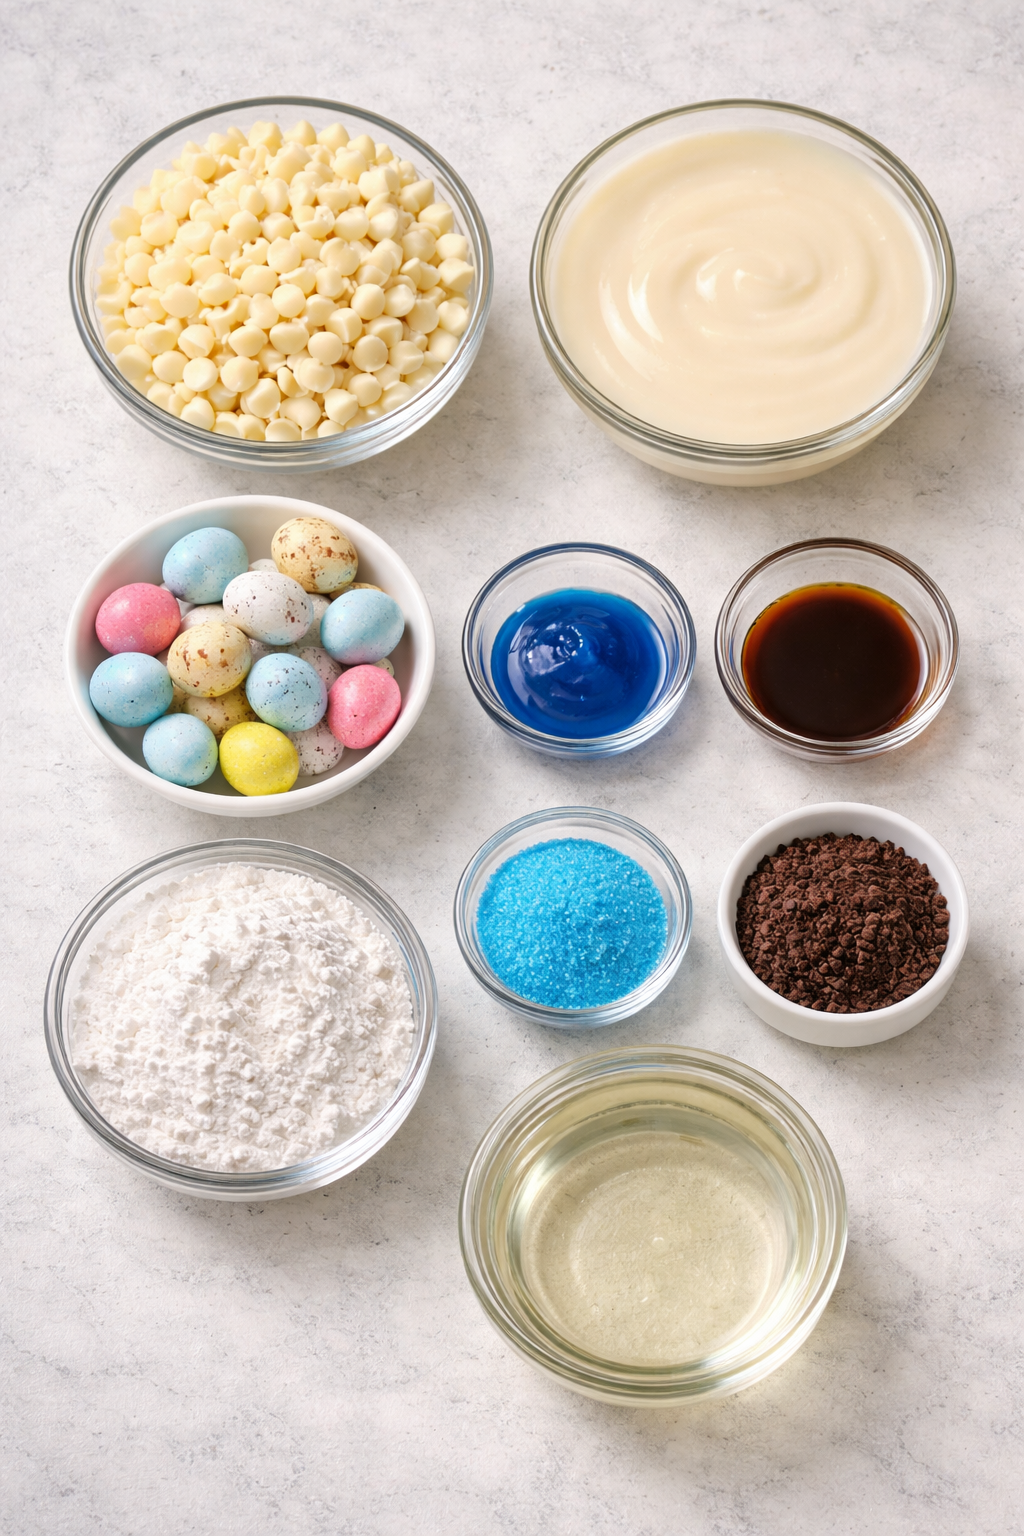
If you want to put your own spin on Robin’s Egg Fudge Jars, you have lots of room to play. For the crust, swap graham crackers with vanilla cookie crumbs, chocolate wafer crumbs, or even shortbread cookie crumbs for a richer, butterier base. You can also use gluten free graham crackers if that is what your guests need, just keep the butter amount the same so the crumbs still pack and hold. The fudge layer works with milk chocolate for a sweeter bite, or dark chocolate for grown up flavor. If you do not have vanilla bean paste, use regular vanilla bean paste and add a tiny pinch of salt to keep the flavor from tasting flat.
The cheesecake mousse is easy to personalize while keeping that sweet spring look of Robin’s Egg Fudge Jars. Swap the cream cheese for mascarpone for a softer, more delicate filling, or use neufchâtel if you want a slightly lighter option. Any food coloring works here, but gel gives you that pretty robin egg blue without watering down the mousse. You can top the jars with homemade whipped cream or a stabilized whipped cream if they need to sit out at a party, the way I do for make ahead desserts like my layered tiramisu cups. For the candy eggs, feel free to use malted milk eggs, mini chocolate eggs, or even pastel sprinkles if you have someone who does not like crunchy candy shells.
For serving, these little jars shine on an Easter dessert table, nestled in a tray with paper grass or pastel ribbons. Make them in tiny 120 milliliter jars for tasting flights, or use larger 240 milliliter jars for a showstopper individual dessert that feels bakery style. You can even set up a mini topping bar with extra whipped cream, crushed cookies, toasted coconut, and extra candy eggs so everyone can finish their own Robin’s Egg Fudge Jars just how they like them. If you love assembling desserts in jars, you might also enjoy riffing on this idea with flavors from your favorite cheesecake bars or chocolate cream pie so your spring dessert rotation stays fun and fresh.
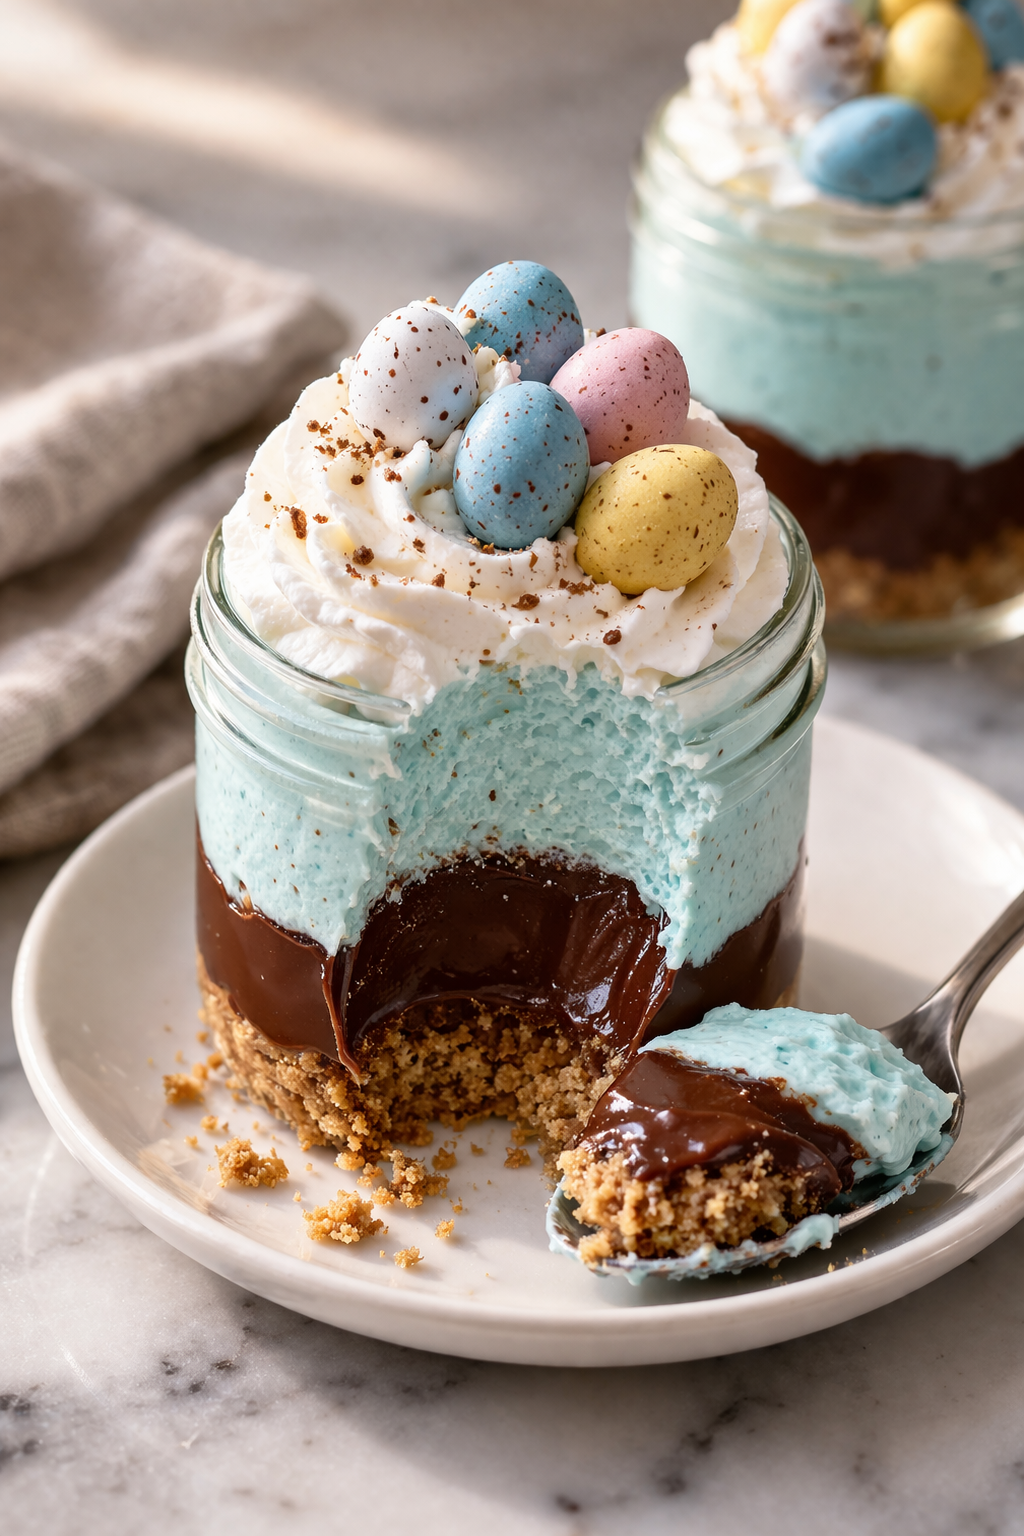
Serving Image of Robin’s Egg Fudge Jars
Conclusion
Every time I make these little jars, I am reminded that dessert does not have to be complicated to feel special. A few simple layers, a swirl of color, and suddenly you have something that makes kids’ eyes light up and adults quietly hover near the dessert table. That is the real magic here. You can stir these together on a weeknight, or set up a build your own topping bar for a spring brunch, and watch everyone lean in, laugh, and linger a little longer at the table.
I hope these Robin’s Egg Fudge Jars find their way into your sweetest moments, whether it is a family movie night, an Easter gathering, or just a treat to brighten an ordinary afternoon. If you are on the fence about trying them, take this as your sign. Clear a little space on the counter, grab your favorite jars or glasses, and give yourself permission to play with color and texture. You might be surprised how much joy fits into one small spoonful.

Recipe Card Image of Robin’s Egg Fudge Jars
Recipe
Robin's Egg Fudge Jars
Ingredients
Ingredients
- 1 1/2 cups graham cracker crumbs
- 1/4 cup granulated sugar
- 1/2 cup unsalted butter melted
- 1 cup semi-sweet chocolate chips
- 1/2 cup sweetened condensed milk
- 1/2 teaspoon vanilla bean paste
- 8 oz cream cheese softened
- 1/2 cup powdered sugar
- 1 teaspoon vanilla bean paste
- 1 cup heavy whipping cream cold
- A few drops pastel blue gel food coloring
- 1 cup whipped cream homemade or store-bought
- 1 cup speckled candy-coated mini eggs
Instructions
- In a medium bowl, combine graham cracker crumbs and granulated sugar. Add melted butter and stir until all crumbs are evenly moistened.
- Divide the crumb mixture among 6 small jars, pressing 2 to 3 tablespoons firmly into the bottom of each jar to form a compact crust. Chill while you prepare the fudge layer.
- In a microwave-safe bowl, combine chocolate chips and sweetened condensed milk. Microwave in 30 second intervals, stirring after each, until the mixture is melted and smooth.
- Stir 1/2 teaspoon vanilla bean paste into the warm chocolate mixture until fully combined.
- Spoon a thin, even layer of chocolate fudge over the crust in each jar, tilting the jars slightly if needed to help the fudge reach the edges. Chill for 15 minutes to firm.
- In a mixing bowl, beat softened cream cheese with powdered sugar and 1 teaspoon vanilla bean paste until completely smooth and creamy.
- In a separate chilled bowl, whip the cold heavy whipping cream to stiff peaks.
- Gently fold the whipped cream into the cream cheese mixture in batches until the mousse is light and fluffy.
- Add a few drops of pastel blue gel food coloring to the mousse and gently stir until the color is evenly distributed and pastel blue.
- Spoon or pipe the blue cheesecake mousse over the chilled fudge layer in each jar, dividing it evenly among the jars.
- Chill the jars for at least 1 hour, or until the mousse is set and the jars are well chilled.
- Just before serving, top each jar with a generous swirl of whipped cream.
- Garnish each jar with speckled candy-coated mini eggs, pressing them gently into the whipped cream. Serve chilled.
Notes
- Chill the bowls and beaters before whipping the cream for the fluffiest mousse and best structure in the jars.
