The Practical Why Behind It
You know those Easter weekends when the oven is already full and you still promised “just one more dessert”? These Banana Pudding Easter Truffles | Easy No-Bake Dessert step in exactly for that moment, giving you a creamy, nostalgic treat with almost no effort and zero oven time. You skip the custard pot and egg tempering completely and lean on dry pudding mix and cream cheese to do the heavy lifting. The pudding mix brings instant banana flavor and velvety texture, while the cream cheese pulls everything together into a soft, scoopable dough that chills quickly.
Crushed vanilla wafers stand in for a crust, so you get those classic banana pudding vibes in bite size pieces without layering, baking, or worrying about soggy cookies. You can mix the base in about 10 minutes, chill it while you melt chocolate, and still have time to assemble the rest of your Easter dessert tray or whip up a quick batch of carrot cake cookies.
The pastel shell does more than just look pretty in a basket. It protects that creamy center so the truffles travel well, stack neatly on platters, and stay fresh in the fridge for several days. That makes them perfect for gifting, brunch buffets, and make ahead entertaining. White chocolate or candy melts let you tint one batch into three or four soft spring colors, so a single bowl of filling turns into a full assortment of Banana Pudding Easter Truffles that look like they came from a fancy candy shop.
You do not need special tools either. A bowl, a spoon, and a baking tray will do the job. In a season when the oven works overtime on halal turkey strips, scalloped potatoes, and maybe an Easter poke cake, having a no bake dessert like this quietly saves your sanity while still feeling festive and a little magical.
Step-by-step method
Start by making the creamy banana pudding style center. In a medium bowl, stir together the crushed vanilla wafers, softened cream cheese, dry banana pudding mix, milk, and vanilla bean paste. At first the mixture will look sandy and crumbly. Keep stirring and pressing with the back of your spoon and it will come together into a soft dough that feels like thick cookie dough.
If the mixture seems too dry and will not hold together when you squeeze a bit in your hand, add milk a teaspoon at a time. If it feels sticky like frosting and clings to your fingers, sprinkle in a tablespoon or two of extra crushed wafers and fold them in until the dough firms up.
Use a tablespoon or a small cookie scoop to portion the dough. Roll each portion between your palms to make smooth truffle balls. Try to keep them all about the same size so they chill and coat evenly. Line them up on a parchment covered baking sheet and chill for 30 to 45 minutes, just until they feel firm and cool all the way through. This step helps them stay round and neat when you dip them.

Process Image of Banana Pudding Easter Truffles | Easy No-Bake Dessert
While the centers chill, melt your white chocolate chips or candy melts in a microwave safe bowl in 20 to 30 second bursts. Stir very well between each burst until the mixture looks smooth and glossy with no lumps at the bottom. If you want that sweet Easter pastel look for your Banana Pudding Easter Truffles, divide the melted chocolate into small bowls and tint each one with a tiny drop of gel food coloring. A little goes a long way, so start with the tip of a toothpick and add more only if you need a deeper shade.
Take the chilled truffle balls out of the fridge. Working with a few at a time, use a fork or dipping tool to gently lower each ball into the melted chocolate. Turn it once to coat, then lift it out and tap the fork on the edge of the bowl so the extra coating drips off in a thin stream. Slide the coated truffle back onto the parchment by nudging it off the fork with a toothpick or another fork.
While the coating is still wet, decorate with crushed wafers, pastel sprinkles, or a thin drizzle of a contrasting color for a bakery style finish. If the coating thickens as you work, warm it in the microwave for another 10 seconds and stir again. Let the truffles set completely at room temperature or in the fridge until the shells feel firm and dry to the touch. Then tuck them onto an Easter dessert tray next to treats like my carrot cake cookies, coconut macaroon nests, or even some bright no bake strawberry swirl mini cheesecakes.
Make Ahead and Storage Notes
These Banana Pudding Easter Truffles are a hostess dream because you can prepare them ahead without losing that creamy, nostalgic flavor. You can roll the truffle centers up to 2 days in advance, then keep them uncoated on a parchment lined tray in the refrigerator. Wrap the tray well in plastic so the centers do not dry out or pick up fridge odors. When you are ready to serve or gift, dip them in the pastel chocolate so the coating looks fresh and glossy on your Easter dessert trays.
For very early prep, freeze the rolled centers on a sheet pan until firm, then transfer them to an airtight container for up to 2 months. Thaw them in the fridge overnight. Once they feel chilled but not rock hard, dip them in melted chocolate. The centers will soften to that classic banana pudding texture as they rest.
Once coated, store your Banana Pudding Easter Truffles in a single layer in an airtight container in the refrigerator for up to 5 days. The white chocolate or candy melt shell locks in moisture from the cream cheese and pudding, so the centers stay soft and creamy rather than dry or crumbly. If you plan to stack them, separate layers with parchment to protect the pastel coating and any decorations from smudging or chipping.
Before serving, let the truffles sit at room temperature for 10 to 15 minutes so the centers taste extra silky and the banana flavor blooms. If you love make ahead holiday sweets, these hold up about as well as carrot cake cheesecake bites, peanut butter buckeyes, or even a chilled slice of Biscoff banana pudding, but with a lighter, spring ready twist that fits right in on any Easter dessert table.
Variations and How to Serve It

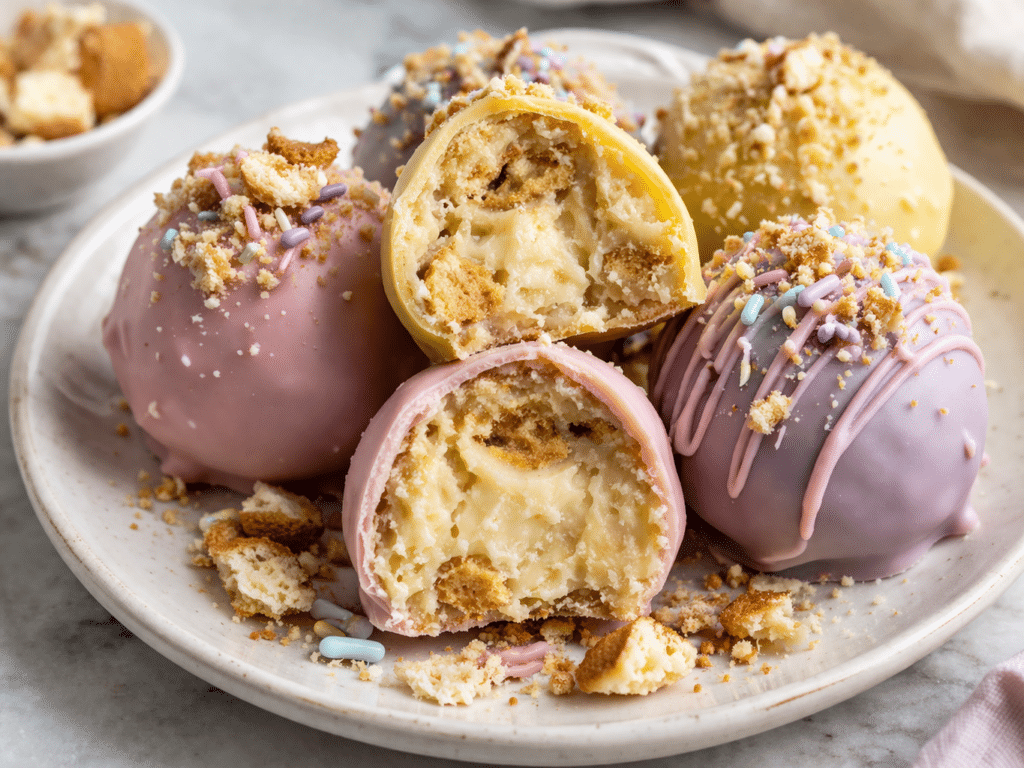
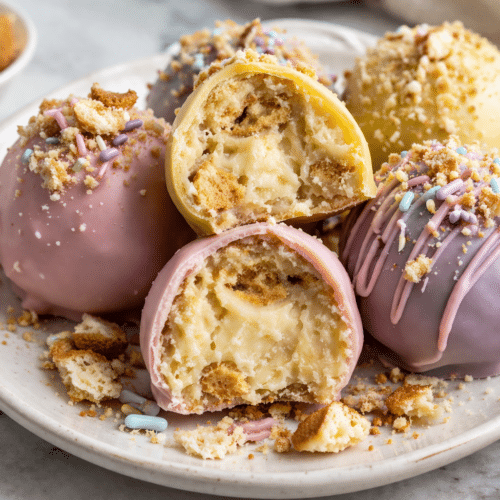
Serving Image of Banana Pudding Easter Truffles | Easy No-Bake Dessert
You can dress these Banana Pudding Easter Truffles | Easy No-Bake Dessert up or down to match whatever spring gathering you have on the calendar. For a sweeter, more nostalgic twist, press a mini vanilla wafer piece into the top of each freshly dipped truffle, or roll the undipped centers in extra crushed wafers before coating for more crunch.
For a brighter flavor, add a teaspoon of lemon zest to the filling. It cuts through the sweetness and wakes up the banana. You can also swirl a spoonful of melted peanut butter into part of the coating for a playful banana peanut butter version that kids and grown ups both love. If you enjoy extra color, dip half of the batch in classic white, then drizzle with pastel pink, yellow, and mint green chocolate so your tray looks like a carton of Easter eggs.
You can even roll a few truffles slightly smaller and use them as toppers for banana pudding parfaits or tuck them onto mini cheesecakes for your dessert table. They make a lovely little surprise on top of Easter poke cake slices or even next to soft Easter basket sugar cookie cups.
For serving, I like to nestle the truffles in mini paper cups and arrange them on a cake stand with a few chocolate eggs scattered around for a simple centerpiece. If you are building a full Easter dessert spread, these pair beautifully with soft sugar cookies, bright lemon bars, or a pan of carrot cake squares. Keep the truffles chilled until about 15 to 20 minutes before serving so the centers stay creamy but not too firm.
For gifting, tuck three or four truffles into a small treat box or jar, add a ribbon and a handwritten tag, and you have the sweetest little Banana Pudding Easter Truffles to share with neighbors, teachers, or family after brunch. They also slip nicely into Easter baskets next to homemade carrot cake cookies or a slice of chilled no bake cheesecake.
Conclusion
Whenever I make these little truffles, I am reminded that the sweetest moments rarely feel fancy. They look more like kids in slightly crooked bunny ears, friends hovering near the dessert tray “just to look,” and someone sneaking one last bite from the fridge at midnight. These Banana Pudding Easter Truffles | Easy No-Bake Dessert turn simple pantry ingredients into something that feels extra special, the kind of treat that invites people to linger just a little longer around the table.
I hope you feel excited and confident to try these at home. Whether you are making them with little helpers who go a bit wild with the sprinkles or you are prepping a quiet dessert for two, these truffles are there to help you celebrate the tiny, happy moments. If you give them a try, I have a feeling they might hop right into your regular holiday rotation.
Recipe
Banana Pudding Easter Truffles
Ingredients
Ingredients
- 2 cups crushed vanilla wafers
- 1/2 cup cream cheese softened
- 1 package 3.4 oz instant banana pudding mix, dry
- 2 tablespoons milk
- 1 teaspoon vanilla bean paste
- 2 cups white chocolate chips or candy melts
- Gel food coloring pastel colors (optional)
- Crushed vanilla wafers sprinkles, or chocolate drizzle for garnish (optional)
Instructions
- In a medium bowl, combine crushed vanilla wafers, softened cream cheese, dry banana pudding mix, milk, and vanilla bean paste.
- Mix thoroughly with a spoon or spatula until the mixture comes together into a soft dough that holds when pressed.
- Use a tablespoon or small cookie scoop to portion the dough into equal pieces.
- Roll each portion between your palms to form smooth balls and place them on a parchment-lined baking sheet.
- Chill the tray in the refrigerator for 30 minutes, until the truffle centers are firm and cool.
- Place white chocolate chips or candy melts in a microwave-safe bowl.
- Microwave in 20 to 30 second intervals, stirring well between each, until completely melted and smooth.
- If using pastel colors, divide the melted chocolate into small bowls and tint each with a small amount of gel food coloring, stirring until evenly colored.
- Remove a few chilled truffle centers from the refrigerator at a time.
- Using a fork or dipping tool, dip each truffle into the melted chocolate, turning to coat completely.
- Lift the truffle out, gently tap the fork on the edge of the bowl to let excess coating drip off, then place it back on the parchment-lined sheet.
- While the coating is still wet, decorate with crushed wafers, sprinkles, or a drizzle of contrasting melted chocolate, if desired.
- Repeat with remaining truffles, reheating the coating in short bursts if it thickens.
- Let the truffles set at room temperature or refrigerate until the coating is firm and dry to the touch.
- Store the finished truffles in an airtight container in the refrigerator until ready to serve.
Notes
- If the filling is too sticky, mix in 1 to 2 tablespoons of additional crushed vanilla wafers.
- Use gel food coloring rather than liquid so the coating does not seize or thin too much.
- For neat bottoms, gently twist the truffles off the parchment once set, or use a small offset spatula.