Why This Recipe Works
These No-Bake Date Bars work because every ingredient has a job, and they all support that naturally sticky, chewy texture we want. Soft medjool dates act as both the sweetener and the glue, so you do not need refined sugar or syrups to hold everything together. When you pulse the oats a bit, they soak up the date mixture and give the bars a firm, sliceable base that still feels tender, not dry or crumbly. A small amount of melted butter or coconut oil adds richness and keeps the bars from tasting like “just fruit and nuts.” That little pinch of sea salt is the quiet hero here, because it cuts through the sweetness and makes the caramel notes in the dates taste deeper.
Toasted nuts bring more than crunch, they add a slow building roasted flavor that makes these date bars taste like something from a bakery case instead of a quick pantry project. Toasting the nuts first releases their oils, so when you chill the mixture, everything binds into clean, solid bars that hold their shape in the lunchbox. The chill time in the fridge is not just waiting around either, it lets the oats hydrate, the fats firm up, and the dates relax into that chewy, fudge like texture. You get something that feels like a treat, with a short ingredient list you can actually pronounce. If you love easy recipes like my peanut butter oatmeal bars, this no bake method will slide right into your regular snack routine and stay there.
How to Make It
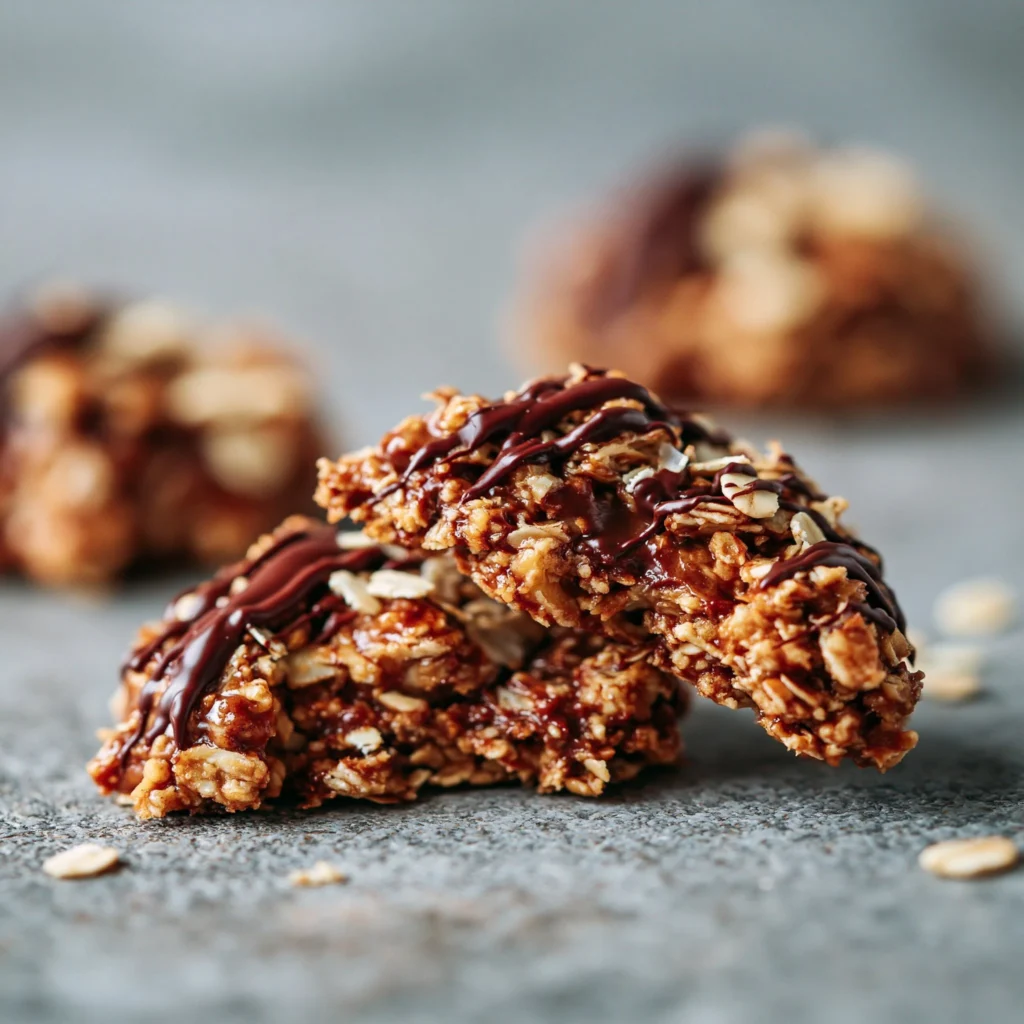
Start by getting your dates and nuts ready, because that is where all the flavor hides in these No-Bake Date Bars. Pit and chop your medjool dates, and if they feel a little tough, soak them in warm water for about 5 minutes, then drain them very well so your bars do not turn soggy. While the dates soften, toast your almonds or walnuts in a dry skillet over medium heat until they smell nutty and turn lightly golden, then let them cool. In a food processor, pulse the oats just until they look a bit finer, like coarse meal, then add the cooled nuts and chopped dates. Blend in short pulses until everything starts to clump, then add the melted butter or coconut oil, vanilla bean paste, and a pinch of sea salt, and process again until the mixture looks sticky and holds when you pinch it.

Process Image of No-Bake Date Bars
Line an 8 by 8 inch baking dish with parchment, letting the paper overhang for easy lifting later. Scrape the date mixture into the pan, then use a spatula or your hands lightly dampened with water to press it very firmly into an even layer, especially into the corners. Take your time here, because the more tightly you pack it, the cleaner your bars will slice, just like those neat bakery squares. Slide the pan into the refrigerator and chill for at least 2 hours so the bars can firm up and develop that chewy, caramel like bite. Once chilled, lift the slab out by the parchment, cut into 12 bars with a sharp knife, and either enjoy right away or tuck them into an airtight container in the fridge. They keep beautifully for about a week, and if you love easy fridge treats, these sit happily next to a pan of homemade rice krispie squares or your favorite no bake cheesecake.
Time, Prep, and Storage Plan
No Bake Date Bars are a dream on busy days, because the hands on time is about 15 minutes, and the rest is chill time in the fridge. Plan about 5 to 10 minutes to pit and chop the medjool dates, toast the nuts, and pulse everything together. Pressing the mixture into the pan takes just a couple of minutes, especially if you use slightly damp hands to keep things from sticking. The recipe needs at least 2 hours of chilling to set, so this is perfect to make in the morning for afternoon snacks, or at night for the next day. If you love planning ahead, add these to your weekend prep right next to your granola or energy bites.
For storage, treat your No Bake Date Bars like a soft but sturdy fudge. In the fridge, they keep well for up to 1 week in an airtight container; I like to layer them with parchment so they do not cling together. For grab and go snacks, slice them into bars and wrap each piece in parchment or wax paper so they tuck easily into lunch boxes. For longer storage, freeze the wrapped bars in a freezer safe container for up to 1 month. Let a frozen bar sit at room temperature for 15 to 20 minutes, or pop it in the fridge for an hour, and it will taste just as chewy and caramel like as the day you made it.
Flexible Options and Serving Notes

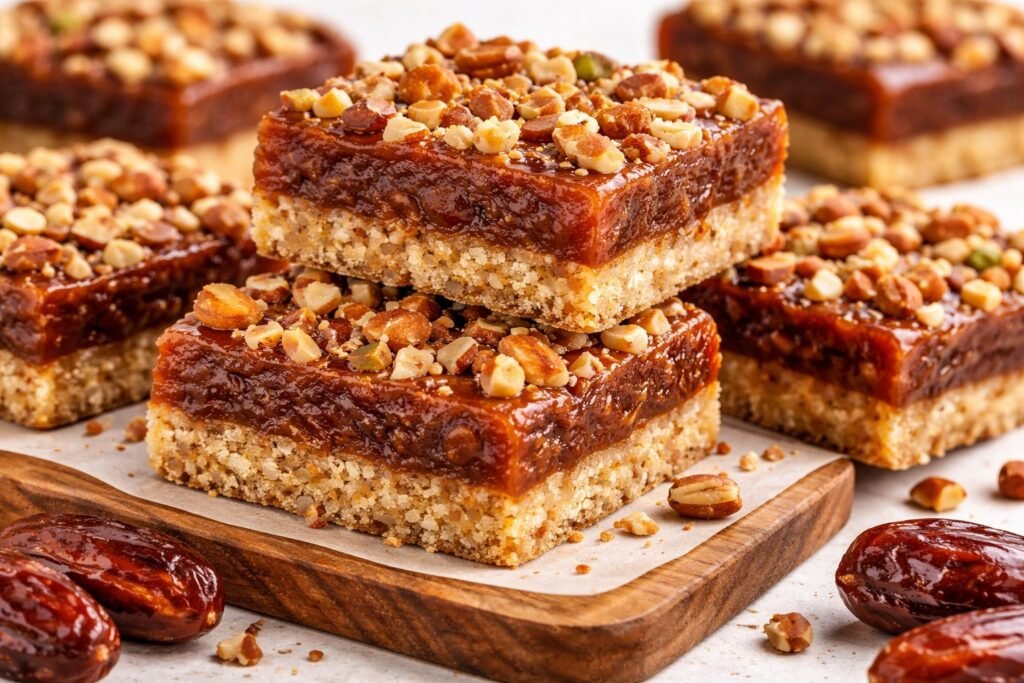
Serving Image of No-Bake Date Bars
You can dress these No-Bake Date Bars up for dessert or keep them in their cozy snack lane. For a more indulgent treat, drizzle the chilled slab with melted dark chocolate, then return it to the fridge until the top snaps cleanly when sliced. If you like extra texture, scatter a pinch of flaky sea salt or a spoonful of finely chopped toasted nuts over the chocolate before it sets. For a more breakfast friendly version, stir in 2 to 3 tablespoons of unsweetened shredded coconut or chia seeds when you mix the oats and nuts. You can also swap the butter for coconut oil if you want a dairy free option, just know the bars will taste a little more tropical and firm up a bit more in the fridge.
These bars shine on a snack board next to sliced apples, fresh berries, and maybe a few no bake cookies or truffles for contrast. For dessert, cut smaller squares and serve them slightly chilled with a spoonful of Greek yogurt or a dollop of lightly sweetened whipped cream, plus a dusting of cocoa or cinnamon on top. If you are packing the bars for lunch boxes or travel, cut them into rectangles, wrap each piece in parchment, and store them in a container so they do not squish. They keep their best chewy texture in the fridge, but you can leave them at room temperature for 1 to 2 hours without any melty trouble. I love tucking a small square next to my afternoon coffee while a slice of banana bread waits on the counter for anyone who wanders into the kitchen.
Conclusion
If you are anything like me, the best recipes in your life are the ones that feel easy, inviting, and just a little bit nostalgic. These bars check every one of those boxes. You stir, press, chill, and before you know it, a pan of simple sweetness is sitting on your counter, ready to slice and share. I love how a humble tray of treats can pull people into the kitchen, spark conversations, and turn an ordinary afternoon into something just a little more special.
Set these out for after school snacks, tuck them into lunch boxes, or bring them to a cozy gathering and watch how quickly they disappear. There is something very grounding about a recipe you can make without turning on the oven, yet still feel proud serving to the people you love. These No-Bake Date Bars are exactly that kind of little ritual you will find yourself making again and again.
If your fingers are even a tiny bit itchy to bake, take that as your sign to head to the kitchen and give these a try. Then come back, tell me how it went, and what memories you started with your very first batch.
For more delicious recipes like this, follow us on Facebook and Pinterest!

Recipe Card Image of No-Bake Date Bars
Recipe
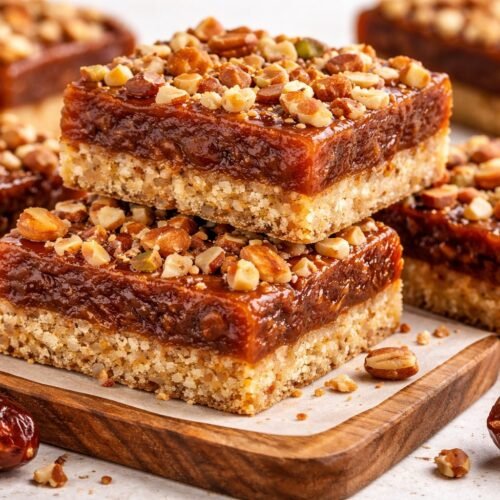
No-Bake Date Bars
Ingredients
Ingredients
- 1 1/2 cups medjool dates pitted and chopped
- 1 cup rolled oats
- 1/2 cup almonds or walnuts lightly toasted
- 2 tablespoons butter or coconut oil melted
- 1 teaspoon vanilla bean paste
- 1 pinch sea salt
Instructions
- Line an 8 x 8 inch baking dish with parchment paper, letting the paper overhang the sides for easy lifting.
- If the dates feel dry, soak the chopped dates in warm water for 5 minutes, then drain very well and pat dry.
- Toast the nuts in a dry skillet over medium heat for 3 to 4 minutes, stirring often, until fragrant and lightly golden. Let them cool completely.
- Add the rolled oats to a food processor and pulse several times until they are broken down to a coarse meal texture.
- Add the cooled toasted nuts and chopped dates to the food processor and pulse until the mixture is evenly combined and starting to clump.
- Pour in the melted butter or coconut oil, vanilla bean paste, and sea salt, then process again until the mixture becomes sticky and holds together when pinched between your fingers.
- Transfer the mixture to the prepared baking dish and spread it out evenly.
- Use a spatula or slightly damp hands to press the mixture very firmly into the pan, packing it tightly and smoothing the top.
- Refrigerate the pan for at least 2 hours, or until the mixture is firm and set.
- Lift the chilled slab out of the pan using the parchment overhang and place it on a cutting board.
- Cut into 12 equal bars with a sharp knife and serve, or store as desired.
Notes
- Store bars in an airtight container in the refrigerator for up to 1 week; for longer storage, wrap bars individually and freeze for up to 1 month.