

Why This One Delivers
This Oreo Mousse Cake gives you true bakery style payoff with very little effort. You use crushed Oreos and melted butter for the base, so there is no fussy pastry crust and no blind baking to stress over. The filling skips eggs completely, which means no tempering, no water bath, and no guessing if a custard layer is set. You simply whip cream, fold in melted chocolate, and let time in the fridge do the work. It is the kind of recipe you can trust on a busy day, when you need a dessert that looks like you spent all afternoon on it.
The texture is where this Oreo Mousse Cake really shines. The buttery cookie crust firms up in the freezer, so it slices cleanly and supports the cloud like mousse without crumbling into dust. Folding only half the whipped cream into the chocolate keeps that layer dense and truffle like, while the remaining cream on top stays light and airy. You get a clear contrast of layers in every forkful, from crunchy crumb at the bottom to creamy chocolate center to soft vanilla kissed topping. Sprinkle of crushed Oreo cookies over the top finishes it with that classic cookies and cream look, so it feels party ready the moment you pull it from the fridge.
You also get a dessert that is incredibly forgiving. If your chocolate cools a little too much, it still blends beautifully once you fold in the cream. If your cookie crumbs are a bit coarse, they only add more texture to the crust. There is no delicate sponge to collapse and no meringue that might weep, just simple pantry ingredients woven into a show stopping Oreo Mousse Cake. It is perfect for holidays, potlucks, or any cozy evening when you want a rich, chilled slice without turning your kitchen into a science lab.
From Prep to Finish
From the moment you crush that first Oreo for the crust, this Oreo Mousse Cake comes together in a series of simple, reassuring steps. Start by combining the cookies and melted butter until every crumb looks glossy and damp, then press the mixture into your springform pan. You want a firm, even layer, so use the bottom of a measuring cup to really pack it in. While the crust chills and firms up in the freezer, melt your chocolate chips slowly in the microwave, stirring between bursts until completely smooth, then let it cool slightly so it does not melt the whipped cream later.
Next, whip your very cold heavy cream with confectioners sugar until stiff peaks form. The cream should stand tall on the whisk, not flop over like soft serve. Gently fold half of this whipped cream into the cooled melted chocolate, working from the bottom of the bowl up, and rotating the bowl as you go. You want to keep as much air as possible, since that airy texture is what makes the mousse layer feel bakery worthy. Spread this chocolate layer over the frozen Oreo crust, making sure it reaches all the way to the edges, then top it with the remaining whipped cream and a generous handful of crushed Oreos for crunch and drama.
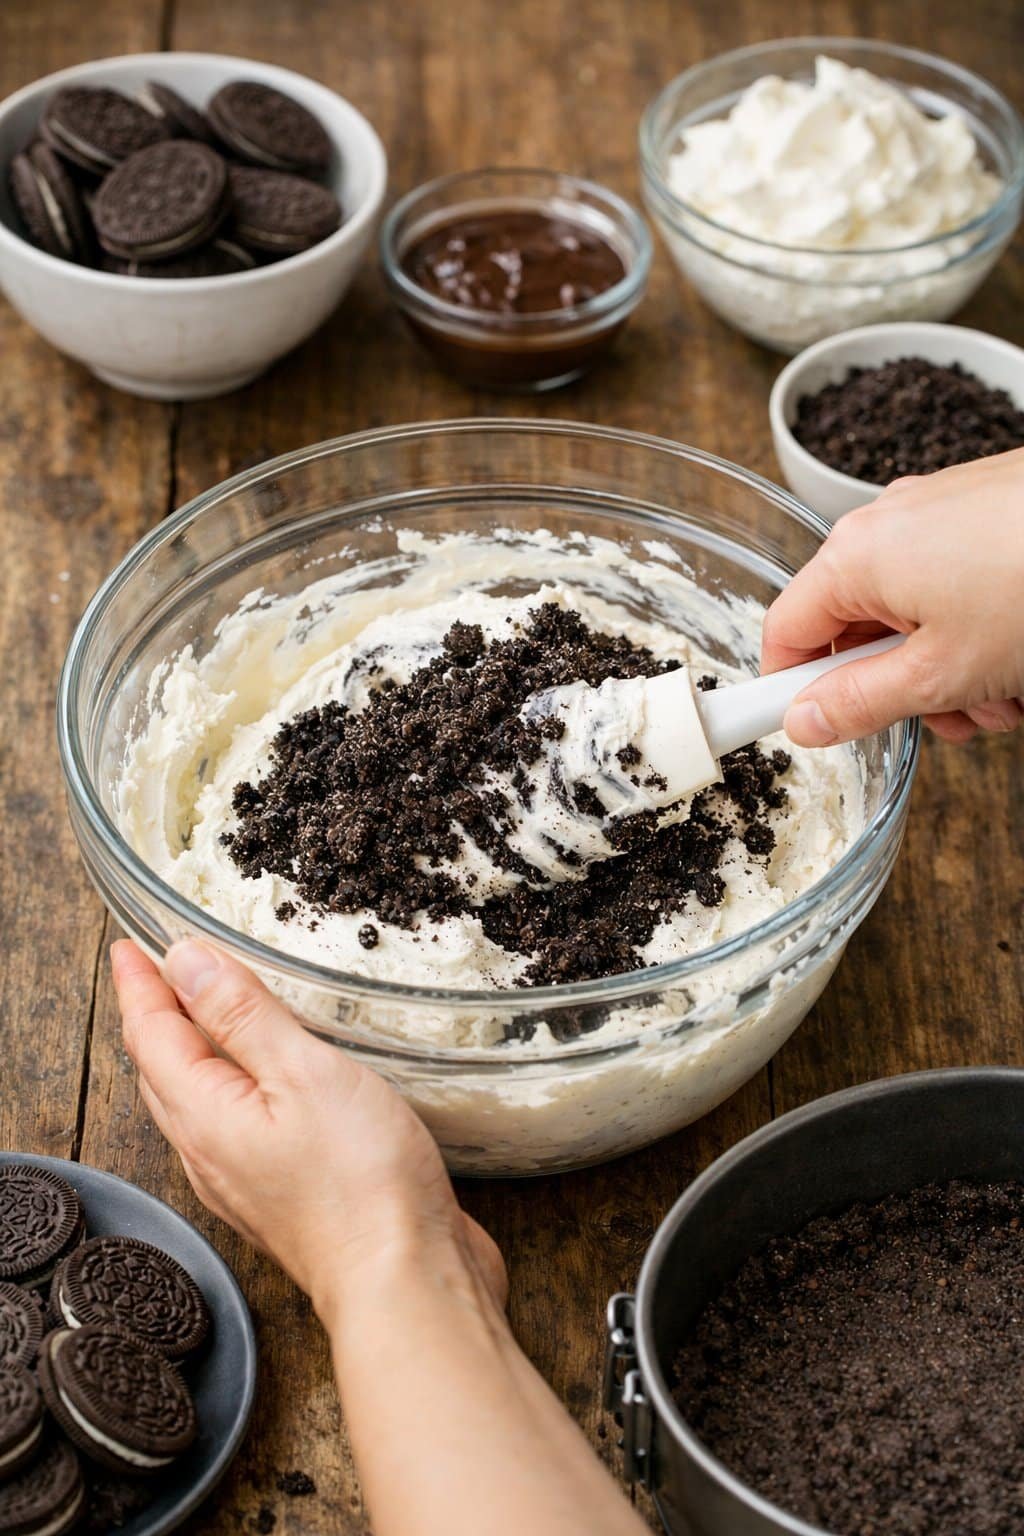
Process Image of Oreo Mousse Cake
The hardest part is the wait. Cover the Oreo Mousse Cake loosely and let it chill in the refrigerator for at least 4 hours. During that time the crust firms up, the mousse sets, and the flavors mingle into something that tastes far more complex than the short prep time suggests. When you release the springform and slice into it, you will get clean layers of cookie, mousse, and cloudlike cream, all dotted with Oreo crumbs. If you love layered desserts like this, you will probably enjoy serving it next to a plate of my classic chocolate chip cookie bars for a very happy, very chocolate friendly table.
Timing, Storage, and Make-Ahead
Your Oreo Mousse Cake is mostly hands off, but it does demand a bit of patience. You only need about 15 minutes to crush the Oreos, whip the cream, and melt the chocolate, plus a brief 10 to 12 minutes if you toast the crust lightly in the oven for extra crunch. The real magic happens as it chills, so plan on at least 4 hours in the refrigerator for the mousse to set, or even better, make it the night before you need it. If you chill it overnight, let it sit at room temperature for 10 to 15 minutes before slicing, so the layers cut cleanly and the texture is silky, not icy.
For storage, keep your Oreo Mousse Cake covered in the refrigerator for up to 4 days. Use plastic wrap or a cake dome that does not press directly on the top layer so you protect the whipped cream and Oreo garnish. The crust will soften a little each day from the creamy filling, which actually makes the slices more cohesive and fork tender. If you want a firmer crust for longer, you can brush the base lightly with melted chocolate to create a barrier, the same trick I often use with my no bake cheesecake recipes.
You can absolutely make this Oreo Mousse Cake ahead for parties or holidays. Prepare the cake fully, then chill it at least 8 hours and up to 2 days before serving, which gives the flavors time to mingle in the happiest way. For longer make ahead, freeze the assembled cake without the final Oreo sprinkle, wrapped well, for up to 1 month. Thaw it in the refrigerator overnight, then add fresh crushed Oreos on top before bringing it to the table. If you plan a dessert spread with treats like an easy chocolate pudding pie, you can bake and freeze both in advance, then simply thaw, garnish, and serve when guests arrive.
Ingredient swaps and serving options
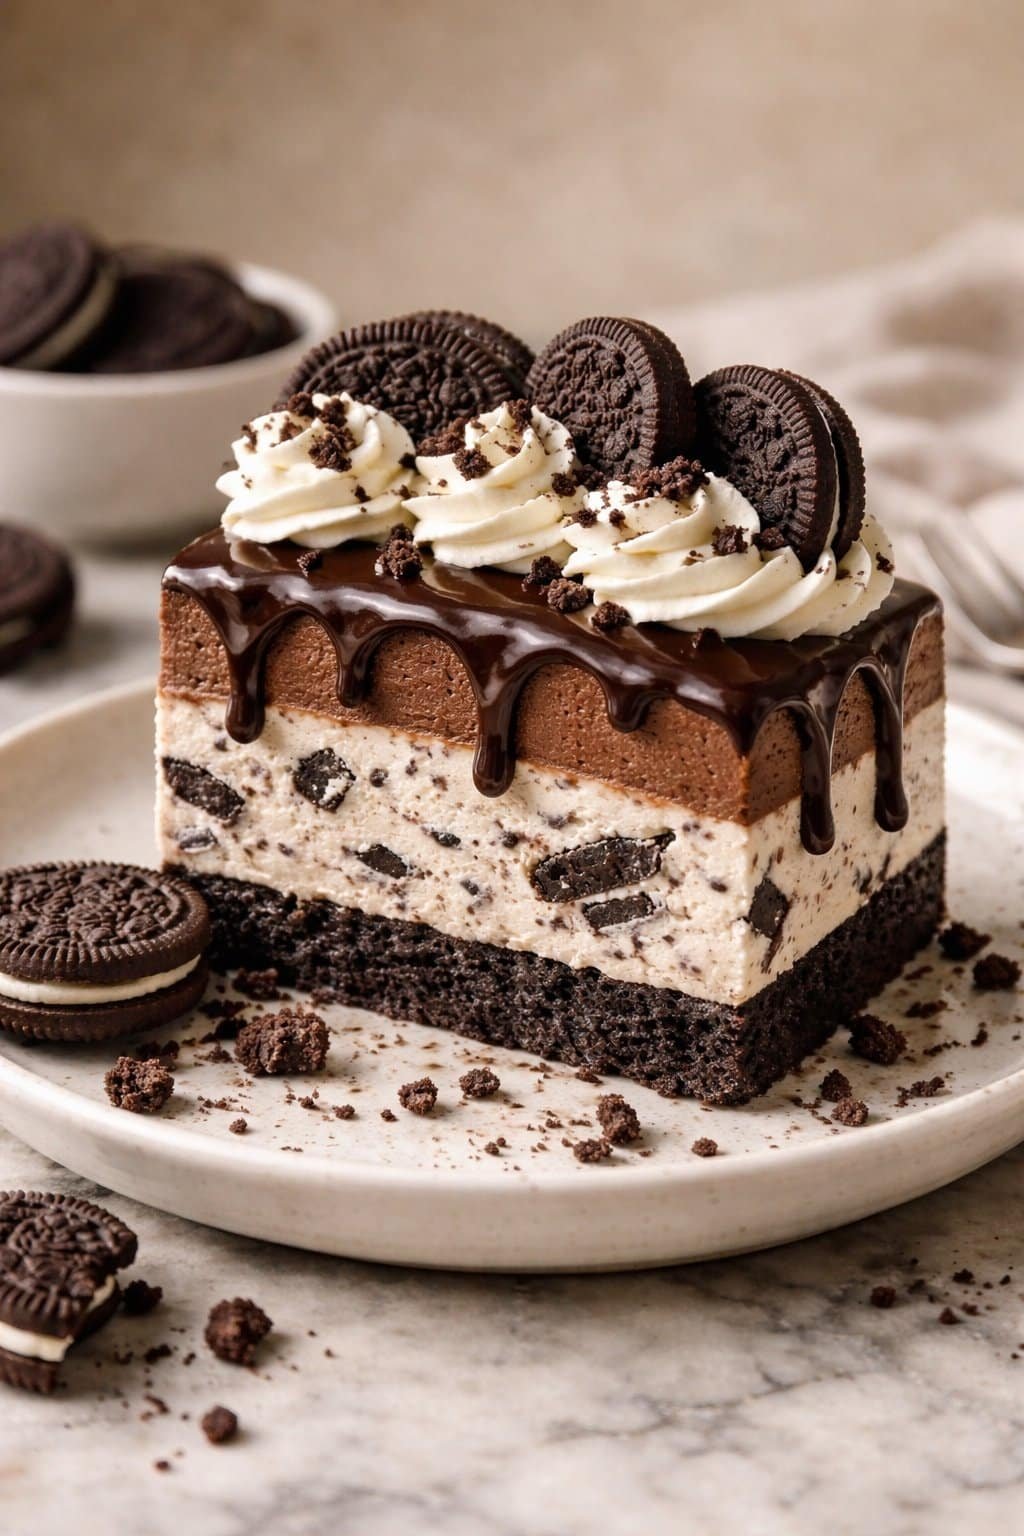
Serving Image of Oreo Mousse Cake
If you want to play with flavors but still keep the cozy feel of this Oreo Mousse Cake, you have lots of wiggle room. For the crust, you can swap classic Oreos for Golden Oreos, mint Oreos, or even chocolate graham crackers if someone in your crew is not a cream sandwich cookie fan. Use an equal amount of cookies by weight, and keep the butter amount the same so the crust holds when sliced. If you only have salted butter, use it and skip any extra pinch of salt you might usually add, it gives a nice sweet and salty finish. You can also trade the semi sweet chocolate chips for dark chocolate if you like a less sweet mousse, or use milk chocolate for a softer, more kid friendly flavor.
The whipped cream base is what makes this Oreo Mousse Cake so cloud like, so try not to cut corners there. You can replace heavy whipping cream with a plant based whipping cream alternative if you need it dairy free, just be sure it whips to stiff peaks and is labeled as suitable for whipping. For a slight flavor twist, add 1 teaspoon of vanilla bean paste or a splash of strong cooled coffee to the chocolate layer. Serve the cake very cold, with extra crushed Oreos on top, or dress it up with chocolate shavings, a drizzle of chocolate sauce, or a dollop of whipped cream on each slice. This cake loves company on a dessert table, so you can pair it with lighter treats like a citrusy tart or a simple vanilla pudding to balance all that chocolatey richness.
Conclusion
Whenever I make this Oreo Mousse Cake, it never just sits quietly on the table. It draws people in. Someone comes over “just for a sliver,” someone else grabs a fork before the plates are out, and suddenly you have a little circle of laughter around a dessert stand. That is the magic I love most about baking. You are not only making a recipe, you are creating a memory that people will talk about long after the crumbs are gone.
I hope this becomes one of those treats you pull out for birthdays, cozy movie nights, or the kind of random Tuesday that needs a little sparkle. You absolutely can do this, step by step, layer by layer. And if it is not perfectly neat, that only proves it was made by real hands for real people.
When you try it, come back and tell me how it went and who you shared it with. Your stories are my favorite ingredient.
For more delicious recipes like this, follow us on Facebook and Pinterest!
Recipe

Oreo Mousse Cake
Ingredients
Ingredients
- 36 Oreo cookies crushed (about 14.3 oz, standard, not double stuffed), plus extra for garnish
- 6 tbsp unsalted butter melted
- 8 oz semi-sweet chocolate chips
- 3 cups heavy whipping cream very cold
- 1/2 cup confectioners sugar
Instructions
- Line the bottom of a 9-inch springform pan with parchment paper and lightly grease the sides.
- Place 36 Oreo cookies in a food processor and pulse into fine crumbs, or crush them in a sealed bag with a rolling pin.
- Transfer the Oreo crumbs to a mixing bowl, pour in the melted butter, and stir until all crumbs are evenly moistened.
- Press the crumb mixture firmly and evenly into the bottom of the prepared springform pan, using the bottom of a measuring cup to pack it tightly.
- Optional but recommended for extra crunch, bake the crust at 350°F for 10 to 12 minutes, then cool completely, or skip baking and place the crust directly in the freezer to firm while you prepare the filling.
- Place the chocolate chips in a medium microwave safe bowl and heat in 30 second increments, stirring after each, until fully melted and smooth. Set aside to cool to room temperature but remain fluid.
- In the bowl of a stand mixer fitted with the whisk attachment, or using a hand mixer, add the cold heavy whipping cream and confectioners sugar.
- Whip on medium to medium high speed until stiff peaks form and the cream holds its shape on the whisk.
- Transfer about half of the whipped cream to the bowl with the cooled melted chocolate.
- Gently fold the whipped cream into the chocolate using a spatula until the mixture is smooth and no streaks remain.
- Remove the springform pan with the Oreo crust from the freezer.
- Spoon the chocolate mousse mixture over the crust and spread it into an even layer, making sure it reaches the edges.
- Spread the remaining plain whipped cream evenly over the chocolate mousse layer, smoothing the top with an offset spatula or the back of a spoon.
- Crush a few additional Oreo cookies and sprinkle them generously over the top of the cake for garnish.
- Cover the pan loosely with plastic wrap or foil and refrigerate for at least 4 hours, or until the mousse is fully set.
- When ready to serve, run a thin knife around the inside edge of the pan, release the springform ring, slice, and serve chilled.
Notes
- Let the melted chocolate cool until just slightly warm to the touch so it does not deflate or melt the whipped cream when folding.
- For the cleanest slices, chill the cake overnight and wipe the knife clean between cuts.
- Store leftovers covered in the refrigerator for up to 3 days.


Hello my friend! I wish to say that this article is awesome, nice written and come with almost
all viital infos. I’d like to see extra posts like
this .