The Practical Why Behind It
There is a very real, very practical reason to make Cadbury Creme Bites at home instead of just tossing a carton of eggs into your cart. When you make them yourself, you control everything. You decide how thick that milk chocolate shell should be, how soft and gooey the creme center is, and how sweet the overall bite tastes. If store bought Cadbury Creme Eggs ever feel a little too sugary or too messy, this mini bite version lets you keep all the nostalgia but tuck it into a neat, transport friendly package. Plus, mini cupcake liners make cleanup easy and keep each bite portioned, which is helpful when you are baking for a crowd or a classroom.
Using simple pantry ingredients also stretches your budget much farther than buying individual candies. One batch of Cadbury Creme Bites gives you 48 pieces, which makes these perfect for Easter baskets, dessert boards, or party favors. The corn syrup and butter create that classic silky creme you expect from the original, and powdered sugar makes it sturdy enough to pipe without puddling out under the chocolate. That little mix of orange and yellow food coloring in part of the filling might seem extra, but visually it gives you that familiar egg like look when you bite in, which makes the experience feel special rather than just another piece of fudge. If you already love making small candies like peanut butter cups or chocolate fudge, these fit right into your holiday sweets rotation with very little extra fuss.
From a workflow standpoint, the steps are designed to keep things approachable even if you are not a candy maker. You melt the chocolate in the microwave, you whip the filling in a stand mixer, and you layer everything like you would a simple bar cookie. Cooling the chocolate in stages helps prevent bloom, so the bites stay shiny and smooth instead of turning streaky or chalky in the fridge. Piping the creme instead of spooning it keeps the layers even so every piece feels balanced, not chocolate heavy or filling heavy. Once you make this recipe, you can lean on the same method for other filled treats like homemade caramel cups or peppermint patties, using the Cadbury Creme Bites technique as your new little candy making blueprint.
Step-by-step method
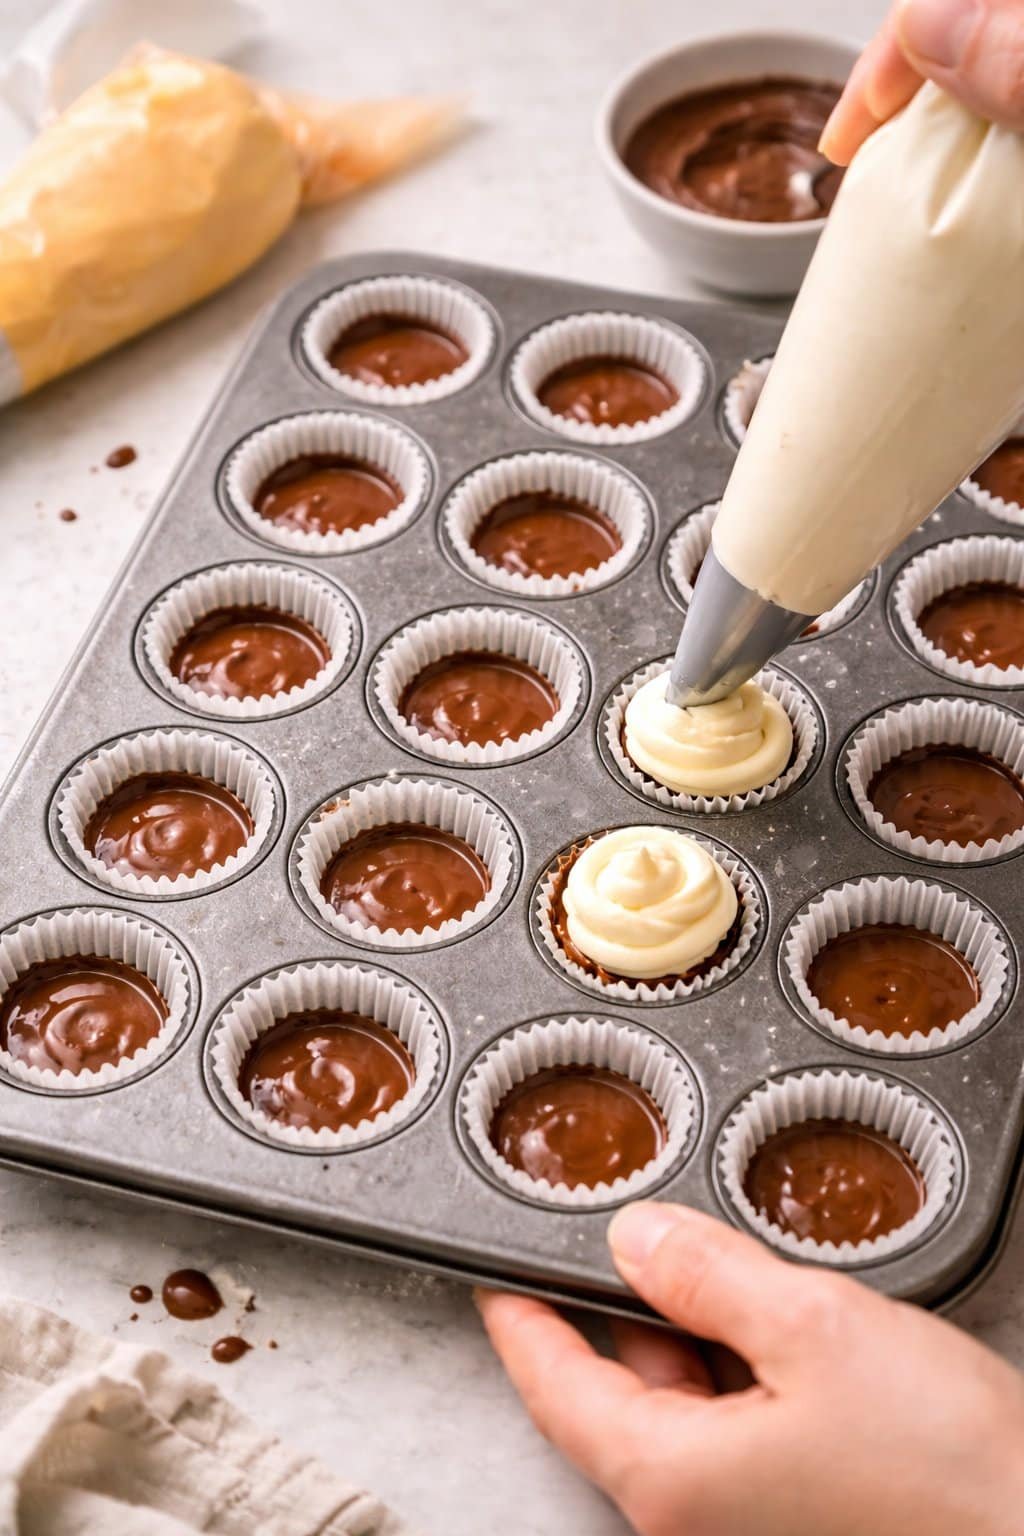
Start by lining a mini muffin pan with 48 parchment paper liners so your Cadbury Creme Bites release cleanly and keep their shape. Melt half of your milk chocolate in a microwave safe bowl, working in short bursts of 20 to 30 seconds, and stirring very well between each round so the chocolate turns smooth and glossy instead of grainy or scorched. Once melted, pipe or spoon a small pool of chocolate into each liner, then gently tap the pan on the counter to level the chocolate and knock out any air bubbles. Slide the pan into the fridge just until the bottoms firm up, 5 to 10 minutes, so the creme layer does not sink through.
Process Image of Cadbury Creme Bites
While the chocolate sets, make the filling in a stand mixer to get that classic Cadbury Creme Bites texture. Beat the softened butter with the corn syrup until it looks thick and creamy, then mix in the milk, vanilla bean paste, and salt. Add the powdered sugar slowly, about 1 cup at a time, scraping down the bowl as you go, until the mixture turns stiff but still pipes smoothly. Scoop about two thirds of the white creme into a piping bag, then tint the remaining creme with the orange and yellow gel food coloring until you reach a rich egg yolk shade and transfer that to a second bag. Snip the tip of the white creme bag to about ½ inch, then pipe a generous mound in the center of each chocolate base, leaving a little room around the edges for the top chocolate. Add a smaller dot of orange creme in the center if you want a yolk effect similar to the real thing, then remelt the remaining chocolate, transfer it to a clean piping bag, and cover each bite completely. Chill the tray for at least 30 minutes until the chocolate is firm, the centers feel set, and your bites are ready to peel from the liners and serve, just like a tray of mini bakery candies.
Make-Ahead and Storage Notes
Cadbury Creme Bites are a perfect make ahead candy, especially for Easter or any spring party. You can prepare the chocolate shells and creme filling one day, then assemble and chill the next if that fits your schedule better. Once the layers are set, keep the bites in a single layer in an airtight container, or separate layers with parchment so the chocolate tops do not smudge. Store your Cadbury Creme Bites in the refrigerator for up to 10 days. The centers stay soft and creamy, while the chocolate stays firm and snappy when chilled.
If you prefer to work even further ahead, these candies freeze surprisingly well. Freeze the fully set bites on a sheet pan until firm, then transfer them to a freezer bag or container with parchment between layers. Label and freeze for up to 2 months, and let them thaw in the refrigerator for a few hours before serving so the creme filling loses its icy chill. Avoid leaving Cadbury Creme Bites at room temperature for more than 2 hours, especially in a warm kitchen, because the chocolate can bloom or soften and the filling can turn a bit greasy. If you love make ahead treats like these, you will probably also enjoy stashing a batch of homemade fudge or peanut butter cups in the freezer for the same reason, they are grab and go sweet insurance for future you.
Variations and How to Serve It

Serving Image of Cadbury Creme Bites
These Cadbury Creme Bites are easy to dress up or tweak to fit whatever is happening in your kitchen. For a richer flavor, swirl in a little semisweet or dark chocolate with the milk chocolate layer, using a toothpick to marble the tops before they set. You can also swap the vanilla bean paste for almond extract or orange extract for a little twist, or fold a pinch of espresso powder into the chocolate for a coffeehouse vibe. If you love texture, sprinkle a few flakes of sea salt, toasted coconut, or finely chopped roasted almonds over the chocolate while it is still slightly glossy. Holiday baking mood. Tint part of the creme in pastel shades for spring, red and green for Christmas, or orange and purple for Halloween.
Serve these Cadbury Creme Bites straight from the fridge for the cleanest bite and neat layers, especially on warmer days. For a softer, more authentic candy center, let them sit at room temperature for 10 to 15 minutes until the creme turns just a little gooey. Pile them on a pretty pedestal stand for an Easter dessert table, tuck a few into treat bags for classroom parties, or arrange them alongside other small sweets like truffles or mini cheesecake bars. They pack well in a lidded container, so they make a lovely edible gift when nestled in mini wrappers, much like homemade fudge or caramel turtles. If you are planning a bigger spread, they pair beautifully with cozy bakes like my chocolate chip cookie bars or a simple vanilla snack cake, so everyone can choose a little bite of creamy chocolate or a classic slice.
Conclusion
Whenever I make these, I am reminded that the best kitchen moments are rarely perfect, but they are always sweet. There is something a little magical about cracking into that tender chocolate shell and finding that creamy, nostalgic center. Whether you stash a few in the fridge for yourself or pile them onto a plate to share, you are creating more than dessert. You are making a tiny tradition that folks will look forward to, one bite at a time.
I hope this becomes one of those recipes you pull out for movie nights, office potlucks, and those evenings when everyone ends up in the kitchen instead of the living room. A tray of homemade Cadbury Creme Bites has a way of turning an ordinary day into a memory. If you have been nervous to try candy making at home, let this be the recipe that changes your mind. You absolutely can do this.
When you make them, I would love for you to come back and tell me how they turned out. For more cozy dessert ideas and new sweet inspiration, follow us on Facebook and Pinterest!
Recipe

Cadbury Creme Bites
Ingredients
Ingredients
- 32 oz milk chocolate chopped and divided
- 1 cup light corn syrup
- 1/2 cup unsalted butter softened
- 2 tsp vanilla bean paste
- 2 tbsp milk
- 1/2 tsp fine salt
- 6 cups powdered sugar
- 2 drops orange gel food coloring
- 1 drop yellow gel food coloring
Instructions
- Line a mini muffin pan with 48 parchment paper mini cupcake liners and set aside.
- Place 16 oz of the milk chocolate in a microwave safe bowl and heat on HIGH for 30 seconds. Stir well, then continue microwaving in 20 second increments, stirring after each, until completely melted and smooth.
- Spoon or pipe a small pool of melted chocolate into the bottom of each liner, just enough to cover the base, then gently tap the pan on the counter to level the chocolate and release any air bubbles. Refrigerate for 5 to 10 minutes, until the chocolate just firms up.
- In the bowl of a stand mixer fitted with the paddle attachment, beat the softened butter and corn syrup on medium speed until thick and creamy.
- Add the milk, vanilla bean paste, and salt, and mix until combined.
- With the mixer on low speed, gradually add the powdered sugar, about 1 cup at a time, mixing well and scraping the bowl as needed, until a stiff, smooth creme forms.
- Transfer about two thirds of the white creme mixture to a piping bag and set aside.
- Add the orange gel food coloring and yellow gel food coloring to the remaining creme in the mixer bowl and mix until the color is completely even and a rich orange shade forms. Transfer the colored creme to a second piping bag.
- Snip the tip of the white creme piping bag to create about a 1/2 inch opening. Pipe a generous mound of white creme into the center of each chocolate base, leaving a small border around the edges for the top chocolate layer.
- Snip a small opening in the colored creme piping bag and pipe a small dot of orange creme in the center of each white creme mound to create a yolk effect.
- Add the remaining 16 oz milk chocolate to the bowl with any leftover melted chocolate and microwave in 20 second increments, stirring after each, until fully melted and smooth.
- Transfer the melted chocolate to a clean piping bag, snip the tip, and pipe chocolate over the creme in each cup, covering completely and sealing to the edges of the liners.
- Gently tap the pan again to level the tops, then refrigerate for at least 30 minutes, or until the chocolate is fully set and firm.
- Once set, peel the bites from the liners and serve, or store in an airtight container in the refrigerator until ready to enjoy.
Notes
- If the creme feels too stiff to pipe, beat in 1 to 2 teaspoons of milk until it loosens slightly.
- Work in short microwave intervals with the chocolate and stir well to avoid scorching.
- For clean layers, make sure the bottom chocolate is set but not rock hard before piping the creme.
- Store the bites in an airtight container in the refrigerator for up to 2 weeks, or freeze for up to 2 months.