What Makes This Recipe Reliable
I tested this Red Velvet Cheesecake Swirl Cake like a busy bakery day, not a lucky one time kitchen fluke. The batter uses standard pantry ingredients and classic red velvet ratios, so you are not juggling obscure add ins or fussy techniques. The vinegar and buttermilk work together to keep the crumb tender and moist, even if your cake spends an extra couple of minutes in the oven. Measured flour in cups can vary a lot, so I wrote the recipe to be forgiving, with enough fat from vegetable oil to keep the cake soft instead of dry and crumbly.
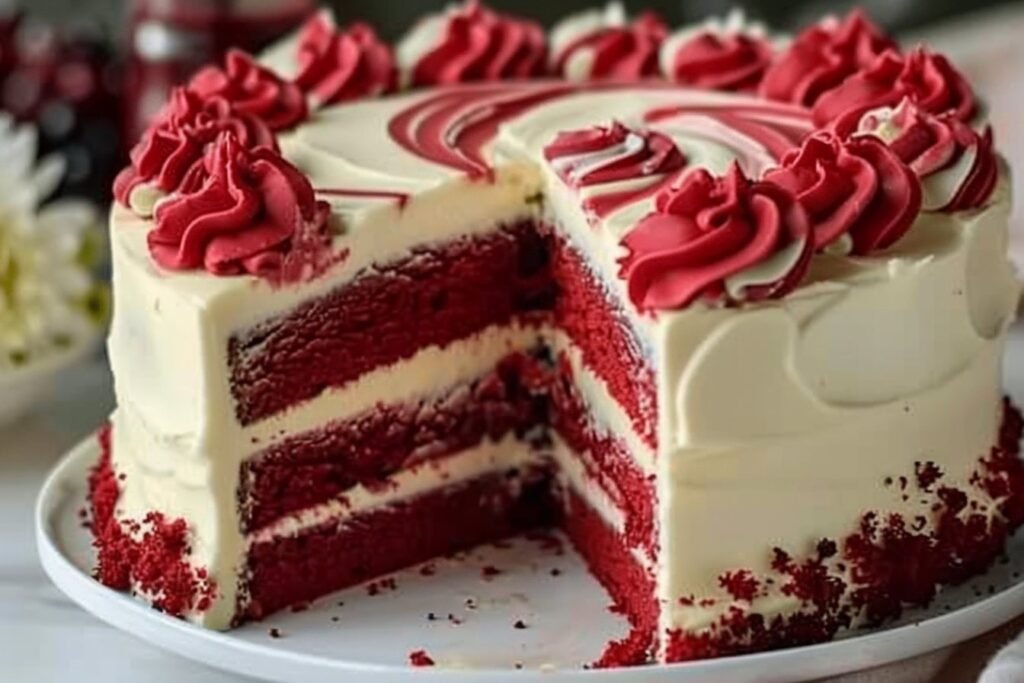
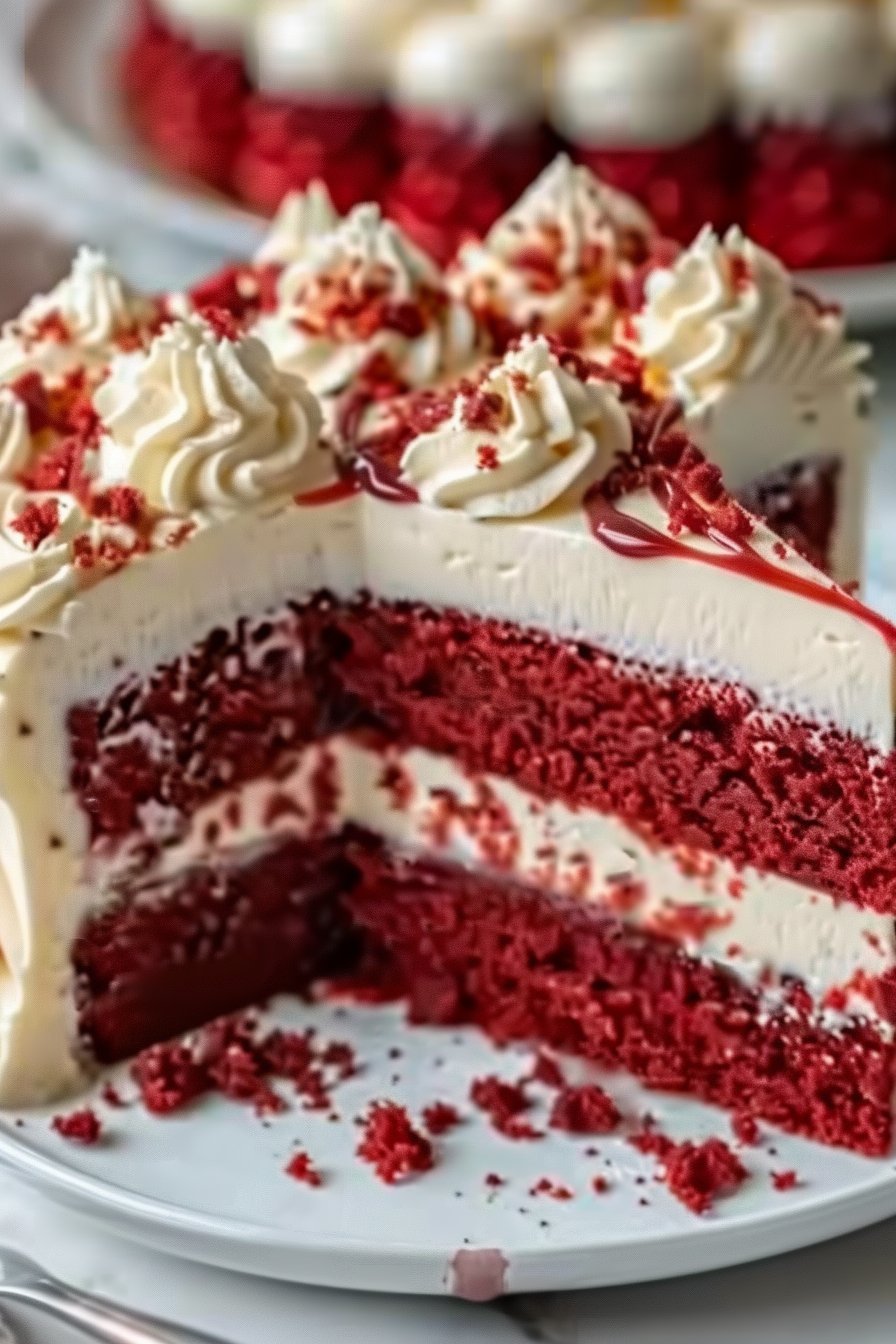
The cheesecake swirl is just as dependable. The mix uses only cream cheese, powdered sugar, and vanilla bean paste, so you get smooth marbling without cornstarch or eggs that can overbake and crack. Starting with room temperature cream cheese and powdered sugar prevents lumps, and I built in a generous swirl step so you can drag a knife through the batter a few times without muddying the colors. You will see clear ribbons of pale cheesecake against deep red velvet, even if you do not consider yourself a swirling artist.
Baking time can be the fussiest part of any red velvet cheesecake style cake, so I designed the instructions to rely on visual cues, not just the clock. You will look for edges set and slightly pulling from the pan, a center that springs back lightly, and only a few moist crumbs on a toothpick. Since everything bakes at 350°F in simple 9 inch pans, you do not need specialty equipment or a water bath the way some cheesecake based recipes demand. If you have already mastered a basic vanilla sheet cake or chocolate birthday cake, this one sits firmly in that same confidence zone, only dressed up in a party outfit.
The Method (Step by Step)
Start by setting yourself up for success. Grease and line your pans, then preheat the oven so it is fully hot when the Red Velvet Cheesecake Swirl Cake goes in. Whisk the flour, sugar, cocoa, baking soda, and salt together so everything is evenly distributed and you do not end up with bitter pockets of cocoa. In a separate bowl, whisk the buttermilk, oil, eggs, vinegar, vanilla, and food coloring until the mixture turns a smooth, even red. Gently pour the wet ingredients into the dry, then whisk or stir just until the batter looks silky and uniform, scraping the bottom of the bowl where flour loves to hide.
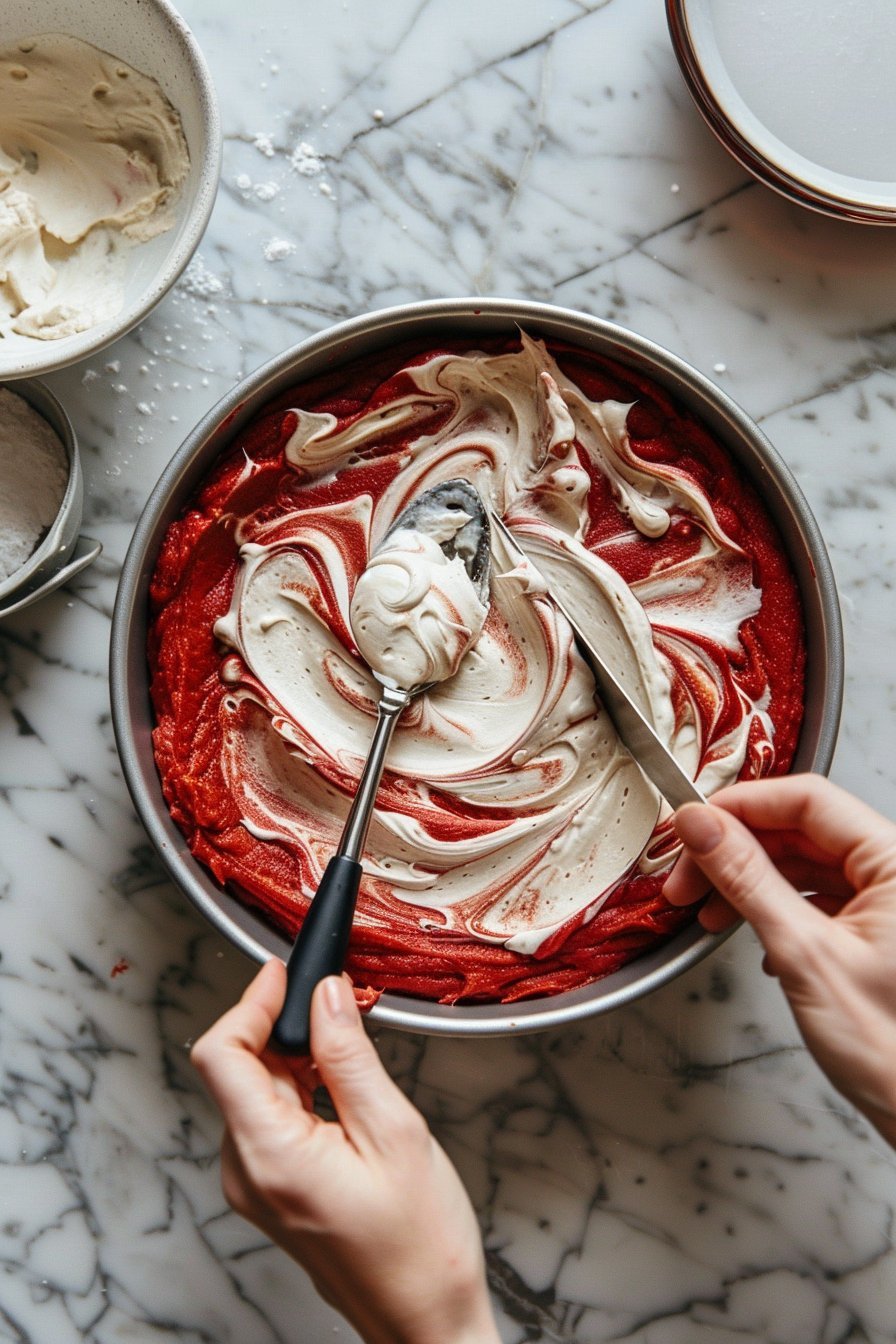
Next, make the cheesecake swirl. Beat the softened cream cheese until it is completely smooth with no lumps, then add the powdered sugar and vanilla and keep beating until the mixture turns fluffy and glossy. Pour the red velvet batter into your prepared pans, dividing as evenly as you can. Use a spoon to drop generous dollops of cheesecake mixture over the surface, spacing them out so each slice catches that tangy swirl. Drag a thin knife or skewer through the batter in loose figure eights, going from one side of the pan to the other without over mixing. You want distinct ribbons, not a pale pink batter.
Bake until the tops spring back lightly and a tester comes out with just a few moist crumbs. The cheesecake spots will look set but still a bit shiny. Cool the cakes in the pans on a rack so they can relax without breaking, then turn them out once they feel just slightly warm. Let the layers cool completely before you frost. Use the remaining cheesecake mixture or your favorite cream cheese frosting, smoothing the top and adding a few extra swirls and red velvet crumbs for that bakery style finish that makes this cake look as good as it tastes.
Keep It Fresh: Timing and Storage
Your Red Velvet Cheesecake Swirl Cake combines a tender cake crumb with a creamy cheesecake swirl, so it behaves a bit like both a layer cake and a cheesecake when it comes to storage. After baking and cooling completely, you can leave it at room temperature for up to 4 hours if you are serving it the same day, especially if the kitchen is cool. For anything longer, move it to the refrigerator to keep that rich cream cheese swirl safe and silky.
I like to chill the cake uncovered for about 20 minutes first so the frosting firms up, then cover it loosely with plastic wrap or a cake dome so it does not smudge. If you frosted the cake with extra cream cheese frosting, treat it just like my favorite carrot cake and keep it chilled when you are not cutting slices.
In the refrigerator, your Red Velvet Cheesecake Swirl Cake will keep its flavor and texture for about 4 to 5 days. Wrap individual slices in plastic, or store the whole cake in a covered container, and let slices sit at room temperature for 15 to 20 minutes before serving so the cheesecake ribbons relax and taste creamy again.
For longer storage, you can freeze the cake, either as unfrosted layers or as frosted slices. Wrap each layer tightly in plastic, then in a layer of foil, and freeze for up to 2 months. For slices, place the wrapped pieces in a freezer safe container so they do not pick up stray freezer smells. Thaw overnight in the fridge, then bring to room temperature on the counter before enjoying, so every bite tastes as indulgent and fresh as the day you baked it.
Swaps, Variations, and Serving Ideas
If you want to tweak this Red Velvet Cheesecake Swirl Cake a little, start with the dairy. You can swap buttermilk with regular milk mixed with 1 tablespoon of vinegar or lemon juice. Let it sit for 5 minutes, then use it as written. Use any neutral oil you love, or even half oil and half melted butter for a slightly richer crumb. For the cheesecake swirl, full fat cream cheese gives the best texture, but you can use neufchâtel in a pinch, just expect a softer swirl. If you prefer a gentler flavor, use regular vanilla bean paste instead of vanilla bean paste, and add a touch of almond extract for a bakery style vibe.
For flavor variations, try a black velvet version by using Dutch process cocoa and a touch less red coloring for a deeper, moodier shade, perfect for holidays or a dramatic birthday cake. Fold mini chocolate chips into the red velvet batter, or add white chocolate chips to the cheesecake swirl for little pockets of sweetness. If you love crunch, stir toasted pecans into the batter or just sprinkle chopped nuts over the frosted cake. You can also bake the same batter in a 9 by 13 inch pan for a casual party cake, then cut generous squares so everyone sees that pretty cheesecake swirl.
Serve this cake slightly chilled, so the cheesecake ribbons stay creamy but not firm. Add a cloud of softly whipped cream, a drizzle of warm chocolate sauce, or a scattering of fresh berries for a dinner party level dessert. For the holidays, finish the top with red velvet crumbs and white chocolate curls so it looks like a bakery window cake. Leftovers taste even better the next day, so it is a smart make ahead option when your oven is already busy with other desserts like a classic carrot cake or a pan of brownie cheesecake bars.
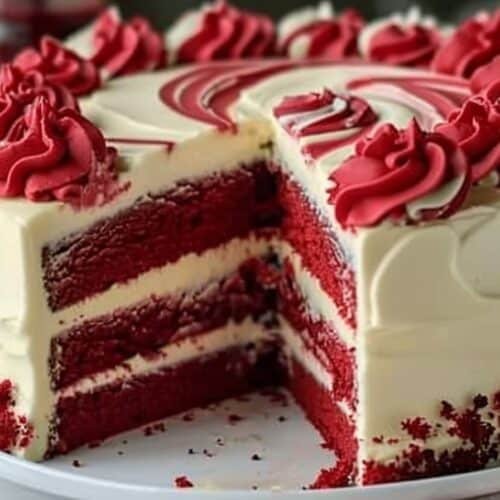
Serving Image of Red Velvet Cheesecake Swirl Cake
Conclusion
When I pull this pan from the oven and see those ruby red swirls marbled through creamy cheesecake, it always feels like more than just dessert. It is a little celebration in a baking dish, the kind that turns an ordinary weeknight into something you will remember, whether you are sharing slices at the kitchen counter or bringing it to the center of a holiday table.
This Red Velvet Cheesecake Swirl Cake has a way of slowing people down. Friends linger for that “just one more sliver,” kids hover for a second bite of the tangy cheesecake ribbon, and suddenly you are not just serving cake, you are making a moment. My hope is that when you bake it, your kitchen fills with that same cozy hush of happy forks and contented sighs.
So tie on your apron, preheat that oven, and give this recipe a try. You are more than capable of baking something beautiful and bakery worthy right at home. And if you do, I would love for you to share a photo and tag me so I can cheer you on.
Process Image of Red Velvet Cheesecake Swirl Cake
Recipe
Red Velvet Cheesecake Swirl Cake
Ingredients
Ingredients
- 2 1/2 cups all-purpose flour
- 1 1/2 cups granulated sugar
- 2 tablespoons unsweetened cocoa powder
- 1 teaspoon baking soda
- 1/2 teaspoon salt
- 1 cup buttermilk at room temperature
- 1 cup vegetable oil
- 2 large eggs at room temperature
- 1 teaspoon white vinegar
- 1 teaspoon vanilla bean paste
- 1 tablespoon red food coloring
- 16 ounces cream cheese softened
- 1 1/2 cups powdered sugar
- 2 teaspoons vanilla bean paste
- Cream cheese frosting for finishing (optional)
- Red velvet cake crumbs for garnish (optional)
Instructions
- Preheat the oven to 350°F. Grease and line two 9 inch round cake pans with parchment paper.
- In a large bowl whisk together the flour, granulated sugar, cocoa powder, baking soda, and salt until well combined.
- In a separate bowl whisk together the buttermilk, vegetable oil, eggs, white vinegar, vanilla bean paste, and red food coloring until smooth and evenly colored.
- Pour the wet ingredients into the dry ingredients and whisk or stir just until the batter is smooth and no dry streaks of flour remain, scraping the bottom of the bowl.
- In another bowl beat the softened cream cheese with an electric mixer until completely smooth. Add the powdered sugar and vanilla bean paste and beat until fluffy and glossy.
- Divide the red velvet batter evenly between the prepared pans and smooth the tops.
- Drop spoonfuls of the cream cheese mixture over the surface of each pan, reserving about 1/2 to 3/4 cup of the mixture if you plan to use it for a light frosting.
- Use a thin knife or skewer to gently swirl the cheesecake mixture into the red velvet batter in loose figure eights, creating distinct ribbons without fully mixing the batters together.
- Bake the cakes for 30 to 35 minutes, or until the edges are set and pulling slightly from the sides, the tops spring back lightly when touched, and a toothpick inserted in the cake portion comes out with just a few moist crumbs.
- Cool the cakes in the pans on a wire rack for 10 minutes, then run a knife around the edges, turn them out onto the rack, peel off the parchment, and let cool completely.
- Once cool, stack the layers on a serving plate. Spread the reserved cheesecake mixture or cream cheese frosting over the top and sides of the cake as desired.
- Decorate with swirls of frosting and red velvet cake crumbs if using, then chill for at least 20 minutes before slicing for cleaner cuts.
Notes
- Do not over mix the batters when swirling or the colors will blend into a pale pink instead of distinct ribbons.
- Store the cake covered in the refrigerator for up to 5 days and let slices sit at room temperature for 15 to 20 minutes before serving.
- You can bake the layers a day ahead, wrap them well once cool, and frost them just before serving.