Why This One Delivers
These Black Forest Cupcakes give you true bakery style flavor without throwing you into an all day project. The batter uses cake flour for a tight, tender crumb, cocoa plus espresso powder for a deeper chocolate that tastes like it came from a professional pastry case, and a balanced amount of leavener so they rise with pretty domed tops instead of spilling over the liners. You mix everything in familiar bowls with regular tools, nothing fussy, so you can focus on timing and texture instead of intimidating techniques. If you have ever baked a chocolate cupcake that looked impressive but tasted flat, you will notice right away that the flavor in these actually matches how good they look.
The structure of these Black Forest Cupcakes has real thought behind it, not just decoration. The crumb is firm enough to hold a cherry filling and generous swirl of cream, yet still soft when you bite in, like a mini slice of classic torte. The cocoa base contrasts with the tart cherries and lightly sweet whipped topping, so each component brings something to the party instead of just piling sugar on sugar. You can easily make the cupcakes a day ahead, then fill and frost before serving, which means they work for birthdays, holidays, and those last minute dinner invites when you want something special that you can actually pull off. If you already love rich chocolate recipes like a flourless chocolate cake or a deep cocoa sheet cake, these cupcakes give you all that intensity with the extra drama of cherries and cream in every bite.
From Prep to Finish
You will start these Black Forest Cupcakes the way every good chocolate cupcake begins, by whisking together your dry ingredients until the cocoa looks evenly blended into the flour. I like to sift the cake flour, cocoa, espresso powder, baking powder, and salt into one bowl so there are no stubborn cocoa clumps hiding in the corners. In a separate bowl you will whisk your wet ingredients until smooth and glossy, then fold the dry mixture in just until you no longer see streaks of flour. The batter should feel loose enough to flow off a spatula in a thick ribbon, but not so thin that it runs like water. If you are familiar with making chocolate sheet cake, you are aiming for that same silky, pourable texture here.
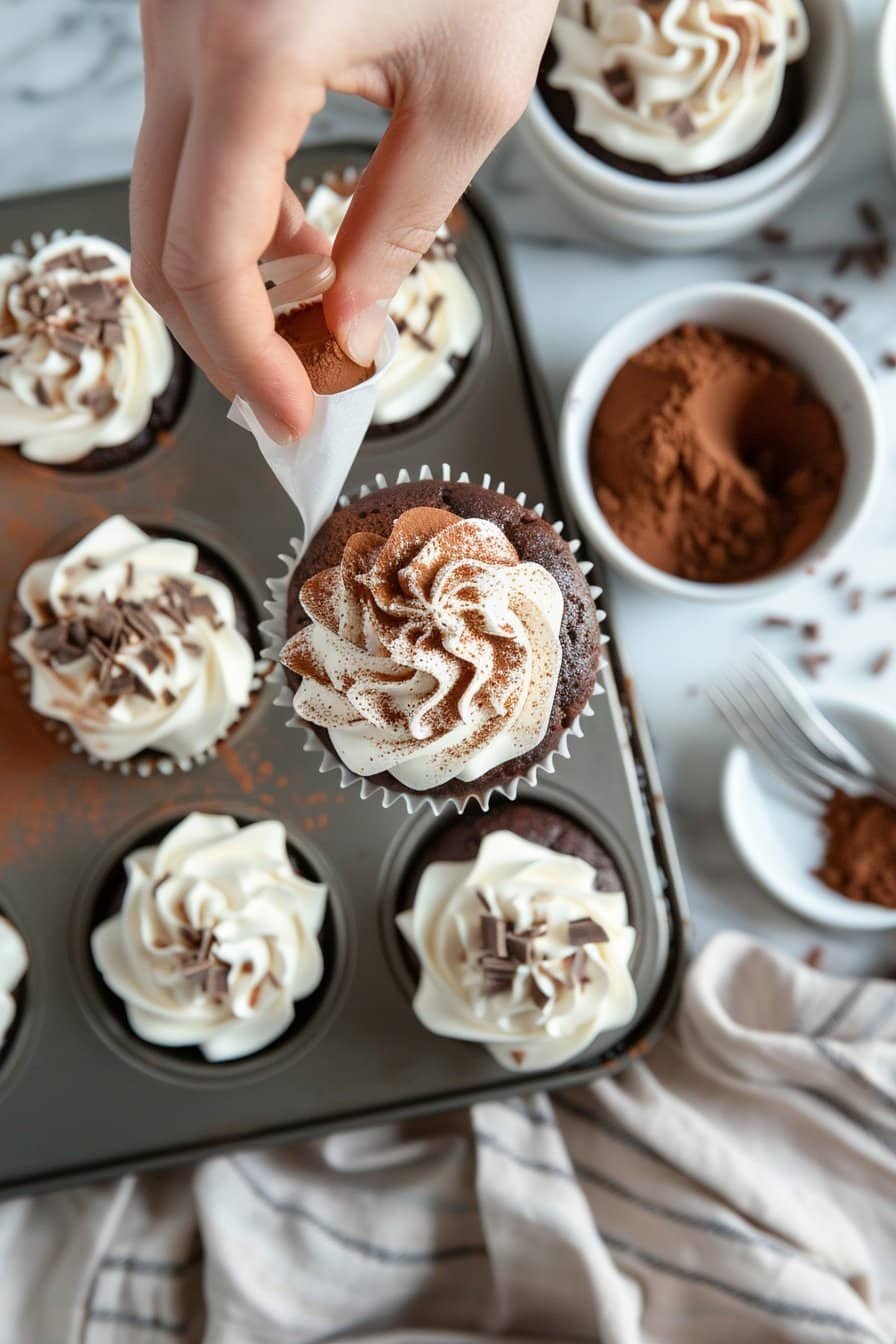
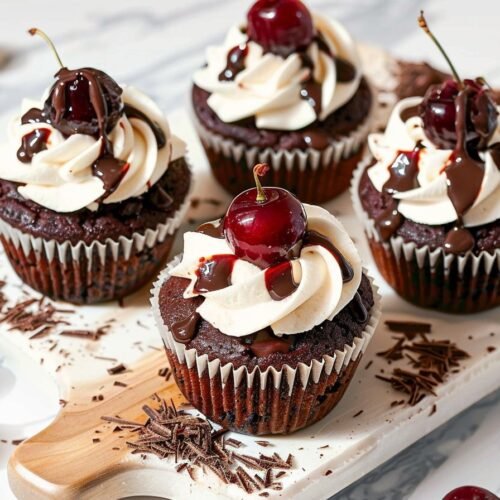
Once your batter is ready, divide it evenly among your cupcake liners, filling each about two thirds full so they have room to rise without spilling over. Bake until the tops spring back lightly when touched and a toothpick comes out with only a few moist crumbs, usually around 18 to 20 minutes, then let them cool completely before you think about filling or frosting. For that true Black Forest Cupcakes bite, use a small knife or cupcake corer to remove a little plug from the center, spoon in your cherry filling, then tuck a bit of the cake plug back on top to keep everything tidy. Swirl on your whipped cream frosting, nestle a cherry on top, and if you like, finish with a few chocolate shavings for that bakery counter sparkle. By the time you are done, your kitchen will smell like a German bakery and your cooling rack will look like a tray of tiny celebration cakes, each one ready to steal the spotlight on your dessert table.
Timing, Storage, and Make Ahead
These Black Forest Cupcakes come together surprisingly quickly, which makes them perfect for celebrations or a random Tuesday sweet tooth. You will need about 30 minutes to prep, 20 minutes to bake, plus cooling time before you add the cherry filling and whipped cream. If you are planning for a party, count backward from serving time so the frosting goes on close to when people will eat. Whipped cream sits happily for a few hours in the fridge, but after that it can start to deflate. For the very best texture, serve the cupcakes within 24 hours of decorating.
For storage, keep fully assembled Black Forest Cupcakes in the refrigerator, loosely covered, for up to 2 days. The whipped cream will firm up a little, and the cherry juices will gently seep into the crumb, which is honestly delicious. If you want to keep the texture as bakery fresh as possible, store the unfrosted cupcakes at room temperature in an airtight container for up to 2 days, then add the filling and cream the day you serve. You can also bake the cupcakes, cool them completely, wrap them individually, and freeze them for up to 2 months. Thaw at room temperature, then fill and frost so you still get that soft, tender bite you expect from classic Black Forest Cupcakes.
To work ahead for a big event, you can make the cherry filling 2 to 3 days in advance and keep it chilled, then stir it before using. If your recipe uses a stabilized whipped cream, you can whip it a day ahead and gently rewhisk it by hand right before piping. I often bake the cupcake base in the evening, let them cool, and fill and decorate the next morning so nothing feels rushed. For a dessert table, you can top the cupcakes up to 4 hours before guests arrive, then keep them refrigerated until serving. This timing keeps the cream cloud light and the chocolate rich, exactly what you want in true bakery style Black Forest Cupcakes.
Ingredient Swaps and Serving Options
You can keep these Black Forest Cupcakes classic, or take a few smart shortcuts without losing that nostalgic bakery flavor. If you do not have cake flour, measure 1 cup all purpose flour, remove 2 tablespoons, then replace them with 2 tablespoons cornstarch, and whisk well to mimic the tenderness. Natural cocoa works, but for a deeper, almost truffle like chocolate flavor you can use Dutch process cocoa, just keep the baking powder amount the same. If cherry fruit juice concentrate is not your style, try cherry juice, pomegranate juice, or even the syrup from jarred morello cherries to soak the centers. You can use any cherry you love, from canned pie filling to frozen dark sweet cherries that you simmer with a spoonful of sugar until jammy.
For a lighter twist on Black Forest Cupcakes, swap the whipped cream topping for a stabilized version made with a spoonful of instant pudding mix, which helps the swirls hold up on a warm day. Need a dairy free version for a party mix of guests. Use a rich plant based milk in the batter, coconut cream for whipping, and dairy free chocolate shavings on top. If someone does not like cherries, fold a quick raspberry compote into the centers instead, or leave the filling out entirely and brush the cupcakes with a little coffee for a chocolate mocha moment, similar to my favorite tiramisu cupcakes. For serving, dress them up on a tiered stand for holidays, serve them plain on a wooden board for a casual weekend dessert, or plate a single cupcake with extra cherries and a drizzle of chocolate sauce for a restaurant style finish at home.
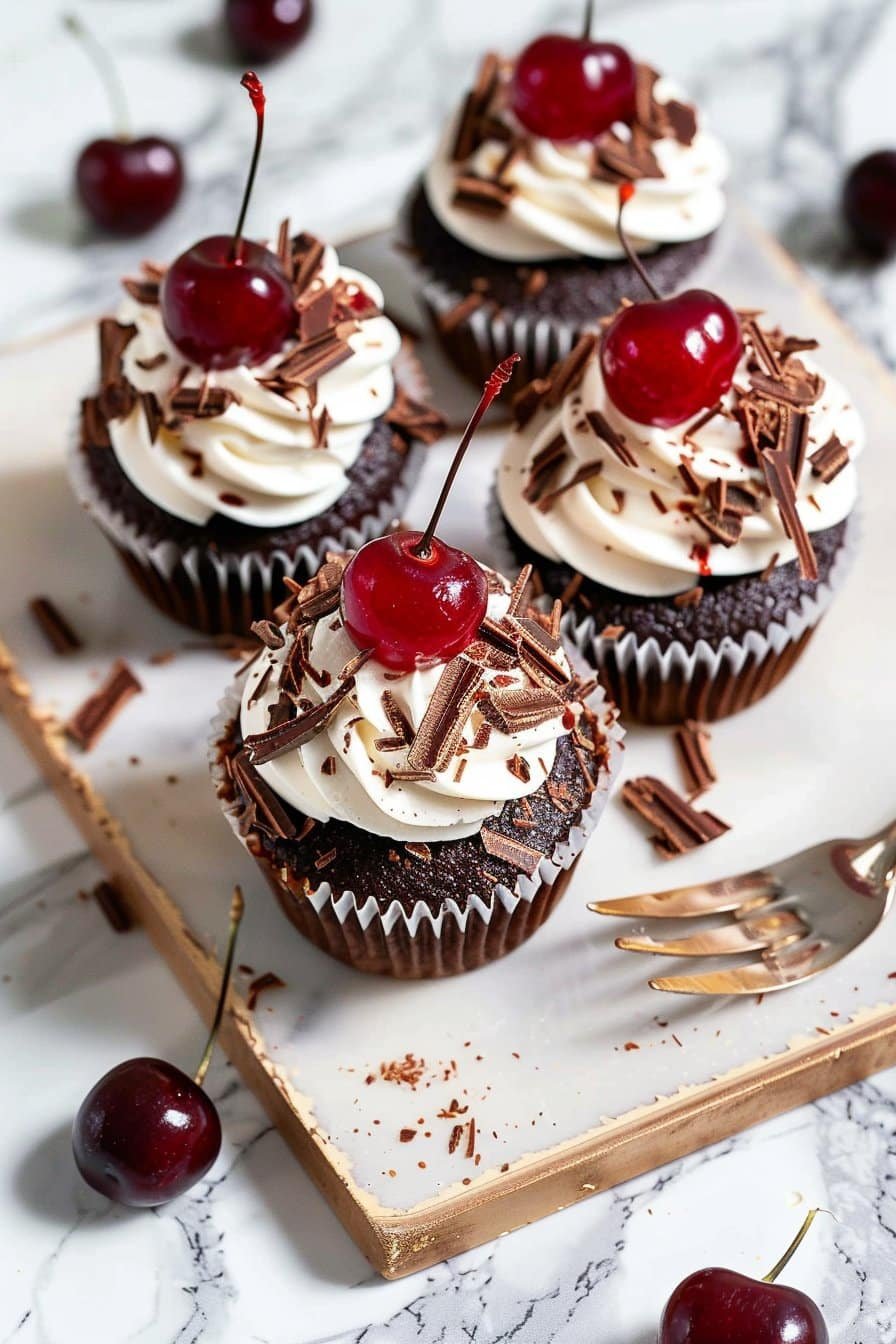
Serving of Black Forest Cupcakes
Conclusion
Every time I pull a tray of these little chocolate and cherry beauties from the oven, I am reminded that the best moments rarely look fancy. They usually look like kids sneaking extra cherries from the bowl, someone licking whipped cream from a spoon, or a late night cup of tea shared over a plate of slightly imperfect, deeply delicious cupcakes. That is the quiet magic of baking at home. You are not just making dessert, you are making stories that everyone will remember long after the crumbs are gone.
I hope you feel excited, and maybe a little nostalgic, as you gather the simple ingredients and turn them into something worthy of any bakery case. Invite your favorite people to help, or surprise them with a plateful, and watch how quickly the room softens and the conversation starts to sparkle. Go ahead and try these Black Forest Cupcakes soon, and let them become part of your own celebrations, big and small.
For more delicious recipes like this, follow us on social media!
Instructions Process of Black Forest Cupcakes
Recipe
Black Forest Cupcakes
Ingredients
Ingredients
- 1 cup cake flour
- 1/2 cup unsweetened cocoa powder
- 1 teaspoon espresso powder
- 1 1/2 teaspoons baking powder
- 1/2 teaspoon kosher salt
- 3/4 cup granulated sugar
- 2 large eggs room temperature
- 1/2 cup whole milk room temperature
- 1/3 cup vegetable oil
- 2 teaspoons vanilla bean paste
- 1/2 cup water hot
- 1 cup cherry pie filling or canned sour cherries in syrup drained and chopped
- 1 cup heavy whipping cream cold
- 3 tablespoons powdered sugar
- 1/2 teaspoon vanilla bean paste for whipped cream
- 12 maraschino cherries or fresh cherries for topping
- 1 ounce dark chocolate shaved or grated, for garnish
Instructions
- Preheat the oven to 350°F and line a standard 12 cup muffin pan with cupcake liners.
- In a medium bowl sift together the cake flour, cocoa powder, espresso powder, baking powder, and kosher salt, then whisk to combine and set aside.
- In a large bowl whisk the granulated sugar and eggs until slightly thickened and pale.
- Add the milk, vegetable oil, and 2 teaspoons vanilla bean paste to the egg mixture and whisk until smooth and glossy.
- Add the dry ingredients to the wet ingredients and whisk just until no streaks of flour remain and the batter is smooth.
- Pour in the hot water and whisk gently until the batter is loose and flows in a thick ribbon.
- Divide the batter evenly among the 12 cupcake liners, filling each about two thirds full.
- Bake for 18 to 20 minutes, until the tops spring back lightly when touched and a toothpick inserted in the center comes out with a few moist crumbs.
- Let the cupcakes cool in the pan for 5 minutes, then transfer to a wire rack to cool completely.
- When the cupcakes are cool, use a small knife or cupcake corer to cut a 1/2 inch wide, 3/4 inch deep plug from the center of each cupcake and reserve the plugs.
- Spoon about 1 tablespoon of cherry pie filling into the center of each cupcake, then trim and replace a bit of the cake plug over the filling to cover it.
- In a chilled bowl beat the heavy whipping cream with powdered sugar and 1/2 teaspoon vanilla bean paste until medium stiff peaks form.
- Pipe or spoon the whipped cream onto the filled cupcakes in generous swirls.
- Top each cupcake with a cherry and a sprinkle of chocolate shavings.
- Refrigerate the cupcakes until serving and serve within 24 hours for best texture.
Notes
- Keep assembled cupcakes refrigerated and store unfrosted cupcakes at room temperature in an airtight container for up to 2 days before filling and topping.