
Why This One Delivers
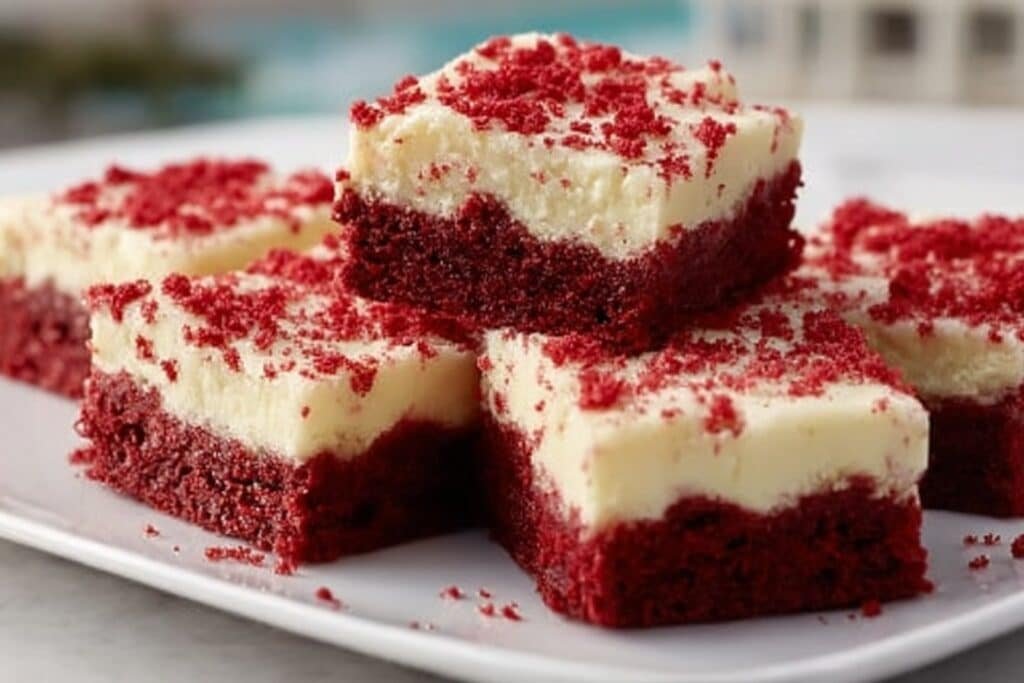
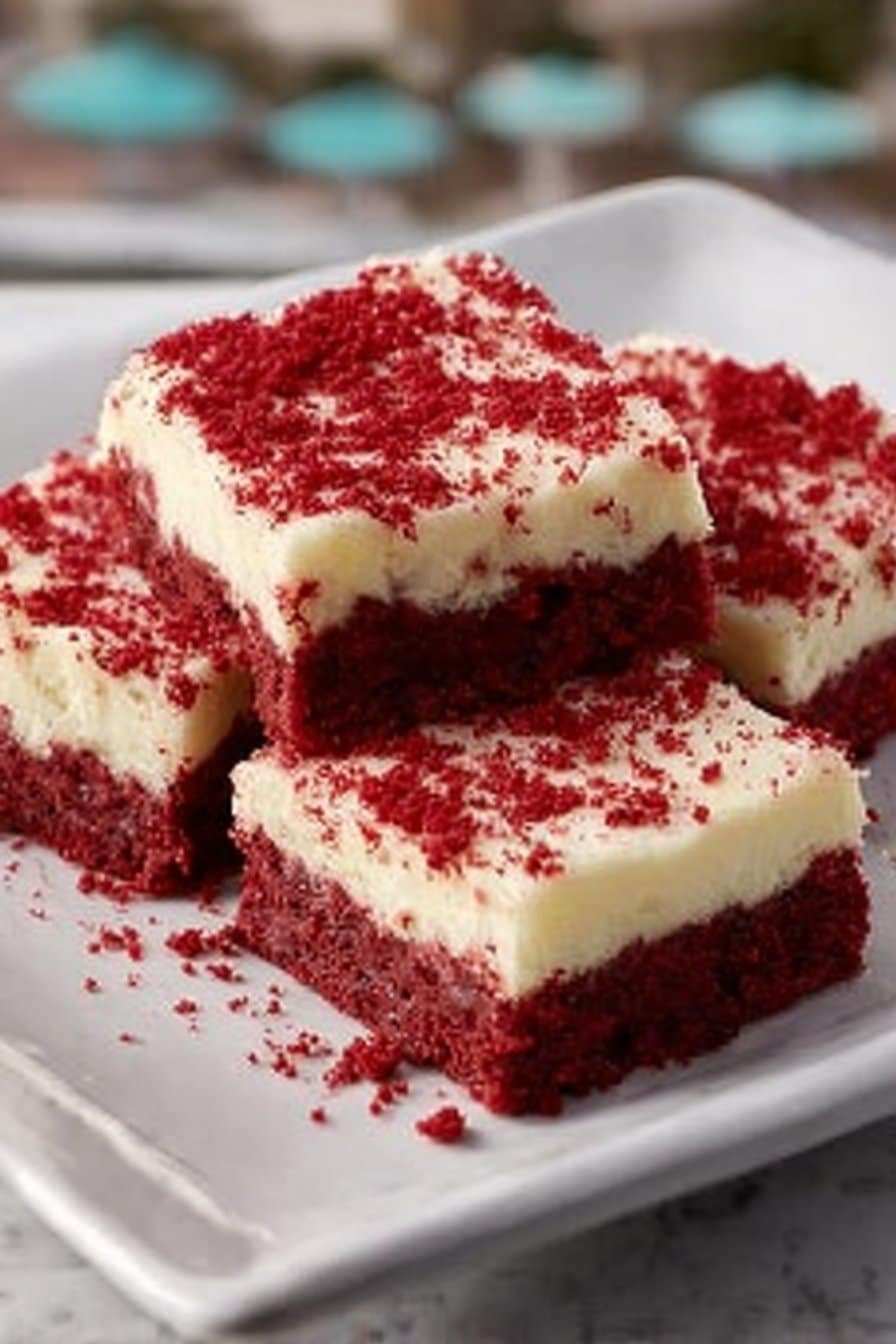
These Red Velvet Cookie Bars give you that thick, chewy, bakery-counter bite without the fuss of scooping individual cookies. You press one pan of dough into the oven, frost it generously, and end up with neat, party-ready squares that look like they came from your favorite bakery case.
You cream butter and sugars just like a classic red velvet cookie dough, which keeps the bars dense and chewy instead of light and cakey. The combination of cocoa, fragrant vanilla bean paste, and red gel food coloring gives you that nostalgic red velvet flavor—chocolatey, a little tangy, and deeply red without tasting like straight food dye. Because everything bakes in a 9 × 13-inch pan, the bars cook evenly: no rotating trays, no guessing which cookies are done while others still look raw.
The bars cool right in the pan, which keeps the centers soft and helps them slice into clean, pretty squares for potlucks, office trays, or holiday dessert platters. The real bakery magic, though, comes from the bar-to-frosting ratio. The base is thick and buttery, sturdy enough to hold in your hand, but still tender when you bite in. You spread on the cream cheese frosting once the bars are completely cool, so it sits as a velvety layer that melts just slightly into the top instead of sliding off.
You only need a handful of pantry-friendly ingredients—no buttermilk, no special equipment—so these Red Velvet Cookie Bars are just as doable on a Tuesday night as they are for a birthday spread. If you love simple tray bakes like blondies or frosted sugar cookie bars, this red velvet version slips easily into your regular dessert rotation.
From Prep to Finish
You’ll start these Red Velvet Cookie Bars the way most good bar cookies begin: with a prepped pan and a steady oven. Line a 9 × 13-inch baking pan with parchment paper, letting the paper overhang on the long sides so you can lift the bars out in one clean motion later. Lightly grease the parchment if your pan tends to stick.
Cream the butter and sugars together until the mixture looks pale, fluffy, and slightly whipped. This step matters; it builds tiny air pockets that give you that tender, bakery-style chew instead of a dense brick. Scrape down the bowl so nothing clings to the sides. Add the eggs, vanilla bean paste, and red gel food coloring. Mix just until everything turns an even, vibrant red. If the color looks a little dull, add a tiny dab more gel and stir it in—you want a deep red, not a pinkish batter.
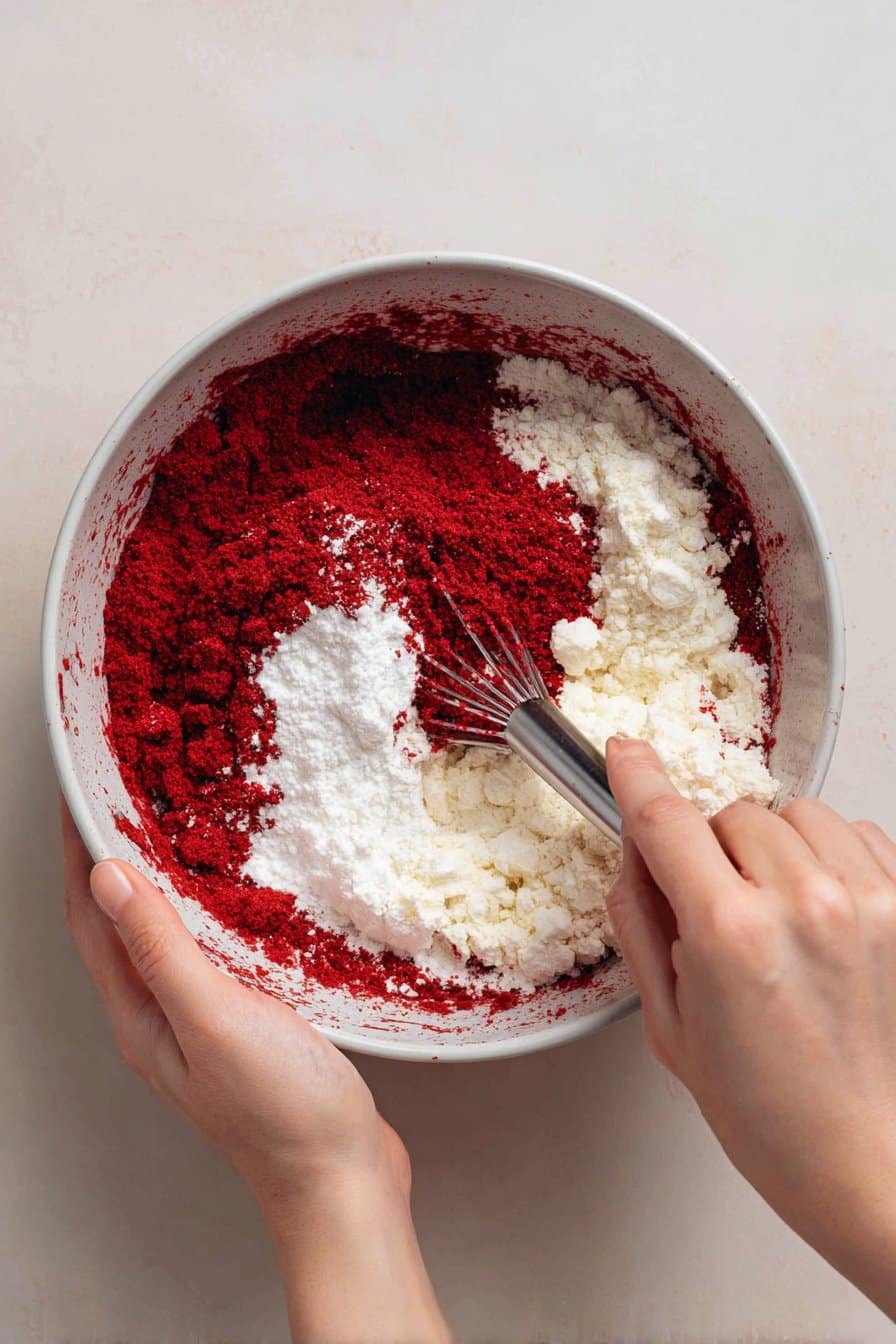
In a separate bowl, whisk together the flour, cocoa powder, baking powder, and salt. This quick whisk keeps the cocoa from clumping and leaving dark streaks in your dough. Add the dry ingredients to the red mixture in 2–3 additions, mixing on low and stopping as soon as no dry spots remain. The dough should feel thick, soft, and scoopable, more like cookie dough than cake batter.
Transfer the dough to your prepared pan. Use clean, slightly damp hands or an offset spatula to press it into an even layer, nudging it into the corners and smoothing the top. Take a minute here—an even layer bakes into neat, uniform Red Velvet Cookie Bars that slice beautifully.
Bake until the edges look set and just start to pull away from the sides of the pan, and the center no longer looks glossy. The bars should still feel soft when you press the center lightly; they will firm up as they cool. Overbaking turns them cakey and dry, so pull them as soon as they hit that soft-but-set stage. Let the pan cool completely on a wire rack.
For the cream cheese frosting, beat the cream cheese and softened butter together until the mixture is completely smooth and no tiny lumps remain. Scrape the bowl well—cream cheese likes to hide. Add the powdered sugar gradually to avoid a sugar cloud all over your counter. Beat until thick and smooth, then add just enough milk to create a spreadable, silky frosting that holds a soft peak on the spatula.
Make sure the bars are totally cool—no warmth at all on the bottom of the pan—before you frost. If the bars are even slightly warm, the frosting will melt and turn greasy. Spread the frosting over the surface, swirling it into soft waves with an offset spatula or the back of a spoon. Chill the pan for at least 30 minutes for cleaner slices, then lift the whole slab out by the parchment and cut into squares or rectangles. Wipe your knife between cuts for that true bakery-style look you want from homemade Red Velvet Cookie Bars.
Timing, Storage, and Make-Ahead Tips
These oven-baked Red Velvet Cookie Bars come together quickly, which makes them ideal for last-minute gatherings or weeknight baking. Plan for about 15 minutes of hands-on prep, 22–25 minutes of baking, and at least 1 hour of cooling before you frost and slice. If you’re serving them for a party, bake the bars in the morning, let them cool while you make the frosting, then chill the frosted pan for 30–45 minutes so the cream cheese layer sets for tidy cuts.
Once sliced, the bars can sit out at cool room temperature (around 68–70°F) for up to 2 hours on a dessert table without losing their texture. After that, move them to the fridge so the cream cheese frosting stays food-safe and the bars keep their structure.
Because of the cream cheese frosting, always store these Red Velvet Cookie Bars in the refrigerator. Arrange them in a single layer in an airtight container, or stack them with parchment between layers so the frosting doesn’t glue them together. They keep well for 4–5 days chilled; the cookie base stays soft and chewy, and the frosting stays velvety and smooth. For the best flavor and texture, pull them out of the fridge 15–20 minutes before serving so the butter and cream cheese can soften.
If you like to plan ahead for holidays or birthdays, you have a couple of easy options. You can bake just the bar layer, cool it completely, wrap it tightly in plastic wrap and then foil, and freeze for up to 2 months. When you’re ready to serve, thaw at room temperature, frost, chill briefly, and slice. You can also make the frosting up to 3 days in advance, store it in the fridge, then let it sit at room temperature for a bit and re-whip before spreading.
If you’re in full prep mode for a dessert table with brownies, blondies, or even something like chocolate chip cookie bars, you can fully bake and frost these Red Velvet Cookie Bars 1 day ahead. Cover the pan (or container of slices) well and refrigerate. This overnight rest lets the cream cheese frosting mingle slightly with the red velvet layer, giving every bite that bakery-style, melt-in-your-mouth feel that makes these bars so special.
Ingredient Swaps and Serving Options for Red Velvet Cookie Bars
One of my favorite things about these Red Velvet Cookie Bars is how forgiving they are when you want to tweak ingredients to match your pantry. If you do not have vanilla bean paste, you can use the same amount of good-quality vanilla bean paste and add ¼ teaspoon almond extract for a little extra bakery-style depth. The flavor changes slightly but stays in that cozy, nostalgic lane.
You can swap half of the all-purpose flour for cake flour if you like a softer, slightly more cakey bite. A 1:1 gluten-free baking blend also works if needed; just know the bars may be a bit more delicate when sliced, so chill them well before cutting. For the cocoa, any unsweetened cocoa powder works, but Dutch-process will give you a deeper chocolate flavor and a slightly richer color.
If you are out of red gel food coloring, you can use liquid food coloring instead. Start with 2–3 tablespoons, then adjust as needed. Because liquid color adds moisture, reduce the milk in the frosting by about 1 teaspoon so the overall dessert doesn’t feel too soft. The dough should still feel thick and scoopable, not thin or runny.
You can shape and serve these Red Velvet Cookie Bars to fit whatever crowd you are feeding. Leave them in classic squares with cream cheese frosting for birthdays and potlucks, or chill the pan well and cut the bars into tiny 1-inch bites for a holiday dessert board alongside brownie bites and sugar cookie bars. For a less-sweet option, skip the frosting and dust the cooled bars with powdered sugar, or drizzle them with melted white chocolate instead of adding a full layer.
To dress them up, scatter chocolate shavings, festive sprinkles, or even crumbled chocolate sandwich cookies over the frosted top for extra texture. I love them slightly chilled for clean edges and a firm bite, but if you prefer a softer, almost truffle-like texture, let them sit at room temperature for about 20 minutes before serving. A scoop of vanilla ice cream or a spoonful of lightly sweetened whipped cream never hurts either.
Serving of Red Velvet Cookie Bars
Conclusion
Some of my favorite kitchen moments happen with a pan of bars cooling on the counter and people wandering in “just to check” if they are ready. These Red Velvet Cookie Bars are exactly that kind of recipe—the one you reach for on birthdays, game nights, or the quiet evenings when someone you love needs a little extra sweetness.
They slice into tidy squares, stack beautifully on a platter, and somehow turn an ordinary day into a small celebration. I hope you’ll bake a batch, let them cool just enough, pour some cold milk or brew a fresh pot of coffee, and see how quickly the kitchen fills up. That is where the good conversations always seem to start—and where these red velvet squares will disappear faster than you expect.
Instructions Process of Red Velvet Cookie Bars
How do I get the best red color in Red Velvet Cookie Bars?
For vivid, bakery-style Red Velvet Cookie Bars, gel food coloring works best because it gives intense color without thinning the dough. Add the gel with the wet ingredients so it blends evenly and you avoid streaks. If you only have liquid food coloring, you can use it, but add it gradually and watch the dough consistency. You may need more liquid color to reach a deep red, so stop if the dough starts to feel loose. Remember that the color will deepen slightly as the bars bake and cool.
Recipe
Red Velvet Cookie Bars
Ingredients
Ingredients
- 1 cup unsalted butter softened
- 1 cup granulated sugar
- 0.5 cup packed brown sugar
- 2 large eggs room temperature
- 2 teaspoons vanilla bean paste
- 2 tablespoons red gel food coloring
- 2 tablespoons unsweetened cocoa powder
- 2.5 cups all-purpose flour
- 1 teaspoon baking powder
- 0.5 teaspoon salt
- 8 oz cream cheese softened
- 0.5 cup unsalted butter softened
- 2 cups powdered sugar
- 2 tablespoons milk
- 1 teaspoon vanilla bean paste
Instructions
- Preheat the oven to 350°F and line a 9x13-inch baking pan with parchment paper, leaving some overhang on the long sides. Lightly grease the parchment.
- In a large bowl, cream together 1 cup softened unsalted butter, 1 cup granulated sugar, and 0.5 cup packed brown sugar with a hand mixer or stand mixer on medium speed until pale and fluffy.
- Add the eggs, vanilla bean paste, and red gel food coloring to the creamed mixture and beat on low until fully combined and evenly red, scraping down the sides of the bowl as needed.
- In a separate bowl, whisk together the cocoa powder, all-purpose flour, baking powder, and salt until well combined.
- Add the dry ingredients to the red mixture in 2–3 additions, mixing on low speed just until no dry spots remain and a thick cookie dough forms.
- Transfer the dough to the prepared pan and press it into an even layer, smoothing the top with an offset spatula or clean hands.
- Bake for 22–25 minutes, until the edges are set and just beginning to pull from the pan and the center no longer looks glossy but still feels soft when lightly pressed.
- Place the pan on a wire rack and let the bars cool completely in the pan, about 1 hour.
- Once the bars are cool, prepare the frosting by beating the cream cheese and 0.5 cup softened unsalted butter in a medium bowl until smooth and creamy.
- Add the powdered sugar gradually, beating on low speed until incorporated and thick, then increase to medium speed and beat until smooth.
- Add the milk and vanilla bean paste and beat until the frosting is silky, spreadable, and holds soft peaks.
- Spread the cream cheese frosting evenly over the cooled red velvet cookie bar base, creating swirls on top if desired.
- Refrigerate the frosted bars for at least 30 minutes to help the frosting set, then lift the slab out using the parchment and cut into 15 squares.
- Store any leftovers covered in the refrigerator for up to 4 days and serve chilled or at cool room temperature.
Notes
- Do not overbake; the center should still feel soft so the bars stay chewy, not cakey.


