
Why This One Delivers Bakery-Level Magic
These Chocolate Tiramisu Cupcakes deliver because they respect both desserts: you get the deep cocoa richness of a classic cupcake and the creamy, coffee-soaked luxury of tirisu, without any fussy layer assembly. The batter uses cocoa powder plus espresso for a double hit of chocolate and coffee flavor that actually comes through after baking, instead of fading into “kind of chocolate-ish.” Vegetable oil keeps the crumb moist and tender for days, so your cupcakes don’t dry out by the time the mascarpone filling has chilled and settled. With a quick whisk—no stand mixer required—you can have them in the oven in about 10 minutes. That makes them realistic for a weeknight treat or a last-minute dinner party dessert.
The technique stays simple but thoughtfully structured. You bake the cupcakes first, then scoop and fill, which gives you that tiramisu-style “soaked” center without creating soggy tops or collapsed sides. The mascarpone and espresso mixture mimics classic tiramisu cream, but here it’s stable enough to hold inside a cupcake and still feel airy and spoonable, almost like a mousse when chilled. Because the recipe leans on pantry staples—flour, cocoa, sugar, eggs, milk, and oil—you probably have most of what you need already. Flexible swaps (like almond milk, ricotta, or gluten-free flour) mean you can adapt for most guests without drama. A final dusting of cocoa powder instantly signals “tiramisu” before anyone even takes a bite, yet the handheld format is as easy to serve at a birthday party as a batch of homemade espresso brownies or your favorite chocolate loaf cake.
From Prep to Finish: Bringing Chocolate Tiramisu Cupcakes to Life
From the moment you preheat the oven to 350°F (175°C), these Chocolate Tiramisu Cupcakes move quickly, so it helps to set yourself up before you crack the first egg. Line your muffin tin with cupcake liners, then whisk together your dry ingredients in a roomy bowl so you have space to fold without spilling: flour, cocoa powder, baking powder, and sugar. In a separate bowl, whisk the eggs, milk, and oil until the mixture looks smooth and a little glossy—no streaks of yolk or oil hiding at the bottom.
Pour the wet ingredients into the dry and stir gently with a spatula just until you no longer see pockets of flour. A few tiny lumps are better than an overmixed batter, which can give you tough, rubbery cupcakes instead of a soft, bakery-style crumb. Fill each liner about two-thirds full so they have room to rise without mushrooming over the edges. Slide the pan into the oven and bake for 18–20 minutes, just until the tops spring back lightly to the touch and a toothpick comes out with a few moist crumbs. Let the cupcakes cool in the pan for 5 minutes, then move them to a rack so the bottoms don’t steam and turn soggy.
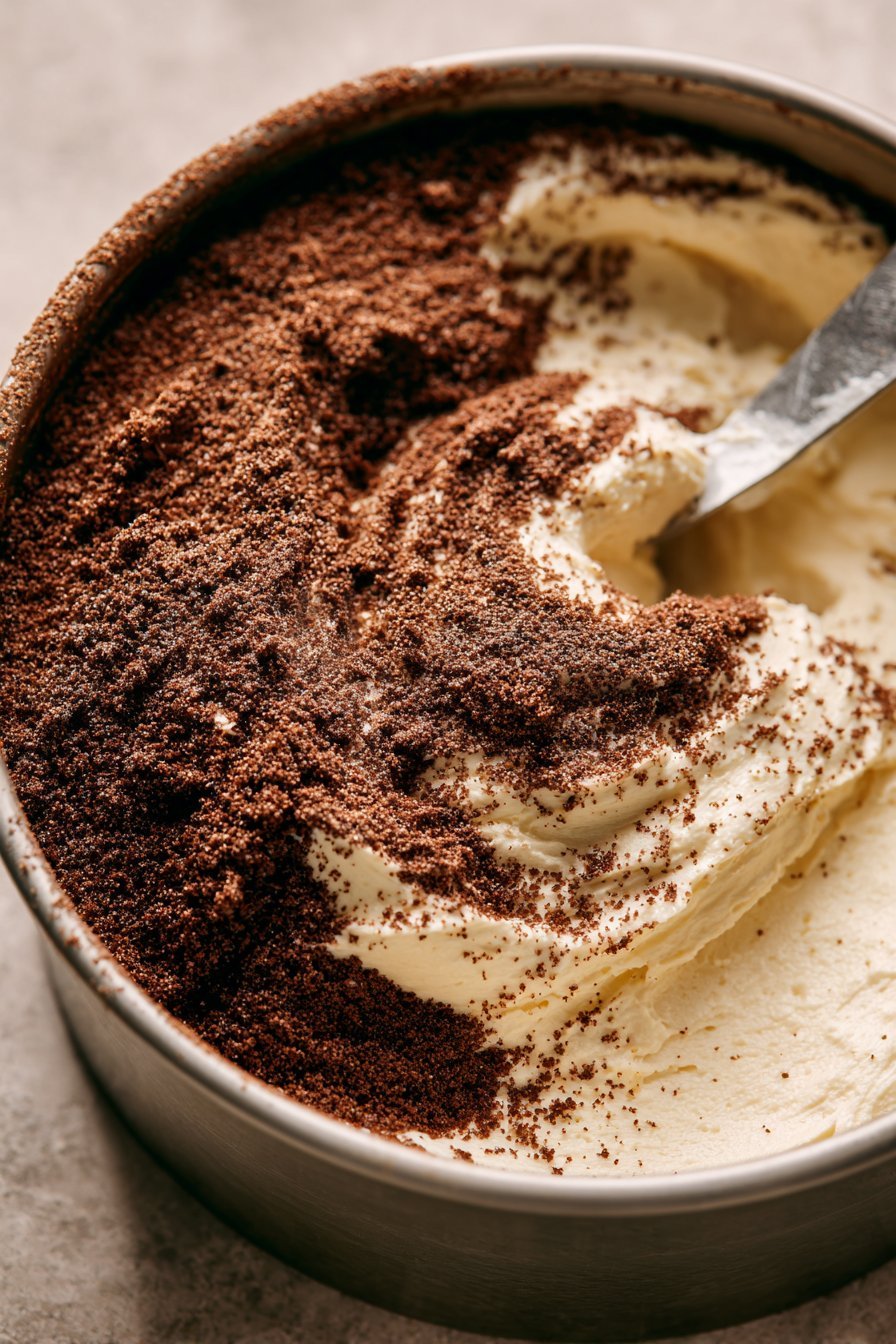
While the cupcakes cool completely (this really matters for clean cuts later), whip together the mascarpone and espresso until you get a fluffy, spreadable filling—soft, but not runny. If the mixture looks loose or shiny instead of pillowy, chill it in the fridge for 10–15 minutes so it firms up and won’t leak out of the centers.
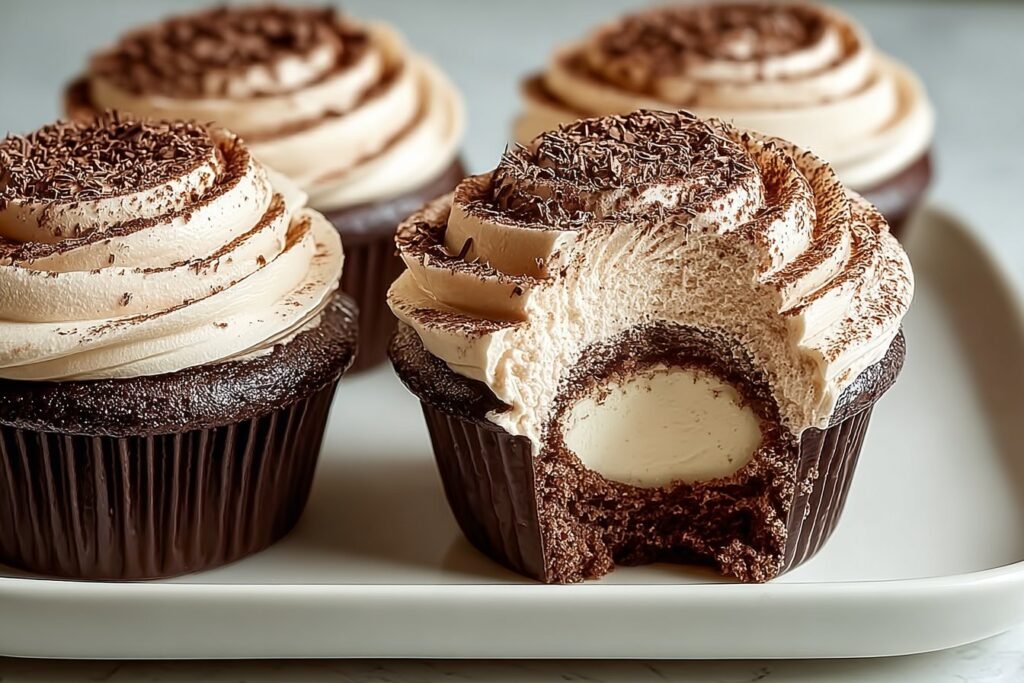
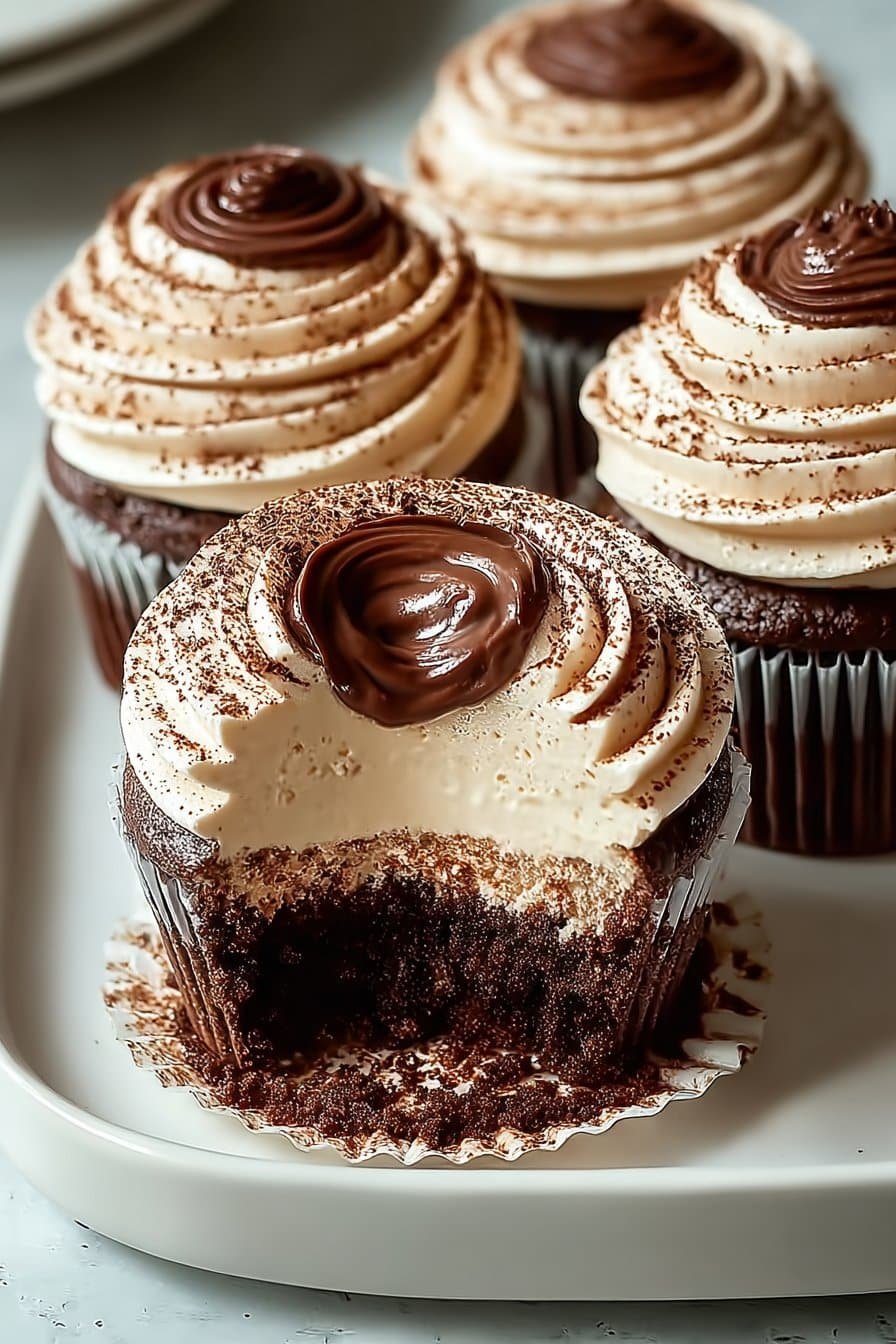
Once the cupcakes are cool to the touch, use a small knife or a teaspoon to carefully cut off the tops and scoop out a little crater in the middle, saving the tops for a cute “lid.” You’re aiming for a well about the size of a walnut, not a tunnel straight through. Spoon or pipe in the espresso-mascarpone filling so it mounds slightly, then nestle the tops back on like tiny tiramisu hats. Right before serving, dust the cupcakes generously with cocoa powder for that classic tiramisu finish. The cocoa melts on your tongue and gives a gorgeous, bakery-style look that makes them feel special even on a Tuesday night. If you love this style of hybrid dessert, these pair beautifully on a dessert table with something light and creamy, like vanilla bean panna cotta or a simple ricotta cheesecake for contrast.
Timing, Storage, and Make-Ahead for Chocolate Tiramisu Cupcakes
These Chocolate Tiramisu Cupcakes move quickly once you start, so it helps to know your timing before you preheat the oven. The batter itself comes together in about 10 minutes, then the cupcakes bake for 18–20 minutes. Plan another 20 minutes for them to cool completely before you fill them with the espresso mascarpone; if you rush this step, the filling can melt and turn soupy. If you’re baking for guests, allow about 45 minutes total from first whisk to final dusting of cocoa powder, plus an extra 10 minutes if you like to clean as you go. I like to bake the cupcakes in the morning, fill them in the afternoon, and serve them after dinner when the flavors have had time to settle in and mingle.
For storage, think of these cupcakes like mini tiramisu: they prefer the refrigerator, not the counter. Once filled, place the Chocolate Tiramisu Cupcakes in an airtight container and refrigerate for up to 3 days. Arrange them in a single layer so the tops stay neat. Let them sit at room temperature for 15–20 minutes before serving so the mascarpone softens and the chocolate becomes a little more fragrant and fudgy.
If you want to bake ahead, you can make the plain chocolate cupcakes (unfilled) up to 2 days in advance. Cool them completely, then store them covered at room temperature, away from direct sunlight or heat. Alternatively, freeze unfrosted cupcakes, well wrapped, for up to 1 month. When you’re ready to serve, thaw them at room temperature, then whip the mascarpone-espresso filling fresh on the day you plan to enjoy them for the best tiramisu texture and flavor.
Ingredient swaps and cozy serving ideas for Chocolate Tiramisu Cupcakes
One of my favorite things about these Chocolate Tiramisu Cupcakes is how forgiving they are when you need to substitute. If you’re baking for gluten-free friends, use a 1:1 gluten-free all-purpose blend and sift it with the cocoa so the crumb stays light instead of dense or gummy. For dairy-free cupcakes, swap the milk for almond, oat, or soy milk and trade mascarpone for a thick dairy-free cream cheese or chilled coconut cream (scooped from the top of a can and whipped). You can also use instant coffee or espresso powder in place of brewed espresso—just dissolve 1 to 2 teaspoons in a few tablespoons of hot water and adjust the strength to taste. If you’re out of vegetable oil, melted butter or a neutral oil like canola works well; just avoid olive oil here unless you truly enjoy that savory note with chocolate.
For a plant-based twist on your Chocolate Tiramisu Cupcakes, replace each egg with a flax egg (1 tablespoon ground flax + 3 tablespoons water per egg, rested until thick), and make sure your sugar is vegan-friendly. Mascarpone can be replaced with whipped coconut cream plus a spoonful of powdered sugar and a splash of espresso for that tiramisu vibe.
Want a stronger coffee kick? Brush the baked cupcake centers with a little extra espresso or coffee concentrate before filling, the way you’d soak ladyfingers in a classic tiramisu. Just don’t drench them—two or three light brushes per cupcake is plenty. To serve, I love topping each cupcake with a small dollop of lightly sweetened whipped cream and a dusting of dark cocoa powder, then chilling them for at least 30 minutes so the flavors meld—almost like mini tiramisu layer cakes.
For a party tray, mix these with something lighter, like lemon cupcakes or vanilla bean cupcakes, so guests can choose between bright and deeply chocolatey bites. Add a few small bowls of chocolate shavings, espresso beans, or berries on the side so everyone can “decorate” their own plate.
Serving of Chocolate Tiramisu Cupcakes
Conclusion
There’s something a little magical about pulling a tray of cupcakes from the oven, especially when they smell like cocoa, coffee, and vanilla all at once. These Chocolate Tiramisu Cupcakes aren’t just dessert; they’re little invitations to linger at the table a bit longer, to pour one more cup of coffee, to laugh over smudged cocoa and stolen tastes of cream.
I love how a simple batch of cupcakes can turn an ordinary night into a tiny celebration. Whether you’re sharing them at a birthday, bringing them to a friend who needs cheering up, or serving them after Sunday dinner, they have a way of starting conversations and creating memories. You don’t need bakery training or fancy tools—just a mixing bowl, a spoon, and a bit of patience while everything bakes and cools.
I hope you feel encouraged to tie on your apron, preheat your oven, and give these a try. And when you do, I’d love to hear how they turned out and who you shared them with.
Instructions Process of Chocolate Tiramisu Cupcakes
What makes these Chocolate Tiramisu Cupcakes taste like real tiramisu?
These Chocolate Tiramisu Cupcakes start with a moist, bakery-style chocolate base that mimics a rich sponge cake. Instead of soaking the entire cake like traditional tiramisu, you tuck an espresso-kissed mascarpone filling into the center for that classic creamy layer. A generous dusting of cocoa powder on top gives you the same slightly bitter, chocolatey finish you expect from tiramisu. Together, the chocolate cupcake, coffee, and mascarpone recreate all the cozy flavors of the classic Italian dessert in handheld form.
Can I adjust or skip the coffee in Chocolate Tiramisu Cupcakes?
You can easily dial the coffee flavor up or down in these cupcakes. For a milder taste, use half the amount of espresso or switch to a weaker brewed coffee. If you want to skip caffeine, use decaf espresso or coffee so you still get that tiramisu flavor without the buzz. For a coffee-free version, replace the espresso in the filling with milk plus a splash of vanilla, knowing they will taste more like chocolate cream cupcakes than traditional tiramisu.
How far in advance can I make Chocolate Tiramisu Cupcakes?
You can bake the chocolate cupcakes up to 1 day in advance and keep them covered at room temperature before filling. For the best texture, add the espresso-mascarpone filling and cocoa dusting the day you plan to serve, ideally within a few hours of eating. Fully assembled Chocolate Tiramisu Cupcakes can chill in the refrigerator for about 2 days, but the crumb will gradually absorb moisture from the filling. Let chilled cupcakes sit at room temperature for 15 to 20 minutes before serving so the mascarpone turns silky again.
Recipe
Chocolate Tiramisu Cupcakes
Ingredients
Ingredients
- 1 cup all-purpose flour
- 1/2 cup unsweetened cocoa powder
- 1 tablespoon baking powder
- 3/4 cup granulated sugar
- 2 large eggs room temperature
- 1/2 cup milk
- 1/3 cup vegetable oil
- 1 cup strong brewed espresso cooled and divided
- 1 cup mascarpone cheese chilled
- 2 tablespoons unsweetened cocoa powder for dusting
Instructions
- Preheat the oven to 350°F and line a 12-cup muffin pan with paper cupcake liners.
- In a large bowl, whisk together the flour, 1/2 cup cocoa powder, baking powder, and granulated sugar until well combined.
- In a separate bowl, whisk the eggs, milk, and vegetable oil until the mixture is smooth and emulsified.
- Add 1/2 cup of the cooled espresso to the wet ingredients and whisk until fully blended.
- Pour the wet mixture into the dry ingredients and stir gently with a spatula just until no dry streaks of flour remain.
- Divide the batter evenly among the prepared liners, filling each about two-thirds full.
- Bake for 18 to 20 minutes, or until the tops spring back when lightly pressed and a toothpick inserted in the center comes out with a few moist crumbs.
- Cool the cupcakes in the pan for 5 minutes, then transfer them to a wire rack and let them cool completely.
- While the cupcakes cool, add the mascarpone to a medium bowl and beat briefly with a whisk or hand mixer until smooth.
- Gradually whisk in the remaining 1/2 cup cooled espresso until the mixture is thick, smooth, and fluffy; if it becomes too loose, chill it for 10 to 15 minutes to firm up.
- Once the cupcakes are completely cool, use a small sharp knife to slice a thin round “lid” off the top of each cupcake.
- Gently scoop out a small well from the center of each cupcake without cutting through the bottom, reserving the tops.
- Spoon or pipe the espresso mascarpone filling into each well, mounding it slightly above the surface.
- Replace the reserved tops on each cupcake, pressing gently so they sit neatly over the filling.
- Just before serving, dust the tops generously with the remaining 2 tablespoons cocoa powder using a small sieve.
Notes
- For cleaner cuts and neater filling, chill the cupcakes for 20 to 30 minutes after filling and before serving.
- Store filled cupcakes in an airtight container in the refrigerator for up to 3 days; dust with cocoa just before serving for the freshest look.
- You can bake the cupcakes a day ahead, keep them covered at room temperature, and fill them the next day for easier entertaining.


