The Memory Behind This Treat
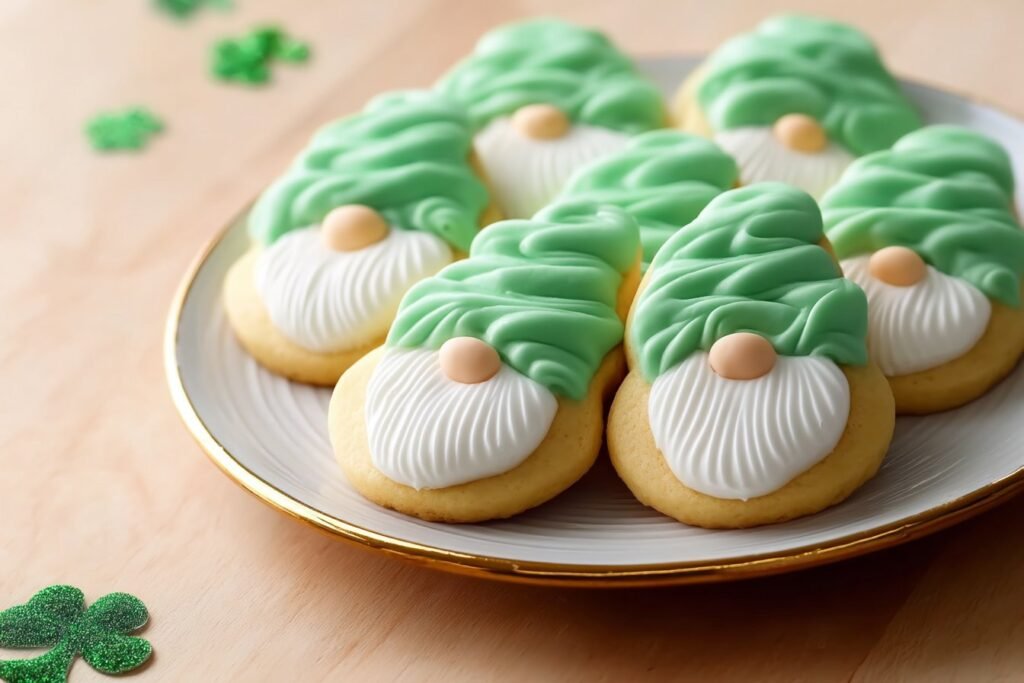
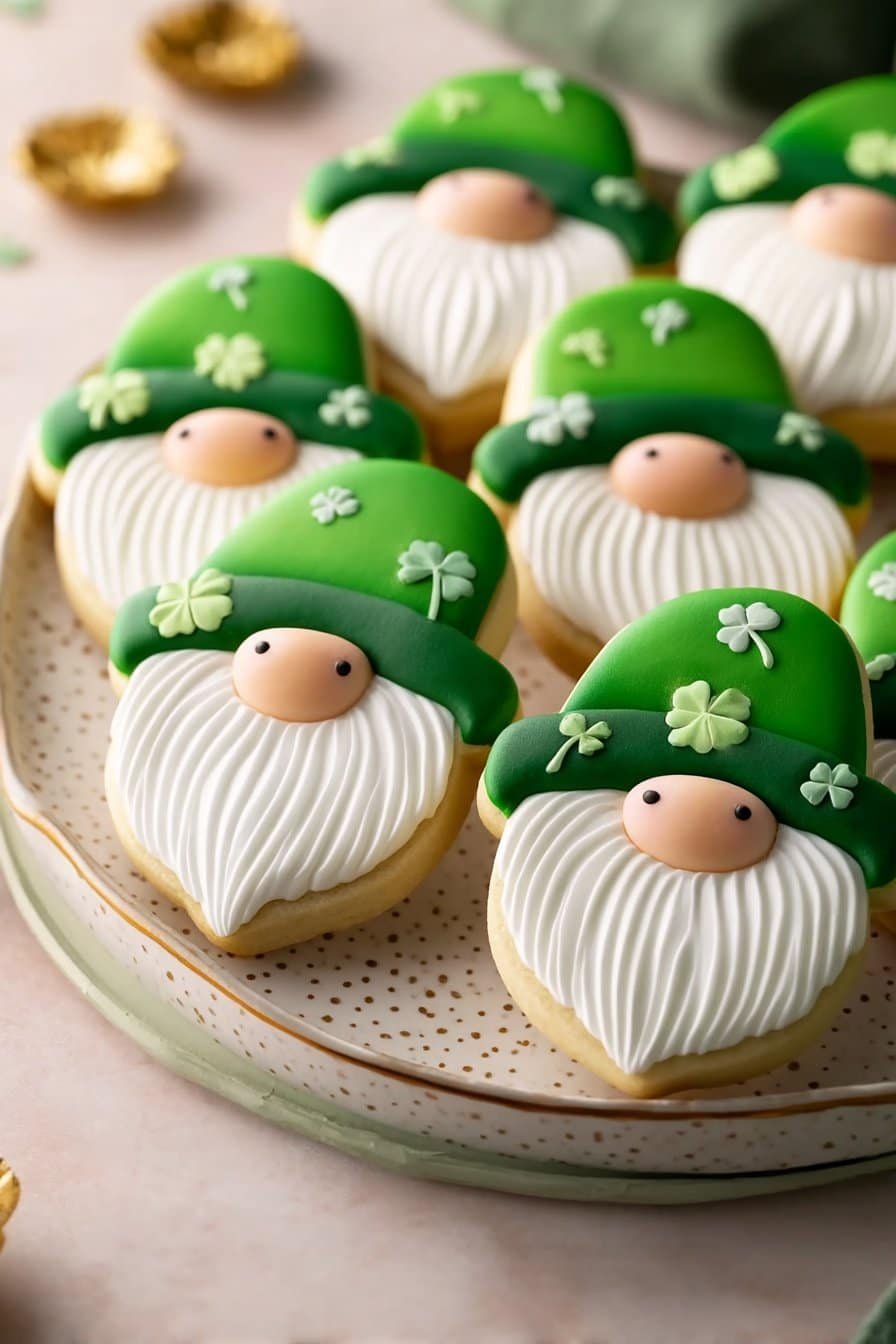
The first time I made these St. Patrick’s Day Gnome Cookies, it was pure chaos in the sweetest way. My nieces were over, my kitchen table was covered in bowls of royal icing, and someone had already dropped a piping bag on the floor. We started with simple round sugar cookies, but the girls insisted they needed “faces and hats and magical beards,” so the gnomes were born right there between spilled sprinkles and cooling racks. I remember showing them how to mark the cookie into thirds with a food-safe marker, the same way I’d sketch out layers back when I worked as a food stylist. By the second or third tray, our gnomes had personalities—crooked hats, fluffy beards, and noses that were a little too big, in the best way.
Now, these St. Patrick’s Day Gnome Cookies have become our unofficial kick-off to spring baking, right alongside my favorite shamrock sugar cookies and rainbow-swirled goodies. I love how approachable they are: you don’t need advanced piping skills, just a steady-ish hand and a sense of humor. If your green hat line wobbles or the white beard drips a bit, it somehow makes the cookie even cuter, like a gnome who’s been out celebrating a little too hard. Each year we tweak small things—thicker beards one year, extra shamrock transfers the next—but the basic ritual stays the same: bake, cool completely, then decorate slowly with way too much chatting in between. For me, that’s the real magic of these cookies; they’re less about perfection and more about gathering around the table, turning simple sugar cookie rounds into tiny, goofy, lucky little characters.
How To Make It (Mix & Ingredients)
To get started on your St. Patrick’s Day Gnome Cookies, you’ll first need a chilled batch of sugar cookie dough with that extra teaspoon of vanilla for cozy flavor. Roll the dough to an even 1/4 inch thickness (thinner cookies tend to over-brown and won’t hold the gnome details as well), then cut 18–24 rounds with a 3 inch cutter. Bake according to your sugar cookie recipe and let the cookies cool completely on the tray, then move them to a wire rack; if they’re even slightly warm, your royal icing will slide right off instead of hugging those curves like it should. While the cookies cool, mix up your royal icing to a smooth, pipeable consistency that holds its shape but still settles flat within 10–15 seconds. If you’ve made my classic cut-out cookies or holiday sugar cookies before, you’ll notice we’re using the same straightforward dough technique here—just changing the decorations to fit the St. Patrick’s Day theme.

Instructions Process of St. Patrick’s Day Gnome Cookies
Once your icing is ready, divide it into three bowls: white for the beard, green for the hats, and flesh-toned for the noses (you only need a small amount of the flesh color, about 1/2 cup). Tint the green icing with gel food coloring so you get that bold, leprechaun green without thinning the mixture; stir until there are no streaks. The white icing should be just thick enough that it doesn’t run off the cookie, since it will become the fluffy beard, and you’ll use the same icing a bit thicker for adding those final textured beard lines. The flesh-colored icing should be slightly thicker so the gnome noses dry as cute, rounded domes. Set out your shamrock icing transfers (if using) and food-safe black marker so everything is within reach once you start decorating—St. Patrick’s Day Gnome Cookies are easiest when your workstation is as organized as a bakery prep table.
Make-Ahead & Storage
You can absolutely make these St. Patrick’s Day Gnome Cookies in stages, which is a lifesaver if you’re hosting a party or decorating with kids. Bake the plain sugar cookies up to 3 days ahead, cool them completely, and store them in an airtight container at room temperature with parchment between layers so they stay tender and don’t stick. You can also make the royal icing 1–2 days in advance: keep it covered with plastic wrap pressed directly onto the surface, then seal the bowl or piping bags in an airtight container so it doesn’t crust over. If you love planning even further ahead (busy March, anyone?), you can bake the cookies, cool them, and freeze them undecorated for up to 2 months; just thaw at room temperature in a single layer before decorating so the icing doesn’t weep.
Once your St. Patrick’s Day Gnome Cookies are fully decorated and the royal icing has dried for at least 2–4 hours (it should feel firm, not tacky), you can store them at room temperature for up to 1 week. Always keep them in a cool, dry spot in an airtight container, and layer them with parchment or wax paper to protect the beards, noses, and shamrock details. Avoid the fridge if you can; the moisture can soften the cookies and cause colors to bleed, especially those bright green hats. If you need to transport them to a party or classroom, pack them snugly in a single layer in a lidded container or cookie tin so they don’t slide around and smudge their cute little gnome faces.
Best Ingredients & Party Variations
For the cutest, cleanest St. Patrick’s Day Gnome Cookies, start with a sturdy sugar cookie dough that bakes up flat with minimal spread—this gives you more control when you draw the thirds and pipe the hat and beard. I like a dough with a touch of vanilla and a hint of salt so the sweetness of the royal icing doesn’t feel overwhelming. Use gel food coloring for that bold St. Patrick’s Day green; it won’t water down your royal icing the way liquid color can. When you mix your flesh–toned icing, add color slowly—a toothpick swirl at a time—so your gnomes don’t turn accidentally orange or too pink. And if you use shamrock icing transfers, have a few extra ready for breakage (they’re like leprechauns—cute but fragile).
Once your base recipe is set, you can turn these St. Patrick’s Day Gnome Cookies into a full party project with some easy variations. Turn them into a “gnome family” by piping different hat styles: tall and pointy, short and wide, or tilted to one side, and mix in deeper greens, a touch of gold, or even a plaid pattern with a fine piping tip. For kids’ parties, skip the shamrock transfers and let everyone decorate hats with mini sprinkles, gold sanding sugar, or tiny hearts reused as “lucky charms.” For a more grown–up dessert table, place each cookie on a swirl of green buttercream or set them alongside simple cut-out shamrock cookies for contrast. You can even make a “rainbow and pot of gold” version by adding a thin rainbow stripe on the hat and a few gold dragees at the brim—same base cookie, but a whole new story on the platter.
Serving of St. Patrick’s Day Gnome Cookies
Conclusion
Every time I set a tray of these little gnome faces on the table, something sweet happens that has nothing to do with sugar. People lean in closer, point out their favorite hat, compare beards, and suddenly everyone is laughing and nibbling and “just fixing” one more cookie. That’s the quiet magic of baking: you don’t just make treats, you make tiny traditions.
These St. Patrick’s Day Gnome Cookies are whimsical, yes, but they’re also wonderfully forgiving and hands-on. Kids can choose hat styles, friends can design their own beards, and you get to be the calm, flour-dusted ringmaster of it all. My hope is that this becomes one of those recipes you pull out year after year, the one everyone recognizes before you even say what’s in the oven.
If you’ve been thinking, “I could never decorate cookies like that,” consider this your gentle nudge: you absolutely can. Grab your dough, mix up those icings, and give yourself permission to play in the kitchen a little.
For more delicious recipes like this, follow us on social media!
What’s the best dough for St. Patrick’s Day Gnome Cookies, and can I use store-bought?
A classic sugar cookie dough works best for St. Patrick’s Day Gnome Cookies because it holds its shape and gives you a smooth canvas for decorating. I like to add an extra teaspoon of vanilla for a little more cozy flavor. You can absolutely use store‑bought sugar cookie dough; just chill it well so the rounds don’t spread too much in the oven. Roll the dough evenly so your cookies bake at the same rate and give you consistent gnome faces. If your dough tends to puff, bake a test cookie first to check the shape before baking the full batch.
How do I get vibrant green hats and a natural nose color with royal icing?
Use gel food coloring for the green hats—gel gives you bold color without thinning the royal icing. Start with a tiny amount, mix thoroughly, then deepen the shade drop by drop until you reach your ideal St. Patrick’s Day green. For the noses, mix a small portion of white royal icing with a touch of brown and pink or peach gel to create a soft, flesh‑toned color. Always let colored icing rest a few minutes; the color will deepen slightly as it sits. If the icing gets too dark, lighten it by stirring in more white icing.
How can I keep the gnome details neat and prevent the icing from running together?
The secret is working with outline‑plus‑flood consistency and letting sections dry slightly between steps. Pipe a thin outline for the hat and beard first, then fill in with slightly thinner icing so it settles smoothly without spilling over your sketch lines. Let the hat and beard dry until they’re just tacky before adding the nose so it sits on top instead of sinking. When you add beard lines and hat borders, make sure the base layer has started to crust so the details stay crisp. If your icing is running, stir in a bit more powdered sugar to thicken it before continuing.
Recipe

St. Patrick's Day Gnome Cookies
Ingredients
Ingredients
- 1 batch sugar cookie dough with 1 teaspoon vanilla added
- Flour for dusting work surface
- 1 cup green royal icing tinted with gel food coloring
- 1.5 cups white royal icing
- 0.5 cup flesh colored royal icing
- 18 shamrock icing transfers optional
- 1 food safe black marker
Instructions
- Preheat the oven according to your sugar cookie dough recipe. Line baking sheets with parchment paper.
- Lightly flour your work surface and roll the chilled sugar cookie dough to 1/4 inch thickness.
- Cut 18 to 24 round cookies using a 3 inch round cutter, gathering and rerolling scraps as needed.
- Arrange the cookie rounds on the prepared baking sheets, leaving a little space between each.
- Bake the cookies according to your sugar cookie recipe instructions, until the edges are set and just starting to turn light golden.
- Let the cookies cool on the baking sheets for 5 to 10 minutes, then transfer them to a wire rack to cool completely.
- Divide the royal icing into three portions if not already separated: leave 1.5 cups white, tint 1 cup green with gel food coloring, and tint 0.5 cup to a flesh tone for the noses. Stir each until smooth and evenly colored.
- Fit piping bags with small round tips and fill with the green, white, and flesh-colored icings, or snip small openings in disposable piping bags.
- Use the food safe black marker to lightly sketch a guideline on each cooled cookie, dividing it into roughly three horizontal sections: top third for the hat, center for the nose, and bottom third for the beard.
- Pipe an outline for the hat on the top third of a cookie with green icing, then flood the inside of the outline with more green icing, using a toothpick to gently nudge the icing to the edges if needed.
- Pipe an outline for the beard section on the bottom third of the cookie with white icing, then flood the beard area with white icing, keeping the center area under the nose free if desired.
- Pipe a small dome of flesh-colored icing in the center where the hat meets the beard to form the gnome’s nose.
- When the hat and beard icing are slightly tacky, gently lift a tiny spot of the beard icing if necessary and press the nose area so it rests neatly between the hat and beard.
- Allow the base layers of icing on the cookies to set until they are firm enough to hold detail, about 30 to 60 minutes at room temperature.
- Once the white beard icing is set, pipe thin vertical lines of white icing over the beard area to create texture, leaving small gaps so the lines resemble strands of hair.
- Pipe a clean border around the hat edge and brim with green icing to define the hat shape and cover any rough edges between colors.
- If using shamrock icing transfers, place one shamrock onto the hat area of each cookie while the green border or a small dab of green icing is still soft so the transfer adheres.
- Repeat the decorating process for all remaining cookies, working in batches so the icing does not crust before you finish each step.
- Allow the decorated cookies to dry completely at room temperature for 2 to 4 hours, or until the royal icing is fully hardened to the touch.
- Store the finished cookies in a single layer or between sheets of parchment paper in an airtight container at room temperature until ready to serve.
Notes
- Make sure the cookies are completely cool before decorating or the icing will melt and lose definition.
- For smoother flooding, keep the icing at a consistency that settles flat in about 10 to 15 seconds after stirring.
- Let the iced cookies dry fully before stacking or packaging so the surface does not smudge.