The Memory Behind This Treat
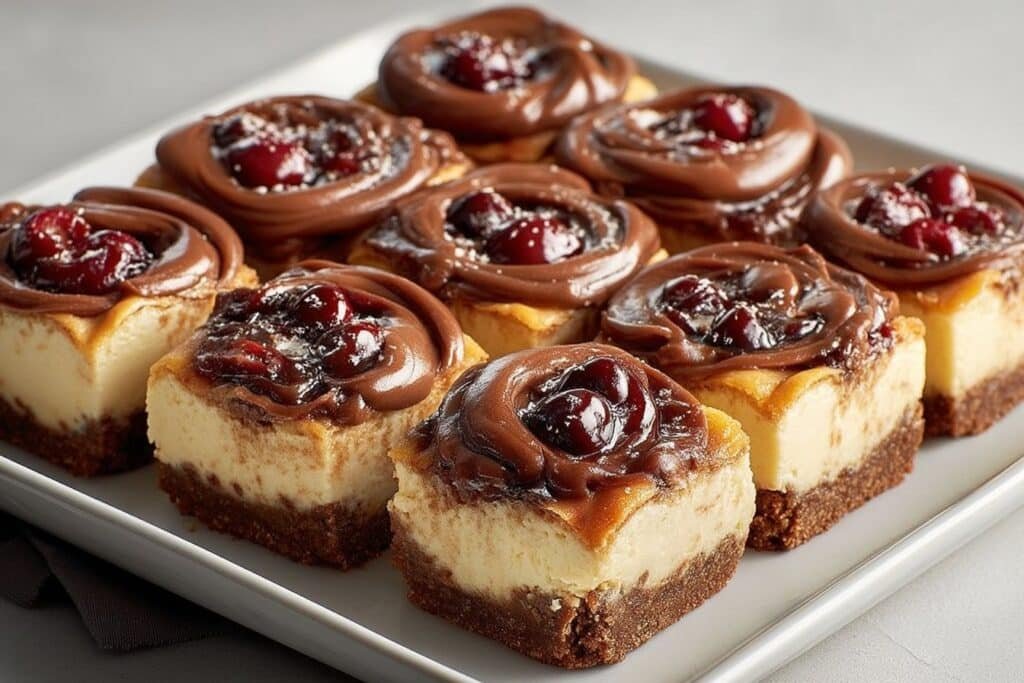
The first time I made these Chocolate Cherry Cheesecake Bars, it was one of those late-winter nights when the sun disappears too early and everyone seems a little grumpy. I remember standing in my tiny apartment kitchen with a half-block of cream cheese, a jar of dark cherries, and exactly one stick of butter left in the fridge. Cake felt like too much, cookies felt too casual, and a full cheesecake sounded fussy. So I pressed a quick chocolate crust into a pan, swirled in the cheesecake layer, dotted on the cherries, and hoped for the best. When I pulled the pan out of the oven, the chocolate crust was crackly at the edges, the cheesecake layer puffed just enough, and the cherries looked like little ruby jewels.
Over the years, these Chocolate Cherry Cheesecake Bars quietly became one of my “emergency desserts.” They’re what I make when I need something special but only have 20 minutes of energy and a half-stocked pantry. I’ve baked them in rental cabins with wobbly ovens, at my parents’ house for Sunday dinners, and once for a friend who just went through a breakup and needed something more comforting than ice cream straight from the carton. The cherry layer hides tiny imperfections in the cheesecake, the chocolate crust forgives a heavy hand with the crumbs, and the bars slice cleanly enough to feel company-ready. Every time I press that buttery chocolate mixture into the pan, it reminds me that a cozy dessert doesn’t have to be complicated to feel memorable.
How To Make It (Mix & Ingredients)
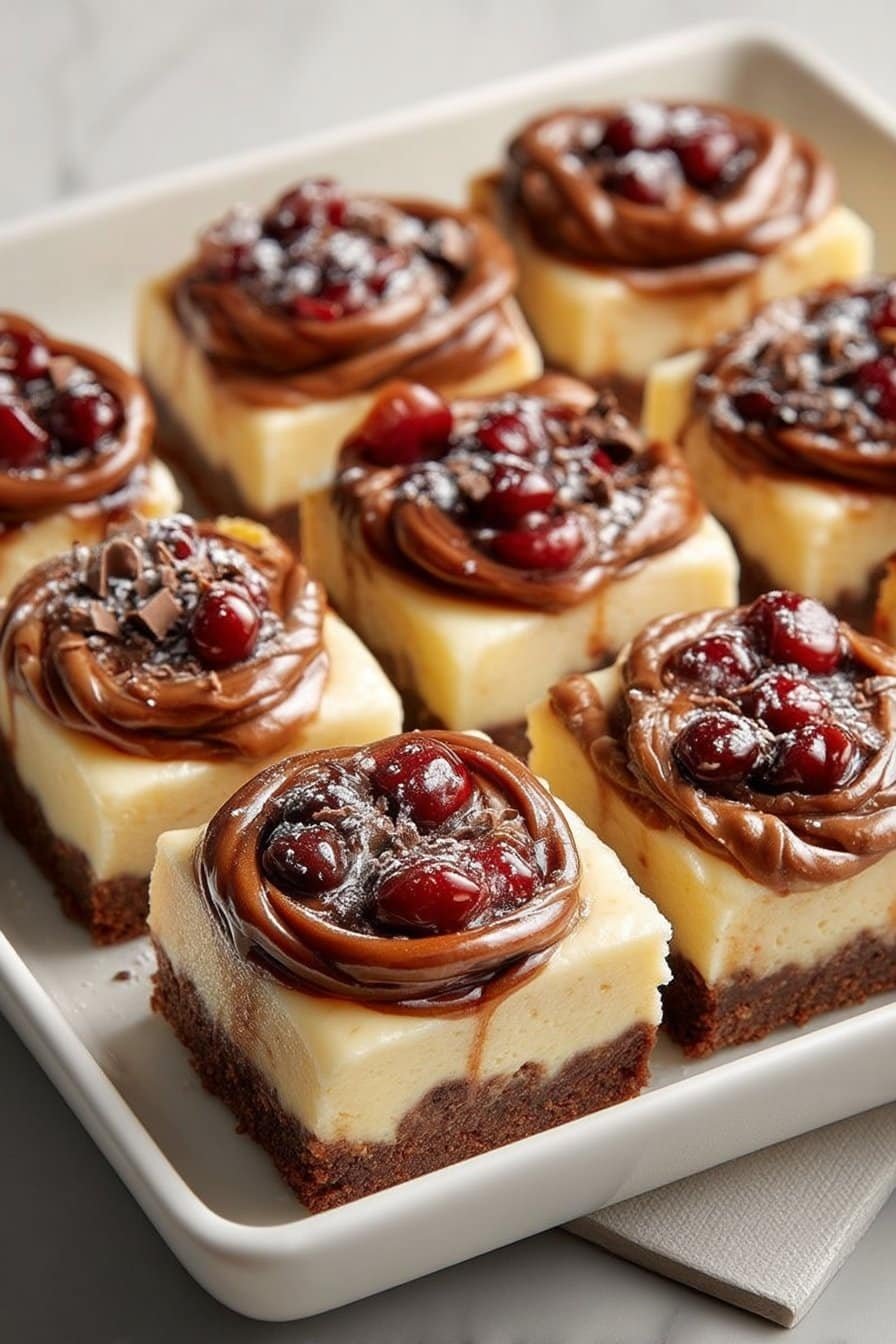
To build the best Chocolate Cherry Cheesecake Bars, start by organizing your layers. You’ll need a simple chocolate cookie crust (think crushed chocolate wafers or Oreos with melted butter), a creamy cheesecake filling, and a juicy cherry layer. Use full-fat cream cheese at room temperature so it blends silky smooth without stubborn lumps. Granulated sugar sweetens the cheesecake, while a bit of sour cream or yogurt adds that gentle tang and extra creaminess. For the cherries, you can use good-quality cherry pie filling or quickly simmer frozen cherries with sugar and a squeeze of lemon until syrupy.
Instructions Process of Chocolate Cherry Cheesecake Bars
When you mix the cheesecake batter, beat the cream cheese and sugar just until smooth, then add eggs one at a time on low speed to avoid whipping in too much air (air = cracks). Scrape down the bowl often—those sneaky bits of unblended cream cheese love to hide on the sides and bottom. Once your crust is pressed into the pan and lightly baked, pour on the cheesecake layer and gently spoon or swirl the cherries over the top. A small offset spatula helps spread everything evenly so your Chocolate Cherry Cheesecake Bars bake up level and pretty. When they’re done, let them cool completely and chill for a few hours; this helps the layers set and makes cutting clean, confident squares much easier.
Make-Ahead & Storage
Chocolate Cherry Cheesecake Bars are one of those desserts that almost taste better the next day, so they’re perfect for making ahead. You can bake the bars completely, let them cool to room temperature, then cover the pan tightly with plastic wrap or foil and chill for at least 4 hours, but overnight is even better. The chill time helps the cheesecake layer firm up and lets the cherry flavor gently soak into the creamy filling. If you like extra neat slices, pop the pan in the fridge until the bars are very cold, then cut with a sharp knife wiped clean between cuts. For a party, you can bake these up to 2 days in advance and just slice and garnish before serving.
For storage, keep your Chocolate Cherry Cheesecake Bars refrigerated at all times. Store them in an airtight container or leave them in the baking pan, tightly covered, so they don’t absorb fridge odors from things like onions or leftovers. They’ll stay fresh for about 4–5 days; after that, the crust can get a bit soft and the cheesecake layer may start to lose its silky texture. If you need to stack pieces, place a layer of parchment or wax paper between the bars so the toppings don’t stick together. You can also freeze individual bars for up to 2 months: wrap each one in plastic wrap, then place them in a freezer bag or container, and thaw in the fridge overnight before serving.
Best Ingredients & Party Variations
For the best Chocolate Cherry Cheesecake Bars, start with quality basics you can taste. Use full-fat cream cheese at room temperature so it beats smooth and doesn’t leave tiny lumps in your batter. A sturdy graham cracker crust (or even chocolate cookie crumbs for extra drama) keeps the bars from falling apart when you slice them for a party tray. Canned cherry pie filling works beautifully for swirls and layering, but if you have fresh or frozen cherries, toss them with a spoonful of sugar and a squeeze of lemon for a brighter, more tangy flavor. And don’t skip the chocolate: a mix of melted semi-sweet chocolate in the batter plus mini chocolate chips on top gives each bite real depth, not just a hint of cocoa.
When you’re planning for a party, these bars are incredibly easy to dress up in different ways. For a birthday spread, swirl the cherry filling into the cheesecake, then drizzle cooled melted chocolate over the baked, chilled bars and finish with a handful of chocolate curls. For holidays, make a black forest style version: add a splash of kirsch or almond extract to the cheesecake, layer extra cherries on top, and crown everything with softly whipped cream just before serving. If your crowd loves variety, bake one pan of classic Chocolate Cherry Cheesecake Bars and a second pan with a brownie base instead of graham cracker, then cut both into small squares so guests can mix and match on their dessert plates.
Serving of Chocolate Cherry Cheesecake Bars
Conclusion
If you’re anything like me, the best moments in life seem to gather around a plate of something sweet, a pot of coffee, and people you love. These Chocolate Cherry Cheesecake Bars feel like that kind of dessert—easy enough for a weeknight, pretty enough for a celebration, and nostalgic in all the right ways. Every bite has that cozy mix of creamy, fudgy, and juicy that makes everyone go quiet for a second…then reach for another square.
I love how a simple pan of bars can turn an ordinary evening into a little event. Bring them to a book club, a school event, or just to the couch for movie night, and watch how quickly folks scoot their chairs closer together. Desserts like this have a way of saying, “You’re welcome here,” without you needing to say a word.
I hope you print this one, splatter it with a little chocolate, and make it part of your own traditions. When you do, I’d love to hear how they turned out.
For more delicious recipes like this, follow us on social media!
What cherries are best for Chocolate Cherry Cheesecake Bars?
You can use fresh, frozen, or canned cherries for Chocolate Cherry Cheesecake Bars, and each brings something a little different. Fresh cherries give you the brightest flavor and a juicy, slightly firm bite, but you’ll need to pit them first. Frozen cherries are a great shortcut—just thaw them completely and pat them very dry with paper towels so they don’t water down the cheesecake layer. Canned cherries work too; choose cherries packed in juice rather than heavy syrup if you can, and drain them thoroughly. If your cherries taste very sweet, you can even reduce the sugar in the cherry layer slightly to keep everything in balance.
How long should Chocolate Cherry Cheesecake Bars chill before slicing?
Plan on chilling your Chocolate Cherry Cheesecake Bars for at least 4 hours so the layers have time to fully set. If you can wait, an overnight chill gives you the cleanest slices and the creamiest texture. Cooling them at room temperature first, then transferring to the fridge, helps prevent condensation from forming on top. Don’t rush the process by putting a hot pan straight into the refrigerator; it can cause the cheesecake layer to crack and the crust to get soggy. When they’re cold and firm to the touch in the center, they’re ready to cut.
Can I freeze Chocolate Cherry Cheesecake Bars for later?
Yes, these bars freeze beautifully, which makes them ideal for make-ahead desserts. Once fully chilled and cut, place the bars on a baking sheet to freeze until firm, then wrap each one tightly in plastic wrap. Tuck the wrapped bars into an airtight container or freezer bag to prevent freezer burn and flavor transfer. They keep well for about 2 months. To serve, thaw in the refrigerator for several hours or overnight so the cheesecake layer returns to its silky, creamy texture.
Recipe
Chocolate Cherry Cheesecake Bars
Ingredients
Ingredients
- 24 chocolate sandwich cookies Oreos, finely crushed
- 6 tbsp unsalted butter melted
- 16 oz full-fat cream cheese softened
- 1/2 cup granulated sugar
- 1/4 cup sour cream
- 1 tsp vanilla bean paste
- 2 large eggs room temperature
- 1 tbsp all-purpose flour
- 1 1/2 cups cherry pie filling or cherry topping
- 1/4 cup semisweet chocolate chips optional, for sprinkling on top
Instructions
- Preheat the oven to 350°F. Lightly grease a 9x13-inch baking pan and line it with parchment paper, leaving an overhang on the long sides for easy removal.
- Place the chocolate sandwich cookies in a food processor and pulse into fine crumbs, or crush them in a zip-top bag with a rolling pin until very fine.
- In a medium bowl, combine the cookie crumbs and melted butter. Stir until the crumbs are evenly coated and resemble wet sand.
- Press the crumb mixture firmly and evenly into the bottom of the prepared pan to form the crust.
- Bake the crust for 8 minutes, then remove from the oven and set aside to cool slightly while you prepare the cheesecake layer.
- In a large mixing bowl, beat the softened cream cheese and granulated sugar together on medium speed until smooth and creamy, scraping down the bowl as needed.
- Add the sour cream and vanilla bean paste to the cream cheese mixture and beat on low speed until just combined.
- Add the eggs one at a time, beating on low speed after each addition until just incorporated. Do not overmix. Sprinkle the flour over the batter and gently mix in until no streaks remain.
- Pour the cheesecake batter over the slightly cooled crust and spread it into an even layer with a spatula.
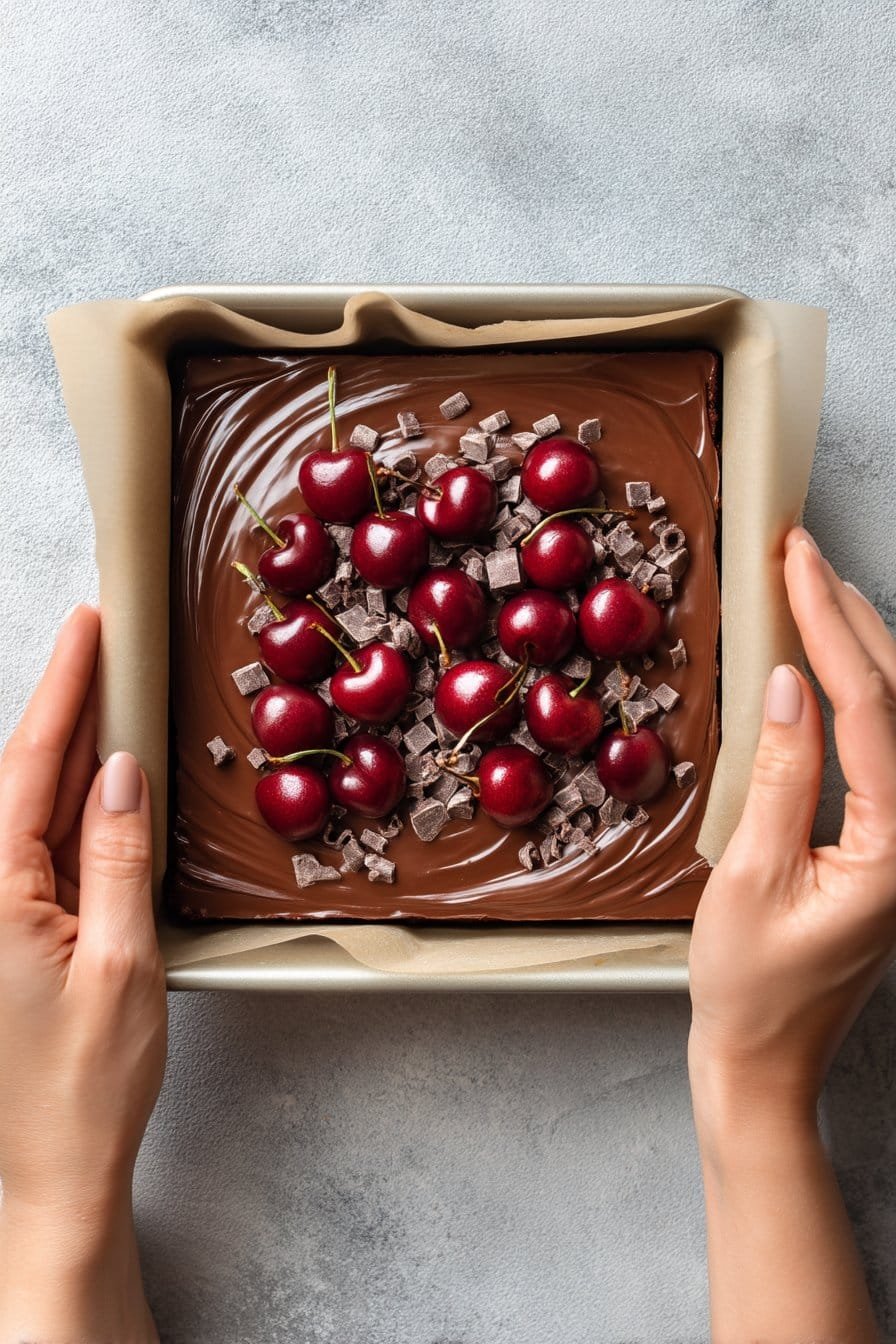
- Spoon the cherry pie filling over the cheesecake layer in small dollops. Gently swirl the cherries into the cheesecake with a knife or skewer, being careful not to disturb the crust.
- If using chocolate chips, sprinkle them over the top of the cherry layer.
- Bake the bars for 30 to 32 minutes, or until the edges are set and the center looks just slightly wobbly when you gently jiggle the pan.
- Remove the pan from the oven and place it on a wire rack. Cool completely at room temperature.
- Once cooled, cover the pan and refrigerate the bars for at least 4 hours, or until fully chilled and set.
- When ready to serve, use the parchment overhang to lift the bars out of the pan. Cut into 12 squares with a sharp knife, wiping the blade clean between cuts.
Notes
- Make sure the cream cheese and eggs are at room temperature so the batter mixes smoothly without lumps.
- For cleaner slices, chill the bars overnight and cut them straight from the fridge with a hot, dry knife.
- You can substitute 1 1/2 cups homemade cherry topping made from simmered frozen cherries, sugar, and lemon juice instead of canned cherry pie filling.
- Store leftover bars covered in the refrigerator for up to 5 days or freeze individually wrapped bars for up to 2 months.