The Memory Behind This Treat
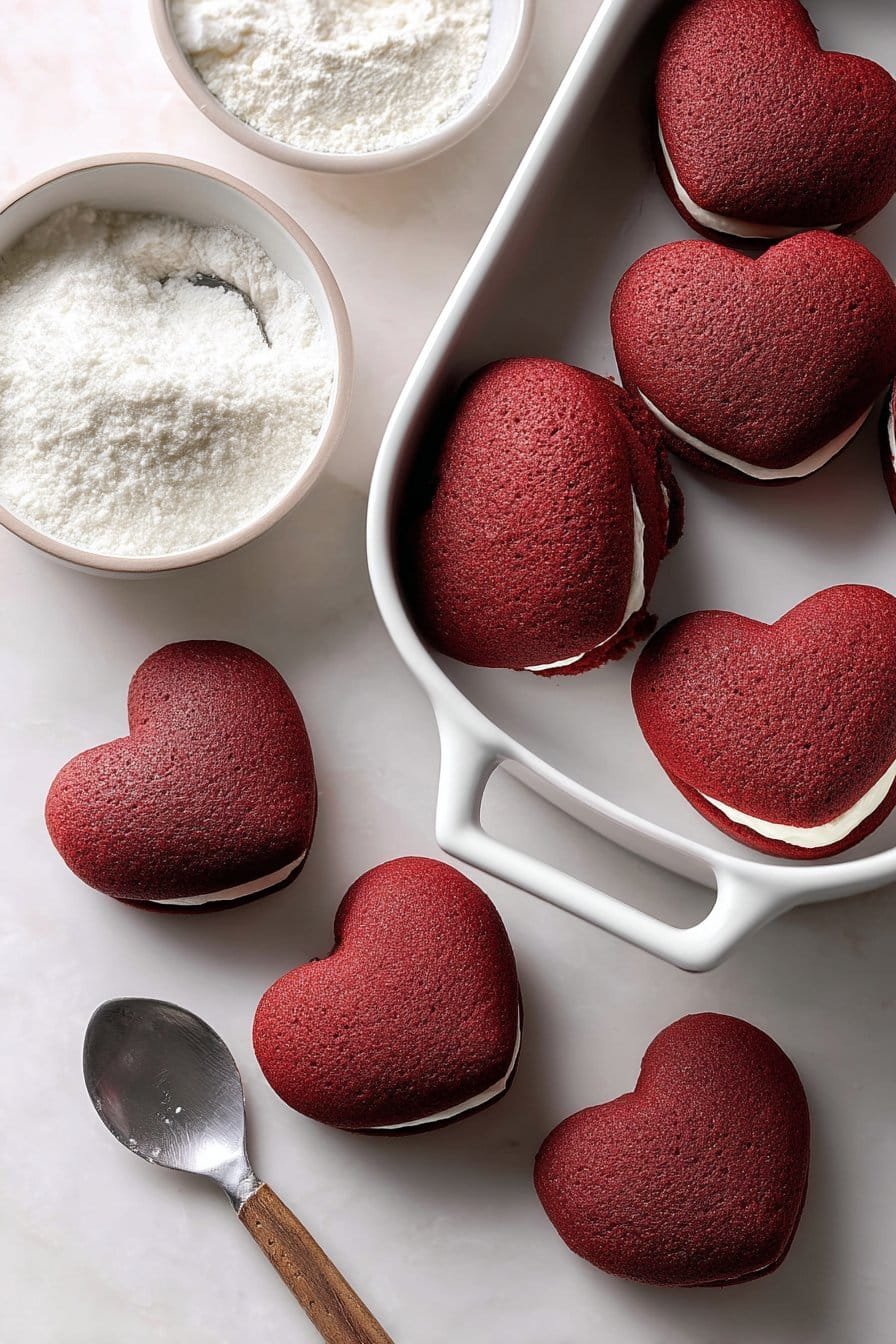
The very first time I made Red Velvet Whoopie Pies, I was trying to recreate the feeling of those little bakery boxes my dad used to bring home on Fridays—always tied with red and white string, always slightly smudged with cocoa. I remember standing in my tiny first apartment kitchen, a hand mixer that screamed louder than the TV, and red food coloring stains on my fingers for days. The cookies kept coming out too round, too flat, not quite “romantic.” That’s when I grabbed a scrap of parchment paper and sketched out crooked hearts, using them like training wheels. As each tray came out of the oven, my whole kitchen smelled like warm cocoa and vanilla, and those imperfect hearts suddenly felt exactly right.
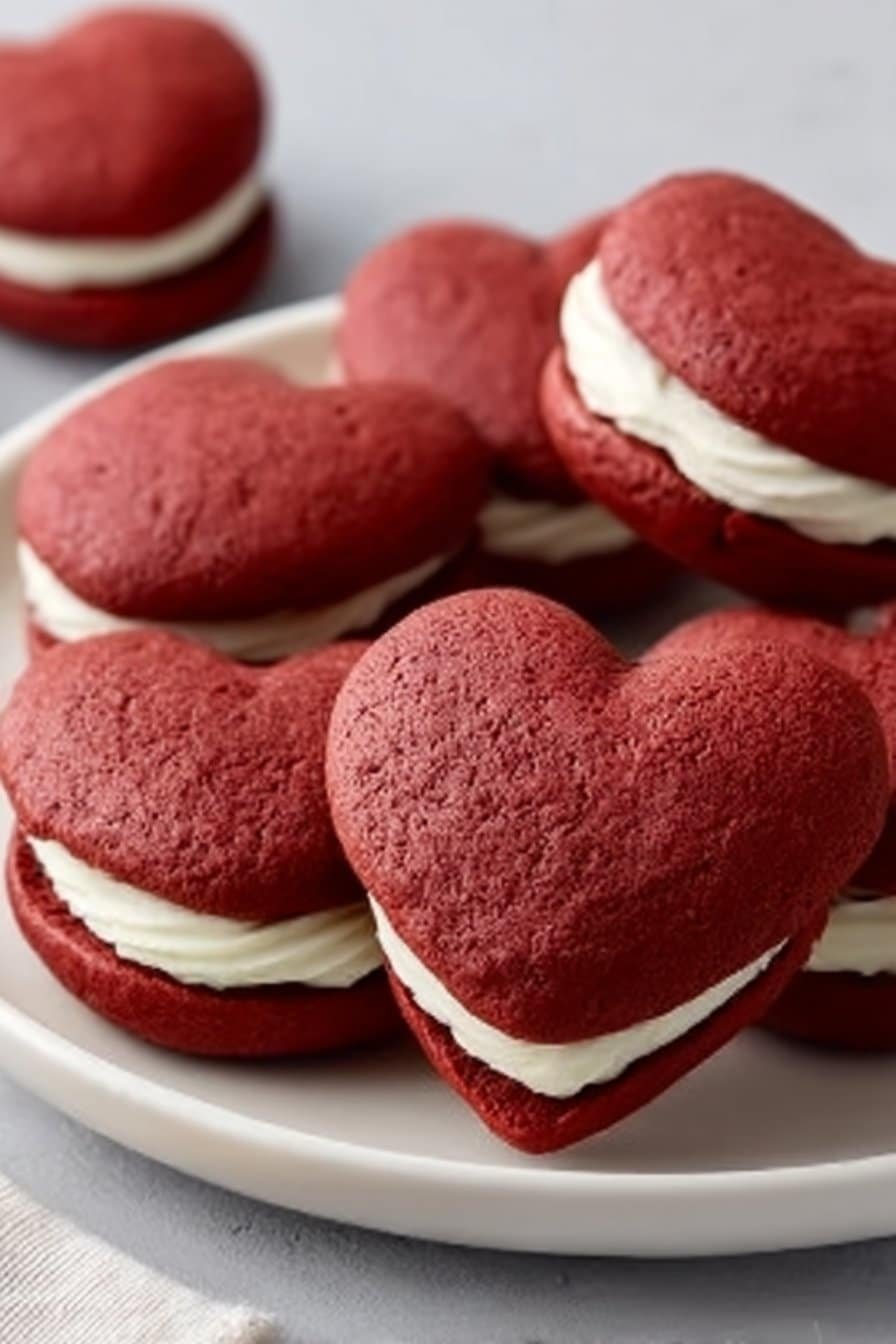
Now, these heart-shaped Red Velvet Whoopie Pies are my February tradition, right alongside a pan of fudgy brownies and a batch of soft chocolate chip cookies. I make them for my kids with extra filling (because that’s the best part and we all know it), and I still use a simple parchment stencil instead of buying a fancy pan. The cream cheese filling reminds me of my grandmother’s red velvet cake, but the handheld, sandwich-style cookies feel a little more playful and modern. Over the years, I’ve learned that it doesn’t matter if every heart is perfectly symmetrical—some are a bit chubby, some are a little lopsided, and they’re all still charming on a big platter. That’s the real magic of this recipe: you’re not just baking a cute Valentine’s Day dessert, you’re baking a little collection of edible love notes.
How To Make It (Mix & Ingredients)
To get started on these Red Velvet Whoopie Pies, you’ll mix the dry ingredients in one bowl and the wet ingredients in another. In a medium bowl, whisk together the flour, baking powder, baking soda, salt, and cocoa powder until everything looks evenly cocoa-kissed—no streaks of white flour. This simple step keeps your batter smooth later and prevents those little pockets of baking soda that can taste salty. In a larger bowl, beat the softened butter with both the brown sugar and white sugar until it’s light, fluffy, and a little bit creamy around the edges of the bowl; you’re looking for a texture similar to thick frosting. Add the egg and vanilla bean paste, then beat again until the mixture is glossy and fully combined with no streaks of egg.
Instructions Process of Red Velvet Whoopie Pies
Now you’ll bring everything together for that classic red velvet whoopie pie batter. Add the dry ingredients to the butter mixture in 2–3 additions, alternating with the buttermilk. Start and end with the dry mix, and mix on low speed or fold gently with a spatula—this keeps your cookies tender instead of tough. The batter should be thick but still pipeable, like a very soft cookie dough that slowly mounds on itself. Add your red food coloring a little at a time, mixing just until you reach that rich, romantic red; gel color works best because it gives you intense color without thinning the batter. If you love cream cheese treats like red velvet cupcakes or carrot cake sandwiches, you’ll be happy to know the filling here is just as dreamy: beat softened cream cheese with butter, then gradually add sifted powdered sugar and vanilla bean paste until you have a fluffy, pipeable frosting that holds soft peaks.
Make-Ahead & Storage
Red Velvet Whoopie Pies are actually a perfect make-ahead dessert, which makes them ideal for Valentine’s Day, date night, or a party platter. For the neatest results, I like to bake the cookies and make the filling a day ahead, then assemble the sandwiches the day I plan to serve. Once the heart-shaped cakes are completely cool, layer them in a single layer in an airtight container with parchment between layers so the tops don’t smudge. Store them at room temperature for up to 24 hours, or in the fridge for up to 3 days before filling. The cream cheese filling can be made 2–3 days in advance, stored in the refrigerator, and briefly re-whipped to bring back its fluffy texture before piping.
Once assembled, these Red Velvet Whoopie Pies should be stored in the refrigerator because of the cream cheese filling. Arrange them in a single layer in a lidded container, or use parchment paper between layers if you need to stack them. They keep well for about 3 days; after that, the cake portion starts to soften a bit more, though they’ll still taste good (and make a great “cook’s treat” with coffee). Let them sit at room temperature for 15–20 minutes before serving so the centers turn creamy again and the cakes lose their fridge chill. If you’re planning a larger dessert spread with things like red velvet cupcakes or classic whoopie pies, you can safely make these first and tuck them in the fridge, knowing they’ll still be tender and pretty when it’s time to share.
Best Ingredients & Party Variations
For the softest, prettiest Red Velvet Whoopie Pies, a few ingredient choices make all the difference. Use room-temperature butter and cream cheese so they whip up smooth—cold ingredients give you lumpy batter and grainy filling. I like natural cocoa powder for a classic tang, but Dutch-process will give a deeper, more chocolate-forward flavor. Stick with gel red food coloring; it delivers that rich red color without thinning the batter. And if you can find it, vanilla bean paste adds those lovely little specks and a warmer flavor than regular extract, especially in the cream cheese filling.
Once you’ve mastered the base recipe, you can spin these whoopie pies into a whole dessert spread for a Valentine’s Day party or bridal shower. Roll the filled edges in sprinkles, mini chocolate chips, or crushed freeze-dried raspberries for color and crunch. Make a “his and hers” tray with some filled with classic cream cheese frosting and others with a light chocolate or strawberry buttercream. For kids’ parties, pipe smaller hearts (about 1 inch) and create mini Red Velvet Whoopie Pies that are perfect for little hands. You can even do a mixed red-and-pink platter by tinting some of the batter a softer blush, then pairing them with white, chocolate, or raspberry fillings for a playful, match-and-mix dessert board.
Serving of Red Velvet Whoopie Pies
Conclusion
I hope you can already picture a plate of these pretty little sandwiches on your table—soft, cocoa-kissed cookies, creamy filling peeking out, and maybe a little sprinkle of crumbs left behind from “taste testing.” Desserts like these aren’t just about something sweet to eat; they’re about the giggles in the kitchen, the flour on your sleeves, and the quiet moment when someone takes a bite, pauses, and says, “Oh wow…these are amazing.”
Heart-shaped Red Velvet Whoopie Pies have a way of turning an ordinary afternoon into a mini celebration. Whether you’re surprising someone you love, baking with kids, or just treating yourself after a long week, this recipe was made to spark connection and make everyday moments feel just a bit more special.
When you’re ready, tie on your apron, preheat that oven, and give this recipe a try—you might just start a new tradition. And when you do, I’d love to hear how it went and who you shared them with.
For more delicious recipes like this, follow us on social media!
How are Red Velvet Whoopie Pies different from regular red velvet cake?
Red Velvet Whoopie Pies have the same classic red velvet flavor—light cocoa, a hint of tang, and that gorgeous red crumb—but in a handheld sandwich form. Instead of slices, you get soft, cake-like cookies that stay tender yet sturdy enough to hold the cream cheese filling. The ratio of cake to frosting is a little more generous, so every bite feels extra indulgent. They also bake faster than a full cake, making them perfect when you want that red velvet flavor in under an hour.
How can I make sure my Red Velvet Whoopie Pies keep their heart shape?
The secret is to pipe, not scoop, your batter. Use a heart-shaped stencil under parchment paper, then pipe an outline first and fill it in so the shape stays neat. Don’t overfill the hearts—leave a bit of space, because the batter will spread slightly in the oven. If the tips of the hearts look too pointy, smooth them gently with a damp fingertip before baking for a softer, cuter heart shape.
What’s the best way to get a vibrant red color in Red Velvet Whoopie Pies?
Gel food coloring works best because it gives you intense color without thinning the batter. Start with a small amount, mix it in completely, then add more drop by drop until you reach that deep, romantic red. If you only have liquid coloring, add it gradually and stop when the batter still feels thick and scoopable. Remember, the color deepens slightly as the whoopie pies bake, so don’t panic if the raw batter looks a touch lighter.
Recipe

Heart-Shaped Red Velvet Whoopie Pies
Ingredients
Ingredients
- 1 1/2 cups all-purpose flour
- 3 tbsp unsweetened cocoa powder
- 1/2 tsp baking soda
- 1/2 tsp baking powder
- 1/4 tsp salt
- 1/2 cup unsalted butter softened
- 1/3 cup packed brown sugar
- 1/2 cup granulated sugar
- 1 large egg at room temperature
- 1 tsp vanilla bean paste
- 1/2 cup buttermilk at room temperature
- 1 –2 tsp red gel food coloring
- 4 oz cream cheese softened
- 3 tbsp unsalted butter softened
- 2 1/2 cups powdered sugar sifted
- 1/2 tsp vanilla bean paste
Instructions
- Preheat the oven to 350°F and line 2 baking sheets with parchment paper. Draw heart shapes on the underside of the parchment as a stencil, then flip so the pencil marks face down.
- In a medium bowl, whisk together the flour, cocoa powder, baking soda, baking powder, and salt until evenly combined.
- In a large bowl, beat 1/2 cup softened butter, brown sugar, and granulated sugar with a hand mixer until light and fluffy.
- Add the egg and 1 tsp vanilla bean paste to the butter mixture and beat until smooth and glossy.
- Add the dry ingredients to the butter mixture in 2–3 additions, alternating with the buttermilk, beginning and ending with the dry ingredients. Mix on low speed just until a smooth, thick batter forms.
- Add the red gel food coloring and mix briefly until the batter is an even, vibrant red color.
- Transfer the batter to a piping bag fitted with a round tip and pipe heart shapes onto the parchment, following the stencils and leaving space between each for spreading.
- Bake one sheet at a time for 9–10 minutes, or until the tops are set and spring back lightly when touched.
- Let the cookies cool on the baking sheets for 5 minutes, then transfer them to a wire rack to cool completely.
- While the cookies cool, make the filling: In a medium bowl, beat the cream cheese and 3 tbsp softened butter together until smooth and creamy.
- Add the powdered sugar gradually, beating on low at first, then increase to medium speed until the mixture is thick, smooth, and fluffy.
- Beat in 1/2 tsp vanilla bean paste until fully combined and the frosting is light and pipeable.
- Match up the cooled heart cookies in pairs of similar size. Pipe or spread a layer of cream cheese filling onto the flat side of one cookie from each pair.
- Gently place the second cookie on top of the filling and press lightly to sandwich, allowing the filling to reach the edges.
- Chill the assembled whoopie pies in the refrigerator for at least 20 minutes before serving to help the filling set.
Notes
- Make sure the cookies are completely cool before filling to prevent the cream cheese frosting from melting.
- Store assembled whoopie pies in an airtight container in the refrigerator for up to 3 days.
- For cleaner edges, pipe the filling slightly away from the edge and gently press the top cookie until the filling reaches the sides.