The Memory Behind This Treat
The first time I tested this Mint Chocolate Cheesecake, it was the week before Christmas, and my whole kitchen smelled like a candy shop collided with a bakery—in the best possible way. I grew up with those shiny little boxes of Andes mints tucked into my stocking every year, so folding chopped pieces into a creamy cheesecake filling felt like turning a childhood habit into a grown-up dessert. I remember standing at the mixer, dipping a spoon into the batter “just to taste for mint,” and realizing I’d hit that perfect balance: cool and refreshing, but still deeply chocolatey and cozy. While the crust baked, my daughter lined Andes mints in a perfect ring on the counter, “to be the official taste testers,” she said. By the time the cheesecake was chilling, we were already planning who we’d surprise with extra slices, because this felt like the kind of dessert you share.
Part of the inspiration came from my frustration with store-bought mint desserts that taste like toothpaste or like someone whispered “mint” over plain chocolate and walked away. I wanted a Mint Chocolate Cheesecake that tasted like the best parts of a mint chocolate chip sundae and a classic New York–style cheesecake had teamed up. So I kept the base rich and dense (we’re not skimping on the cream cheese here), added just enough peppermint extract to cool your tongue, and made sure the Oreo crust brought that deep, almost smoky chocolate note. The silky ganache on top was my “just one more thing” moment, the same way I finish off my favorite chocolate cream pie—with a glossy blanket of melted chocolate and cream. Now, this is the dessert I pull out for holidays, winter birthdays, and any dinner where I want something special that still feels familiar, like a fancier version of the mint chip ice cream we all grew up loving.
How To Make It (Mix & Ingredients)
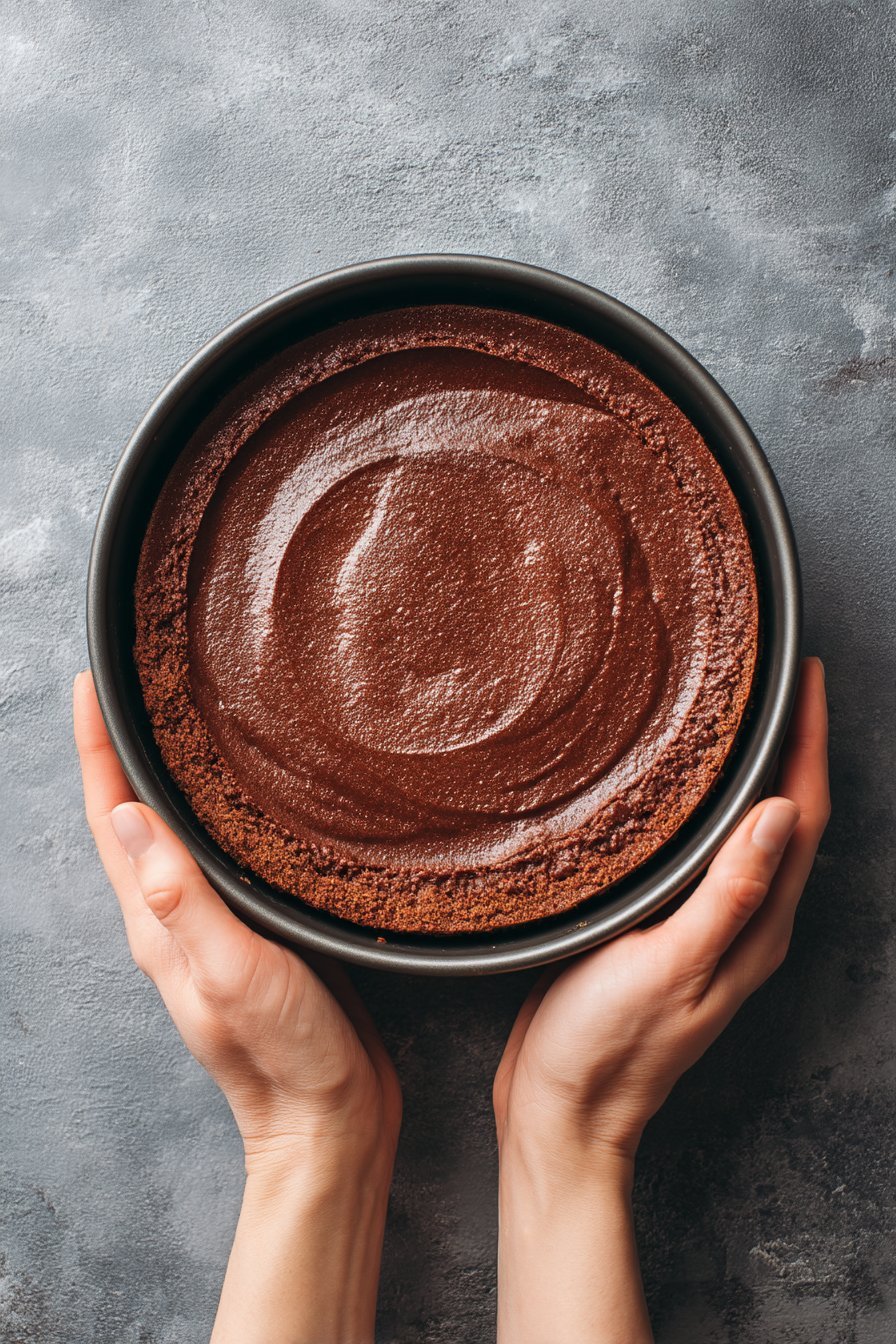
To build your Mint Chocolate Cheesecake, you’ll start with the Oreo crust. Crush about 30 Oreo cookies into very fine crumbs; you want them almost sandy so they press together nicely. Stir in the melted butter until every crumb looks a little glossy and damp—if you see dry white centers, keep mixing. Press this firmly into the bottom and slightly up the sides of a 9‑inch springform pan; use the flat bottom of a measuring cup to really compact it so it bakes up crisp, not crumbly. Bake the crust for 10 minutes at 350°F to set it, then reduce your oven to 325°F so it’s ready for the cheesecake filling.
Instructions Process of Mint Chocolate Cheesecake
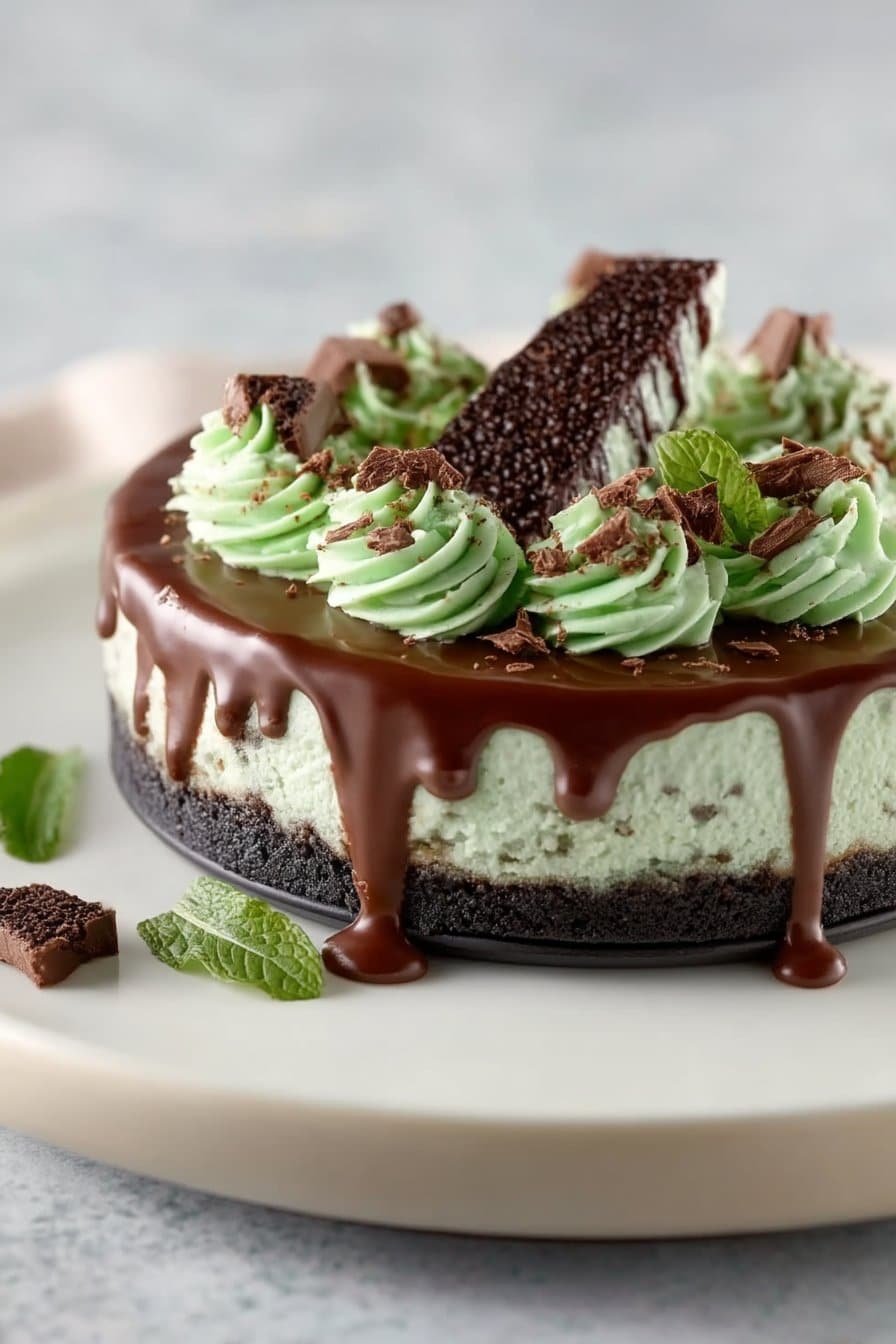
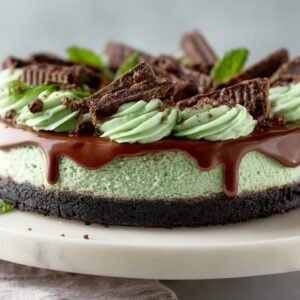
For the creamy mint layer, beat the softened cream cheese and sugar until completely smooth and creamy, scraping the bowl so no lumps hide at the bottom. Mix in the sour cream, vanilla bean paste, mint extract, and salt until combined; taste a tiny bit here to make sure the mint level feels right to you before the eggs go in. Add the eggs one at a time on low speed (over‑mixing can create cracks), then add several drops of green food coloring until you get that pale minty shade you like. Fold in the chopped Andes mints gently with a spatula so they’re evenly scattered but not broken into dust. Pour the batter into your foil‑wrapped pan and bake it in a water bath until the edges are set and the center still has a soft wiggle, then cool slowly and chill thoroughly so the texture turns ultra‑silky.Once your Mint Chocolate Cheesecake is fully chilled, you’ll finish it with ganache and whipped cream. Warm the chocolate and heavy cream together (microwave in 20‑ to 30‑second bursts works great), then stir until it becomes shiny and smooth, with a pinch of salt to sharpen the chocolate flavor. Spread this over the cold cheesecake so it sets into a soft, glossy layer. For the mint whipped cream, beat the heavy cream with confectioners’ sugar, mint extract, and just a drop or two of green coloring until it forms medium peaks that hold their shape but still look pillowy. Pipe or spoon it around the edges, then decorate with extra Andes mints or Oreo pieces for a finishing touch that hints at all the flavors inside.
Make-Ahead & Storage
Cheesecakes are naturally make-ahead friendly, and this Mint Chocolate Cheesecake is no exception. For the best texture and flavor, I actually recommend baking it 1 day before you plan to serve it. Follow the recipe through baking and cooling, then chill it uncovered in the fridge until completely cold, about 4 hours. Once chilled, loosely cover the pan with plastic wrap or foil so condensation doesn’t drip onto the surface. Add the chocolate ganache and whipped cream toppings the day you plan to serve (or up to about 6 hours ahead) so they look fresh and clean.
Store leftover Mint Chocolate Cheesecake in the refrigerator, tightly covered, for up to 5 days. If you’ve added whipped cream, it will look its best for the first 2–3 days; after that it may deflate slightly, but it will still taste delicious. For neat slices, refrigerate the cheesecake until fully cold, then use a hot knife (dip in warm water and wipe dry between cuts). If you want to freeze it, skip the whipped cream and decorations, and freeze the fully baked, cooled, and ganache-topped cheesecake well-wrapped in a double layer of plastic plus foil for up to 2 months. Thaw overnight in the fridge, then add fresh whipped cream and Andes mints before serving so your Mint Chocolate Cheesecake looks bakery-beautiful again.
Best Ingredients & Party Variations
For the creamiest Mint Chocolate Cheesecake, start with full‑fat cream cheese; this is not the place for low‑fat unless you enjoy cracked tops and slightly squeaky texture. Room‑temperature cream cheese, eggs, and sour cream blend into that ultra-smooth, bakery-style filling you’re after. I like vanilla bean paste here because those tiny specks make the mint flavor feel more “gourmet” than “toothpaste.” Use a good-quality mint or peppermint extract and add it slowly—taste after 1 teaspoon, then build up—because different brands vary in strength. And while the green food coloring is optional, a drop or two gives you that visual “mint chocolate” cue without turning your cheesecake neon.
For the chocolate elements, standard Oreos make the perfect crisp, slightly salty base that balances the cool filling; if you love texture, you can stir in a few crushed Oreos with the chopped Andes mints. Use real chocolate chips or chopped bar chocolate for the ganache—semi-sweet keeps things classic, but dark chocolate makes the whole dessert skew a little more grown‑up (and less sweet). Heavy cream is non-negotiable for both the ganache and the mint whipped cream; anything lighter won’t hold up for topping or slicing. To dress it up for parties, pipe tall swirls of mint whipped cream and tuck in halved Andes mints, mini Oreos, or even shards of chocolate bark from your favorite holiday cookie tray.
For party variations, turn this Mint Chocolate Cheesecake into bite‑size minis by baking the crust and filling in lined muffin tins (about 18–22 minutes at 300 °F, no water bath needed). For kids’ parties, skip the ganache and top cooled cheesecake slices with chocolate shavings and sprinkles for a lighter, less intense chocolate hit. At Christmas, swirl a little red-tinted whipped cream with the green on top for a peppermint-candy look, or add a thin brownie layer underneath the Oreo crust if you want a truly over-the-top mint brownie cheesecake moment. And if you’re serving a crowd with mixed tastes, pair this with something classic and simple, like a vanilla bean cheesecake or a silky chocolate tart, so the mint chocolate lovers and the purists are all happy.
Serving of Mint Chocolate Cheesecake
Conclusion
Every time I pull this Mint Chocolate Cheesecake from the fridge, it feels like I’m setting the stage for a little celebration, even if it’s just a Tuesday night. There’s something about that cool minty swirl and glossy chocolate that makes people lean in a bit closer, linger at the table a bit longer, and (my favorite part) go quiet for just a second after the first bite. That’s when you know you’ve made something special.
I hope this recipe becomes one of those “Oh, you have to bring that again” desserts in your life—the one you make for birthdays, holidays, or those cozy nights when you just want to spoil your favorite people. Don’t overthink it, and don’t worry if it’s not bakery-perfect. The love you put into it is what everyone will remember.
Give it a try, make it your own, and share it with someone who deserves a slice of something decadent and homemade.
For more delicious recipes like this, follow us on social media!
Can I use peppermint extract instead of mint extract in Mint Chocolate Cheesecake?
Yes, you can absolutely use peppermint extract in place of mint extract in your Mint Chocolate Cheesecake. Peppermint has a sharper, cooler flavor, so it can taste stronger than classic “mint” extract. I recommend starting with about 1 teaspoon, then tasting the batter before adding the full amount. If you want a bolder flavor, add the remaining 1/2 teaspoon drop by drop. Remember that the flavor will deepen slightly as the cheesecake chills, so aim for pleasant but not overpowering.
Do I really need a water bath for Mint Chocolate Cheesecake?
A water bath gives your Mint Chocolate Cheesecake that ultra-creamy, bakery-style texture. It helps the cheesecake bake gently and evenly so the edges don’t overbake while the center is still soft. The steam from the water keeps the surface from drying out, which helps prevent big cracks. If you’re nervous about leaks, double-wrap the pan in heavy-duty foil and place it in a larger pan before adding the hot water. If you skip the water bath, your cheesecake can still taste good, but expect a slightly firmer texture and more risk of cracking.
How far in advance can I make Mint Chocolate Cheesecake?
Mint Chocolate Cheesecake is a perfect make-ahead dessert and actually improves with time. You can bake it up to 2 days in advance, then add the chocolate ganache and whipped cream topping on the day you plan to serve. Just cool it fully, chill it uncovered for the first hour, then cover it tightly so it doesn’t absorb fridge odors. If you need to work even further ahead, you can freeze the baked and completely cooled cheesecake (without whipped cream) for up to 2 months. Thaw it in the refrigerator overnight, then garnish just before serving.
Recipe
Mint Chocolate Cheesecake
Ingredients
Ingredients
- 30 Oreo cookies about 12 oz, finely crushed
- 1/4 cup unsalted butter melted
- 32 oz cream cheese softened
- 1 cup granulated sugar
- 2/3 cup sour cream room temperature
- 2 tsp vanilla bean paste
- 1 1/2 tsp mint or peppermint extract
- 1/4 tsp salt
- 4 large eggs room temperature
- several drops green food coloring
- 1 cup chopped Andes mints
- 1 cup semisweet chocolate chips or chopped chocolate
- 3/4 cup heavy cream for ganache
- pinch salt for ganache
- 3/4 cup heavy cream for whipped cream
- 2 tbsp confectioners’ sugar
- 1/4 tsp mint or peppermint extract for whipped cream
- 2 –3 drops green food coloring for whipped cream
- Andes chocolate mints or crushed Oreos for topping
Instructions
- Preheat the oven to 350°F. Lightly grease a 9-inch springform pan.
- Crush the Oreo cookies into fine crumbs, then combine them in a bowl with the melted butter until the mixture is evenly moistened.
- Press the crumb mixture firmly into the bottom and slightly up the sides of the springform pan. Bake for 10 minutes, then remove from the oven and reduce the oven temperature to 325°F.
- In a large mixing bowl, beat the softened cream cheese and granulated sugar together until completely smooth and creamy, scraping down the sides and bottom of the bowl as needed.
- Add the sour cream, vanilla bean paste, 1 1/2 tsp mint extract, and 1/4 tsp salt to the cream cheese mixture and beat until well combined.
- Add the eggs one at a time, beating on low speed just until each egg is incorporated and scraping the bowl between additions. Do not overmix.
- Add several drops of green food coloring and mix on low speed until the color is evenly distributed and reaches a pale mint shade.
- Gently fold in the chopped Andes mints with a spatula until evenly dispersed throughout the batter.
- Wrap the outside of the springform pan in several layers of heavy-duty aluminum foil, covering the bottom and sides to prevent water from leaking in.
- Place the foil-wrapped pan in a large roasting pan and pour the cheesecake batter into the crust, smoothing the top with a spatula.
- Pour hot water into the roasting pan to come about halfway up the sides of the springform pan, creating a water bath.
- Carefully transfer the pan to the oven and bake at 325°F for about 70 minutes, or until the edges are set and the center still has a slight jiggle when gently shaken.
- Turn off the oven and crack the door open slightly. Leave the cheesecake in the oven for 30 minutes to cool gradually.
- Remove the cheesecake from the water bath, discard the foil, and place the pan on a wire rack. Cool at room temperature for 1 hour.
- Cover the cheesecake and refrigerate for at least 4 hours, or until thoroughly chilled and set.
- To make the ganache, place the chocolate chips in a heatproof bowl. Heat 3/4 cup heavy cream in a small saucepan or microwave until just simmering, then pour it over the chocolate.
- Let the mixture stand for 1 to 2 minutes, then add a pinch of salt and whisk until smooth and glossy.
- Pour the ganache over the chilled cheesecake and spread it gently into an even layer. Refrigerate for about 30 minutes to allow the ganache to set.
- To make the mint whipped cream, add 3/4 cup heavy cream, confectioners’ sugar, and 1/4 tsp mint extract to a chilled mixing bowl.
- Beat the mixture on medium-high speed until soft peaks form, then add 2–3 drops of green food coloring and continue beating until stiff peaks form.
- Transfer the whipped cream to a piping bag or use a spoon to decorate the top of the ganache-topped cheesecake with swirls or dollops.
- Garnish the cheesecake with additional Andes mints or crushed Oreos around the edges or in the center.
- When ready to serve, run a thin knife around the edge of the pan to loosen the cheesecake, then release and remove the springform ring. Slice with a sharp knife, wiping the blade clean between cuts.
Notes
- Ensure all dairy ingredients are at room temperature to prevent lumps in the batter.
- Avoid overmixing once you add the eggs to reduce the risk of cracking.
- If you prefer a stronger mint flavor, add an extra 1/4 tsp mint extract to the filling or whipped cream.
- Store leftover cheesecake covered in the refrigerator for up to 5 days or freeze slices tightly wrapped for up to 1 month.