The Memory Behind This Treat
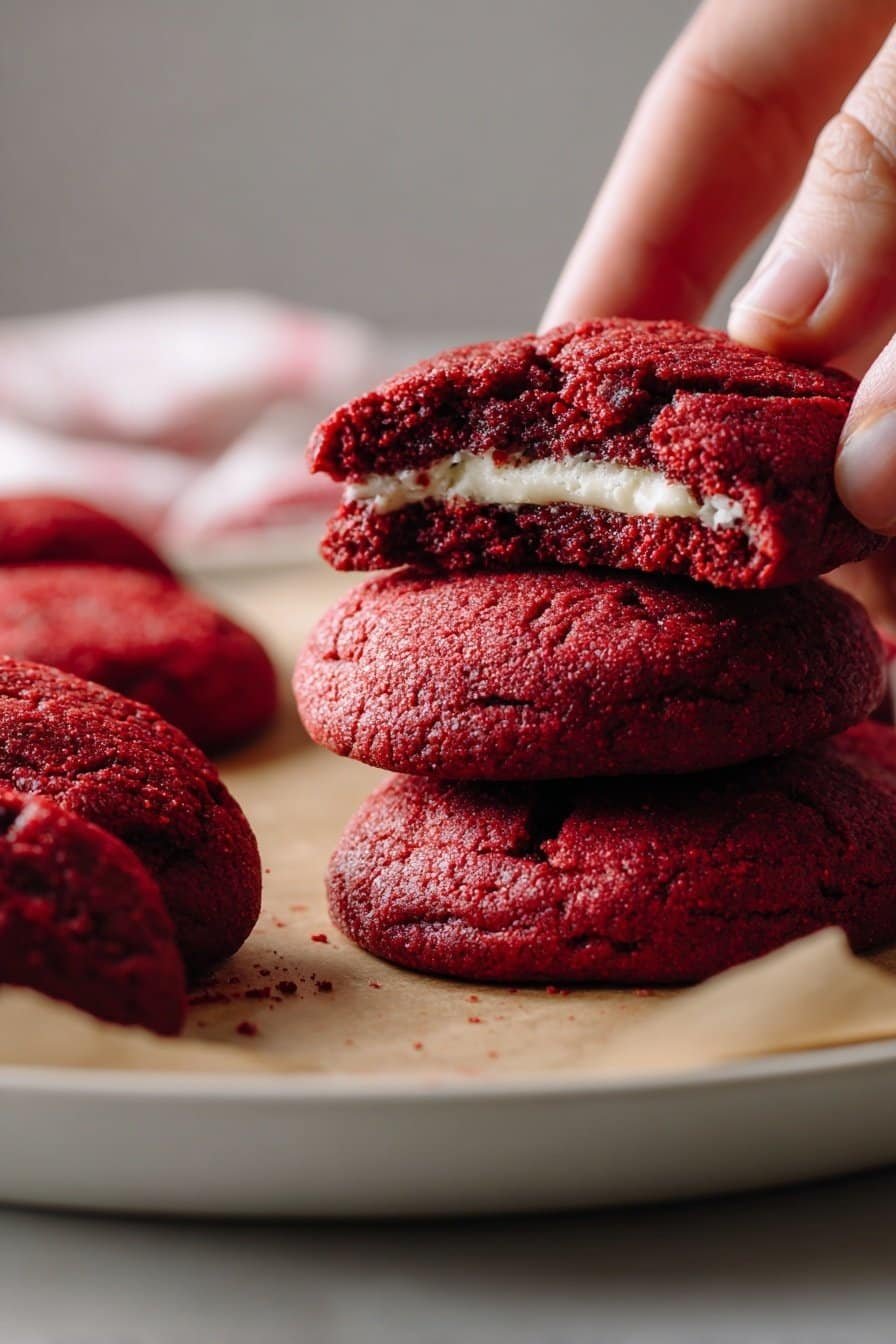
The first time I baked a batch of Red Velvet Cheesecake Cookies, it was one of those winter afternoons when the sun disappears at 4:30 and you suddenly need something cozy and a little dramatic. I was testing Valentine’s Day desserts and couldn’t decide between my favorite red velvet cake and a pan of classic cheesecake bars. So I did what any indecisive baker would do: I tried to squeeze them into one bite. The house smelled like cocoa and butter, and I remember watching those first cookies crack just enough to let a little cream cheese peek through. When I bit into a warm one and hit that soft, tangy center, I knew this recipe was not going back in the “test” pile.
These Red Velvet Cheesecake Cookies quickly became a “special occasion” request in my family, but not just for Valentine’s Day. My mom claims they taste like the holidays and insists they belong next to the sugar cookies on the Christmas cookie tray. I still remember frantically rotating baking sheets in and out of the oven, trying to keep the dough cold while my nieces snuck frozen cream cheese centers off the plate. That little step of freezing the filling felt fussy at first, but seeing those perfect pockets of cheesecake inside every cookie convinced me it was worth the extra time.
Now I reach for this recipe whenever I want something that feels a little fancy without requiring bakery-level skills. The red velvet color makes these cookies look like you spent all day on them, even though most of the time is just chilling in the fridge or freezer while you do other things. It reminds me a lot of how I treat my red velvet cupcakes and cheesecake brownies: simple, reliable recipes that still feel like an occasion. Every time I bake a tray of Red Velvet Cheesecake Cookies, I’m pulled right back to that first winter afternoon—neon red dough, powdered sugar everywhere, and the happy realization that sometimes dessert indecision leads to the very best kind of cookie.
How To Make It (Mix & Ingredients)
To make these Red Velvet Cheesecake Cookies, you’ll build two simple components: a tangy cream cheese center and a rich red velvet cookie dough. Start with the cheesecake filling so it has time to firm up. Beat softened brick-style, full-fat cream cheese with powdered sugar and a touch of flour until completely smooth—no lumps hiding on the sides of the bowl. Scoop tiny mounds, about 2 teaspoons each, onto a wax paper–lined baking sheet and freeze them for at least 2 hours so they don’t ooze out of the cookies while baking. This little freeze step is the secret to getting that distinct cheesecake pocket instead of it blending into the dough.

Instructions Process of Red Velvet Cheesecake Cookies
While the filling chills, whisk together your dry ingredients in a separate bowl: all-purpose flour, cocoa powder, baking soda, and salt. In a large mixing bowl, cream the unsalted butter with brown sugar and granulated sugar until it looks light and fluffy; think soft frosting rather than grainy paste. Beat in the egg, vanilla bean paste, distilled vinegar, and red food coloring—the vinegar and cocoa give Red Velvet Cheesecake Cookies their signature tang and color depth. Don’t panic if the mixture looks bright neon red at this stage; once you mix in the flour and cocoa mixture, it will deepen to that classic red velvet shade. Gently beat in the dry mixture on low until just combined; overmixing can make your cookies tough instead of chewy.When your dough looks uniform and soft, cover the bowl tightly with plastic wrap and chill it for at least 2 hours, or up to 48 hours for even better flavor and less spreading in the oven. If the dough feels a bit too firm after a long chill, let it sit on the counter for 10–15 minutes until scoopable. You’ll want it soft enough to wrap around the frozen cheesecake balls, but not so soft that it sticks all over your hands. The optional extra granulated sugar is for rolling, if you like a little sparkle and light crunch on the outside. And if you plan to finish your Red Velvet Cheesecake Cookies with a powdered sugar drizzle, set aside your milk (or cream) and extra powdered sugar so everything is ready when the warm cookies come out of the oven.
Make-Ahead & Storage
These Red Velvet Cheesecake Cookies are wonderfully make-ahead friendly, which is great news because that cream cheese center actually behaves better when it’s cold. You can prepare the cheesecake filling and the cookie dough separately, then chill or freeze them until you’re ready to bake. The cream cheese scoops can sit in the freezer for up to 1 month in an airtight container or freezer bag—perfect if you like to get a head start on holiday baking. The red velvet cookie dough can chill, well-covered, in the fridge for up to 48 hours; the longer chill helps deepen the flavor and keeps the cookies thick and chewy. If the dough feels very firm after a long chill, let it sit at room temperature for 10–15 minutes so it’s easier to scoop and wrap around the frozen filling.
Once baked and fully cooled, store your Red Velvet Cheesecake Cookies in an airtight container in the fridge because of the cream cheese center. They’ll keep well for 4–5 days; I like to stack them in single layers with a bit of parchment between them so the cookies don’t stick together. If you prefer a softer, almost brownie-like texture, let the cookies sit at room temperature for about 15 minutes before serving. For longer storage, you can freeze the baked cookies for up to 2 months—freeze them flat on a baking sheet first, then transfer to a freezer bag so they don’t squash each other. When you’re ready to enjoy, thaw in the fridge overnight or on the counter for about 30–45 minutes, then grab a plate, make a coffee, and enjoy that creamy, tangy surprise in the center all over again.
Best Ingredients & Party Variations
For the very best Red Velvet Cheesecake Cookies, start with brick-style, full-fat cream cheese and real butter. The cream cheese filling needs that higher fat content so it bakes up creamy instead of grainy, and butter gives you that classic red velvet richness that margarine just can’t match. Use all-purpose flour measured correctly (spooned and leveled) so your cookies stay soft and thick, not dry and cakey. A good quality cocoa powder (natural, not Dutch-processed) gives the right red velvet flavor and reacts nicely with the baking soda and vinegar. I also recommend gel red food coloring—it delivers a deep red hue without watering down the dough, so your cookies keep their shape.
Once you’ve nailed the base recipe, you can have fun with party variations. For Valentine’s Day, roll the dough balls in pink or red sanding sugar before baking, then drizzle with a simple powdered sugar glaze for extra sparkle. For Christmas cookie trays, add mini white chocolate chips to the dough or press a few into the tops right after baking for a snowy look. Hosting a dessert bar? Make the Red Velvet Cheesecake Cookies slightly smaller and sandwich two around a scoop of vanilla ice cream for quick “cookie sandwiches.” For a birthday twist, skip the rolling sugar and top the cooled cookies with cream cheese glaze and sprinkles—think of it as red velvet cake and cheesecake in handheld form.
Serving of Red Velvet Cheesecake Cookies
Conclusion
If you’re anything like me, the recipes you remember most aren’t just the prettiest ones, but the ones that made people stop, smile, and say, “Wait…did you make these?” That’s exactly what these Red Velvet Cheesecake Cookies tend to do. They’re the kind of cookie that turns an ordinary afternoon into something a little special – the plate everyone hovers around, the treat your friends ask you to bring “next time, too.”
I hope you feel excited (and totally capable!) to bake a batch. Picture setting them out for a movie night, a holiday party, or just a slow Sunday at home, and watching people go back for seconds. Baking doesn’t have to be complicated to feel a bit magical, and this recipe is proof. You’re not just making cookies; you’re making little moments that people will remember.
For more delicious recipes like this, follow us on social media!
Can I use different cream cheese or skip chilling and freezing steps?
You really want full-fat, brick-style cream cheese here; spreadable or low-fat versions tend to leak and turn greasy or runny in the oven. Freezing the cream cheese dollops helps them hold their shape so you can wrap the dough around them without a sticky mess. Chilling the red velvet dough (at least 2 hours) keeps the cookies thick, chewy, and prevents them from spreading flat. If you skip either step, expect the filling to escape and the cookies to spread more than you’d like.
How do I get the best red color and texture in Red Velvet Cheesecake Cookies?
Use gel red food coloring, 1–2 teaspoons, so you get a bold, vibrant hue without thinning out the dough. The cocoa powder, vinegar, and red color work together to create that signature red velvet flavor—mild chocolate with a slight tang. Measure your flour carefully (spoon and level, don’t pack) so the dough stays soft, not dry or crumbly. If the dough feels a bit sticky after mixing, that’s normal; the chill time will firm it up and give you that perfect tender, chewy bite.
Recipe

Red Velvet Cheesecake Cookies
Ingredients
Ingredients
- 4 ounces cream cheese brick style, full fat, softened
- 3/4 cup powdered sugar
- 1 tablespoon all-purpose flour
- 1 2/3 cups all-purpose flour
- 3 tablespoons unsweetened cocoa powder
- 1/2 teaspoon baking soda
- 1/4 teaspoon salt
- 1/2 cup unsalted butter softened
- 1/2 cup light brown sugar packed
- 1/3 cup granulated sugar
- 1 large egg room temperature
- 1 teaspoon vanilla bean paste or vanilla bean paste
- 1 teaspoon distilled white vinegar
- 1 1/2 teaspoons red gel food coloring
- 1/3 cup granulated sugar for rolling (optional)
- 1 tablespoon milk
- 1 cup powdered sugar for glaze
Instructions
- In a medium bowl, beat the cream cheese, 3/4 cup powdered sugar, and 1 tablespoon flour until smooth and creamy.
- Line a baking sheet or plate with wax paper and scoop 2-teaspoon mounds of the cream cheese mixture onto the paper.
- Place the cream cheese mounds in the freezer for at least 2 hours, or until firm.
- In a medium bowl, whisk together 1 2/3 cups flour, cocoa powder, baking soda, and salt; set aside.
- In a large bowl, beat the butter, brown sugar, and 1/3 cup granulated sugar until light and creamy.
- Add the egg, vanilla bean paste, vinegar, and red food coloring to the butter mixture and beat until well combined.
- Add the dry ingredients to the wet ingredients and beat on low speed just until a soft, uniform dough forms.
- Cover the bowl tightly with plastic wrap and refrigerate the dough for at least 2 hours or up to 48 hours.
- Line 1–2 baking sheets with parchment paper and set aside; keep the cream cheese centers in the freezer.
- Scoop about 1 to 1 1/2 tablespoons of cookie dough, flatten it slightly in your hand, and curve the edges up to form a shallow bowl shape.
- Remove one cream cheese mound from the freezer and place it in the center of the dough.
- Scoop another 1 to 1 1/2 tablespoons of dough, flatten slightly, and place over the cream cheese.
- Pinch the edges of the dough together to fully seal in the cream cheese, then roll gently into a ball.
- If desired, roll the dough ball in the additional 1/3 cup granulated sugar to coat.
- Place the dough ball on the prepared baking sheet and repeat with the remaining dough and cream cheese centers, keeping unused centers in the freezer as you work.
- Cover the dough balls lightly and freeze for at least 30 minutes.
- When ready to bake, preheat the oven to 350°F and ensure racks are set in the middle position.
- Arrange the frozen dough balls on parchment-lined baking sheets, spacing them at least 2 inches apart; do not thaw.
- Bake one sheet at a time for 12 to 14 minutes, or until the tops look set and the edges are just firm.
- Remove the baking sheet from the oven and cool the cookies completely on the sheet.
- For the glaze, whisk together 1 tablespoon milk and 1 cup powdered sugar until smooth and thick but pourable; add a few drops more milk or powdered sugar as needed to reach a drizzle consistency.
- Drizzle the glaze over the cooled cookies, using a spoon or piping from a small plastic bag with the corner snipped off.
- Let the glaze set before serving or storing the cookies.
Notes
- Do not skip chilling and freezing the dough balls; this keeps the cookies thick, soft, and chewy.
- Store baked cookies in an airtight container in the refrigerator for up to 4 days; bring to room temperature before serving.
- For longer storage, freeze baked cookies in a single layer, then transfer to a freezer bag and freeze for up to 2 months.