The Memory Behind This Treat
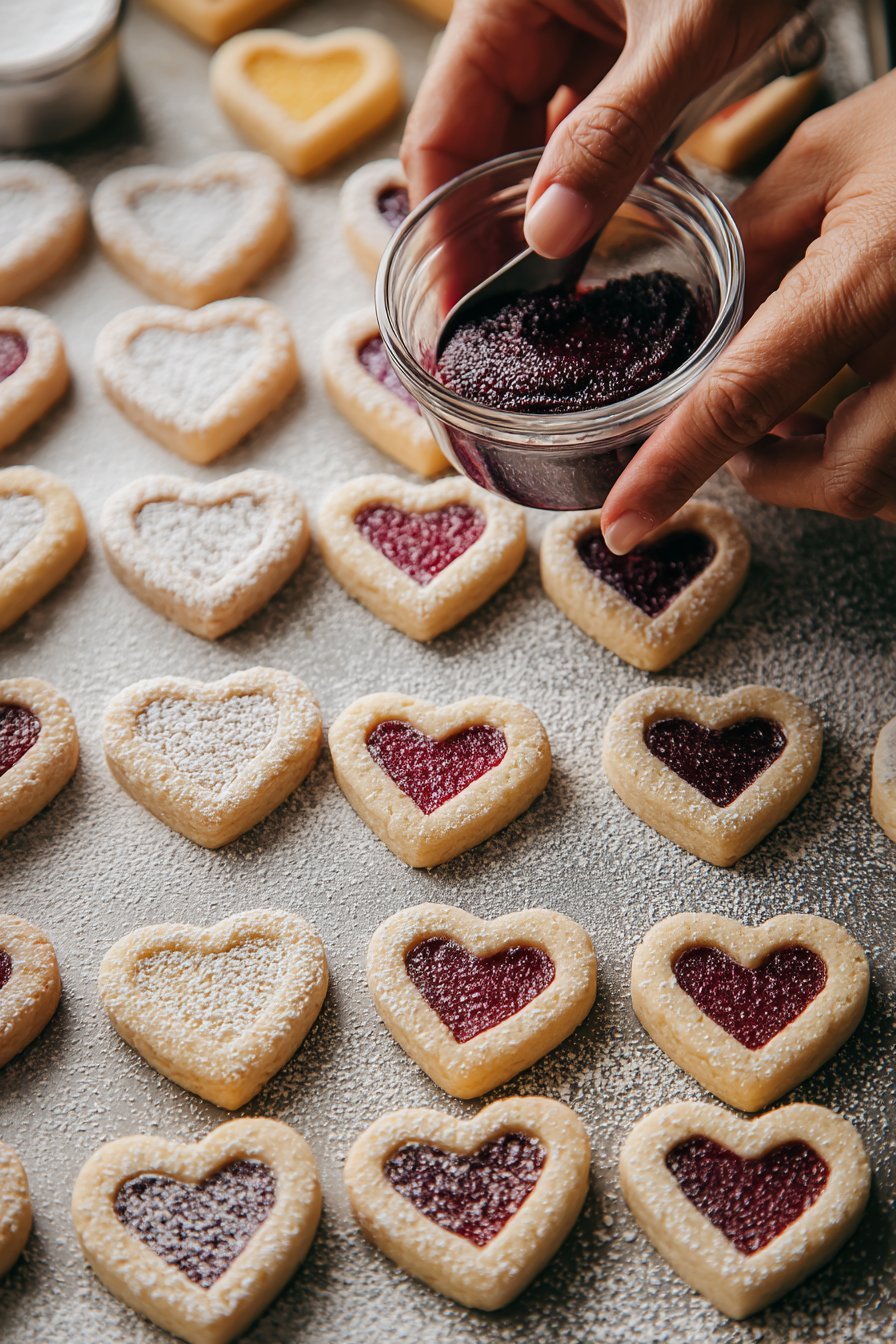
The first batch of these Thumbprint Heart Cookies happened on a February afternoon when winter felt like it would never end. My daughter was little, standing on a chair, elbows dusted with flour, taking her “official job” of thumb-printing very seriously. She kept missing the center, so some looked more like sideways potatoes than hearts, but we filled every one with strawberry jam anyway. When the tray came out of the oven—edges just golden, little wells ready for jam—the whole kitchen smelled like warm butter and toasted sugar. We sat on the floor with the cooling rack between us, taste-testing “the ugly ones” first, and deciding they were far too delicious to care what shape they were.
Since then, these Thumbprint Heart Cookies have become our low-stress way to celebrate just about anything: last-day-of-school Fridays, neighbor drop-offs, even “we found a good movie to watch” nights. I love that you don’t need any fancy cutters or decorating skills—your thumb and a spoonful of jam are enough. When I worked as a food stylist, I spent hours piping perfect borders and obsessing over symmetry. At home, these cookies pulled me back to what I actually love about baking: simple dough, soft in your hands, pressed into wonky little hearts that somehow still look charming. Whether you go classic with strawberry, mixed berry like in my linzer-style treats, or something unexpected like apricot or fig, they hold onto that cozy, homemade look that says, “Someone made these for you on purpose.”
How To Make It (Mix & Ingredients)
These Thumbprint Heart Cookies start with the kind of simple, cozy dough you can make on a sleepy Sunday afternoon. You’ll cream together soft butter (room temperature, not melted) and lightly packed brown sugar until the mix looks fluffy and a little lighter in color; this step traps air, which gives you tender cookies instead of dense little rocks. Beat in the egg and vanilla bean paste until the mixture looks smooth and slightly satiny—if you see streaks of egg, keep mixing. When you add the flour and salt, switch to low speed or a spatula, and stop as soon as the dough comes together; you’re aiming for a soft, slightly sticky dough that holds its shape when you roll it. If your kitchen is very warm and the dough feels greasy or too soft, pop it into the fridge for 10–15 minutes before rolling.
Instructions Process of Thumbprint Heart Cookies
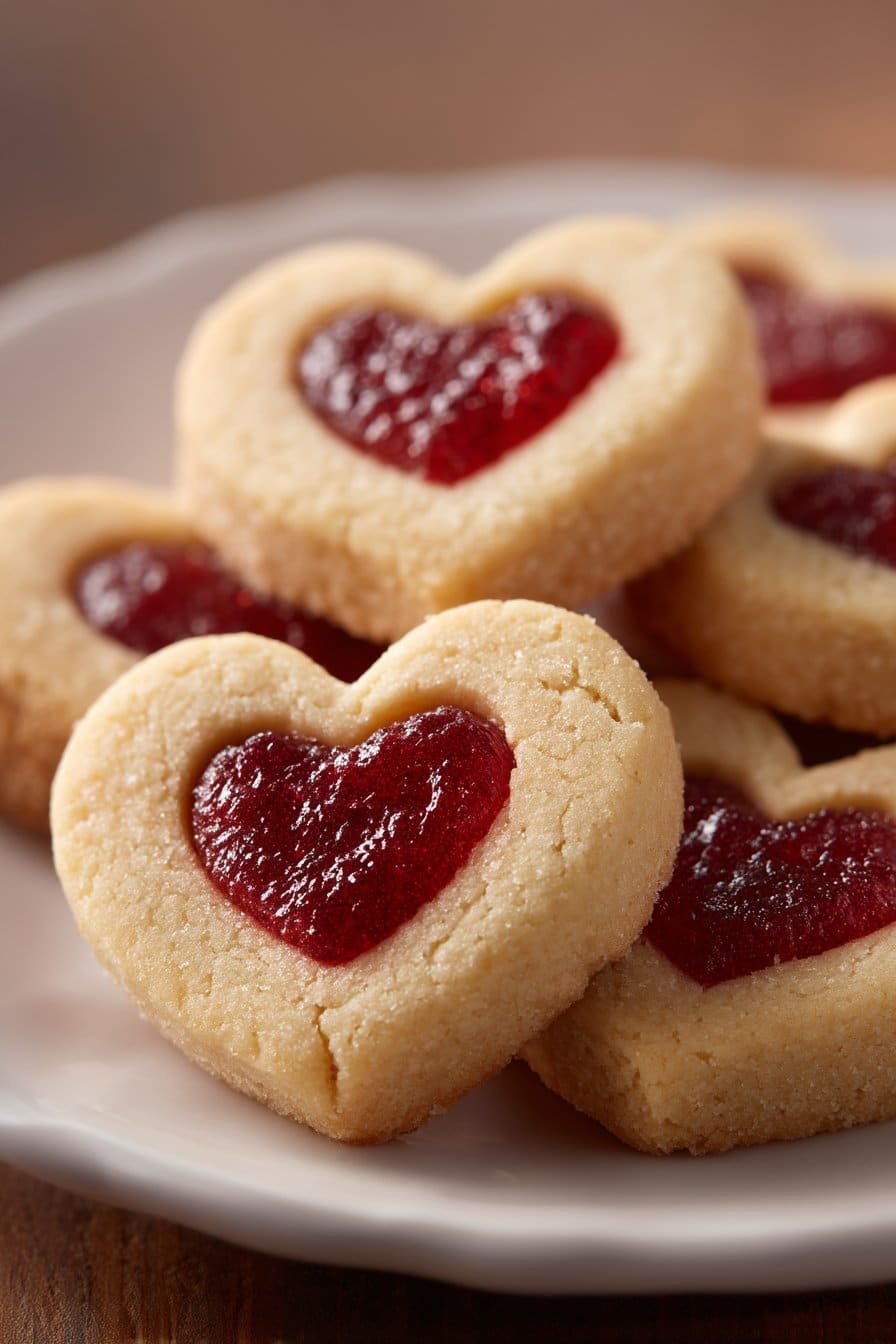
To shape your Thumbprint Heart Cookies, roll the dough into 1-inch balls (about 1 tablespoon each) and space them roughly 1½ inches apart on a parchment-lined baking sheet so they have room to puff. Press your thumb or the rounded back of a teaspoon into each ball twice at an angle, forming that sweet little heart shape in the center—don’t push all the way through, just deep enough to cradle the jam. They’ll puff slightly in the oven, so you want a clear indentation before baking. Once they’re baked and lightly golden at the edges, let them sit on the sheet for a few minutes so they firm up, then gently reshape any hearts that look a bit shy. When the cookies are completely cool, spoon or pipe a small dollop of your favorite jam—raspberry, strawberry, or even apricot—into each heart, like the ones I love to use in my raspberry linzer bars, and let it set before serving.
Make-Ahead & Storage
Thumbprint Heart Cookies are wonderfully make-ahead friendly, which makes them perfect for holidays, classroom treats, or a busy week. For the best texture, you can prepare the dough up to 3 days in advance: shape it into 1-inch balls, place them on a parchment-lined baking sheet, and refrigerate tightly covered. When you’re ready to bake, let the dough balls sit at room temperature for about 10–15 minutes so they’re not rock hard, then press in the heart shapes and bake as directed. You can also freeze the unbaked dough balls (with or without the heart indent) on a tray until firm, then transfer them to a freezer bag for up to 2 months. Just remember to add 1–2 extra minutes to the baking time if you bake them straight from frozen.
Once baked and filled, these Thumbprint Heart Cookies keep their soft, slightly crisp edges best at room temperature. Store them in an airtight container, separating layers with parchment paper so the jam doesn’t stick to the bottoms of other cookies. They’ll stay fresh for about 4–5 days on the counter, and the jam centers will set a bit more after the first day, making them nicely stackable and perfect for gifting alongside treats like lemon bars or shortbread. If your kitchen runs very warm or humid, you can refrigerate them for up to a week, but bring them back to room temperature before serving so the butter softens and the flavor blooms. Baked cookies also freeze well for 1–2 months; freeze in a single layer first so the hearts stay neat, then pack them gently into containers for long-term storage.
Best Ingredients & Party Variations
For the very best batch of Thumbprint Heart Cookies, start with quality basics. Use real unsalted butter, not margarine, so the dough stays tender and rich without that waxy aftertaste. Lightly packed brown sugar adds a subtle caramel note and keeps the cookies soft in the center. I love vanilla bean paste here for those pretty specks and deep flavor, but pure vanilla extract works if that’s what you have. For the filling, choose a thick jam or preserve—thin, runny jams will spill out of those cute heart shapes. Raspberry, strawberry, or cherry are always crowd-pleasers, but apricot or blackberry feels a little extra-special without extra effort.
When you want these Thumbprint Heart Cookies to earn a spot at every celebration, play with flavors, colors, and finishes. For a Valentine’s Day party, try a trio of fillings: raspberry, strawberry, and a glossy cherry jam for a ruby-red cookie platter. For kids’ birthdays, sprinkle the jam-filled hearts with rainbow nonpareils right after filling for a fun confetti look. At Christmas, dip half the cooled cookie in melted dark or white chocolate, then fill the hearts with red jam for an easy “fancy” variation—think of it as a dressed-up version of your everyday thumbprints. You can even swap a few cookies by using lemon curd or salted caramel instead of jam for grown-up dessert platters alongside something like my rich chocolate brownie bars. No matter the occasion, a mixed plate of different fillings makes it look like you baked four recipes, when really you just gave one very lovable cookie a few costume changes.
Serving of Thumbprint Heart Cookies
Conclusion
When I pull a tray of these out of the oven and see those little hearts glowing ruby-red, I’m always reminded that the sweetest moments usually come in the simplest shapes. These Thumbprint Heart Cookies aren’t just treats; they’re tiny invitations to slow down, press your thumb into dough, and share something homemade with someone you love. Whether you’re baking with kids, surprising a partner, or dropping off a plate for a neighbor, you’re not just making cookies—you’re making a memory.
My hope is that this recipe feels like a cozy, reliable friend in your kitchen. Print it, splatter it with a little flour, and come back to it whenever you need something easy, pretty, and full of heart. The first time you see those perfect thumbprints come out of your oven, I think you’ll understand why they’re so special.
If your mixer is calling your name, take this as your nudge to preheat that oven and give these a try. And if you do bake them, I’d love to hear how they turned out and who you shared them with.
For more delicious recipes like this, follow us on social media!
How do I get a clear heart shape that doesn’t disappear while baking?
After rolling your dough into 1-inch balls, press your thumb or the rounded back of a teaspoon into the center at a slight angle, then repeat from the opposite angle to form a clear “V” heart shape. Don’t press all the way through the cookie; you just want a nice, deep well. If your kitchen is warm or the dough feels very soft, chill the shaped cookies for 15–20 minutes before baking to help them hold their design. Check them halfway through baking; if the hearts puff a bit, you can gently nudge the shape back with a teaspoon while they’re still hot on the tray. Let them set on the sheet for a few minutes before moving so the shape stays crisp.
What jam works best in Thumbprint Heart Cookies, and can I use other fillings?
These Thumbprint Heart Cookies love a thicker jam or preserve, like raspberry, strawberry, or apricot, because they don’t run too much in the oven. Seedless jams give you a very smooth, glossy look, while seeded jams add a little texture and visual interest. Avoid very loose or watery jams, which can bubble over and blur the heart shape. You can also try lemon curd, chocolate hazelnut spread, or a thick caramel, but add delicate fillings like curd after baking so they don’t overcook. If using jam before baking, fill just to below the rim of the heart so it has room to bubble without spilling.
Recipe

Thumbprint Heart Cookies
Ingredients
Ingredients
- 3/4 cup unsalted butter softened
- 1/2 cup lightly packed brown sugar
- 1 large egg
- 1/2 teaspoon vanilla bean paste
- 1 1/2 cups all-purpose flour
- 1/4 teaspoon salt
- 1/4 cup jam of choice such as strawberry, raspberry, or apricot
Instructions
- Preheat the oven to 375°F and line a baking sheet with parchment paper.
- In a mixing bowl, cream the softened butter and brown sugar with an electric mixer on high speed until light and fluffy.
- Add the egg and vanilla bean paste to the bowl and mix until fully incorporated and smooth.
- Add the flour and salt, then mix on low speed or stir by hand just until a soft dough forms.
- Roll the dough into 1-inch balls, about 1 tablespoon each, and place them on the prepared baking sheet about 1 1/2 inches apart.
- Using your thumb or the rounded back of a teaspoon, press into the center of each dough ball twice at an angle to create a heart-shaped indent, without pressing all the way through.
- Bake the cookies for 12 to 15 minutes, or until the edges are lightly golden.
- Let the cookies cool on the baking sheet for 5 minutes, then transfer them to a wire rack. If any indentations have puffed up, gently reshape the hearts while the cookies are still warm.
- Once the cookies are completely cooled, spoon a small dollop of jam into each heart-shaped center.
- Allow the jam to set for a few minutes before serving or storing.
Notes
- Store baked and filled cookies in an airtight container at room temperature for up to 4 to 5 days, separating layers with parchment paper.